 >
> >
>  >
>  >
> 
The Receiving and Claiming Queue is intended to be a quicker way to do straightforward receiving, and offers the option to receive and pay, receive or pay without receiving, and claim.
Purchase orders with special processing instructions are filtered out of Receiving Queue searches, and must be received via the standard Line Item Receiving document. Additionally, items that have been damaged, returned, or are only part of an order must also be received through the Line Item Receiving document.
Note
For information about Line Item Receiving, see Receiving (Line Item Receiving).
On the Select/Acquire tab, click on the Receiving and Claiming Queue link listed under the Receiving submenu.
It will bring you to this screen:
 |
The Receiving and Claiming Queue allows users to search by PO, ISXN, Title, Order type, Monograph, Vendor Name, and PO dates. The user can also filter results to find only those orders eligible for claiming by clicking the check box to the right of Filter by Claim.
This search filters for all Purchase Orders with Open statuses that have no Special Processing Instruction Notes that may have been entered on the original Requisition. (Special Processing Instruction Notes require acknowledgment during receiving. Titles with special processing instruction notes therefore cannot be received via the Receiving Queue.)
Note
To learn more about searching, see Searching OLE on the Guide to OLE Basic Functionality and Key Concepts on the Guide to OLE Basic Functionality and Key Concepts.
Click  .
.
The PO search results are retrieved and the user can choose to Receive, Create Receiving, Pay, or Receive and Pay, or Claim.
Note
To receive additional titles on a PO, users must create a purchase order amendment (POA). A POA is created when a change or addition is made to an existing PO. If the existing PO is open then the PO can be amended, if the PO is closed then the PO has to be opened and then amend the PO. PO amendments allows for changes in number of copies, adding a copy for a different location or fund or for adding a new title to the existing PO. To learn more about creating a POA, see Purchase Order Amend
This choice will allow the PO to be received without creating a payment or a general ledger entry. The PO document will move to complete and a Line Item Receiving document id will be available from the View Related Documents tab.
Click the check box to the left of the title(s) you want to receive, and then click the receive button at the bottom of the page:
 |
If this action completes the receiving expected for a given Purchase Order, the system replies in the Actions tab:
 |
This choice will allow for changes to be made to the receiving information on the line item. This will also allow you to partially receive, receive exceptions and damaged items. Once changes are made and item received then the PO moves to the status of received.
Click the check box to the left of the title you want to create a receiving document for, and then click the create receiving button at the bottom of the page:
 |
This will bring up the Line item Receiving e-document.
Note
For information about Line Item Receiving see Receiving (Line Item Receiving)
This choice will allow open and received PO documents with no payments to be paid but not received. This option can be used for pre-payments and for expending funds. Payments are made by creating a new invoice or adding PO to an existing invoice.
Click the check box to the left of the title(s) you want to receive, and then click the pay button at the bottom of the page:
 |
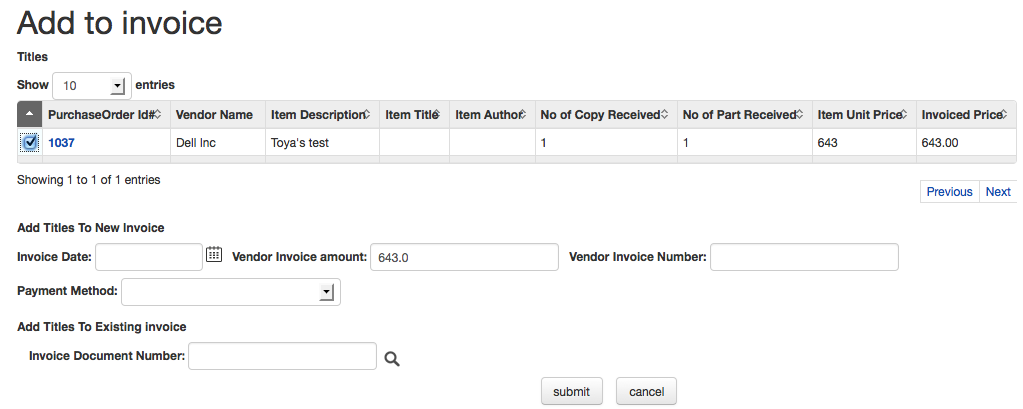
This will bring up the Add to Invoice screen.
 |
Users may choose to add titles to a new invoice or to an existing invoice.
To add titles to a new invoice, enter the Invoice Date or
search for it from the calendar icon  .
.
Check the Vendor Invoice Amount
Enter a Vendor Invoice Number, a searchable number assigned by the library.
Select the Payment Method from the drop down list.
Click  .
.
The invoice is created. A success message is provided below the Add to Invoice title containing the invoice document ID. Click the hyperlinked document ID to access the invoice.
To add titles to an existing invoice, enter the invoice number in the
Invoice Document Number or search for it
from the lookup .
.
Click  .
.
The existing invoice is updated. A success message is provided below the Add to Invoice title containing the invoice document ID. Click the hyperlinked document ID to access the invoice.
This option will allow payment of PO documents while receiving line items.
Click the check box to the left of the title(s) you want to receive and pay for, and then click the receive and pay button at the bottom of the page:
 |
This will bring up the Add to Invoice screen.
To add titles to a new invoice, enter the Invoice Date or
search for it from the calendar icon  .
.
Check the Vendor Invoice Amount
Enter a Vendor Invoice Number, a searchable number assigned by the library.
Select the Payment Method from the drop down list.
Click  .
.
The invoice and the receiving document are created. A success message is provided below the Add to Invoice title containing the document IDs. Click the hyperlinked document IDs to access the documents.
Note
Receiving is not complete until the document is submitted. If the process is canceled, the items will not be received within OLE.
To add titles to an existing invoice, enter the invoice number in the Invoice Document Number or search for it from the lookup .
.
Click  .
.
The existing invoice is updated and a receiving document is created. A success message is provided below the Add to Invoice title containing the invoice document ID. Click the hyperlinked document IDs to access the documents.
Note
Receiving is not complete until the document is submitted. If the process is canceled, the items will not be received within OLE.
This choice will allow any PO item eligible for a claim to be claimed and generating a Claim Notice which can then be saved locally in PDF or sent to the vendor. The item as it appears in Claim Notice will include any notes to the vendor made at the time the claim was generated. All Claims generated will appear in the PO under the Claim History tab for that item.
Click the check box to the right of the title(s) you want to claim, and then click the claim button at the bottom of the page:
 |
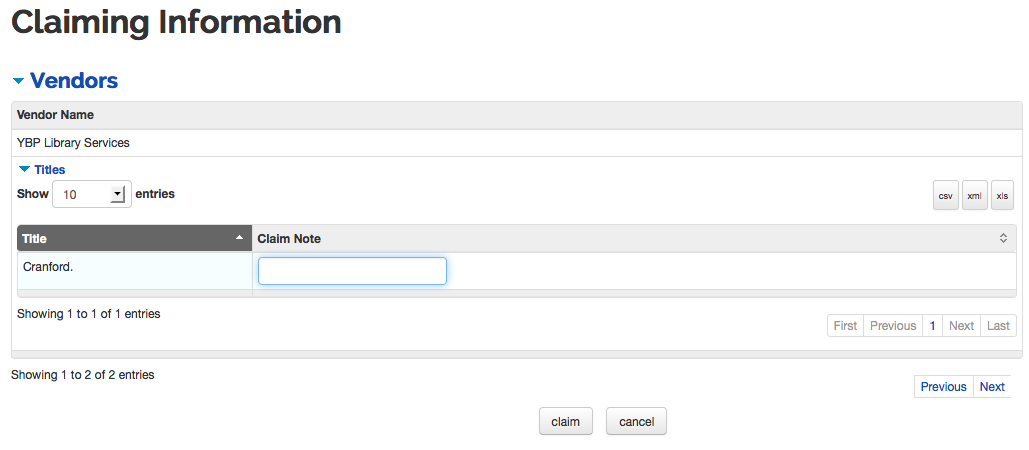
This will bring up the Claim Information screen. If multiple items were selected to claim, OLE will organize them by vendor.
 |
Enter any notes in the Claim Note area, and click Claim. A success message is displayed in the top left side of the screen below Claiming Information.
Note
If the user wishes to save or print a list of titles to be claimed rather than complete the claiming process for those titles at this time, the list can be saved via the Claiming Information screen before claims are generated. Lists can be saved via CSV, XML, or XLS. The user can then click Cancel if they wish to not complete the claiming process.


