 >
> >
> >
> >
>
OLE uses the Invoice document to process vendor billing, whether positive (an invoice) or negative (a credit memo), or a mixture. The only exception is when making an initial prepayment for a Deposit Account Arrangement. See instructions for creating a Disbursement Voucher for these type payments.
Note
To learn more about about Deposit Accounts, see the Disbursement Voucher
Invoice documents can be created three ways:
Manually, from the Select/Acquire Menu. Instructions are documented below.
By choosing “Pay” or “Receive and Pay” from the bottom of the Receiving Queue, which creates a new Invoice for the titles selected. Both these options use the Receiving Queue to create an Invoice document and populate it with chosen titles. From that point on, the document acts like any Saved invoice.
To learn more about the Receiving Queue, see Receiving Queue listed under Receiving.
By importing an EDIFACT Invoice message.
For instructions on how to do this, please see the Batch Processes section of the Guide to OLE System Administration. Once created, the EDIFACT invoice acts like any other Saved invoice.
To make an Invoice in the Select/Acquire menu, clicks the InvoiceCreate button below the Paying submenu. This launches a blank Invoice document.
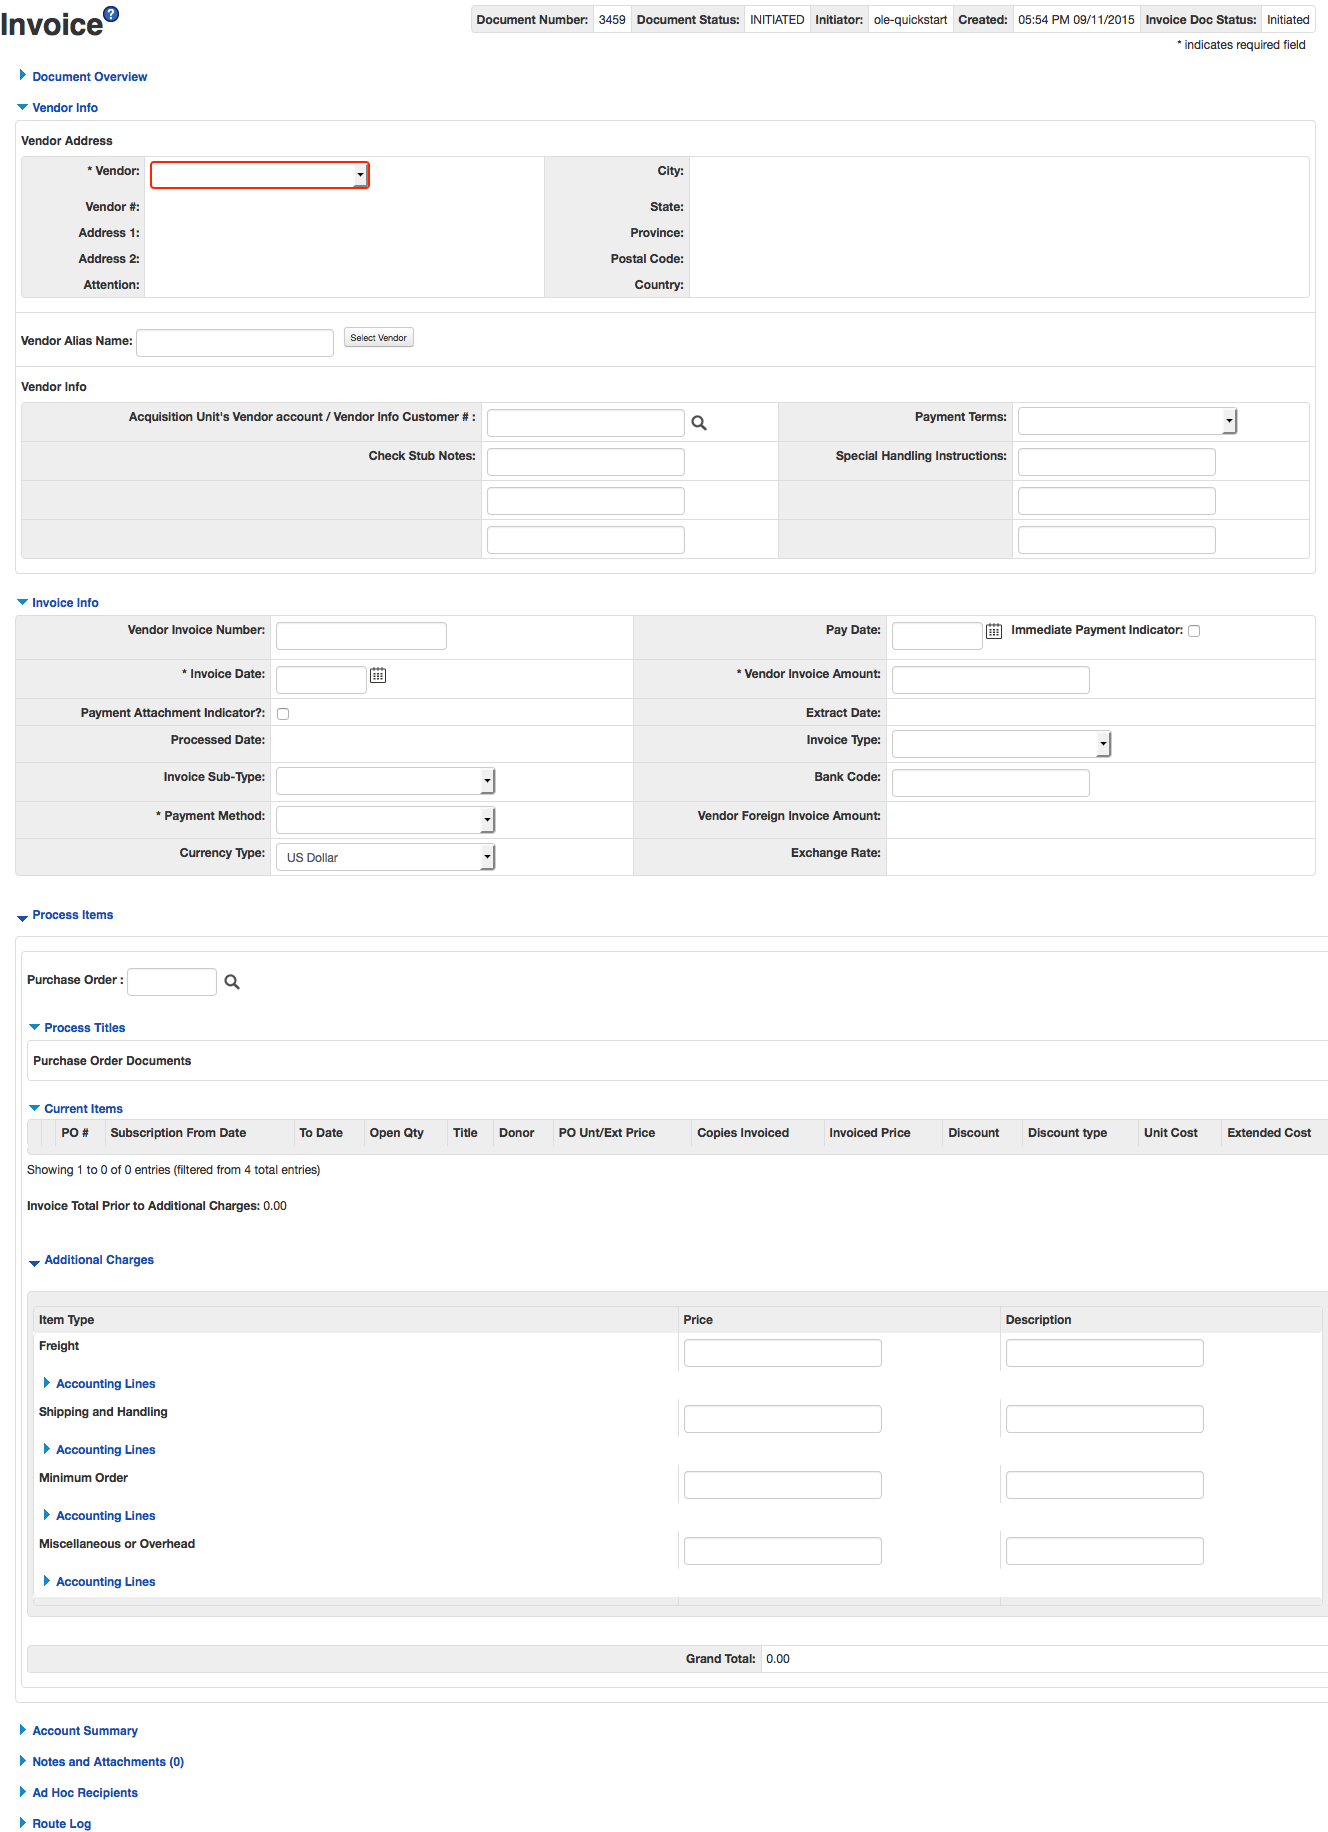 |
This screen includes unique Document Overview, Vendor, Invoice Info, Process Items, Account Summary tabs in addition to the standard tabs that display at the bottom of a financial transaction document.
Note
For more information about the standard tabs, see Standard Tabs on the Guide to OLE Basic Functionality and Key Concepts.
 |
Note
For information about the standard Document Overview tab, see Standard Tabs on the Guide to OLE Basic Functionality and Key Concepts.
Financial Document Detail section definition
|
Title |
Description |
|
Year |
Display-only. The fiscal year of the purchase order referenced by the Payment Request document. |
|
Total Amount |
Display-only. The total amount of the payment request after the request has been submitted. |
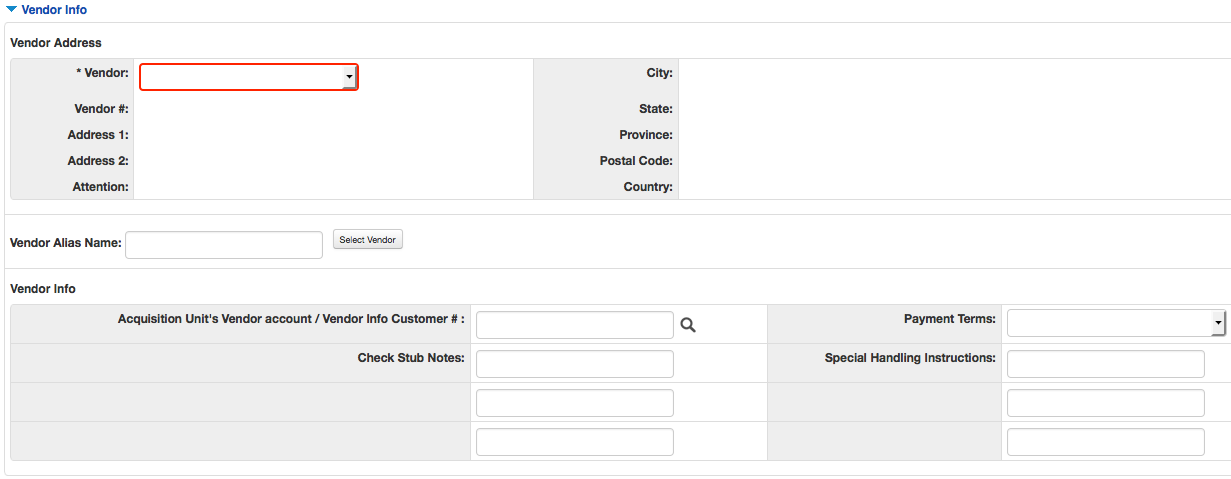 |
The Vendor tab has two sections: Vendor Address and Vendor Info.
Vendor Address section definition
|
Title |
Description |
|
Suggested Vendor |
Select a vendor from the drop down list, this will auto-populate the vendor address and some of the details in the vendor info tab. NoteAll POs on an invoice must use the same vendor. |
|
Vendor Number |
Display-only. Populates when the vendor is selected from the Suggested Vendor drop down. The vendor number followed by a hyphen and the division number. |
|
Address 1 |
Display-only. Populates when the vendor is selected from the Suggested Vendor drop down. |
|
Address 2 |
Display-only. Populates as necessary when the vendor is selected from the Suggested Vendor drop down. |
|
Attention |
Display-only. Populates as necessary when the vendor is selected from the Suggested Vendor drop down. |
|
City |
Display-only. Populates when the vendor is selected from the Suggested Vendor drop down. |
|
State |
Display-only. Populates when the vendor is selected from the Suggested Vendor drop down. |
|
Province |
Display-only. Populates as necessary when the vendor is selected from the Suggested Vendor drop down. |
|
Postal Code |
Display-only. Populates when the vendor is selected from the Suggested Vendor drop down. |
|
Country |
Display-only. Populates when the vendor is selected from the Suggested Vendor drop down. |
Vendor Info section definition
|
Title |
Description |
|
Acquisition Unit's Vendor Account/ Vendor Info Customer # |
Optional. Populated from the PO. Override it by entering the customer number directly. |
|
Check Stub Notes |
Optional. These three fields are for data to be passed along to whatever system your library uses to print checks. The first field mirrors the Vendor Invoice Number field, so that the invoice number will print on the check stub. The other two fields are free-text. |
|
Payment Terms |
Populates when the vendor is selected from the Suggested Vendor drop down. Override it by selecting a different payment term from the drop down list. |
|
Special Handling Instructions |
Optional. Additional free-text fields for instructions. Can be passed on to your check-printing system. . |
 |
Invoice Info tab definition
|
Title |
Description |
|
Vendor Invoice Number | The number assigned by the vendor to their invoice for credit. |
|
Invoice Date |
Required. Enter an invoice date or
select it from the calendar |
|
Payment Attachment Indicator |
Optional. Select the check box if an attachment (such as a copy of the invoice) must be returned to the Vendor with this payment. |
|
Processed Date |
Display-only. The date at which the payment was processed. |
|
Invoice Sub Type |
Select the locally defined invoice sub type from the drop down menu. |
|
Payment Method |
Required. This may be prepopulated from the vendor record but must not be left blank. Select the method of payment from the drop down menu. |
|
Currency Type |
The currency type of the vendor. If the vendor has a currency type assigned, this field will be prepopulated. It is possible to select a different currency type at any time until the Invoice document is submitted however you will need to reenter item price information. |
|
Pay Date |
Defaults to the date automatically
calculated by the system. If payment terms are edited, the
system repopulates this field only if it is blank. Override
the automatic entry by entering a pay date or selecting it
from the calendar NotePay Date Calculations: The pay date is calculated automatically in two different ways. The payment terms specified are applied to the invoice date to generate a pay date. The payment terms parameters are in the Payment Terms Type table. Additionally, ten days (or another institutionally defined default number of days - controlled by the parameter NUMBER_OF_DAYS_USED_TO_CALCULATE_DEFAULT_PAY_DATE under component "Invoice") are added to the current date to generate a pay date. OLE selects the later of these two dates and uses it as the default pay date for this Invoice document. The pay date will not appear until after you save, submit or blanket approve the invoice. The pay date may be entered manually, but it must not be a past date. If the date is more than 60 days from the current date, the system displays a warning message. |
|
(Immediate Payment Indicator) |
Optional. Select the Immediate Pay check box if a check is needed on the same day (overrides the pay date – subject to the rules of your accounts-payable system). This indicator allows for an approved payment request to be extracted for payment during the day. |
|
Vendor Invoice Amount |
Required for non-foreign vendors. The vendor total invoice amount. |
|
Extract Date |
Display-only. The date the Payment record is extracted to the Pre-Disbursement Processor. |
|
Invoice Type |
Optional. Select the type of invoice. Locally defined but sample data could include values Proforma/prepay, Regular. |
|
Bank Code |
Required. The bank code will be
displayed only if the Bank_Code_Document_Types includes
'PREQ' and Enable_Bank_Specification_Ind='Y'. The default
bank is determined by the Default_Bank_By_Document_Type
parameter. You may override this value by entering another
bank code or selecting it from the Bank lookup |
|
Vendor Foreign Invoice Amount |
Required for foreign vendors. The vendor total invoice amount. You must enter the Vendor Foreign Invoice Amount however once the document is submitted, this will be calculated based on the total cost and the currency rate. |
|
Exchange Rate |
Automatically populated from the Currency Type. The exchange rate can be edited until the Invoice is submitted. |
This is the heart of the Invoice document, where the titles to be paid for are listed.
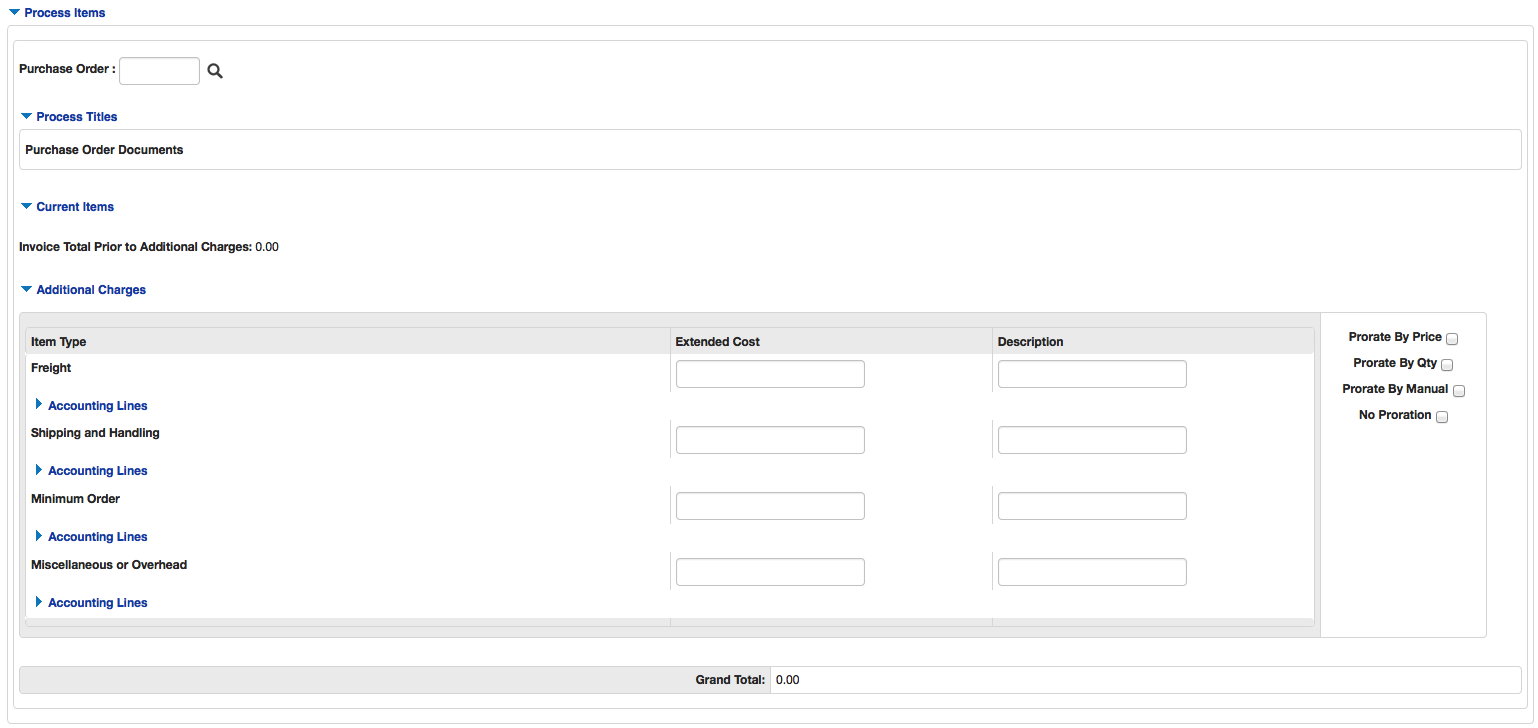 |
The Process Items tab includes a Purchase Order field and additional sections: Process Titles, including Purchase Order Documents, Current Items, and Additional Charges.
To attach a title to the Invoice, you can either type the Purchase Order
number into the box or search for it from the lookup  .
.
Once a purchase order has been located, the Purchase Order Documents subtab of the Process Titles tab with display all the titles on that PO. Remove titles you don’t want by un-checking the “Select Item for Invoice” box.
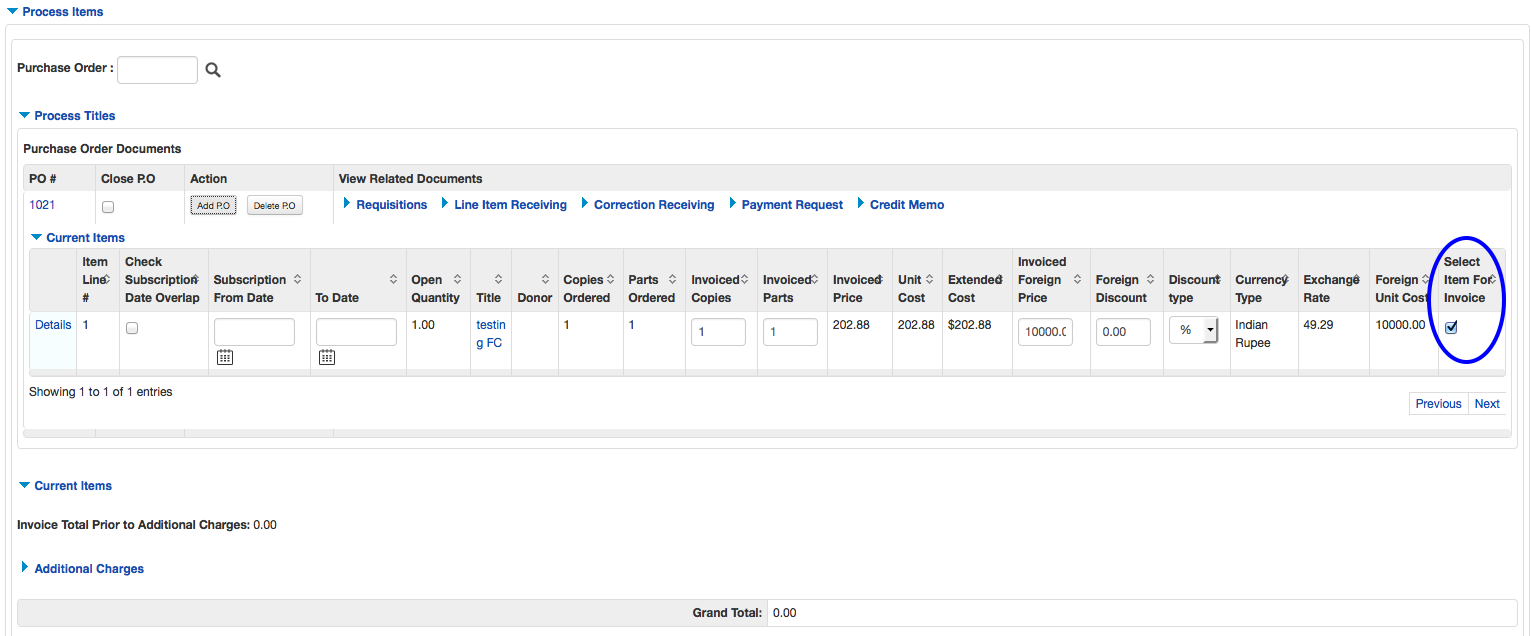 |
Purchase Order Documents subtab definition
|
Title |
Description |
|
PO # |
Displays the Purchase Order number. Click the number to open the purchase order in a new tab or window. |
|
Close PO |
If you know this is the last expected activity on this PO, you can check the box. When the Invoice is approved, OLE will automatically Close the PO. NoteWhether to Close POs after receipt and invoicing is a local decision. |
|
Action |
Click add P.O. or delete P.O. to add or remove the purchase order from the Invoice document. When you’ve made your desired edits to titles from this PO, click the add P.O. button, and the checked title(s) will be moved to the Current Items section. You can then enter your next Purchase Order number to begin working on the next title on the invoice. |
|
View related Documents |
Click the document links to open the documents in a new tab or window. |
|
Item Line # |
Display-only. The line item number representing each item. |
|
Check Subscription Date Overlap |
Check the box if you would like OLE to detect any overlap between the subscription dates on another invoice. OLE will ask you to continue if an overlap is detected. |
|
Subscription From Date |
The date the subscription is to
begin. Enter the date or search for one from the
calendar icon Required if Check subscription date overlap is checked. |
|
To Date |
The date the subscription is to
end. Enter the date or search for one from the calendar
icon Required if Check subscription date overlap is checked. |
|
Open Quantity |
Display-only. The quantity of items that have yet to be invoiced for this line item. |
|
Title |
Display-only. Displays the title from the bibliographic record. Click to open the editor in a new tab or window. |
|
Donor |
Display-only. If available, displays the Donor from the purchase order. |
|
Copies Ordered |
Display-only. Indicates the number of copies ordered from the purchase order. |
|
Parts Ordered |
Display-only. Indicates the number of parts ordered from the purchase order. |
|
Invoiced Copies |
The number of copies listed on the invoice. |
|
Invoiced Parts |
The number of parts listed on the invoice. |
|
Invoice Price |
Defaults to the price entered on the purchase order. You may change it here to the actual invoice price. You can also edit other information, like the accounting string, if desired. NoteThe Dollar field on the Accounting line is a reflection of the Invoiced Price field on the line item. Updating the Invoice Price automatically updates the Amount. |
|
Discount |
The amount of a discount on an item. |
|
Discount Type |
Select the type of discount from the drop down list. |
|
Unit Cost |
Display-only. The cost of the item from the purchase order. |
|
Extended Cost |
The cost of the item after the discount has been factored in. |
|
Invoice Foreign Price |
Basic foreign price of an item before any discounts are taken. This is carried over from the purchase order but can be modified on the Invoice document. |
|
Discount / Foreign Discount |
Discount provided by the vendor/customer number/organization combination. Automatically populated from the Vendor customer number table based on the selected vendor and customer number. Can be modified for a specific title. If the vendor record has a Vendor currency noted other than the default system currency (aka US dollar), then the Vendor discount will populate the Foreign Discount field. |
|
Discount Type |
Choose # (for Amount) or % (for Percentage). |
|
Currency Type |
Display only. Identifies the associated vendor's currency type. |
|
Exchange Rate |
Display only if foreign vendor is chosen. Currency conversion rate populates from the Exchange rate and Currency Type maintenance tables. |
|
Foreign Unit Cost |
Display only if foreign vendor is chosen. Calculated foreign cost per unit from the purchase order. |
|
Select Item for Invoice |
Automatically checked. Uncheck the box to remove the item from the Invoice. |
|
Accounting Lines |
Required. The accounting information is pulled from the purchase order but is editable. To update the Dollar field, change the amount of the Invoiced Price. NoteIf the difference between the amount encumbered on the purchase order and the amount invoiced is larger than the threshold set on the account a warning message will appear when the invoice is submitted. The warning can be overwritten. For details on setting account thresholds see instructions on setting up an account. |
When you’ve made your desired edits to titles from this PO, click the add P.O. button and the checked title(s) will be moved to the Current Items section. You can then enter your next Purchase Order number to begin working on the next title on the invoice.
Once a title has been moved to the Current Items section, its price and accounting string can still be changed. Additionally, you may click Delete to remove the item from the Invoice or Unlink to link a different purchase order to the Invoice.
 |
Once you have added all the titles on your invoice, you can add other amounts on the Additional Charges tab. This tab is divided into four charge lines, each representing a different type of charge, each with its own accounting. The four Additional Charges lines are Freight, Shipping and Handling, Minimum Order, and Miscellaneous or Overhead. Each of these four lines has a ”Description” note field. This field is optional except for the Miscellaneous or Overhead section – if you enter an amount there, you must explain it in a note.
 |
Additional Charges section definition
|
Title |
Description |
|
Item Type |
Display-only. The type of item to be charged. |
|
Extended Cost / Foreign Price |
Enter the extended amount charged on the invoice for this additional charge item. This will be displayed as "Foreign Price" only when a foreign vendor has been selected. |
|
Description |
Required for miscellaneous charges. |
You have two choices for assigning an accounting string to each type of additional charge:
You can supply an accounting string in the “Accounting Lines” subsection, or
you can have the system prorate the charge to the accounts used on the PO titles in the Current Items section. The system assumes you want to prorate the charge if you enter the charge but not an accounting string with it. The four choices for proration are:
This divides the cost among the funds used on the PO titles by the costs of those titles. This is the default option.
Example: an invoice with three titles:
Title 1:2 copies, $25.00 each, charged to chart UP / account PSYCHOL / object code 0010
Title 2: 1 copy, $30.00, charged to chart UP / account ECONOMI / object code 0020
Title 3: 1 copy, $20.00, charged to chart UP / account LITERAT / object code 0010
A Freight charge of $12 is entered with no accounting line. The system creates the following lines:
$6.00, charged to chart UP / account PSYCHOL / object code 0010
$3.60, charged to chart UP / account ECONOMI / object code 0020
$2.40, charged to chart UP / account LITERAT / object code 0010
This divides the cost among the funds used on the PO titles by the quantities being invoiced.
Example: an invoice with three titles:
Title 1:2 copies, $25.00 each, charged to chart UP / account PSYCHOL / object code 0010
Title 2: 1 copy, $30.00, charged to chart UP / account ECONOMI / object code 0020
Title 3: 1 copy, $20.00, charged to chart UP / account LITERAT / object code 0010
A Freight charge of $12 is entered with no accounting line. The system creates the following lines:
$6.00, charged to chart UP / account PSYCHOL / object code 0010
$3.00, charged to chart UP / account ECONOMI / object code 0020
$3.00, charged to chart UP / account LITERAT / object code 0010
This divides the costs among the funds used on the PO titles, but requires the operator to type in the amounts. Use this option when you need to divide the costs unevenly among the funds.
Example: an invoice with three titles:
Title 1:2 copies, $25.00 each, charged to chart UP / account PSYCHOL / object code 0010
Title 2: 1 copy, $30.00, charged to chart UP / account ECONOMI / object code 0020
Title 3: 1 copy, $20.00, charged to chart UP / account LITERAT / object code 0010
A Freight charge of $12 is entered with no accounting line. The system creates the following lines:
an accounting line for chart UP / account PSYCHOL / object code 0010, with a blank amount
an accounting line for chart UP / account ECONOMI / object code 0020, with a blank amount
an accounting line for chart UP / account LITERAT / object code 0010, with a blank amount
The Account Summary tab will summarize all accounts attached to the invoice and their respective charges after calculation. Information in the account summary is divided first by account, then by line item or additional charges line. Charges prorated to multiple accounts will be represented separately. Any changes made to accounting line items will not be updated until the Invoice has been calculated and the “Refresh Account Summary” button at the top of the tab has been clicked.
Click  to reload the page and view all the fiscal years,
accounting lines and dollar amounts for this requisition.
To create an Invoice:
Create an Invoice edoc.
Enter the suggested vendor, add additional information as necessary.
Enter the required fields and any additional information to the Invoice Info tab.
Search for a Purchase Order and modify the item as necessary. Click add P.O.
Update the accounting lines and prorate as needed.
Save or submit the Invoice.
When the Submit, Approve, or Blanket Approve buttons are clicked, OLE compares the total invoice charges (including additional charges) with the Vendor Invoice Amount entered earlier. If they do not match, a warning message appears. Clicking continue submits or approves the invoice, making the necessary ledger entries back on the individual invoice lines. (The “vendor invoice amount” is retained on the document, but nothing further is done with it.)
Note
There is a documented problem with rounding amounts on a foreign invoice. If there is a discrepancy of a few cents, you will need to manually adjust the invoiced price on the Current Items tab. For more information on the bug, please see OLE-6733.
OLE will allow libraries to create $0 invoice lines, or an entire invoice totally $0 (or negative amounts) to accomodate for non-priced items, credits, or error correction.
In order to create a $0 invoice, enter $0 in the Vendor Invoice Amount field on the Invoice Info tab. Then, after the Purchase Order has been added, change the Invoiced Price field on the Current Items tab to $0.
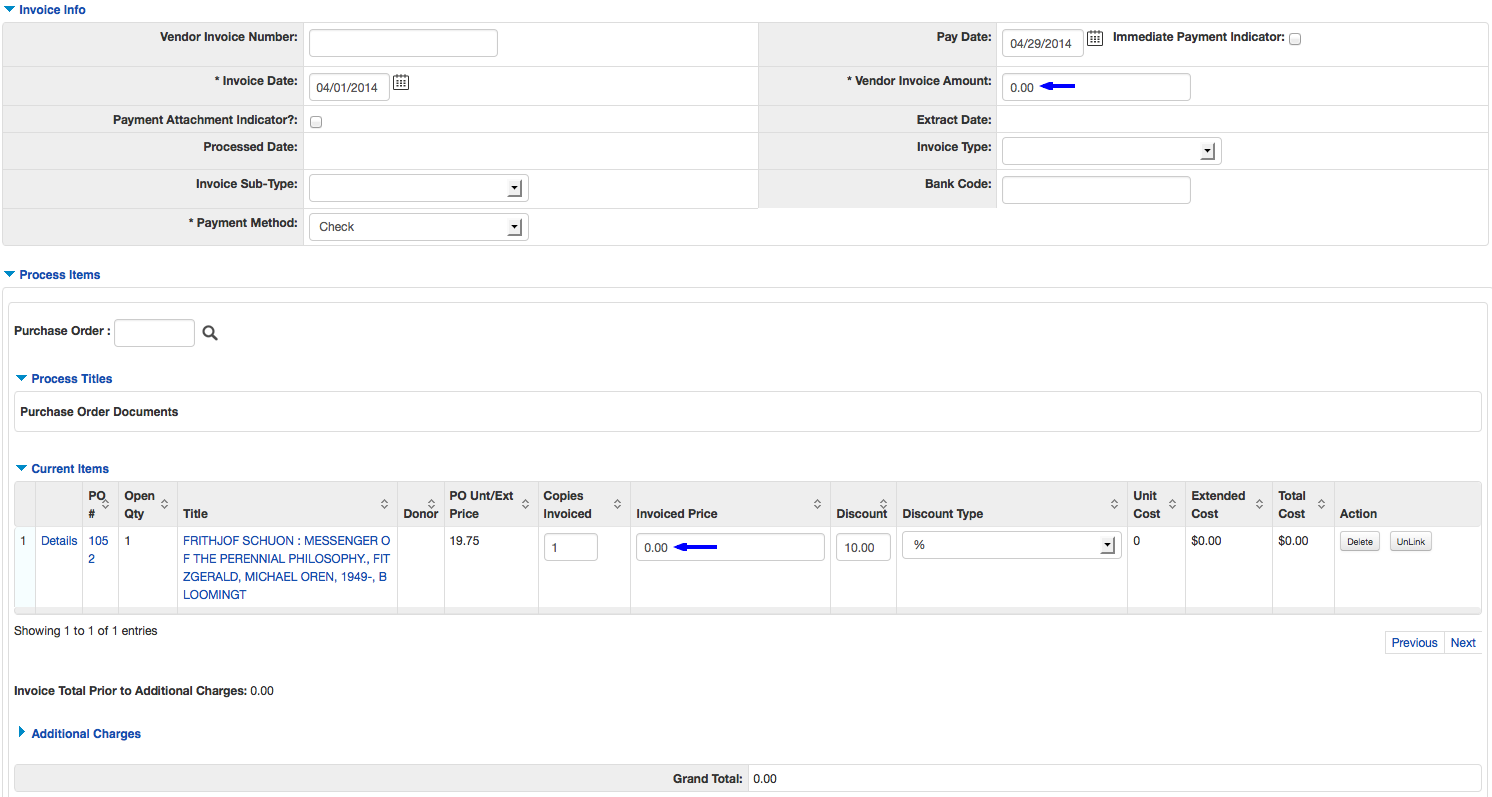 |
If an invoice has multiple purchase orders, change as many Invoiced Price lines to $0 as required. The $0 line items will be allowed and will not change the total amount of the invoice.
 |
A negative charge against a PO line item will have a negative invoice amount for the line item. The total of all invoice amounts on line items must equal the value entered into Vendor Invoice Amount. The amount on the accounting lines will still appear as a positive number, but a negative amount for a PO will generate a Credit Memo instead of a Payment Request. The example below shows how the Invoice's Current Items tab will appear with negative amounts.
 |
Cloning, or copying, an Invoice is a useful feature offered in OLE for multiple-lined renewals and for invoices that need to be reversed.
To clone an Invoice:
Search for an existing Invoice from the Invoice Search.
At the bottom of the screen, click clone.
Select one of the following options in the pop-up box and click ok:
Debit Invoice with Debit Entries
Credit Invoice with Credit Entries
For a Debit Invoice, OLE creates an exact copy of the invoice and saves it as a new eDocument with a new Document Number. Make any modifications and click Submit.
For a Credit Invoice, OLE creates a copy of the invoice, but changes all price fields in the document from positive to negative numbers (or vise versa). The Vendor Invoice Number will not carry forward, you must input one. Make any additional modifications and click Submit.
A pop-up box will appear with a warning. Click continue.
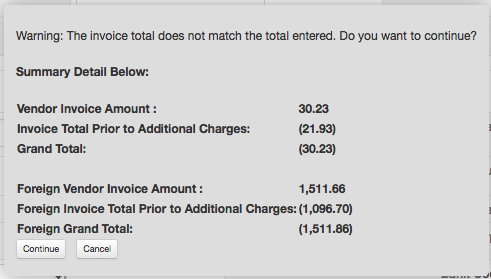
At the top of the document, a "Document was successfully submitted" message will appear.
While an Invoice is still in saved or initiated document status, the option to cancel an invoice is available. To fully remove the link between the purchase order(s) added to the Invoice and the Invoice document, first Delete the purchase orders from the current items section of the Invoice.
 |
Then click Cancel at the bottom of the document.
Skipping the first step will not cause problems within OLE but the purchase order(s) will maintain links to the canceled Invoice, which may cause confusion for staff.
An Invoice can be Saved once its required fields have been filled in (see above) and at least one title has been added to the Current Titles section.
While the Invoice is in Saved status, it can be closed at any time. When reopened, the operator can continue to modify it: adding more titles, removing titles, changing prices, etc.
There are two ways to approve an invoice:
Clicking on the Submit button at the bottom of the document submits the document to the workflow your site has defined for invoices. The most common workflow is for the document to be routed to a Fiscal Officer for approval. The Fiscal Offer would then find the document listed in his/her Action List:

The Fiscal Officer would open it from there, modify it if necessary, and then Approve it by clicking the “Approve” button at the bottom of the document.
A Fiscal Officer can also choose to Disapprove an Invoice, by clicking the “Disapprove” button at the bottom of the document. This might happen if the document was created in error, or was found to be a duplicate not caught earlier in the process. Once Disapproved, the document is retained permanently in the system, but no further action can be taken on it.
OLE can allow a user to approve his/her own Invoices if desired. The user must be authorized to approve invoices, and the workflow would have to not require routing. In that circumstance, a “blanket approve” button will also appear at the bottom of the screen
Note
While this functionality is available in OLE, many sites will choose not to use it, instead requiring all invoices to be routed to another user for approval. If the workflow has been set to require a separate approver, no “blanket approve” button will appear.
An Invoice cannot be edited once it has been Approved. If a correction is made, it must be submitted via a new document (another Invoice, a Credit Memo, or a General Ledger Correction document).
Once an Invoice is approved, OLE takes several actions without further operator input:
It creates Payment Request (PREQ) documents for all positive amounts on the Invoice. One PREQ is created for each PO on the invoice
Example: if an invoice contains 4 line items with positive prices:
2 from PO 1014
1 from PO 1024
1 from PO 1065
OLE will create three PREQs when the invoice is approved.
The PREQs are usually automatically approved at the same time they are created.
It creates Credit Memo (CM) documents for all negative amounts on the Invoice. Like the PREQs, these are automatically approved.
It writes the totals from these PREQs and CMs to a particular set of tables, to enable local extraction of the data for transmission to other accounting systems
Note
OLE does not contain hard-coded functionality for this extraction, since it will vary for each institution, depending on the needs of their local systems. Instead, OLE compiles this data in one set of tables for easy extraction.
It updates balances in the General Ledger (G/L), changing the Invoice amounts from Pending expenditures to actual expenditures, and relieving encumbrances as appropriate.
The Invoice document’s check for duplicate invoice numbers is done at the approval step, since fields such as “invoice number” and “invoice date” are editable within the document until that point. As part of invoice approval, OLE looks for any other approved invoice documents exactly matching all three of these elements:
vendor
vendor invoice number
invoice date
If duplications occur on all three fields, the Invoice will route for approval but when the approver clicks Approve, a message will pop up:

As the approver, click the linked Document ID numbers to review those Invoices.
Click Yes to approve the invoice despite the duplication.
Click No to return to the Invoice document to disapprove or amend it.


