 >
>  >
>  >
>  >
> 
Note
Please click here for technical documentation.
The Patron document is used to create and maintain the contact information of patrons within OLE.
Permissions to create and maintain Patron records are given to several roles. Patron Manager has all privileges to modify Patrons and the maintenance documents. Full Circulation Attendant has permission to edit patron records
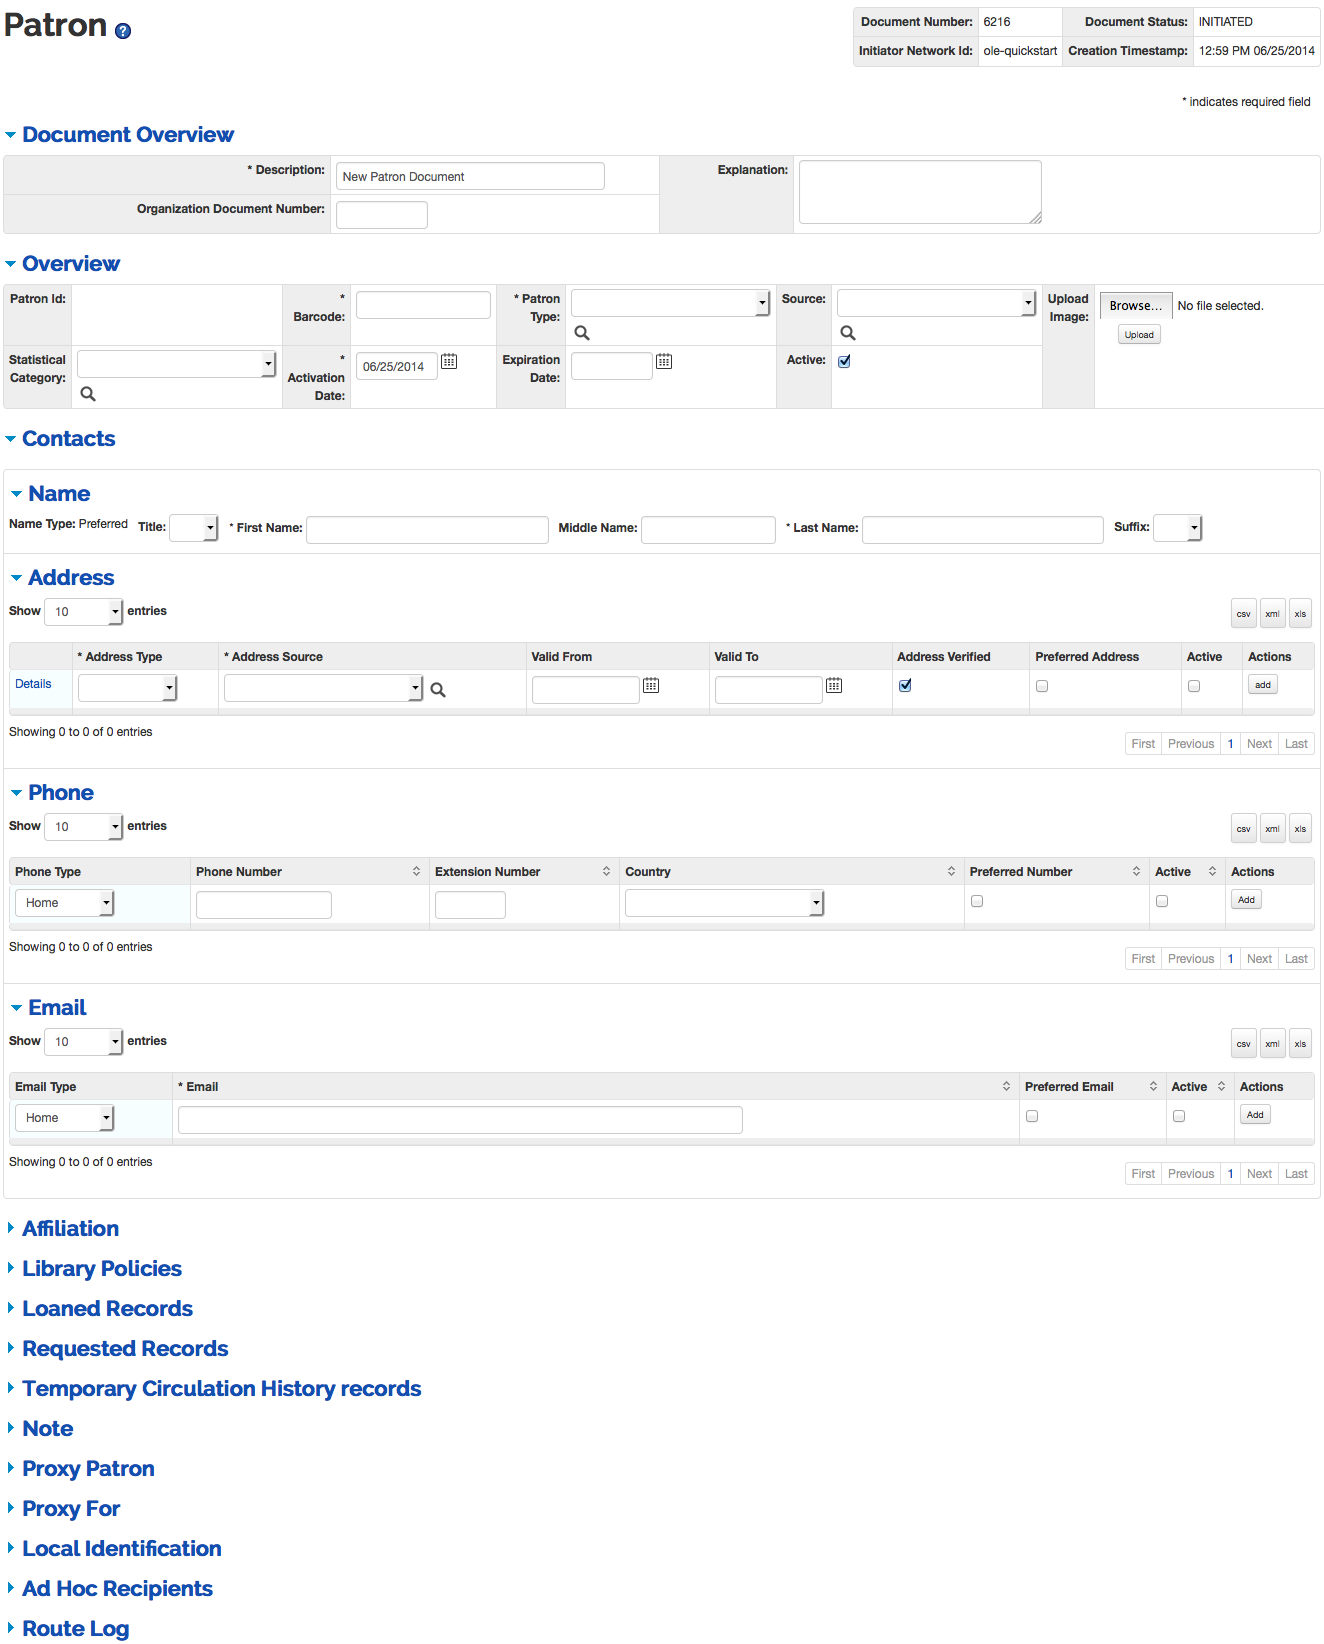 |
The Patron document includes the Overview, Contacts, Affiliations, Library Policies, Loaned Records, Requested Records, Temporary Circulation History Records, Proxy Patron, Proxy For and Local Identification tabs in addition to the standard tabs that display at the bottom of OLE documents.
Note
For more information about the standard tabs, see Standard Tabs on the Guide to OLE Basic Functionality and Key Concepts.
The Overview Tab of the Patron Document is different from the standard Document Overview tab found on OLE e-documents and contains basic information about the patron record.
 |
Patron Overview Tab Definitions
|
Title |
Description |
|
Patron ID |
System-assigned unique ID |
|
Barcode |
Required. A unique sequence of numeric or alphanumeric characters printed on a label (also including an optical, machine-readable version of the number) attached to a patron ID card; used to identify the patron in the system for check-out or request transactions; can also serve as a patron login to "my account" functions from the library’s public user interface. |
|
Patron Type |
Required. Indicates a group of library patrons sharing the same service privileges; one of the primary determinants of loan periods, maximum limits, fine rates, etc. |
|
Source |
Identifies origin of the patron data |
|
Statistical Category |
An identifier as locally defined to fulfill reporting requirements |
|
Activation Date |
Date on which patron’s privileges became active. |
|
Expiration Date |
Date on which a patron’s privileges expire. The expiration date in a patron record can be null. |
|
Active |
Indicates whether this patron is active or inactive. Remove the check mark to deactivate. |
|
Upload Image |
Visual ID of the patron. Browse to find the image on your local
machine. Click |
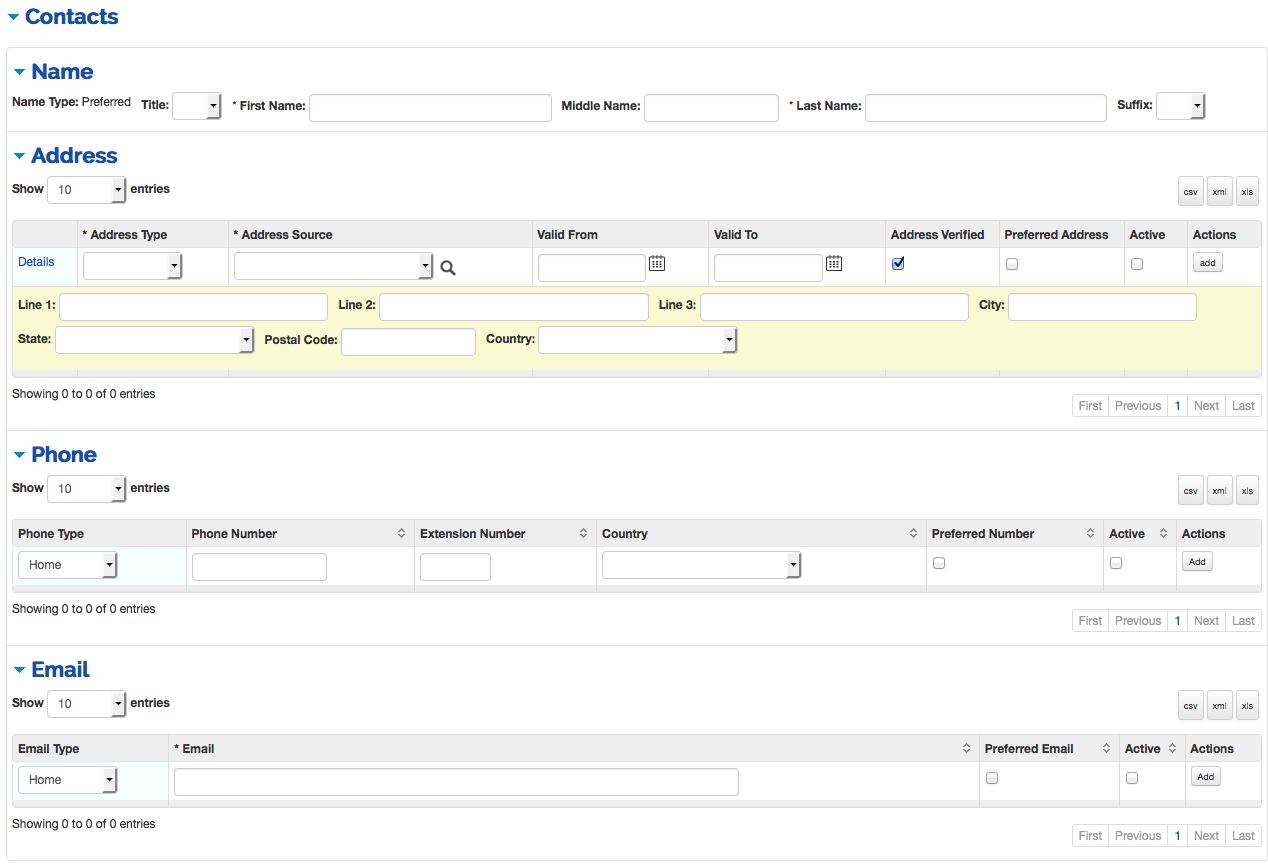
The Contacts tab contains the patron name and contact information. When you modify contact information to an existing patron record, the old tabs will display above the new. When adding lines to the Address, Phone or Email sub-tabs, enter information and then select the add button.
 |
Note
Click Details to view and edit the address.
 |
Patron Contacts Tab Definitions
|
Title |
Description |
|
Name Sub-Tab | |
|
Name Type |
Defaults to Preferred. |
|
Title |
Form of address preceding a name, used in notices and messages addressed to patron |
|
First Name |
Required. Enter the patron’s first name |
|
Middle Name |
Optional. Enter the patron’s middle name |
|
Last Name |
Required. Enter the patron’s last name |
|
Suffix |
A descriptor following a name and providing additional information about a person; used in notices and messages addressed to patron |
|
Address Sub-Tab | |
|
Address Type |
Required. A descriptor identifying characteristics of an address; an address type must be assigned to any address. |
|
Address Source |
Required. A value that identifies the origin of a patron's address. |
|
Valid From |
The date at which an address becomes the preferred address for sending notices and patron bills. |
|
Valid To |
The date at which an address is no longer the preferred address for sending notices and patron bills. |
|
Address Verified |
Indicates whether or not the address is verified; when checking out an item to a patron with an unverified address, the operator will receive a prompt if no addresses have been verified. |
|
Preferred Address |
Indicates which address is used when sending notices and patron bills. Only one address can be the preferred address. |
|
Active |
Indicates whether this address is active or inactive. Remove the check mark to deactivate. |
|
Line 1-3 |
A building name, street number, room number, "attn. of: [nnn]", etc. Three fields are available. Enter the address for the patron. |
|
City |
Enter the name of the city for this address |
|
State |
Select the state from the State list. |
|
Postal Code |
Enter the postal code for this address |
|
Country |
Select the country from the Country list |
|
Phone Sub-Tab | |
|
Phone Type |
A descriptor identifying the type of phone number. Each Phone number must have a type but you cannot use a type more than once. |
|
Phone Number |
Enter a phone number for the patron (only numeric characters). |
|
Extension Number |
Optional. Enter the phone number’s Extension |
|
Country |
Select the country from the Country list |
|
Preferred Number |
Indicates which phone number is preferred for contact. Only one phone number can be the preferred number. |
|
Active |
Indicates whether this phone number is active or inactive. Remove the check mark to deactivate. |
|
Email Sub-Tab | |
|
Email Type |
A descriptor identifying the general use/purpose of the email |
|
|
Required. Enter an email address for the patron. |
|
Preferred Email |
Indicates which email address is preferred for contact. Only one email address can be preferred. |
|
Active |
Indicates whether this email is active or inactive. Remove the check mark to deactivate. |
The Affiliation tab contains information on how a patron is affiliated and to which campus. When adding lines to the Affiliation tab, enter information and then select the add button.
 |
Patron Affiliation Tab Definitions
|
Title |
Description |
|
Affiliation Type |
Select the type of affiliation from the Affiliation Type list |
|
Campus Code |
Select the campus from the Campus List |
The Library Policies tab contains information about a patron’s privileges.
 |
Patron Library Policies Tab Definitions
|
Title |
Description |
|
General Block |
Flag to indicate if the patron is blocked for a reason not otherwise defined in the system; if flag is on, patron cannot checkout or request items. |
|
General Block Note |
A field allowing staff to explain why a general block has been placed on the patron record. Click the |
|
Delivery Privilege |
Enables automatic physical delivery of requested items versus being required to pick up requested items from a pick-up location (i.e., a circulation desk). |
|
Paging Privilege |
Allows a patron to place a paging request. |
|
Courtesy Notice |
Allows the system to send courtesy notices (expired holds and pending due dates) only to those who request them. NoteCourtesy notices can be sent systematically any number of times from the interval setting parameter COURTESY_NOTICE_INTER |
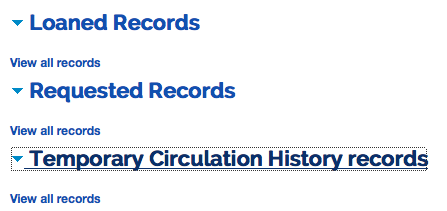
The Loaned Records, Requested Records, and the Temporary Circulation Historytabs allow you to review items linked to the patron. Each tab includes basic information about a title loaned to the patron as well as the due date. Click View all records to see the patron's loaned or requested items, or the patron's temporary Circulation History Record
Note
The Temporary Circulation History Records feature allows users to look up items they have checked out in the past. If privacy concerns trump the desire to offer this feature, a library can opt NOT to create a temporary circulation history.
The Proxy Patron tab allows you to identify another patron as a proxy for this patron as well as set activation and expiration dates for the proxy. When adding a proxy to the Proxy Patron tab, enter the patron and then select the add button.
The Proxy For tab will display the details of the proxied patron. This tab is not editable.
 |
Patron Proxy Patron Tab Definitions
|
Title |
Description |
|
Barcode |
System Assigned Unique ID. Enter the
Patron who will act as the proxy or use the Patron Lookup |
|
First Name |
Display only. Once the patron ID has been entered, this field will auto-populate. |
|
Last Name |
Display only. Once the patron ID has been entered, this field will auto-populate. |
|
Barcode |
Display only. Once the patron ID has been entered, this field will auto-populate. |
|
Activation Date |
Date on which the proxy patron becomes active. |
|
Expiration Date |
Date on which the proxy patron becomes inactive. |
The Local Identification tab allows you to further distinguish a patron’s connection to the library. When adding a local id to the Local Identification tab, enter the identification and then select the add button.
 |
Patron Local Identification Tab Definitions
|
Title |
Description |
|
Local ID |
Any identifier as locally defined to further identify the patron, e.g., any other alphanumeric ID used in the institution |
A patron’s lost/invalid barcode number is tracked to prevent fraudulent use of lost or stolen ID cards. Users may update a patron’s barcode on the Overview tab. When this has been done, any expired barcodes will appear on the Expired/Updated Barcode tab with an Effective date.
 |
To update a barcode:
Choose Update barcode at the bottom of the Patron record.
In the pop-up window, select a Reason from the dropdown list and add a Description.

Click Confirm to update the Patron record.
On the Patron record, enter a new barcode in the Overview tab.
Select Submit.
From the Patron search screen, staff may view bills and accept payments from the Patron Bill link or create a bill from the Create Bill link.
Note
For more information about creating patron bills, see Patron Bill Payment
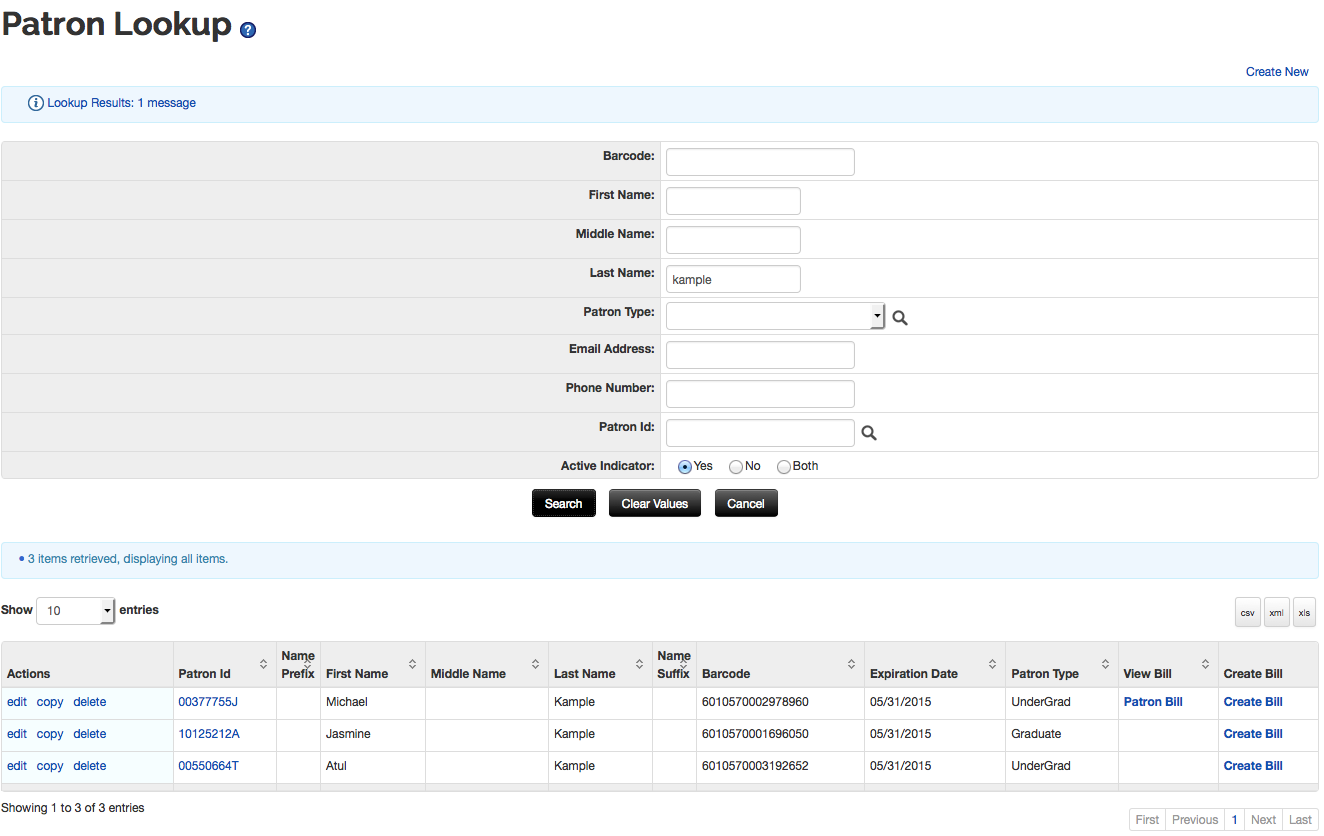 |
Click Patron Bill to view and accept payments for a patron.
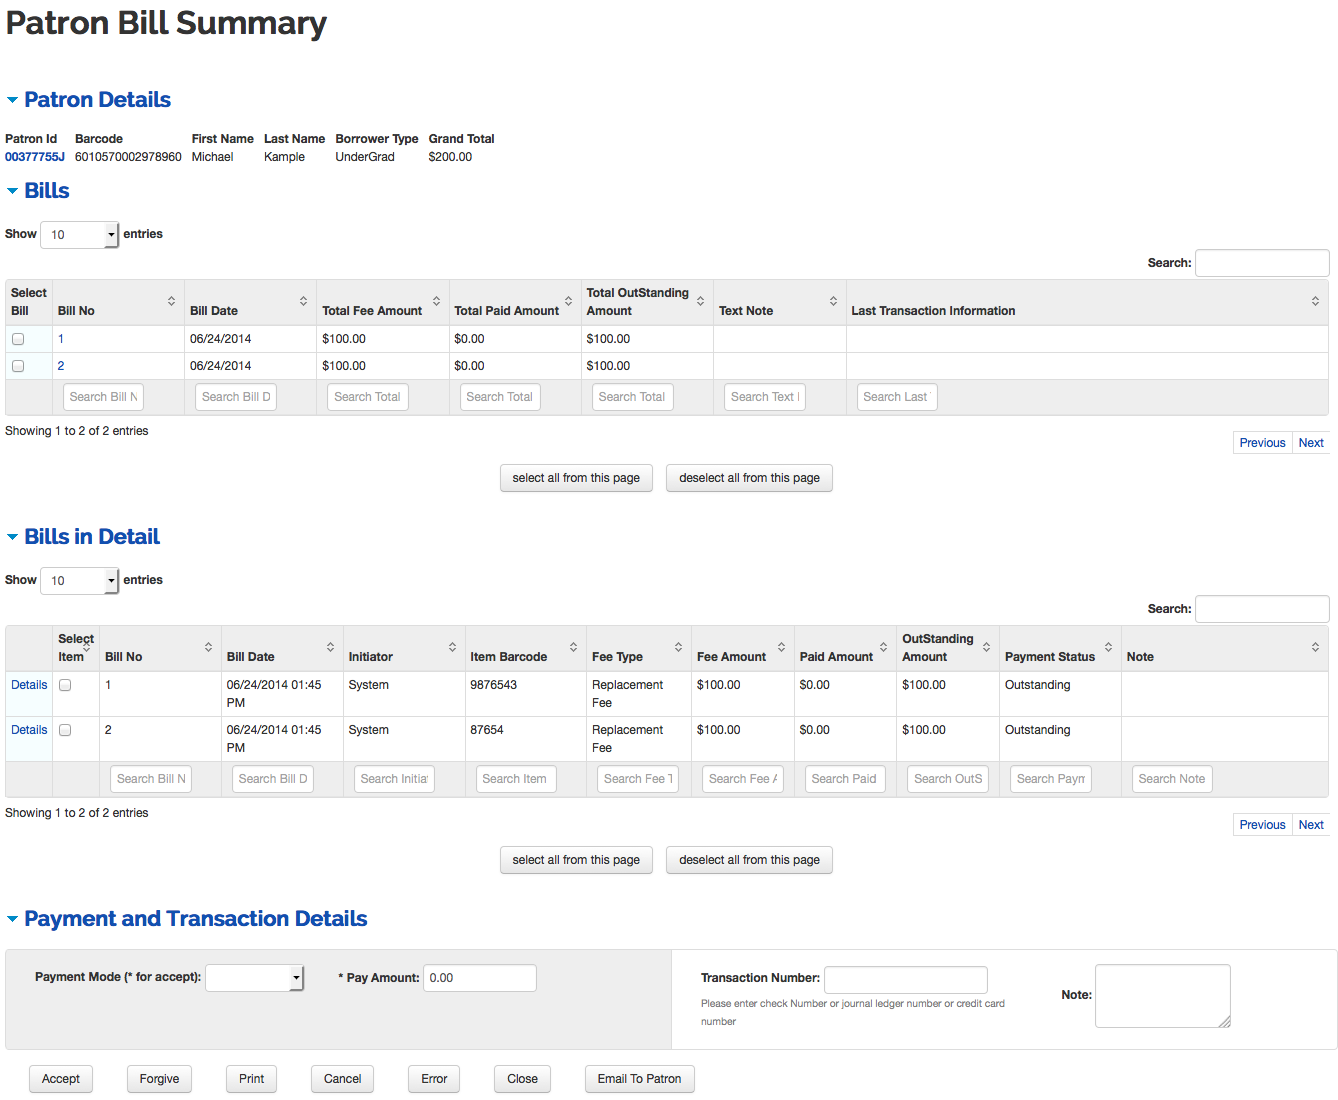
Check the bill from the Bills tab or the line item from the Bills in Detail tab that the patron would like to pay.
Select the Payment Mode from the drop down list if you plan to accept a payment.
Enter the Pay Amount.
Click
 to receive a payment.
Click
 to forgive an amount.
Click
 when the charge was made in error.
When selecting cancel, error. or forgive, you must enter a note in the pop-up box and click ok. This note has a limit of 500 characters.
At a minimum, a patron MUST have the following data elements: last name, first name, borrower type, delivery privileges, paging privileges, affiliation, department, barcode, address, delivery preference, address verified , address (can be either a mail address, email or text; if a mail address), address source (required for each address of any type), courtesy notice preference
Any attempt to create a patron record without a required field will refresh the display with a message indicating the missing data element.
Expiration dates in a patron's record can be set to null.
If courtesy notices are not used by a library, these will be set to "No". If switched to Yes, these will only be produced when a special batch process is run.


