 >
>  >
> >
>
A loan consists of identifying a patron and then creating temporary links to the item(s) being loaned to the patron. The Loan interface allows for staff to circulate materials to patrons.
OLE breaks down circulation permissions into several roles. Unit Manager have all loan privileges including override permissions. Operator have only “create loan” permissions.
Note
You will receive errors if not logged in as a user mapped to a circulation desk. Login before selecting Loan from the Deliver Menu.
Each staff operator can be authorized to work at one or more circulation desks; one must be set as the default. If they have more than one circulation desk, they will be able to change from one circulation desk to another to indicate where they are. When an operator changes a circulation desk during a session, the change will persist for the rest of the session. The next time the operator logs in, OLE will return them to their default location.
Note
For more information about Circulation Desk maintenance and mapping, see Circulation Desk and Circulation Desk Mapping.

Once you have opened the Loan interface, enter the Patron Barcode and press Enter or search for it from the lookup
 . If you search for a patron record from the lookup,
the resulting display will show a Return Value link to the left of each
patron. Click on that link to populate the patron field on the Loan screen.
Press Enter.
. If you search for a patron record from the lookup,
the resulting display will show a Return Value link to the left of each
patron. Click on that link to populate the patron field on the Loan screen.
Press Enter.Note
The preferred addresses on a patron’s record must be verified otherwise the warning “Patron’s street address has not been verified” will appear.
Tip
Clicking on the Return button will take you to the return menu, allowing you to check-in materials.

Once the patron barcode is entered, details about the patron will appear above the Patron field. If there is a block on the patron or some other problem, then an error message will appear. You may need to access the patron record to address the error or, in some cases an override is permitted for you to continue.
Note
For more information about Patron Documents, see Patron.
If text exists in a user note field in the patron record, this message displays immediately whenever the patron’s barcode is scanned into the system. (The purpose is to be able to deliver a message to the patron in person.) The operator has the option to acknowledge and delete the message or simply acknowledge -- in the latter case, the message remains and continues to display each time the patron barcode is entered until the text is removed.
Enter the Item Barcode or search for it from the lookup
 .
. Press Enter

OLE will calculate the due date and time and update the item status to "Loaned". This information displays in the Items Checked Out This Session section of the screen. A sound will notify staff of successful check-outs or alert them of issues to address (provided the sound parameter AUDIO_OPTION is turned on and your computer has speakers).
When loaning an item to a patron, an alert may appear to inform you of any problems based on local configurations settings. OLE provides a pop up screen to assist staff to correct these errors and/or override them so that the loan can proceed.
If the patron has presented more than one item to borrow, enter the next item barcode and press Enter. Each new item checked-out will appear at the top of the Items Checked Out This Session list.
To view all items a patron has checked out, click the
 button.
Clear the patron information to prepare for the next patron.

Tip
Each Circulation Location also defines a timeout interval which has the same effect as manually ending a session. This can be locally configured.
If an item does not have a barcode or cannot be found by a search, click Fast-Add item to create a brief record. This will open a simple record editor on top of the Loan window:
 |
You must enter all fields that have asterisks (*) before their labels, these are required.
Click Submit.
OLE will provide you with an error message if you forget to enter a value for required field. If the system accepts the data, the window closes and supplies the item barcode in the Item field of the Loan screen.
Press Enter on your keyboard.
The Loan now proceeds.
You will notice that there are a row of buttons available at the top of the Loan Screen. These are explained below
 |
If you change circulation desks for a loan and then want to switch back to
your default location, click  . You will not exit the Loan screen but default settings
will be restored.
If you need to clear a patron to loan items to a new patron, click  .
.
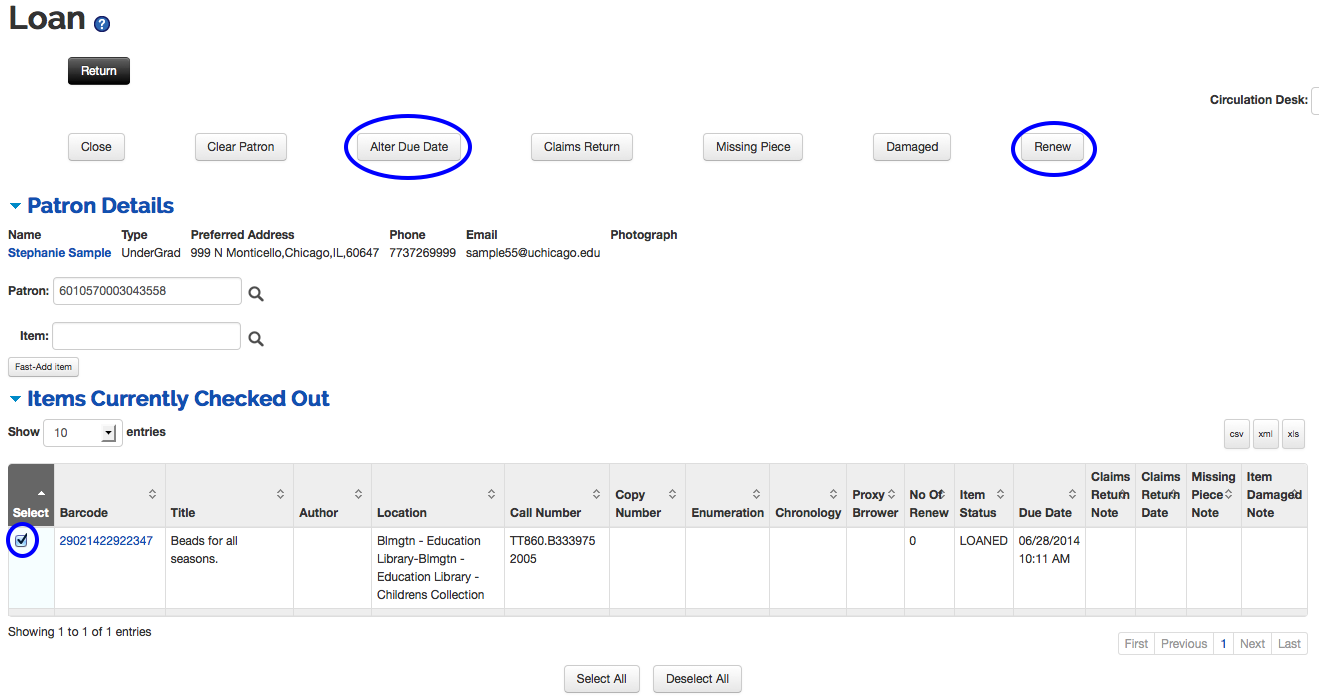
From the top of the loan screen, you can renew items or modify due dates/times.
 |
To renew, select line items from the Current Session Item list or the Items Currently Checked Out list. You can also click the Select All button for either or both lists.
Click
 .
.OLE will update due dates/times.
Tip
Alternatively, enter the item barcode in the item field as though loaning the item and press Enter. The item will be renewed for the patron.
To modify or alter a due date/time, select line items from the Current Session Item list or the Items Currently Checked Out list. You can also click the "Select All" button for either or both lists.
Click
 .
.The Alter Due Date window will appear.

Enter in a new Due Date or use the calendar icon
 . Note that you can also adjust the due time if your
loan periods are hourly, if you do not specify a time, OLE will assume
23:59:59. This assumed time can be changed from the parameter
DEF_CLOSE_TIME.
. Note that you can also adjust the due time if your
loan periods are hourly, if you do not specify a time, OLE will assume
23:59:59. This assumed time can be changed from the parameter
DEF_CLOSE_TIME.Click
 .
.
Patrons sometimes notify library staff that they have returned items for which they may have received overdue notices or replacement fee bills. In such circumstances a library staff operator with proper permission needs to manually turn on a “claims returned” flag in the item and have the system automatically record the date of the event.
To perform the claims return from the loan screen, select the line item associated with the title.
Click
 from the top row of buttons available.
Type any notes to record specific circumstances in the pop up window:

Click
 .
.The claims return note and date will appear in the item record and if the item is requested to circulate again.
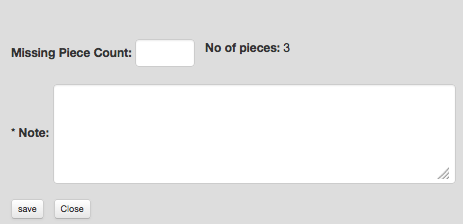
If the operator observes that the item presented for checkout is missing a piece, then they can report the missing piece within OLE. Missing pieces are noted on the item record and will remind staff with each circulation transaction if the item remains in circulation.
To mark an item as missing a piece from the loan screen, select the line item associated with the title.
Click
 from the top row of buttons available.
Type how many pieces are missing from the item and add a notes to record specific circumstances in the pop up window:

Click
 .
.The missing piece count, note, and date will appear in the item record and when the item is requested to circulate again.
If the operator observes that the item presented for checkout is damaged, then they can report the damage within OLE. Damages are noted on the item record and a notice will pop up with each circulation transaction if the item remains in circulation.
To mark an item as damaged from the loan screen, select the line item associated with the title.
Click
 from the top row of buttons available.
Type a notes to record specific circumstances in the pop up window:

Click
 .
.The note and date will appear in the item record and when the item is requested to circulate again.
Click
 to remove the damage flag.
You may print call slips from the item record.
Click the barcode number to access the item record.
 |
Note
To learn more about printing call slips, see the relevant section of the item record in the Guide to the OLE Describe and Manage Module.
Circulation policies are based on three factors: item location, item type and borrower type. Each specific combination determines the loan period, applicable maximum limits, and other policies pertaining to renewals, requests, etc. These can be defined locally.
Staff must log in and select a circulation desk before loaning, or checking-in items.


