
 >
>  >
>  >
> 
> 
Note
Please click here for technical documentation.
When you select the Batch Process Profile link from the Admin menu, the system displays the Batch Process Profile lookup. This screen allows staff to search for and edit pre-existing Batch Process Profiles or create new profiles.
Note
Once a Batch Process Profile is created, it cannot be deleted from the user interface.
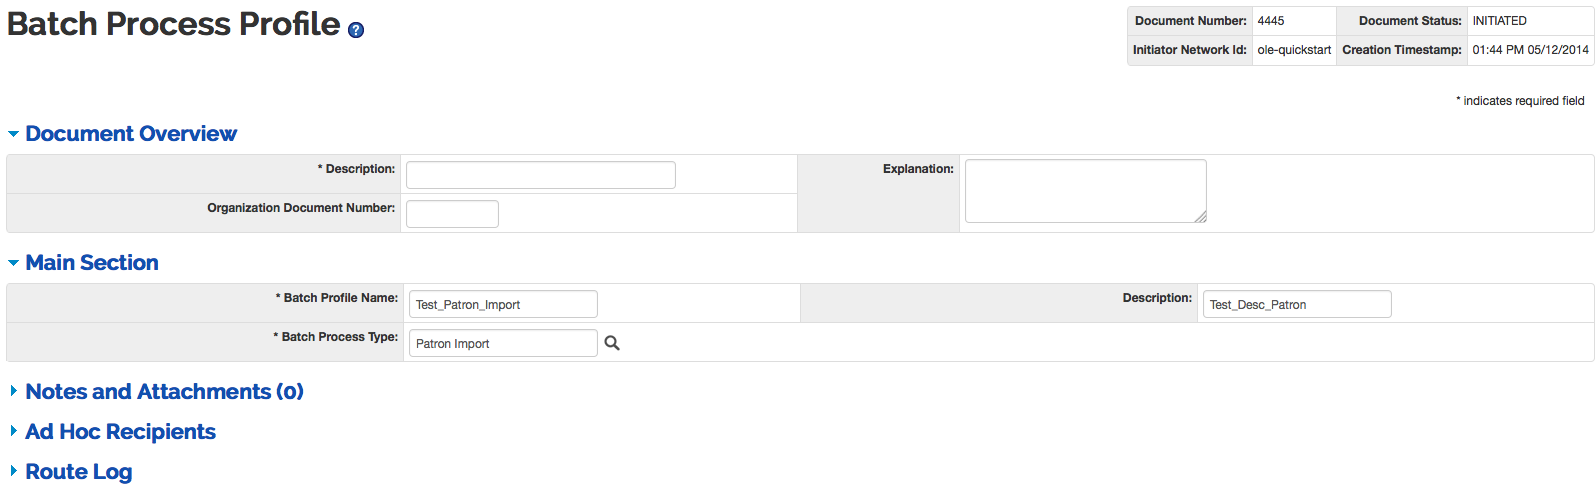 |
When creating a new Batch Process Profile, the only unique tab is the Main Section. However, depending on the Batch Process Type that is selected, different tabs are available for adding or modifying information for the profile.
The Main Section tab contains basic information about the Batch Process Profile. Additional fields will appear in the Main Section tab depending on the Batch Process Type that is selected.
 |
Main Section definition
|
Title |
Description |
|
Batch Process Name |
Enter the name of the Batch Process. |
|
Batch Process Type |
Required. Enter the type of batch
process or search for it from the lookup |
|
Description |
Display only. Indicates whether the vendor is a parent or child record. |
| Data to Import |
If the Bib Import type is selected, select the data type to import from the drop down list. |
|
Requisitions for Titles |
If the Order Record Import type is selected, select from the drop down list to have one requisition created per title or one requisition created for the order. |
| MARC Only |
It the Order Record Import type is selected, and the file to be imported contains MARC records with embedded order data, check this box. If importing order data from an EDIFACT file, do not check this box. |
| Bib Import Profile |
If the Order
Record Import or Invoice Import type is selected, the Bib
Import Profile is required to create or overlay
bibliographic records. Search for the Bib Import Profile by
the lookup |
|
Data to Export |
If the Batch Export type is selected, select from the drop down list to have only bibliographic data exported or bibliographic and instance data exported. |
| Export Scope |
If the Batch Export type is selected, select from the drop down list how much should be exported: full export, filtered, incremental, or full except staff only bibs. |
For Patron import, Location import, Invoice import, Claim Report and Serial Record Import the Main Section is the only tab available for adding or editing information.
Click  to create a new profile for these types of batch
processes.
to create a new profile for these types of batch
processes.
Note
Serials Record Import was developed specifically for early adopters to migrate data into OLE. The loader allows data migrators to create three tables of data and load them without interfering with the workflow processes required by Rice. The three tables must be formatted in a very specific way. Each implementer, being unique in their previous systems, will have to work to create their own CSV or XML files to import. For additional information about the loader for 1.5 and the UChicago experience, see OLE-5642. If you have additional questions, please email ole.technical.usergroup@kuali.org.
Additional information for all other batch process types will be addressed below.
OLE supports two ways of importing order data:
from a file of EDIFACT order messages, loaded in conjunction with a file of bibliographic data
from order data embedded in each bibliographic record in a file
Order Record Import profiles have a "Marc only" checkbox on them. If checked, the profile will expect the user to load a file of bibliographic records alone, and will extract data from it to populate the order record. If the checkbox is left unchecked, it will expect the user to load a pair of files (bibliographic and EDIFACT) when using that profile.
If you are creating orders via embedded order data, you must specify which bibliographic fields and subfields contain which pieces of data. (This will vary from file to file, depending on the coding used by the data creator.) You can specify the mapping from bibliographic data to the requisition using the Constant and Default Values and Data Mapping sections of the profile.
Invoice import can likewise be done two ways:
by loading a file of EDIFACT invoice messages
by loading bibliographic records containing embedded invoice data
When loading an EDIFACT order message, you do not need to load bibliographic data at the same time. The file will try to match the invoice lines to existing purchase order lines as part of the load.
When loading invoice data embedded in bibliographic data, your invoice import profile should be linked to an existing bib import profile.
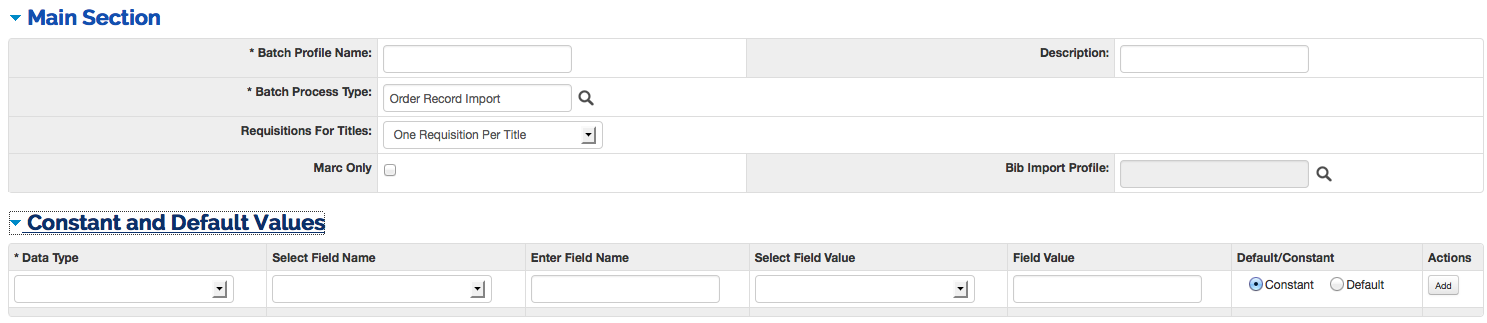
If the Order Record Import or Invoice Import type is selected from the Main Section, a new tab will load.
Enter the constant and default values and click  .
.
Constant: The value entered in the profile will override the present value or add a value if one was not present in the incoming invoice file.
Default: The value entered in the profile will be added to the created document if the value is not available in the incoming invoice file.
Note
Do not forget to select items for the additional Main Section fields.
 |
Constant and Default Values definition
|
Title |
Description |
|
Data Type |
Select the Data Type from the drop down menu. |
|
Select Field Name |
Depending on the Data Type selected, select the field name from the drop down list. |
|
Enter Field Name |
Enter the field name to be defined as the constant or default value. |
|
Field Value |
Enter the field value to be defined as the constant or default value. |
|
Default/Constant |
Select the radio button for default or constant. |
|
Action |
Click |
Once your Order Record Import profile is
completed, click .
For EDI and MARC (Constant and Default Values section):
Default Location
Note
The default location must come from only one subfield (for example: 980 $x), it cannot be two (980 $x$y).
The default location in your MARC record must match the location exactly as it appears in the Requisition's location dropdown. If three levels are used at your institution and three levels appear on the Requisition, then all three levels must be in you MARC subfield. Additionally, location levels must be separated by slashes ($xUC/DDL/Law).
Item Type
Note
This Item Type does not refer to the Item Type listed on an Item Record (the maintenance table listed under Cataloging Maintenance). This refers to the line item on PURAP (S&A) documents. The only valid choice is "ITEM".
Item Types in the item record need to be entered on a Bib Import Profile that can be linked to the Order Import Profile.
Cost Source
Method of PO Transmission
Building Code
Delivery Campus Code
Org Code
Chart Code
Funding Source
For MARC only (Constant and Default Values section or Data Mapping section):
List Price
Vendor Number
Quantity
No Of Parts
Account Number
Object Code
Default Location
Item Type
Note
This Item Type does not refer to the Item Type listed on an Item Record (the maintenance table listed under Cataloging Maintenance). This refers to the line item on PURAP (S&A) documents. The only valid choice is "ITEM".
Item Types in the item record need to be entered on a Bib Import Profile that can be linked to the Order Import Profile.
Cost Source
Method of PO Transmission
Building Code
Delivery Campus Code
Org Code
Chart Code
Funding Source
Item Description is required for EDIFACT or MARC files that will not have a matching PO line item. Currently in OLE without a linked PO, or including the Item Description, the batch process will fail with the reason "Error Message:null".
Note
There is a bug ticket for the Item Description and its error message. See OLE-7057
When typing a field value into the Constant and Default Values section, you must enter it formatted exactly as it is within OLE. For example, when adding Requestor Name you need to add LastName, FirstName.
When running the batch process for order imports, the Bib Import Profile is executed first and then the Order Import Profile.
Items and E-Holdings can be created by the Bib Import Profile and by the Order Record Import via the Requision's transition to a Purchase Order. In order to prevent OLE from creating both, a check has been added to the Order Record Import Profile. If an e-holdings or item record is created or modified by the Bib Import Profile, a second e-holding/item will not be created during the Requisition's transition to a Purchase Order. This ensures that only one new e-holding/item is linked to the Purchase Order and Bibliographic Record.
Note
OLE cannot run an Order Import batch process with hundreds of items. Additionally, the more items links to each order, the more time the system will take to import the order.
In OLE 1.5, you will not be able to import multiple orders with multiple copies and locations.
OLE will try to match each invoice line with its corresponding purchase order line. Match points are:
Primary match - the vendor’s ID number: stored in the Vendor Item Identifier field of the PO line item, and in the SNA segment of the EDIFACT message
Secondary match - ISSN, stored in the bib. record and in the PIA+5 segment of the EDIFACT message
Tertiary match - the OLE PO number, stored in the PO and the RFF+ON segment of the EDIFACT message
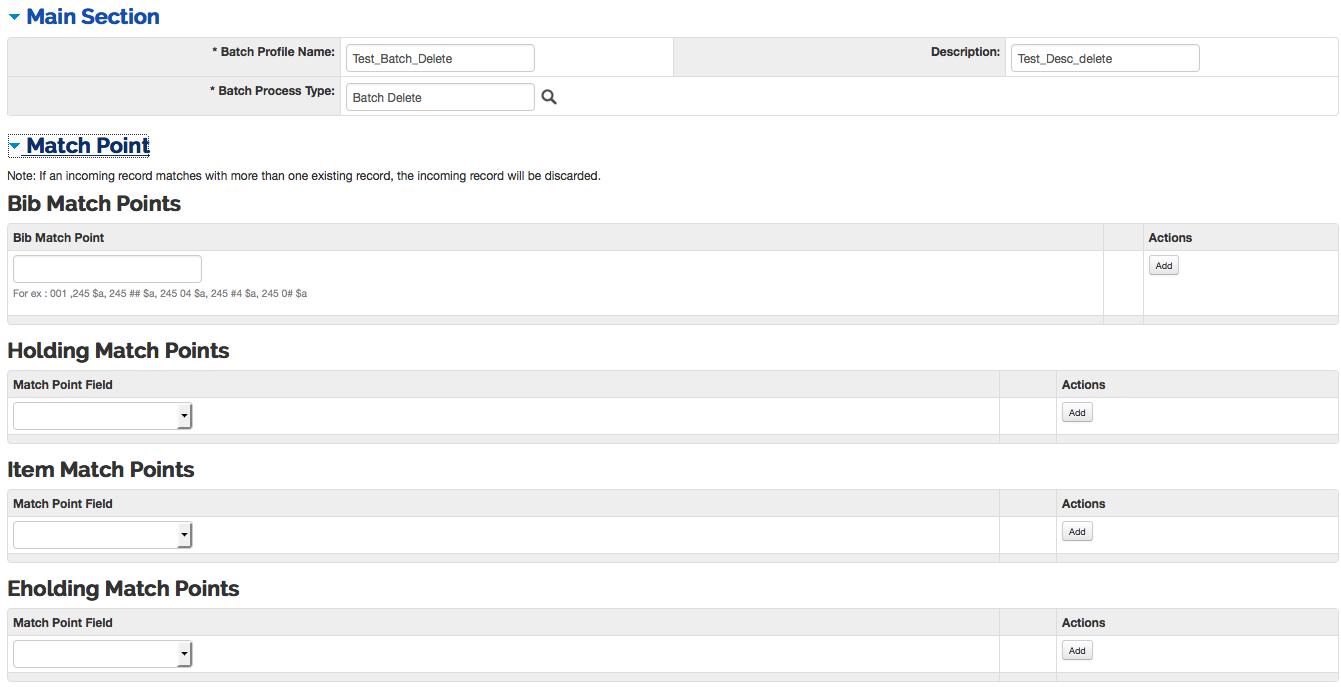
If the Batch Delete type is selected from the
Main Section, a new tab will load. The
Bib Match Point tab is used to determine
what records will be deleted from OLE. Enter the match
point and click . Users may add as many match points as is necessary.
 |
OLE does not provide a public discovery layer. As a result, staff will need to export bibliographic and OLE Instance data to various existing discovery layers. The existing systems expect MARC21 bibliographic records with 9xx local data fields containing a subset of information from OLE Instance records attached to the bibliographic records. OLE is able to suppress bibliographic or Instance data marked as staff only. OLE will also dump incremental updates with additions, modifications and deletions to bibliographic or Instance data as required by each library. OLE also allows the user to specify frequency of full and incremental exports. All of these actions can be set up in the profile and carried out through the Batch Process interface.
If the Batch Export type is selected from the Main Section, four additional tabs will load: Filter Criteria, Data Mapping, Delete Field, and Rename Field.
Note
Do not forget to select items for the additional Main Section fields.
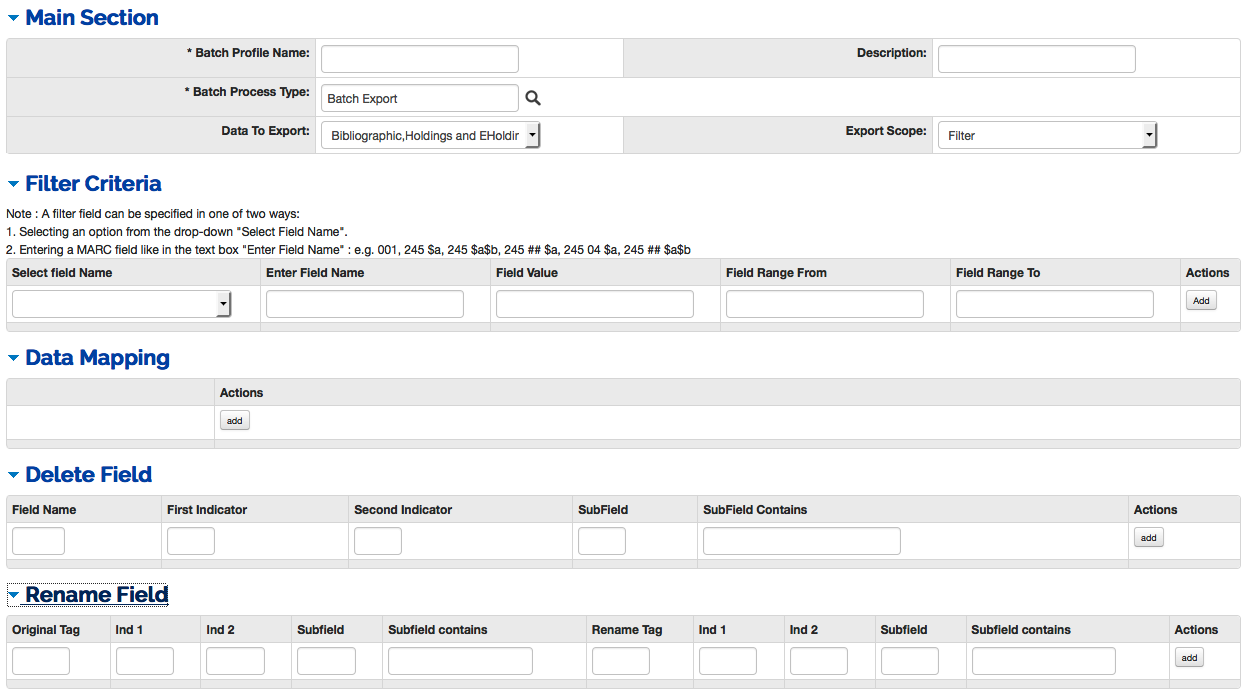 |
If you chose filter in the Export Scope
field of the Main Section, enter the filter
criteria in the Filter Criteria tab and
click .
 |
Filter Criteria definition
|
Title |
Description |
|
Select Field Name | Select the field name from the drop down list. |
|
Enter Field Name |
If the field name does not appear in the Select Field drop down list, enter the field name to be defined as the constant or default value. |
|
Field Value |
Enter the field value to be defined as the constant or default value. |
|
Field Range From |
Enter a beginning field range to limit the filter. |
| Field Range To |
Enter an ending field range to limit the filter. |
|
Action |
Click |
Click to add data mapping options.
Data mapping is divided into two
sections. The first identifies the source field for the export and the
second identities the destination field for which OLE will map to. Enter the
source and destination information and click the button next to Priority.
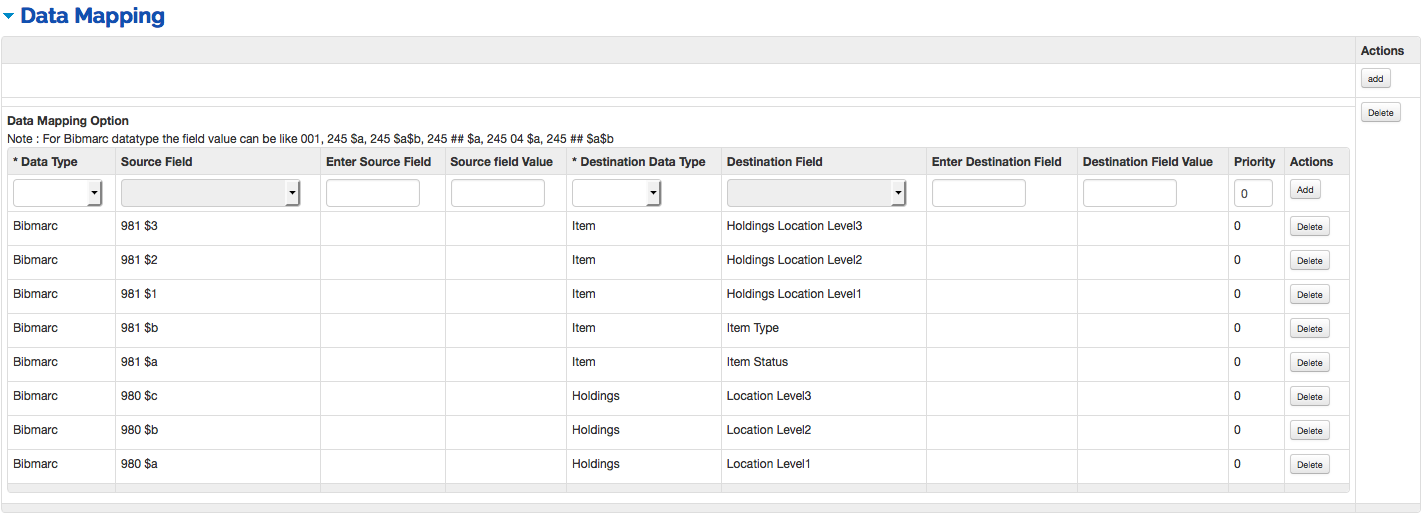 |
Data Mapping definition
|
Title |
Description |
|
Data Type |
Select the type of data (Holding, Item, EHolding) from the drop down list. |
|
Source Field | If you have chosen holding or item as the data type, select the OLE source field from the drop down menu. |
|
Enter Source Field |
If you have chosen bibmarc as the data type, enter a source field. For example "100 $a" |
|
Source Field Value |
If you have chosen bibmarc as the data type, enter a source field value. |
|
Destination Data type |
Select the type of destination data type (bibmarc, holding or item) from the drop down list. |
| Destination Field |
If you have chosen holding or item as the data type, select the destination field from the drop down menu. |
| Enter Destination Field |
If you have chosen bibmarc as the destination data type, enter a destination field. For example "100 $a" |
| Destination Field Value |
If you have chosen bibmarc as the data type, enter a destination field value. |
| Priority |
If the same source field is given multiple destinations, you may prioritize which should be first, second, third, and so on. NoteYou cannot map incoming data from multiple fields to a single field in OLE, unless you set priorities. In that case only the first met priority field will be mapped. |
|
Action |
Click |
The Delete Field tab allows you to
identify fields that will be deleted during the export. Enter the field
information and click . Add as many fields as is needed.
 |
Delete Field definition
|
Title |
Description |
|
Field Name |
Enter the bibliographic field name to be deleted. For example "101" or "245" |
|
First Indicator |
Optional. Enter the first indicator to be deleted. |
|
Second Indicator |
Optional. Enter the second indicator to be deleted. |
|
SubField |
Optional. Enter the subfield to be deleted. |
|
SubField Contains |
Optional. Enter the information the subfield contains that will be deleted during the export. |
|
Action |
Click |
The Rename Field tab is used to rename or
change fields during the export. It is divided into two sections. The first
identifies the original tag within OLE for the export and the second
identities the newly named field in the exported record. Enter information
for both the original and rename tags and click .
 |
Rename Field definition
|
Title |
Description |
|
Original Tag |
Enter the numeric MARC tag that you wish to rename. |
|
Ind 1 |
Enter the Indicator 1 that will be changed. |
|
Ind 2 |
Enter the Indicator 2 that will be changed. |
|
Subfield |
Enter the subfield that will be changed. |
|
Subfield Contains |
Enter the information that the subfield contains to be changed. |
Rename Tag |
Enter the replacing numeric MARC tag. |
Ind 1 |
Enter the replacing Indicator 1 value. |
Ind 2 |
Enter the replacing Indicator 2 value. |
| Subfield |
Enter the replacing Subfield. |
| Subfield Contains |
Enter the replacing subfield content. |
|
Action |
Click |
The most common set up for a batch export is the "incremental" type (set by Export Scope), without a filter and with data mapping of Holdings data as required by the library's discovery layer.
Here is an example:
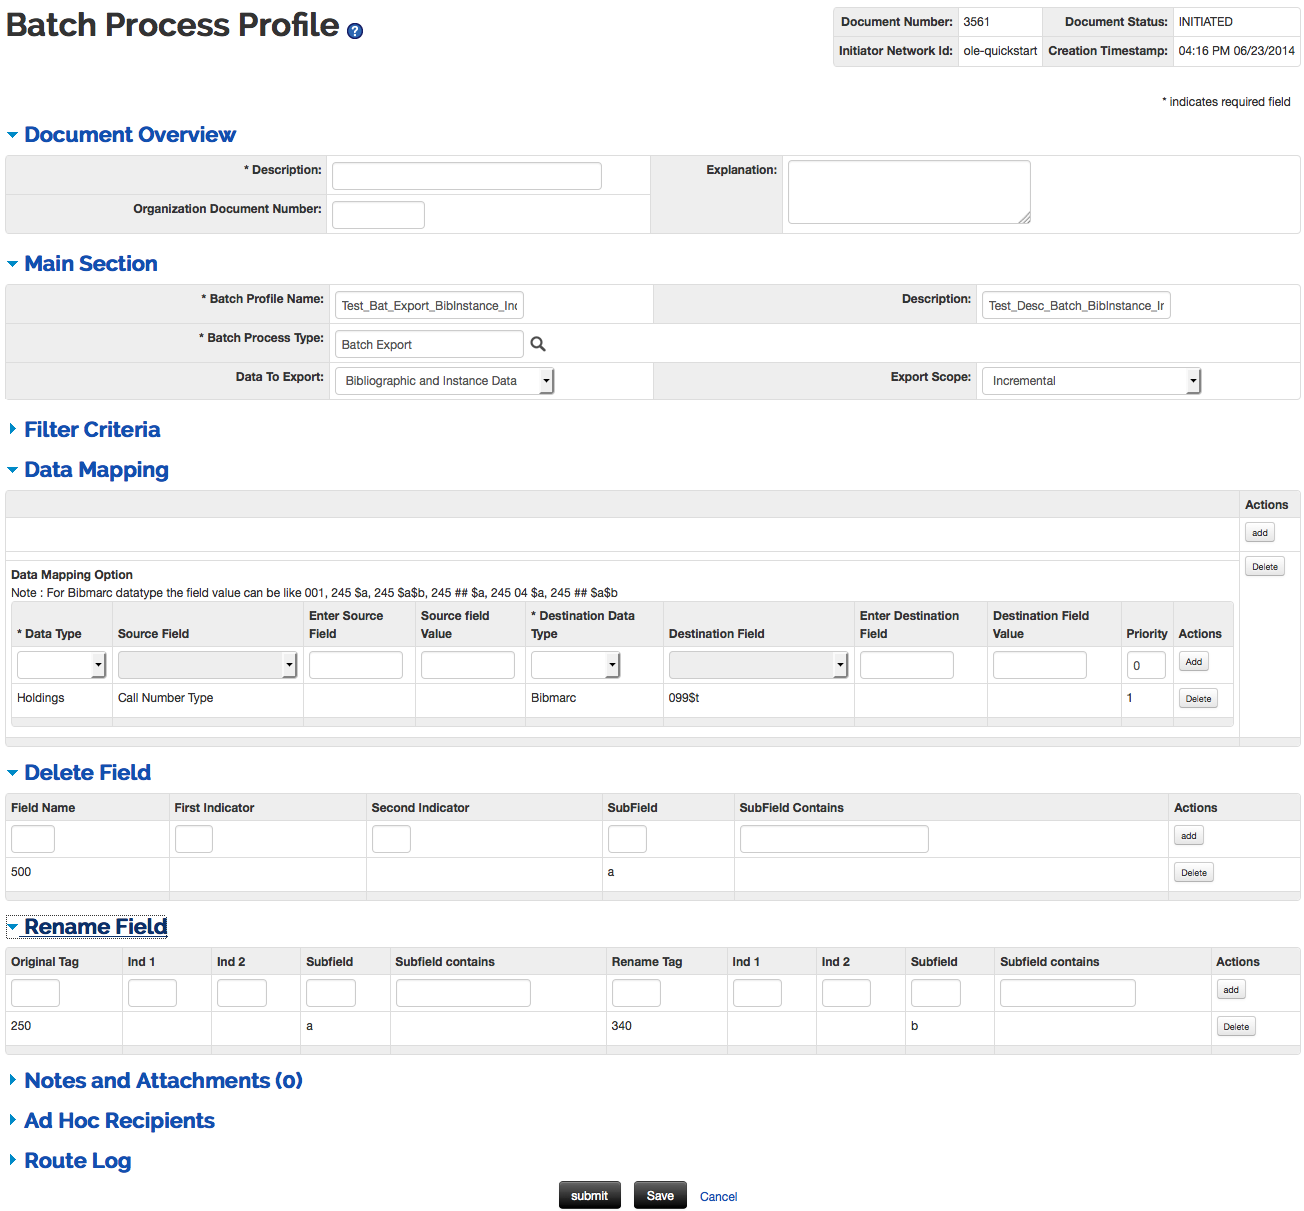 |
After creating and saving your Batch Process Profile, go to the Batch Process interface to set up your incremental export to run on a schedule.
Set up the Profile:
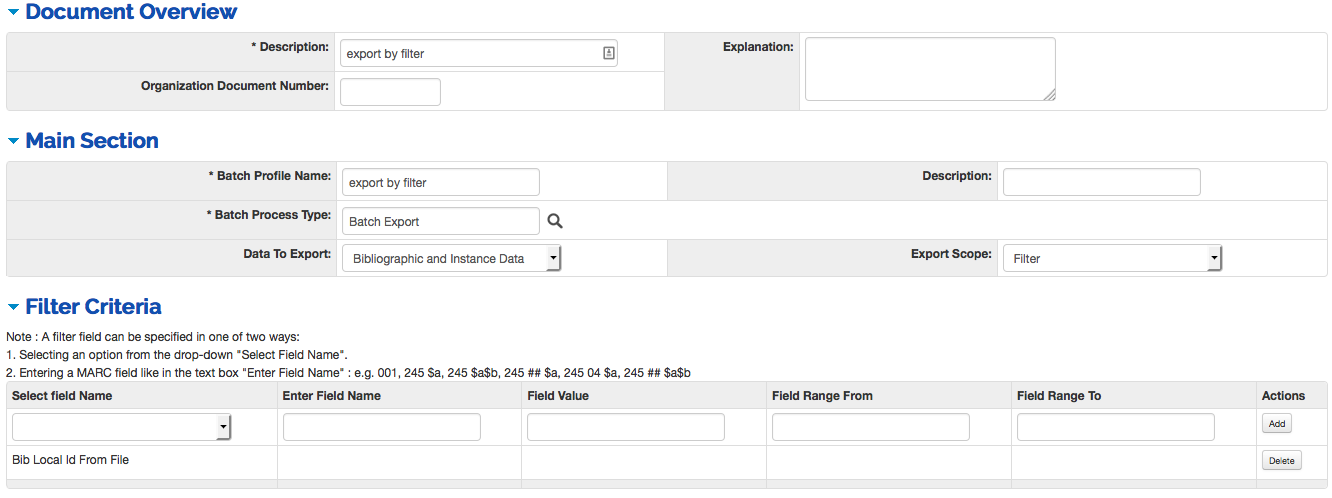 |
In the Document Overview: Enter a Description
In the Main Section: Enter a Batch Profile Name, search for the Batch Process Type “Batch Export”, select a type of Data to Export, and select the Export Scope “Filter”.
In the Filter Criteria: Select “Bib Local ID from File” under Select Field Name. Click Add.
Click Submit
From the Batch Process:
Select the Batch Process Profile Name from the Lookup
 .
.In the Input Section: Click Browse… to search your computer for the .txt file
Important
This .txt file’s local identifiers must be separated by a line break
Click Submit
When the Batch Process Job Details screen appears, refresh your screen to see the completed job. Click View Job Report to download the exported file.
For a demonstration of several Bib Imports in OLE 1.5.2.1, watch "Bib Import 101" available under OLE Demonstration Library - OLE 1.5 Demos. The demonstration presents the setup of several different bib import profiles and the batch processing of .mrc files to import records using the created profiles into OLE. Additionally, to see the step by step functionality of the Bib Import profile, see the Google Document: Spec - Batch Import
Note
You will need to log into KIS to view this document.
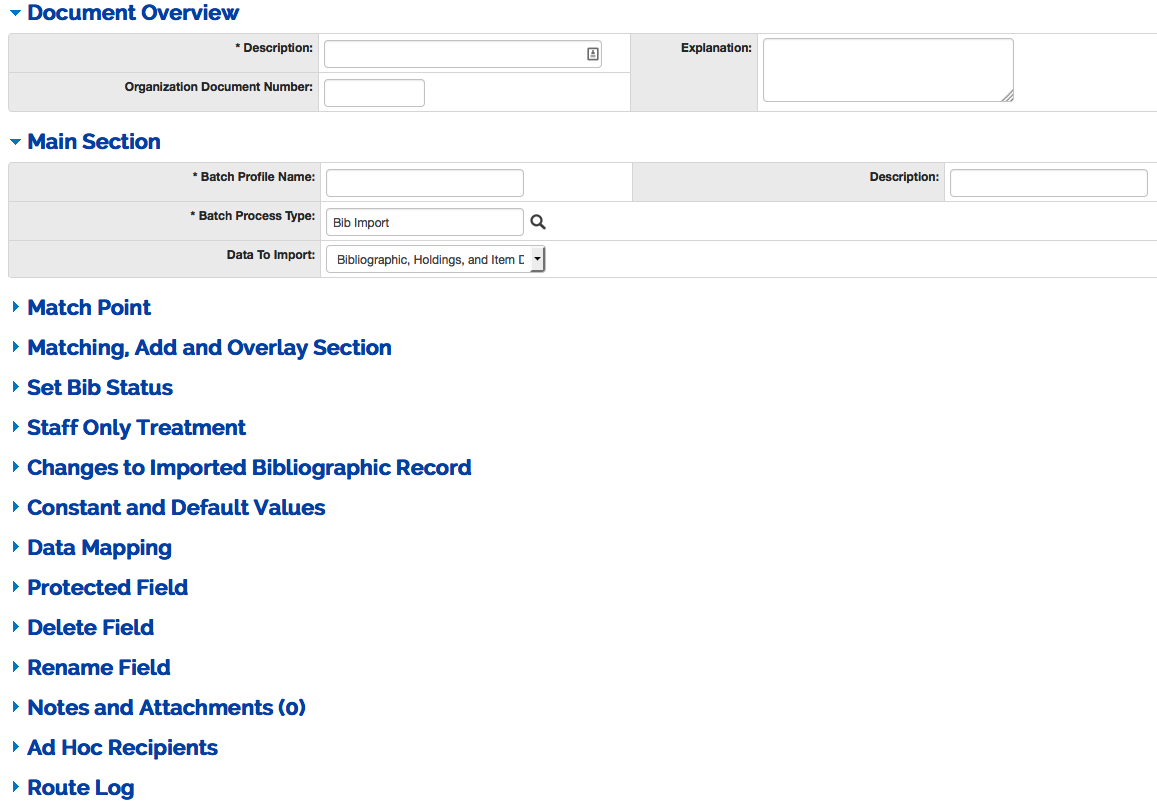
If the Bib Import type is selected from the Main Section, additional tabs will load: Match Point, Matching, Add and Overlay Section, Set Bib Status, Staff Only Treatment, Changes to Imported Bibliographic Record, Constant and Default Values (described above), Data Mapping, Protected Field, Delete Field, and Rename Field.
Note
All imported MARC bibliographic records must be Unicode-compliant (UTF-8).
In the Main Section, be sure to select the Data to Import that is relevant for your import files. If you select "Bibliographic, Instance and EInstance" but only import E-Instance records, you will end up with extraneous holdings and items. Additionally, the Constant and Default Values should match the data to import. If you create a profile and select "Bibliographic and EInstance Data", do not enter any constant or default values for Holdings and Items - only for E-Holdings.
 |
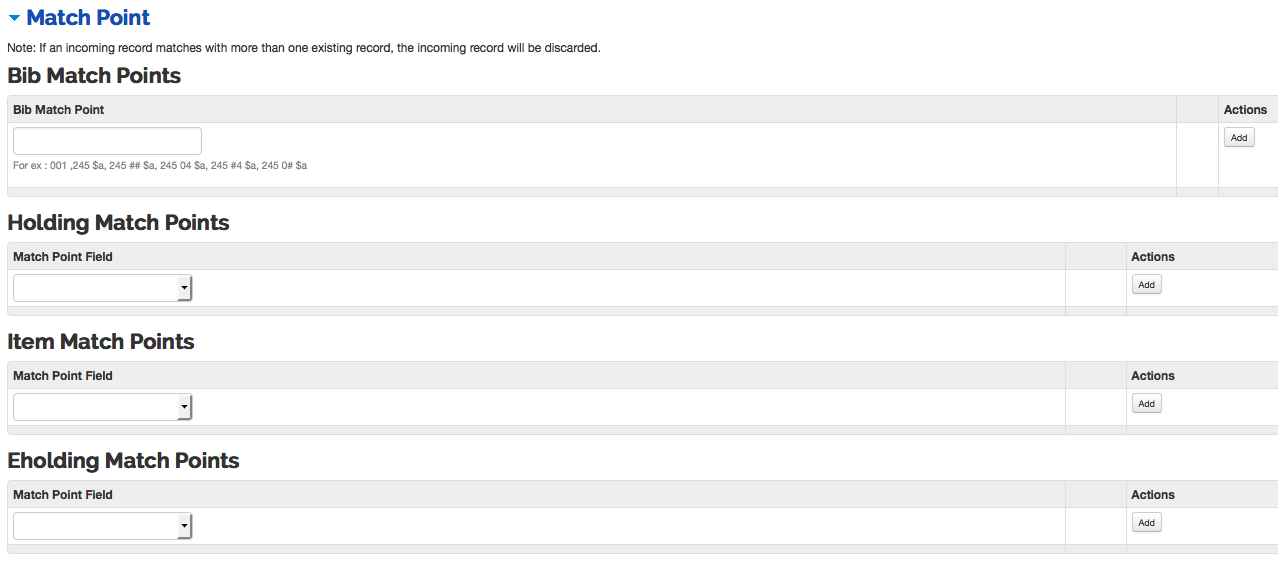
On the Match Point tab, you may enter
match point(s) for the bibliographic, holding, item, or e-holding records.
If you add more than one match point, OLE will prioritize them by the order
they have been entered (First entered, first matched). Click after adding each match point.
 |
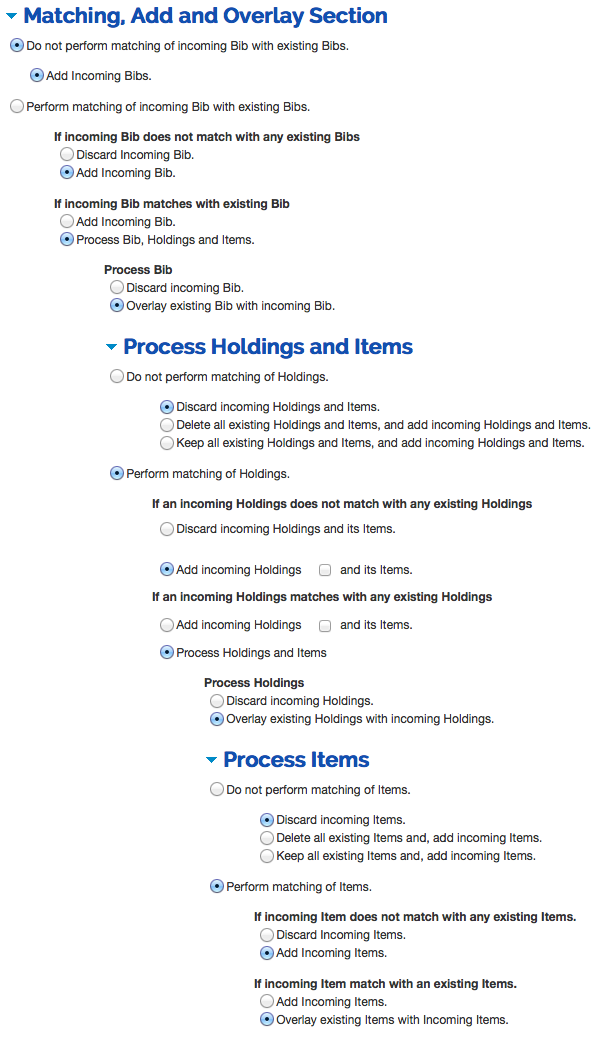
Depending on the Data to Import selection you have chosen on the Main Section Tab, the Matching, Add and Overlay Section allows user to determine what the course of action will be when importing records. Click the radio buttons to make your selection.
Tip
Follow the tree structure to make your selections - decide: Do not perform matching on incoming Bib with existing Bibs or Perform matching of incoming Bib with existing Bibs. If you choose to perform matching, look at the next set up of If statements and make your selections. Continue on only as deeply into the tree structure as you need to go.
Only open one section at a time, as needed (focus on bibs first, then look at Process Holdings and Items).
One radio buttons will always be selected in each section, even when that section is not applicable.
Note
If you select Perform matching of incoming Bib with existing Bibs, you must have a match point selected. If you select Add Incoming Bib under If incoming Bib does not match with any existing Bibs, you will receive a failure report when you run the batch process. In a future release, OLE will alert users of this error before the profile is finalized. See OLE-6789.
Depending on the Data to Import selection you have chosen on the Main Section Tab, the Set Bib Status tab allows user to set the statuses of the new or overlaid bibliographic records. Select the statuses from the drop down menu. For overlaid records, you may choose not to change the status.
 |
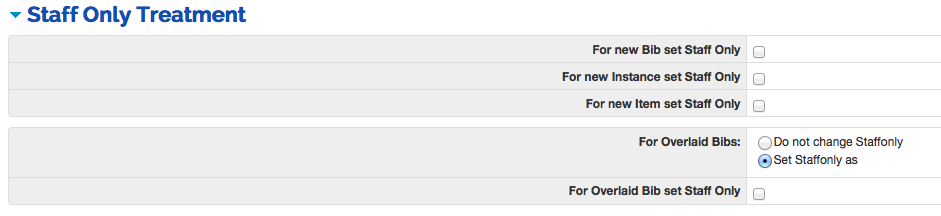
The Staff Only Treatment tab allows user to turn on the staff only flag in the cataloging record. For new records, check the box to apply the staff only flag to new bibliographic, instance, or item records. To set staff only for overlaid bibs, check the box at For Overlaid Bib set Staff Only.
 |
The Changes to Imported Bibliographic Record tab allows users to modify or delete the 001 field if one exists in the incoming record. If you choose to replace the 001 with a new 035, you will be asked about prepending the contents of the 001 with the 003 field in parenthesis or with a stated value (the prepended contents of the 003 field then the 001 field will appear on a new 035 field in the imported record). To remove prefixes from the incoming 001 data, check the box by Remove from 001 and enter the prefix to remove, for example, ocn or ocn, ocm.

The Constant and Default Values tab is used to set default or constant values in OLE bibliographic, holding, e-holding, and item fields.
Enter the constant or default values and click .
 |
Constant and Default Values definition
|
Title |
Description |
|
Data Type |
Select the type of date (bib, holding or item) from the drop down list. |
|
Select Field Name |
If you selected holding or item from the Data Type, select the field name from the drop down list. |
|
Enter Field Name |
Enter the field name to be defined as the constant or default value. |
|
Field Value |
Enter the field value to be defined as the constant or default value. |
|
Default/Constant |
Select the radio button for default or constant.
|
|
Action |
Click |
Click to add data mapping options.
The Data mapping tab is divided into two
sections. The first identifies the source field for the import and the
second identities the destination field for OLE. Enter the source and
destination information and click the button next to Priority.
|
Data Mapping definition
|
Title |
Description |
|
Data Type |
Select the type of data (bibmarc, holding or item) from the drop down list. |
|
Source Field |
If you have chosen holding or item as the data type, select the OLE source field from the drop down menu. |
|
Enter Source Field |
If you have chosen bibmarc as the data type, enter a source field. For example "100 $a" |
|
Source Field Value |
If you have chosen bibmarc as the data type, enter a source field value. |
|
Destination Data Type |
Select the type of destination data type (bibmarc, holding or item) from the drop down list. |
|
Destination Field |
If you have chosen holding or item as the data type, select the destination field from the drop down menu. NoteThe Destination Field options do not appear until you have made a selection in the Destination Data Type Field. TipIf you choose a location level from the dropdown for Holdings or Items, be sure that your institution has a location assigned to that level. |
|
Enter Destination Field |
If you have chosen bibmarc as the destination data type, enter a destination field. For example "100 $a" |
|
Destination Field Value |
If you have chosen bibmarc as the data type, enter a destination field value to overlay or add the value to the newly created record. Leave blank for the incoming record to populate the field. NoteThe values in this field are not applicable to holdings and item records. The batch process will ignore any data you enter in this field for these record types. |
| Priority |
If the same incoming record could have the same information in multiple fields (for example call numbers), you may prioritize which should fill the OLE record first or second, and so on. NoteYou cannot map incoming data from multiple fields to a single field in OLE, unless you set priorities. In that case only the first met priority field will be mapped. |
|
Action |
Click |
Note
If your Bib Import Profile is set to create holdings and items, then you will need to specify a data source for the two required fields in the item record: Item Status and Item Type. These can be specified either in the Constant and Default Data section or the Data Mapping section.
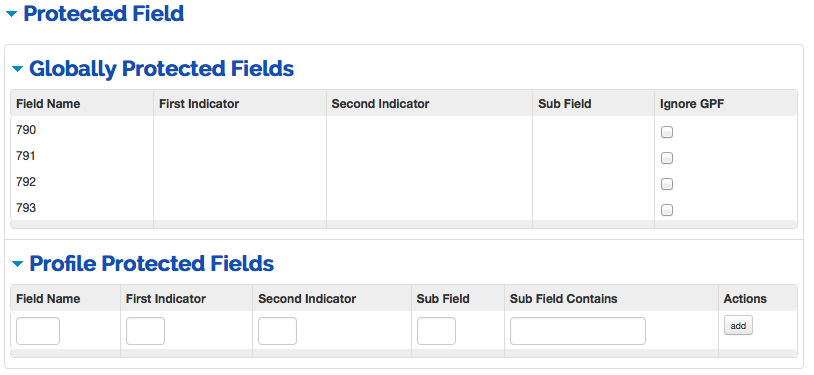
The Protected Fields tab is divided into two tabs.
The Globally Protected Fields allows user to view the globally protected fields defined for your OLE system. Click the checkbox to ignore the global protection of any of the fields listed.
Note
For information on how to add and maintain globally protected fields, see the section of the Guide to the OLE Describe and Manage Module.
The Profile Protected Fields allows users to add fields to protect only when using this profile. Input field information and click
.Note
Some fields may have multiple occurrences to be protected in both the incoming and the existing record (the 590, for example). In OLE 1.5, the protected fields listed in the Profile Protected Fields will be protected for the existing record but will ignore those in the incoming record. This is to be addressed in a later release, see OLE-6848.
 |
The Delete Field tab allows you to
identify entire fields to be deleted from the imported record(s) during the
import process. Enter the field information and click . Add as many fields as is needed.
|
Delete Field definition
|
Title |
Description |
|
Field Name |
Enter the bibliographic numeric tag of the field to be deleted. For example "710" or "245" |
|
First Indicator | Optional. Use to delete a field with a particular first indicator value. Example: To delete field 510 with first indicator 4, enter "510" as Field Name and "4" as First Indicator. |
|
Second Indicator |
Optional. Use to delete a field with a particular second indicator value. Example: To delete field 856 with second indicator 1, enter "856" as Field Name, and "1" as Second Indicator. |
|
SubField |
Optional. Use to delete a particular subfield within a field. Example: To delete subfield 2 from field 655, enter "655" in Field Name and "2" in Subfield. |
|
SubField Contains |
Optional. Use to delete a field when it contains a subfield with a particular value. Example: To delete field 710 when subfield a contains LINK, enter "710" in Field Name, "a" in Subfield, and "LINK" in Subfield Contains. |
|
Action |
Click |
The Rename Field tab is used to change
field tags and data during the import. It is divided into two sections. The
first identifies the original tag from the imported record and the second
identities the newly named MARC elements in the OLE record. Enter
information for both the original and renamed data and click .
|
Rename Field definition
|
Title |
Description |
|
Original Tag |
Enter the numeric tag from the imported record that you wish to rename during import. |
|
Ind 1 |
Enter the value of Indicator 1 from the imported record that will be changed. |
|
Ind 2 |
Enter the value of Indicator 2 from the imported record that will be changed. |
|
Subfield |
Enter the subfield from the imported record that will be changed. |
|
Subfield Contains |
Enter the information that the subfield contains that will be changed. |
Rename Tag |
Enter the replacing numeric tag. |
Ind 1 | Enter the replacing Indicator 1 value. |
Ind 2 | Enter the replacing Indicator 2 value. |
Subfield | Enter the replacing Subfield name. |
Subfield Contains |
Enter the information that will replace the content in the imported record. |
|
Action |
Click |
Rename tag 546 to 500:
 |
Change 245 first indicator value from 0 to 1:
 |
Change 730 second indicator value from 2 to 0:
 |
Change 651 subfield x to 651 subfield v:
 |
Change 650 subfield z with text "Siam" to "Thailand":
 |
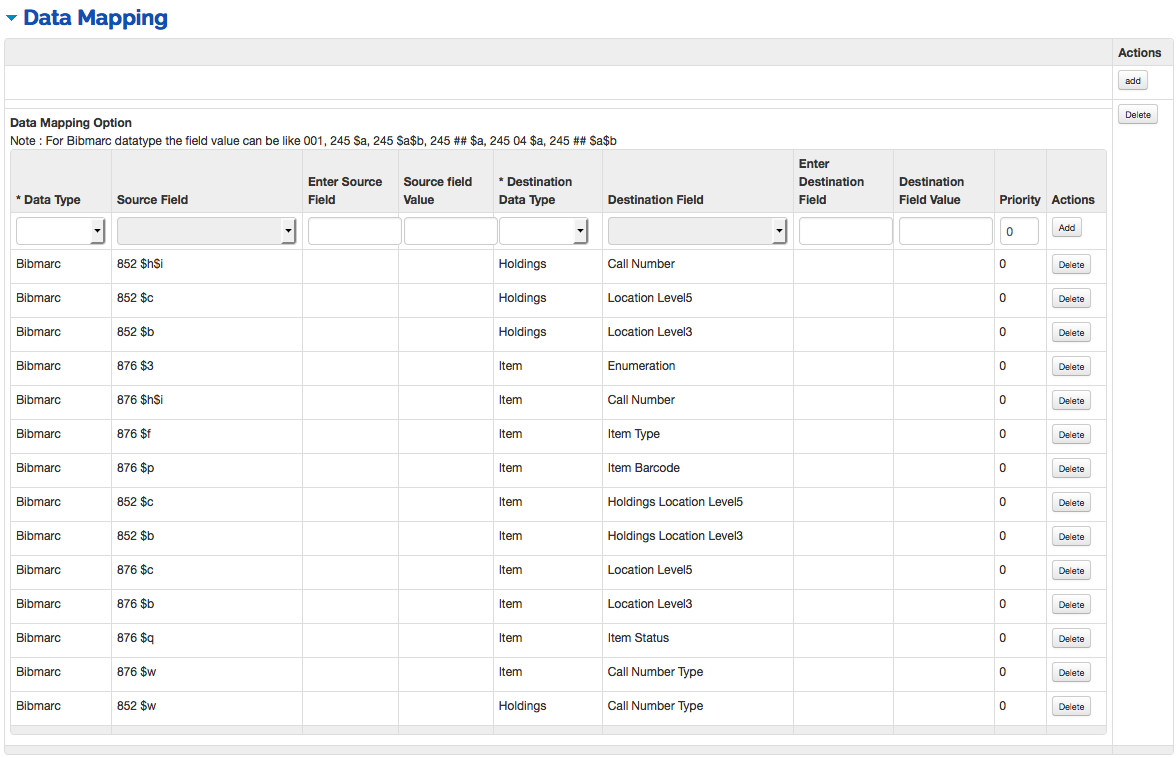
To import multiple holdings and items with the Bib Import Profile, you will need to enter information for at least two different destination fields: A "Location Level5" for both the holdings, and a "Holdings Location Level5" for the item. (Depending on your institution, you may need to include additional location levels.) If you do not include these location level destination fields, the bib import profile will only create one holding and one item per bibliographic record. For Example:
 |
Warning
Leave the Destination Field Value blank. The created records will not include the values if you enter them in this field.
