 >
> >
> >
> >
>
All orders begin in OLE as Requisitions. Requisitions or imported vendor files are processed into Approved Purchase Orders, or can be saved in support of ongoing Selection activities.
Anyone can create a requisition for routing. Users who can create a requisition, that, when all required fields are entered and business rules are satisfied, becomes an automatic/approved Purchase Order transmitted to Vendor must have the role OLE-SELECT Acquisitions-AQ2, Acquisitions-AQ3, Acquisitions-AQ4, Acquisitions-AQ5, OLE_Selectors, OLE_Selectors-serials, OLE_ACQ-Mgr, PLE_ACQ-Mgr-Serials, OLE-Acquisitions, OLE-Acquisitions-serials.
Note
Currently any authorized user of a Requisition e-Doc can process it into an Automated Purchase Order if all business rules and required fields are satisfied for firm, fixed orders. In future, the inherited routing rules and business rules will continue to be modified to prohibit Selection-staff from submitting an order (i.e., via Account codes).
The Requisition (REQS) document collects information about the desired items or services, possible vendors to fulfill the order, delivery instructions, contact information, and related accounting details. The approved Requisition document is used to generate the purchase order. Authorized users can process requisitions to Automated Purchase Orders for firm fixed orders
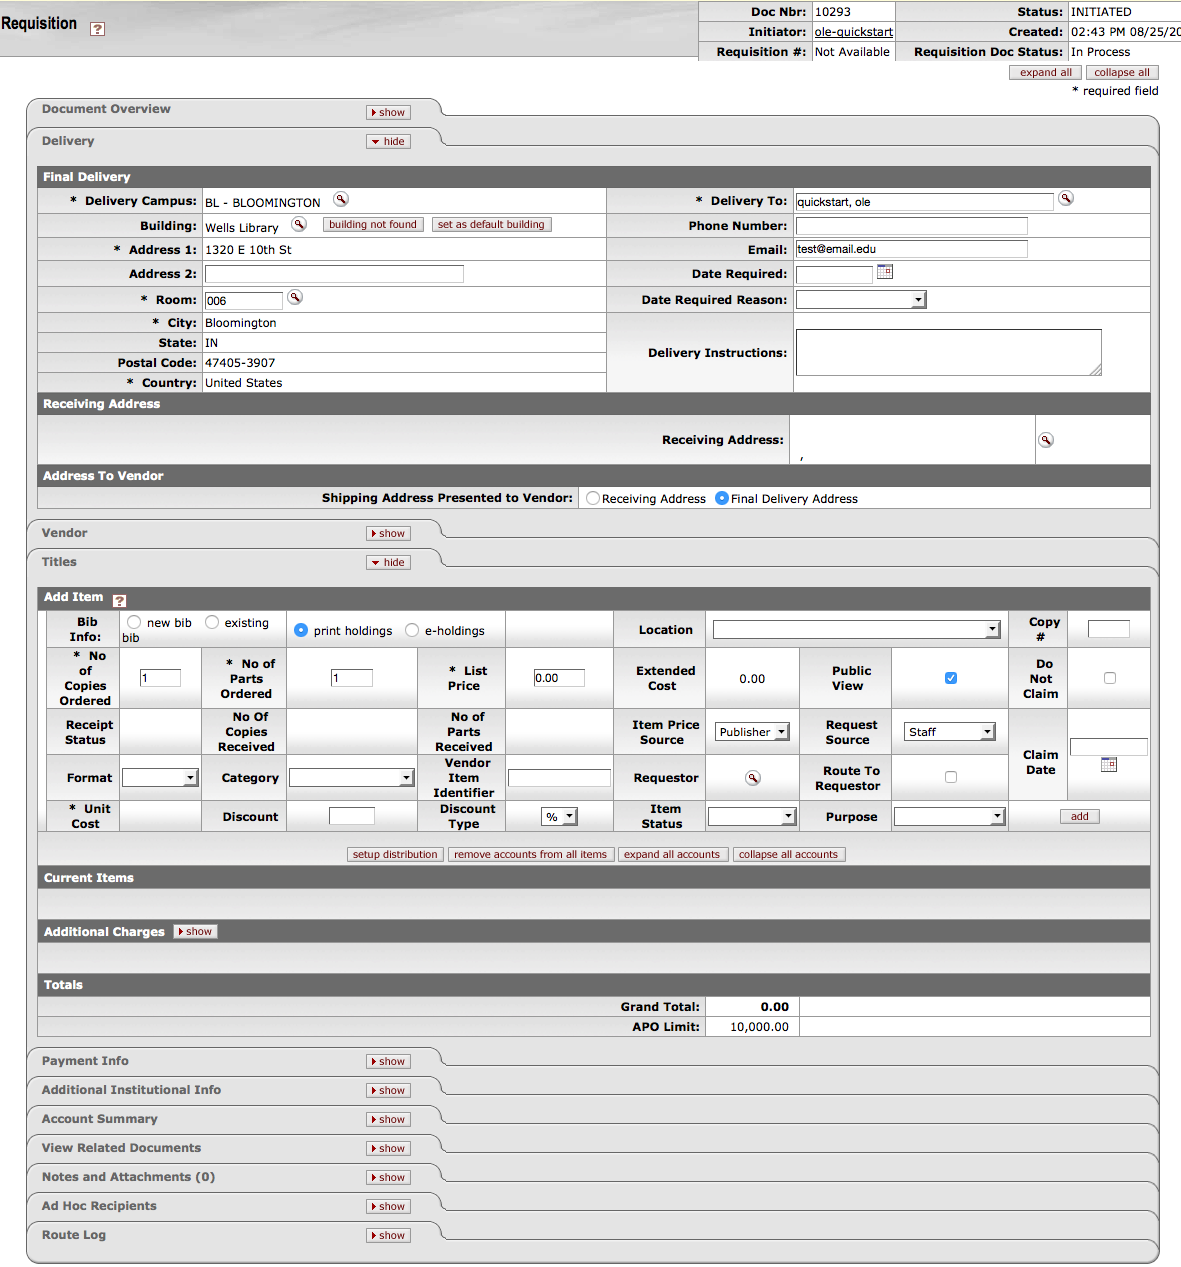 |
The Requisition document includes several unique tabs—Delivery, Vendor, Titles, Payment Info, Additional Institution Info, Account Summary, and View Related Documents.
Unlike a standard financial e-doc, there is no Accounting Lines tab, and the document header and the Document Overview tab are slightly different.
Requisition document tabs and purposes
|
Tab Name |
Purpose |
|
Document Overview |
In addition to the standard document overview information (description, explanation, and organization document number), contains the fiscal year, line item receiving requirements, order types, , funding source, and the payment request positive approval required override flag, license requirement or review flag and status. |
|
Delivery |
Contains information about the final delivery and central receiving addresses. |
|
Vendor |
Suggests a vendor or a list of vendors who might provide the goods or services being requisitioned. |
|
Titles |
Identifies what is being ordered on this requisition and establishes an accounting distribution indicating how those items should be charged. |
|
Payment Info |
Indicates the type of payment schedule required and the duration of that schedule if recurring payments are required for the items on this requisition. |
|
Additional Institutional Info |
Collects information about the organization at your institution that has requested the goods or services for this requisition as well as the internal contact information. |
|
Account Summary |
Summarizes the accounting information for all line items on the requisition. The line items that make up the summary display here. |
|
View Related Documents |
Lists all documents related to a requisition, such as the purchase order, receiving documents, payments, credit memos. |
As in other OLE documents, the header section contains basic identification and status information about the document as well as who created it. The Requisition document has two additional fields in the document header that do not appear in other OLE documents: REQ Nbr and REQ Status.
Like the other fields in the document header, these fields are completed and updated automatically by Kuali OLE.

Document header definition
|
Title |
Description |
|
Requisition # |
An identifying number assigned to this requisition. This number, which may be used for queries specific to the Purchasing/AP module of OLE, differs from the Doc Nbr, which identifies the requisition as a unique document for general OLE and Workflow queries. |
|
Requisition Status |
A status that indicates where in the Purchasing/AP process a requisition is at any given time. This is similar to the status a document receives in Workflow but is specific to the purchasing process. Examples of REQ Status might include 'Awaiting Fiscal Officer,' 'In Process,' and 'Closed'. |
Note
For additional information, see Document Header on the Guide to OLE Basic Functionality and Key Concepts.
Unlike the Document Overview tab in other financial documents, a special Fiscal Year field is included in this tab on the Requisition document because, in some circumstances, users may be able to select from more than one fiscal year to which a Requisition should be applied. The tab also includes the Requisition Detail section, which identifies funding source for this requisition.
 |
Document Overview tab definition
|
Title |
Description |
| Financial Document Detail | |
|
Year |
Required. The default is the current fiscal year. This field is not editable until the 'ALLOW ENCUMBER NEXT YEAR DAYS' parameter has been met. Setting the year to the next fiscal year can affect the requisition in several ways. The requisition may not become an APO if the 'ALLOW APO NEXT FY DAYS' parameter has not been met, and the funds will not be encumbered until the next fiscal year once a PO is fully approved. |
|
Total Amount |
Display-only. Displays the total amount of the requisition after fees. |
| Requisition Detail | |
|
Chart/Org |
Required. Automatically completed based
on the initiator's chart/org. This value may be changed
manually via the lookup |
|
Receiving Required |
Optional. Select the check box to ignore the receiving thresholds on the approved purchase order. If the field is checked, then a Line Item Receiving document must be processed with sufficient quantities received before a payment will route to the fiscal officer. |
|
Order Type |
Identifies the type of order, possible values could be one-time, standing, subscription. System default data value is "Firm, Fixed". |
|
Funding Source |
Required. Defaults to 'Institution Account'. |
|
Payment Request Positive Approval Required |
Optional. The 'DEFAULT POS APPRVL LMT' parameter determines the dollar limit where payment requests must receive positive approval from a fiscal officer. If this field is selected, positive approval on the payment request is required regardless of the total of the payment. |
The Delivery tab contains information about where goods ordered on this requisition should be delivered. It also collects delivery contact information and any special delivery instructions. The system provides two ways for you to specify the delivery address: select the building from the building lookup or enter a different address by entering the address after selecting the Other Building option.
Note
When implementing OLE, libraries can update the Building maintenance e-Doc with their own building designations.
 |
Delivery tab definition
|
Title |
Description |
|
Delivery Campus |
Required. Defaults to the appropriate
campus for the user's chart/org. You may also search for
another campus from the Delivery
Campus lookup |
|
Building |
Required. Search for the building to
which goods should be delivered from the building lookup |
|
Address 1 |
Required; automatically populated from data for the Building value. May be entered manually if the user selects the Building Not Found button. |
|
Address 2 |
Optional. Entered manually if an additional line of address is needed. |
|
Room |
Required. Enter the room number to which delivery should be made. |
|
City |
Required; automatically populated from data for the Building value. May be entered manually if the user selects the Building Not Found button. |
|
State |
Required; automatically populated from data for the Building value. May be entered manually if the user selects the Building Not Found button. |
|
Postal Code |
Required; automatically populated from data for the Building value. May be entered manually if the user selects the Building Not Found button. |
|
Country |
Required; Automatically populated from data for the Building value. May be entered manually if the user selects the Building Not Found button. |
|
Delivery To |
Required. Defaults to the initiator's
user name. You may enter another name or use the User lookup |
|
Phone Number |
Optional. Automatically populated from the initiator's phone number but may be changed. |
|
|
Optional. Defaults to the initiator's user e-mail address but may be changed. |
|
Date Required |
Optional. Enter a date on which
delivery is required or choose the date from the calendar |
|
Date Required Reason |
Optional. If a date required has been specified, select the appropriate date required reason from the list. |
|
Delivery Instructions |
Optional. Enter text describing any special delivery instructions for the item(s). |
|
Receiving Address |
If this field does not display, it is
because the 'ENABLE RECEIVING ADDRESS INDICATOR' parameter
is set to 'N'. If it does display, the default is determined
by the receiving address that has been set up for the
initiator's organization. May be changed by using the lookup |
|
Shipping Address Presented to Vendor |
Defaults to the receiving address. May be changed to the final delivery address. NOTE: If this field is read-only, it is because the 'ENABLE ADDRESS TO VENDOR SELECTION INDICATOR' parameter is set to 'No'. |
The Vendor tab includes three sections: Vendor Address, Vendor Info, and Additional Suggested Vendor Names.
In order to generate a PO through the creation of a requisition it is important to search for and select vendors of the type "Purchase Order"
OLE has built in functionality to support both foreign and domestic vendors. Using a foreign vendor will require you to take the extra step of entering the Foreign List Price (illustrated in the instructions below).
Tip
To prepopulate vendor information, enter the Vendor
Alias Name and click 
 |
Vendor Address section definition
|
Title |
Description |
|
Vendor Alias Name |
If you know the vendor's alias,
enter the code in the box and click |
|
Suggested Vendor |
Optional. Enter the name of a
vendor that is able to fulfill this requisition or
search for it from the
Vendor lookup |
|
Vendor # |
Display-only. Completed automatically when a suggested vendor is selected from the vendor table. |
|
Address 1 |
Optional. Enter the first line of
the address for the suggested vendor. If a vendor has
been selected from the vendor table this field is
automatically populated. If you want to select a
different vendor address than the default, choose one of
the addresses entered for this vendor from the Address lookup |
|
Address 2 |
Optional. Enter the second line of the address for the suggested vendor. If a vendor has been selected from the vendor table this field is automatically populated. |
|
Attention |
Optional. Enter the name of the person to whom the delivery is to be directed. |
|
City |
Optional. Enter the suggested vendor's city. If a vendor has been selected from the vendor table this field is automatically populated. |
|
State |
Optional. Enter the suggested vendor's state. If a vendor has been selected from the vendor table, this field is automatically populated. |
|
Province |
Optional. Enter the province if vendor is located outside of the United States. |
|
Postal Code |
Optional. Enter the selected vendor's postal code. If a vendor has been selected from the vendor table, this field is automatically populated. |
|
Country |
Optional. Enter the selected vendor's country. If a vendor has been selected from the vendor table, this field is automatically populated. |
Vendor Info section definition
|
Title |
Description |
|
Acquisition unit's vendor account/Vendor info customer # |
Optional. Enter a customer number that identifies your institution or department for this vendor's reference Used for reporting and to separate out different library branches or locations' vendor acct information that all links to the same master vendor |
|
Notes to Vendor |
Optional. Include any text notes you want the vendor to see on the PO. |
|
Contract Name |
Optional. If a contract exists with
the vendor for these goods or services, select one from
the Contract lookup NoteThe contracts are campus-specific. A requisition returns results only for the campus associated with the Chart/Org found on the Additional Institutional Info tab (see below). Selecting a contract affects the APO limit, depending on how the contract has been set up for the organization. The APO limit is usually increased when a contract is selected. |
|
Phone Number |
Optional. If a vendor has been
selected from the Vendor table, this field may
automatically be populated or the Phone Number lookup NoteThe lookup is simply a convenience that allows you to view the phone number. It does not provide a return value link. |
|
Fax Number |
Optional. Enter the selected vendor's fax number. If a vendor has been selected from the vendor table, this field may automatically be populated. |
|
Payment Terms |
Display-only. If a vendor has been selected from the Vendor table or a contract, this field may be populated automatically. |
|
Shipping Title |
Display-only. If a vendor has been selected from the Vendor table or a contract, this field may be populated automatically. |
|
Shipping Payment Terms |
Display-only. If a vendor has been selected from the Vendor table or a contract, this field may be populated automatically. |
|
Contacts |
Optional. If a vendor has been
selected from the Vendor table or a contract, the
Contact lookup NoteThe lookup is simply a convenience that allows you to view the contacts list. It does not provide a return value link. |
|
Supplier Diversity |
Display-only. If a vendor has been selected from the Vendor table or a contract, this field may be populated automatically. |
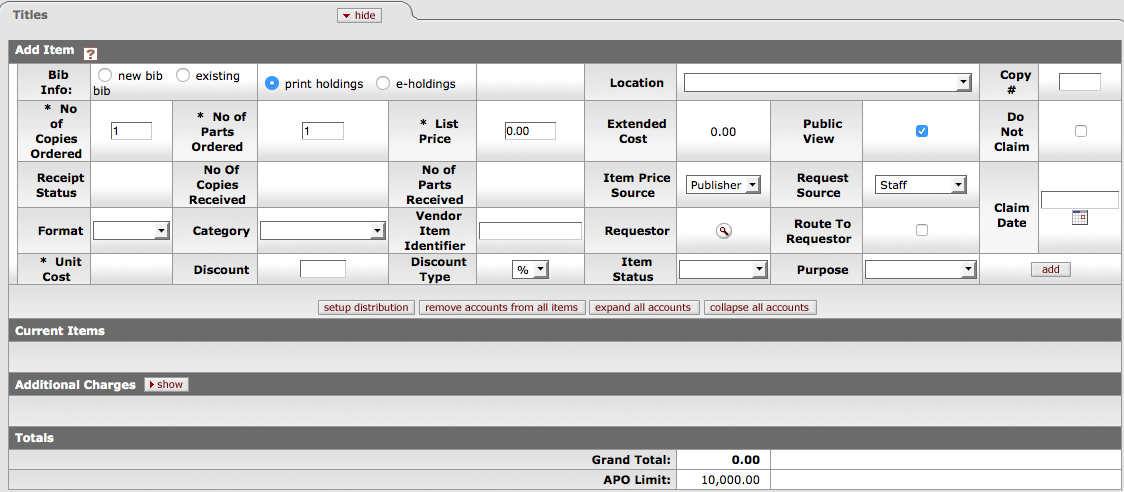
Expand the Titles tab of the requisition to fill in information about the library resource(s) being ordered. On this tab, multiple ordered resources can be added to the requisition by filling in all of the required fields and clicking the add button.
The Titles tab includes four sections: Add Item, Current Items, Additional Charges, and Totals.
 |
Add Item, Current Items section definition
|
Title |
Description |
|
Bib Info |
Choose the radio button to select to create new or link to an existing bib record. Depending on your choice, a button will appear. Click Click |
|
Print Holdings or E-Holdings |
Select the Holdings format you would like the Requisition to link to. Later the created Purchase Order will link to an Item record (for print materials) or E-Instance (for electronic material). |
|
Location |
Select the location of the item being specified on this line from the drop down list. |
|
Copy # |
Optional. You may add a copy number to indicate the copy of the item. This will appear on the purchase order and the item record. If left blank, the field on the purchase order and item record will also be blank. |
|
No of Copies Ordered |
Required. Enter the quantity of the item in this field. NoteIf ordering more than on copy, you will need to fill out the copies tab. |
|
No. of Parts Ordered |
This is the number of individual pieces that must be accounted for upon payment/receipt of a requisitioned item. |
|
List Price |
Basic price of an item before any discounts are taken. |
|
Extended Cost |
Display-only. No of Copies ordered multiplied by the list price and minus any discount. |
|
Public View |
Optional. Indicates whether or not a bibliographic description shall be exposed to users prior to purchase/receipt. Default is Yes. |
|
Do Not Claim |
Optional. Indicates whether or not an item should be claimed. Default is No. If checked, overrides the Claim Date box below in the event a vendor has an established claim interval frequency per the Vendor Record. |
|
Currency Type |
Display only if foreign vendor is chosen. Identifies the associated vendor's currency as identified on the vendor record that is identified in the Link to Vendor/Supplier. |
|
Exchange Rate |
Display only if foreign vendor is chosen. Currency conversion rate populates from the Exchange rate and Currency Type maintenance tables. The rate will populate when user clicks action button "Calculate" on conversion tab. Optionally: when currency tab opens, currency rate may auto-populate. This may be updated up until the Requisition is approved. After that point, it may no longer be modified. |
|
Foreign List Price |
Basic foreign price of an item before any discounts are taken. |
|
Receipt Status |
Display only. Will reflect receipt status after receiving has occurred. |
|
No Of Copies Received |
Display only. The number of copies already received. This will populate as the document moves through the acquisition workflow. |
|
No Of Parts Received |
Display only. The number of parts already received. This will populate as the document moves through the acquisition workflow. |
|
Item Price Source |
Optional. Select the Price Source of the requested item from the drop down list. |
|
Request Source |
Optional. Select the Request Source of the requested item from the drop down list. |
|
Claim Date |
Defaults to the claim interval
recorded in the Vendor Record. If no claim interval is
set per the Vendor Record, the claim date will remain
blank. To override the claiming interval, enter a date
or select one from the calendar |
|
Format |
Optional. Select the Format of the requested item from the drop down list. |
|
Category |
Optional. Select a category for the item from the drop down list. |
|
Vendor Item Identifier |
Display Only. Identifies a vendor item identifier if one has been provided by a vendor. |
|
Requestor |
Defaults to the selector's user
name. If the Requestor is different than the selector,
you may use the Requestor
lookup |
|
Route to Requestor |
Optional. Yes/No checkbox to indicate whether a requestor should be notified when the item has been purchased. System default data value is "No". |
|
Foreign Unit Cost |
Display only if foreign vendor is chosen. Calculated foreign cost per unit for the item or service on this line. Calculation is the Foreign List Price less Foreign Discount amount. |
| Unit Cost | The cost per unit. This is populated by the list price. |
|
Discount |
Discount provided by the vendor/customer number/organization combination. Automatically populated from the Vendor customer number table based on the selected vendor and customer number. Can be modified for a specific title. If the vendor record has a Vendor currency noted other than the default system currency (aka US dollar), then the Vendor discount will populate the Foreign Discount field. |
|
Discount Type |
Choose # (for Amount) or % (for Percentage). |
|
Foreign Discount |
Foreign discount provided by the vendor/customer number/organization combination when the vendor record has a Currency Type different from the system default currency. Should be automatically populated from the Vendor customer number table based on the selected vendor and customer number. This data can be changed for the specific title. Must identify the type of discount (amount or %.) If the vendor record does not have a Currency Type noted other than the default system currency (aka US dollar), then the discount should populate the Discount field. |
|
Foreign Discount Type |
Choose # (for Amount) or % (for Percentage). |
|
Add or delete lines as appropriate. After a line has been added, it is moved to the Current Items section, where the details may be viewed or modified. |
The Additional Charges tab allows lines for predetermined charges to be included on the invoice. This tab is divided into four charge lines, each representing a different type of charge and each with its own accounting lines. The four Additional Charges lines are Freight, Shipping and Handling, Minimum Order, and Miscellaneous or Overhead.
Additional Charges section definition
|
Title |
Description |
|
Item Type |
Display-only. Describes the type of miscellaneous item (freight, shipping and handling, etc.) being defined in this line. |
|
Description |
Required if the extended cost has been entered. Enter text describing the additional charges item line. |
|
Extended Cost |
Required. Enter the dollar amount for this item line. |
Totals section definition
|
Title |
Description |
|
Grand Total |
Display-only. This field displays a total of all item lines and miscellaneous item lines. |
|
APO Limit |
Display-only. This field displays the upper dollar limit for the creation of an automatic PO from this requisition. This dollar amount is based on a system default or, if a contract has been specified, on a contract-specific dollar amount. |
Note: If you are using a foreign vendor, you must also fill in the Foreign List Price pertaining to the item. OLE will then calculate for you the US Dollars Unit Cost.
The linked editor will populate the bibliographic information into this Requisition line item using the Title information in the linked/edited bib. If a minimum input is not filled in on the Editor, filling the “Bib Info” field on the requisition line item, then the requisition cannot be approved (later in the process). If you fail to fill in the required information in the linked editor, and attempt to approve this requisition, OLE will display the following error message: Description in Item X is a required field.
Users must complete the line item and linked bib in this sequential order. This will be fixed in future releases.
New bib:
First click
 to launch the Bib Editor in a new tab.
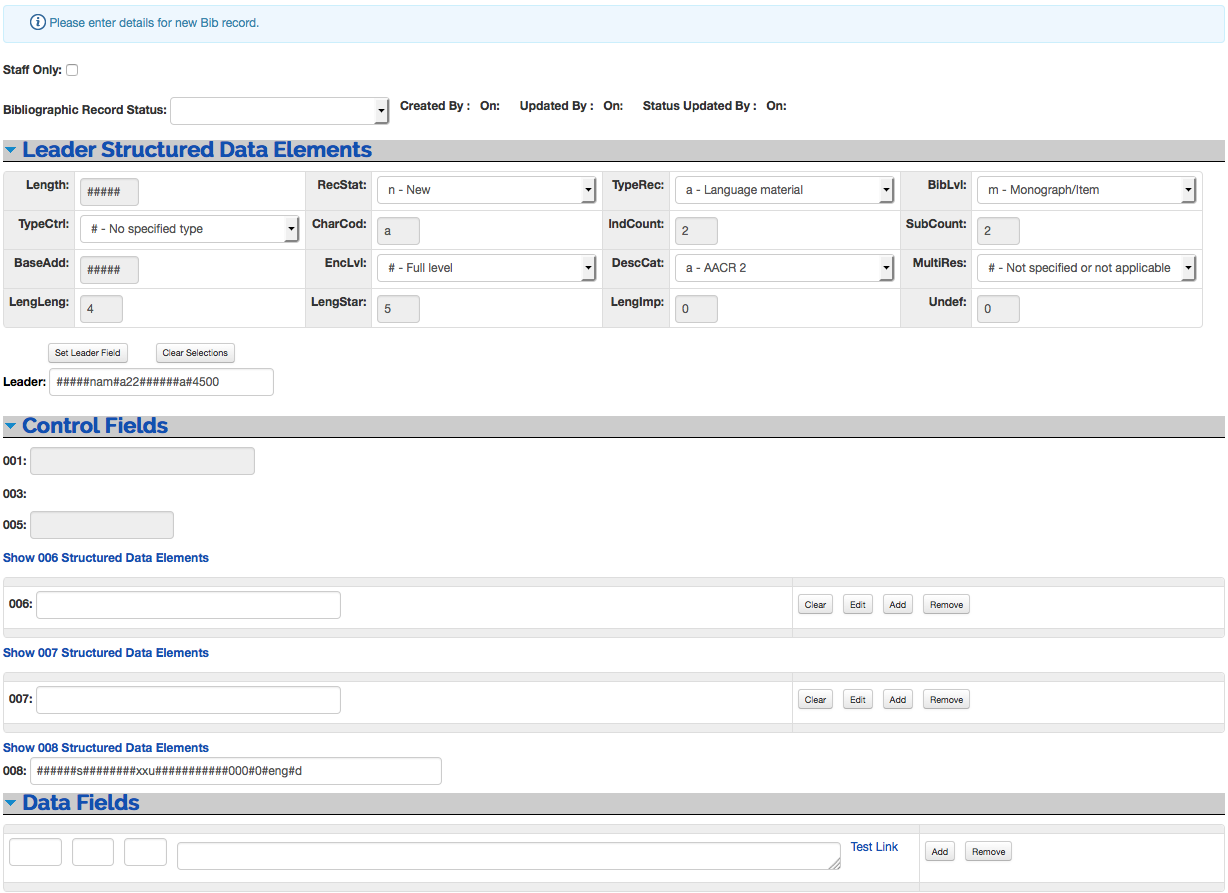
Enter at minimum a title 245 field.
Note
For more information about the bibliographic editor, see the OLE Guide to Describe and Manage.
Click
 .
.You will receive a confirmation message “Record successfully created”:
Click close to return to the original browser tab and add transactional data to the line (quantity, price, category etc.).
Note
The bibliographic information will not yet appear.
Enter the List Price, Location, and any other transactional data.
Click
 to save the line. This will update
and link the bibliographic document and populate the
Bib Info field.
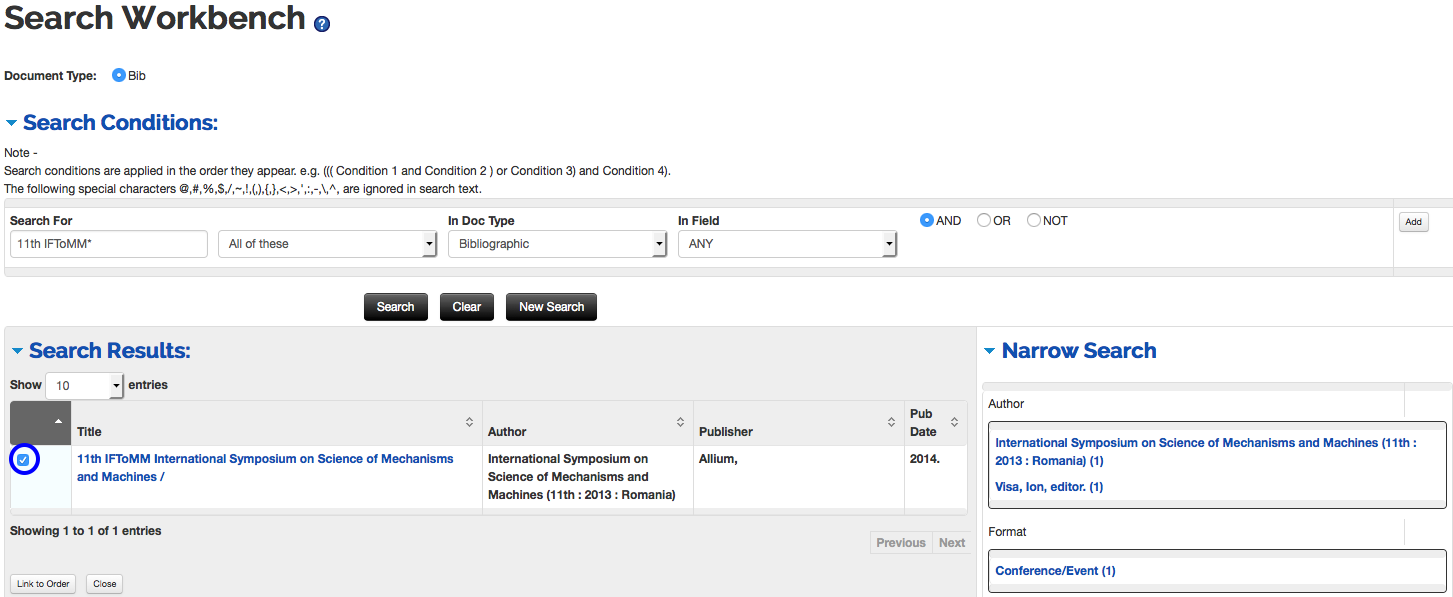
Existing Bib:
First click
 to launch the Search Workbench in a new tab.
Search for the record you wish to link to the requisition.
Note
For more information about the Search Workbench, see the Search Workbench in the Guide to OLE Basic Functionality and Key Concepts.
Select the checkbox next to the correct bib and click
 .
.Return to the original browser tab and select a location and other transactional data to the line (quantity, price, category etc.).
Note
The bibliographic information will not yet appear.
Click
 to save the line. This will update
and link the bibliographic document and populate the
Bib Info field.
Note
To learn more about the bibliographic editor, see the OLE Guide to Describe and Manage. This and other OLE user guides are available for download from the OLE Documentation Portal.
If you enter a number greater than one in No of Copies Ordered, you will be required to enter location data. This section only appears when the field entry is greater than one
In the Copies
section, click the  button.
 |
The expanded section appears:
 |
Enter the copy information and click  .
.
Copies section definition
|
Title |
Description |
|
Location Copies |
Select the home location of the title being requested from the drop down list. |
|
No. of Copies |
Enter the number of copies that will exist at the location selected. |
|
No. of Parts |
Display only. Once copies are added, this field is populated from the No of Parts Ordered. |
|
Starting Copy |
Enter the starting copy for the home location. |
|
Caption |
Optional. Enter a caption. |
|
Volume Number |
Enter the volume number for each item. You must enter the volume numbers sequentially for each value needed, separated only by commas with no spacing (For example if 2 copies were ordered for the same location, enter "1,2"). If there is only one volume, you must enter 1. |
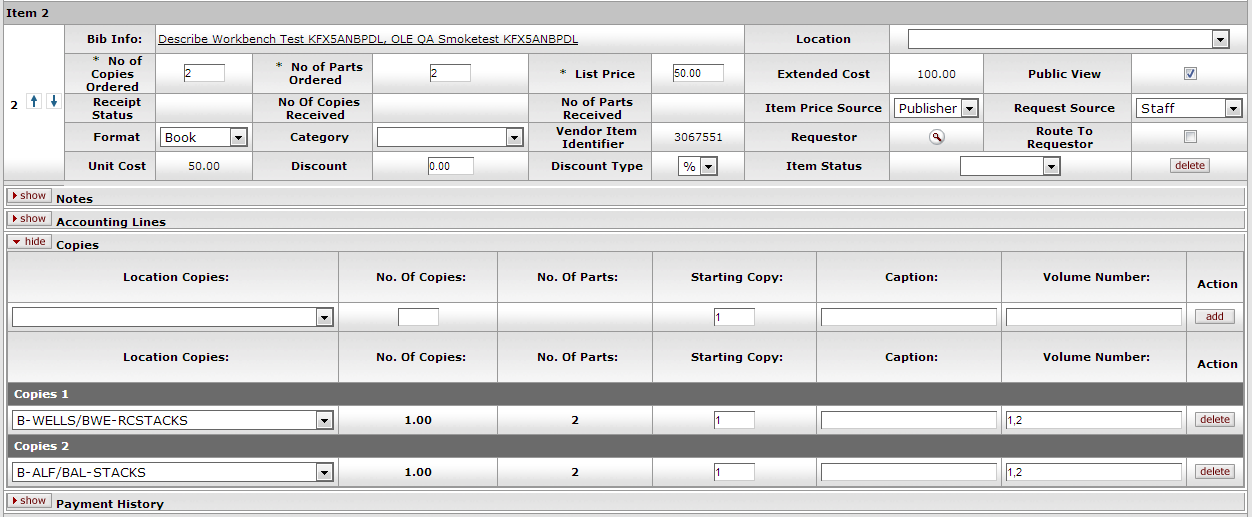
In the example below, there are two copies of Describe Workbench Test ordered containing two parts each. One copy will go to the location B-WELLS/BWE-RCSTACKS and one copy will go to B-ALF/BAL-STACKS.
Tip
Note the volume numbers are 1,2. Each number is separated by a comma but no spaces. OLE will also not allow non-numeric characters. If this format is not followed, you will receive an error.
 |
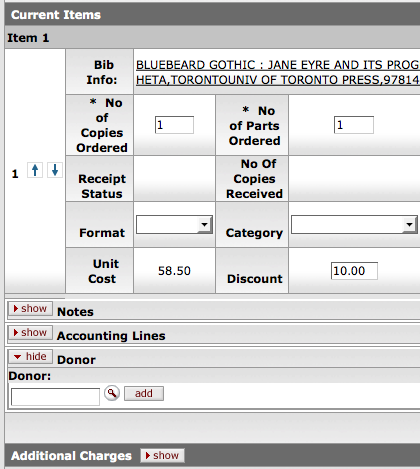
To add one or more Donor codes to the line item, click  in the Donor subsection. This displays an input box
and lookup icon:
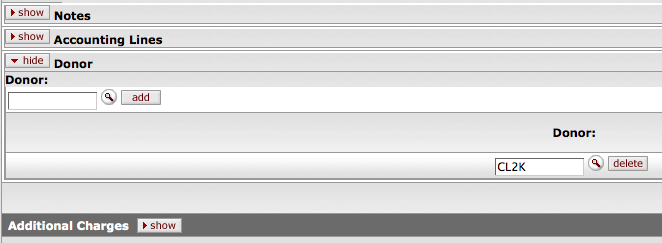
Either type in a valid Donor code, or select one from the lookup  , and then click
  . You can add multiple Donor codes by repeating the
process.
If you have a number of accounts to enter, you may create a .csv file containing the information and import it into the requisition. The template available:
Purchase Requisition (REQS) account import, which uses the Account_Import.xls template
Note
For more information about the layout of these templates, see Account_Import.xls on the Guide to OLE Basic Functionality and Key Concepts.
The procedure for accessing and using these templates is much the same as the procedure for using accounting line import templates.
Note
For information on using a template to import items or accounts, see OLE Data Import Templates on the Guide to OLE Basic Functionality and Key Concepts.
Accounting distributions for item lines may be created individually or a single accounting distribution may be copied to all line items on the requisition. A valid account string contains a chart, an account and an object code. The account must be active and the expiration date must not have been reached. The object code must be valid. Valid object codes are not only active codes in the object code table but are also not included in the 'OBJECT CONSOLIDATION' parameter. You must ‘Add’ at least one accounting line for each item. If you do not, and attempt to approve this requisition, OLE will display the following error message: Item 1 does not contain at least one account. Adding at least one Accounting Line (with 100 in Percent) to each transactional line item will resolve this error.
To create accounting distributions for individual item lines, follow these steps.
Add the title to the requisition.
In the Accounting Lines section, click the
 button.
Complete the accounting line and indicate a percent of this item line that should be charged to this accounting line.
Note
If there is only a single accounting line for this item the percent should be 100.
Note
You may add an entry to either the Dollar $ or the Percent fields. OLE will calculate the other after you click add. You cannot add entries to both fields.
Click
 to add an accounting line.
 If the items need to be distributed to more than one accounting line, repeat steps 3 and 4.
Note
All the accounting lines should total 100 percent when you have completed their accounting line distribution. If the total percent amount for all of the account lines does not equal 100%, the system will display an error message.
If the account chosen has sufficient funds checking and the threshold is reached, you may be blocked from using the account or you may receive a warning (depending on the chosen notification on the account) when the document is saved and the Fiscal Officer will be notified when the document is submitted.
This process may also be followed to add accounting distribution lines for items in the Additional Charges section. Open the Accounting Linessection for that miscellaneous line item and follow steps 4 and 5 above.
Line item accounting could create a lot of repetitive data entry. For example, if there are 100 line items but only one account/object code and one commodity code is being used, OLE allows you to load the information to all the line items rather than entering the information to each line item. The steps below describe how to distribute this information.
Note
Accounts are distributed only to the line items where there are no accounts listed. This process does not replace the accounts that have been set up for individual line items.
Click
 to add the item line to the
requisition.
to add the item line to the
requisition.In the Add Item section, click the
 button.
 The system opens a new Accounting Lines section.
Complete the accounting line and indicate the percent of this item line that is distributed to the items on this requisition.
Note
If there is only one accounting line for this item, the percent should be 100.
The system validates values as you enter them.
Click
 to add the accounting line.
If the items need to be distributed to more than one accounting line, repeat steps 3 and 4.
Note
All the accounting lines should total 100 percent when you have completed the distribution.
Click
 to apply this distribution to all item
lines that do not already have an accounting distribution
specified.
to apply this distribution to all item
lines that do not already have an accounting distribution
specified.The system displays the top of the document along with a message indicating that the accounts were successfully distributed to all items.
If line items have accounts set up and those accounts need to be modified, the individual accounting lines may be modified by following the steps for creating an accounting distribution for an individual item line as described above.
If you feel that it is more efficient to remove all the accounts, however, use the steps for creating an accounting distribution for multiple line items to recreate the accounting for the line items.
Follow these steps to remove all accounts.
Click
 .
.Click
 in response to the question 'Are you sure
you want to remove the accounts from ALL items?'
in response to the question 'Are you sure
you want to remove the accounts from ALL items?'All the accounting lines are removed.
To expand the accounting lines for all the items in
the Current Items section, click .
.
All the accounts are displayed in full detail.
Note
This is the equivalent of clicking the Accounting Lines show button for each item listed.
The Payment Info tab is used to indicate the type of payment schedule required and the duration of that schedule, if recurring payments are required for the items on this requisition.
The Payment Info tab includes two sections: Payment Info and Billing Address.
 |
Payment Info section definition
|
Title |
Description |
|
Type of Recurring Payment |
Optional. Select the proper recurring payment schedule from the list. Examples might include 'Fixed Schedule, Fixed Amount', 'Fixed Schedule, Variable Amount' and 'Variable Schedule, Variable Amount'. |
|
Begin/End Date |
Required if Type of Recurring Payment has been
selected. Indicates the time period in which the
requisition is active. Enter a date or select the date
from the calendar |
The Additional Institutional Info tab collects information about the organization at your institution that is responsible for this requisition. It also collects information on the transmission method and collects contact information.
 |
Additional Institutional Info tab definition
|
Title |
Description |
|
Method of PO Transmission |
Required. From the list, select the PO transmission method that should be used to send the related PO to the vendor. Choices include 'Print' and 'No Print'. |
|
Cost Source |
Display-only. The cost source will
always be 'estimate' unless the vendor was selected from the
Contract lookup |
|
Contact Name |
Optional. The name of the person to be
contacted if there are questions about the requisition.
Enter a name in the field or search for it from the
User lookup TipThe contact name may be used if the requestor should not be contacted with questions. |
|
Contact Phone |
Optional. Enter the phone number of the person specified in the Contact Name field. (Formatted: xxx-xxx-xxxx) |
|
Contact Email |
Optional. Enter the email address of the person specified in the Contact Name field. |
|
PO Total Cannot Exceed |
Optional. This field indicates a total dollar amount that the associated PO should not exceed. |
|
Requestor Name |
Required. The name of the person
requesting the good or services. The default is the
initiator. This field may be changed by entering a new name
or searching for it from the user lookup |
|
Requestor Phone |
Required. Enter the phone number of the person specified in the Requestor Name field. (Formatted: xxx-xxx-xxxx) |
|
Requestor Email |
Required. Enter the email address of the person specified in the Requestor Name field. |
|
Reference (1-3) |
Optional. Provide any type of additional reference information you want to include. |
The method of Purchase Order Transmission is set by default to the preferred method in the vendor record. If the method of Purchase Order transmission is selected as No Print, an EDI file representing the purchase order resulting from this requisition will be automatically created and transferred via FTP to a test server. The Print option should be selected if the vendor does not have access to FTP and needs a printed copy of the purchased order. Several of the fields of this tab are automatically populated with information.
Tip
OLE is not persisting a telephone number for ole-quickstart's record – you will need to input a phone number if using her login (formatted: xxx-xxx-xxxx).
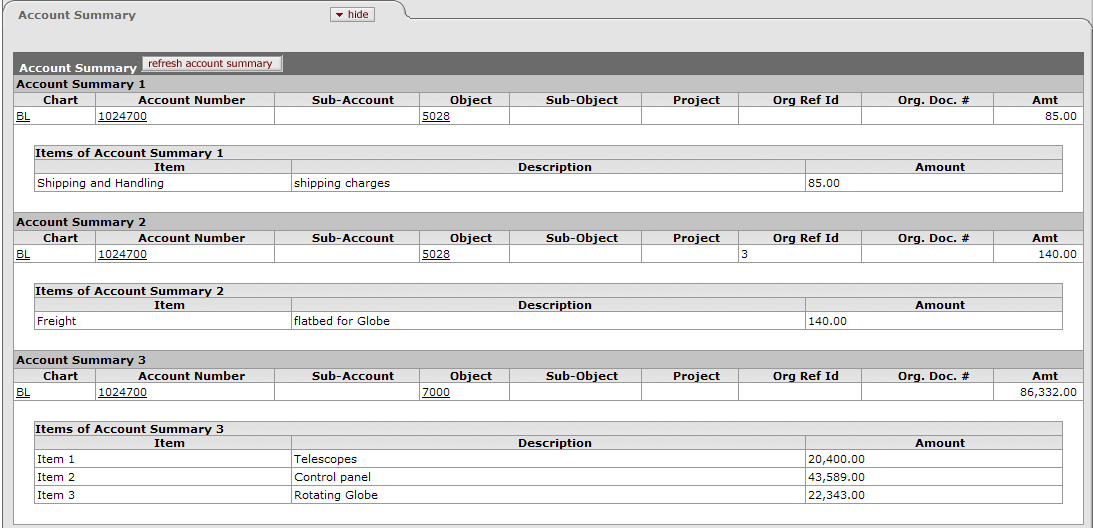
The Account Summary tab combines all the accounting information for the item(s) or service(s) on this requisition for easy reference.
Click  to reload the page and view all the fiscal years,
accounting lines and dollar amounts for this requisition.
 |
Open a Requisition document from the Select/Acquire tab.
Open the Vendor tab and select a vendor.
On the Title tab, select "new bib" or "existing bib".
In the new window, create a new bib or search for the existing. Click Submit to submit a new bib, then close the tab to return to the Requisition. Click Link to Order to add an existing bib.
Select a location and enter a List Price. These are the minimum required fields in the title tab. Add additional information as necessary.
If multiple copies are ordered, enter the location information in the Copies section.
In the Accounting Line section of the requisition form, the required fields are Chart, Account Number and Object.
For testing in the test environment, a full set of valid demo values are available in the Chart Code/Account Appendix
When accounting values are entered into the fields, OLE will look up and display the text value associated with each of the codes.
Warning
Caution: It is important to select the Chart code. The account number and object code look-up will not work properly if the Chart code has not been selected.
Before the requisition form can be submitted, the
 button, which appears at the bottom of the screen,
must be clicked.
button, which appears at the bottom of the screen,
must be clicked.Tip
Remember that all required fields are noted with (*) and must be completed to Submit or Blanket Approve (but not Save).
Choose the appropriate workflow button:
The submit button sends the form to the next person in the workflow chain.
The save button allows you to save the requisition to come back to it later.
The blanket approve button fully approves this requisition without the need for any other approvals. The Blanket Approve button is permissions based - not all sample logins will have this option.
The close button closes this requisition. Clicking the close button will cause a prompt asking you if you would like to save the document before it is closed.
The cancel will completely delete the requisition changes, but will show a warning message first.
If during your creation of a Requisition in OLE you would like to generate a purchase order without any further approval being required, select
 for your requisition. As a result, OLE will
automatically create the purchase order. After clicking the blanket approve button, you will be returned
to the Select/Acquire tab.
OLE provides a demo web form which is meant to simulate a request that would originate from an implementing Library Website. Because the OLE web form was developed for demo purposes only, the screen does not contain any validations (although it may require the input of a Requestor). The menu item for the web form is labeled PreOrder Service and can be found on the Administration tab, in the Testing Section under Testing:
 >
>  >
> >
>
After clicking the PreOrder Service link (as described above), the web form appears. The web form allows you to make a request via Citation, Open URL or based upon item details entered in the web form depending on the option you select within the form:
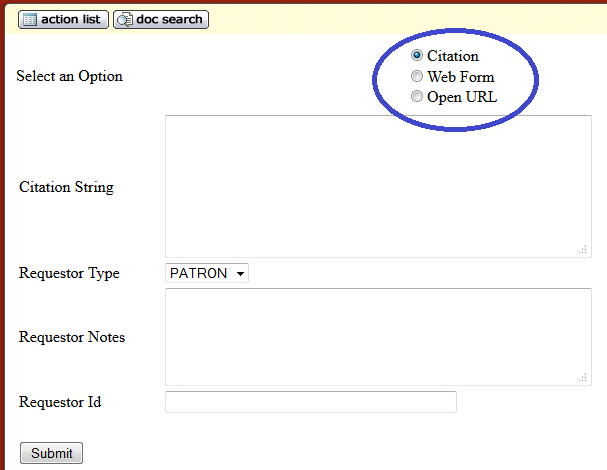
To submit the web form via Citation, select the Citation radio button and enter your citation into the Citation String field and enter a patron ID in the Requestor Id field. In addition, optionally enter notes in the Requestor Notes field. Then, click the Submit button.
The result will be a confirmation page providing you with a document ID number:

This Document ID can then be used to view the requisition
that was created. To view the requisition, click the current default
 button.
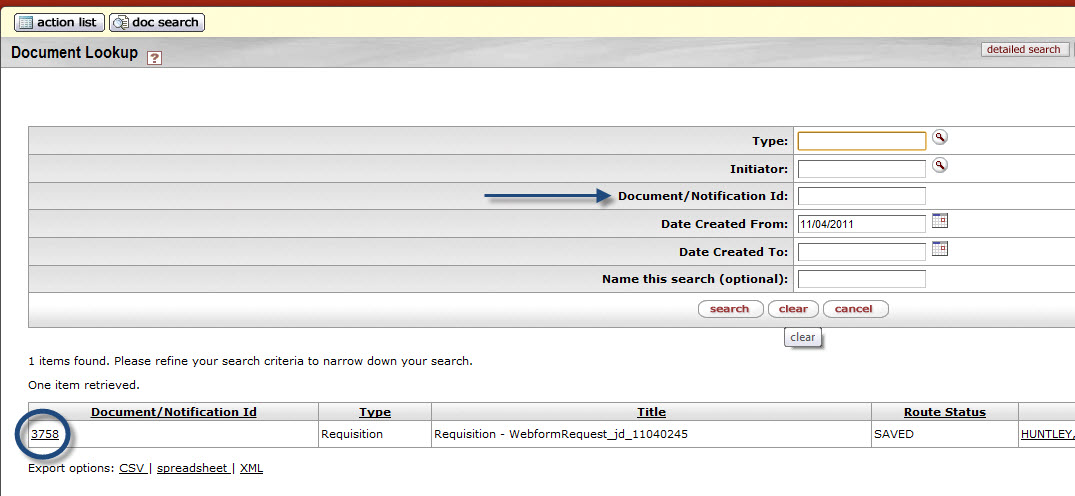
From the Document lookup page you can search for the requisition using the Document ID.
Note
For more information, see Searching OLE on the Guide to OLE Basic Functionality and Key Concepts on the Guide to OLE Basic Functionality and Key Concepts.
To view the requisition, click the Document/ Notification Id URL.
Note
The current default search does not allow you to search by bibliographic information. However, if you select the Acquisitions Search from the Select/Acquire tab, you can use bibliographic search terms.
 |
This requisition is considered to be in an ‘open’ status requiring staff input and edits. At this stage staff members may conduct additional research to determine if they want to order the item.
The requisition will contain a default description –
“WebformRequest_fl_MMDDHHMM”, where "fl" are the first and last initials of
the requestor name entered on the web form, MM and DD are the Month and Day,
and HH and MM are the hour and minute of the requisition's creation. The
bib info of the library resource and requestor name will be a part of the
requisition. To see additional details about the requestor entered through
the web form click the lookup icon  next to the name of the requestor:
 |
This requisition is partially filled in based on the data entered in the Web form. However, all required fields must be filled in (as described in the Manually Creating a Requisition section above) before the requisition can be approved.
In addition to the other required data (such as description, delivery information, and additional details), the requisition must have at least one item on the title tab in order to be submitted to workflow for routing.
You must enter one accounting string per item before submitting the requisition.
If the chart/org on the requisition does not have a content routing rule set up, the requisition routes back to the initiator of the requisition if there are no accounts entered.
Account distributions must exist for all item lines on the document before it may leave the content routing stage.
The Automatic Purchase Order (APO) is automatically generated when a requisition e-Doc is fully approved and all the APO rules are met. APO Rules are defined by the parameter APORules. APO rules are:
requisition total is less than the APO limit for the departmental organization (value set by Purchasing) (Parameter value: REQ_GT_PO)
requisition total is greater than 0 (Parameter value: REQ_GT_ZE)
there are no restricted items (ITM_REST)
the vendor has been selected from the vendor lookup (VEN_NOT_SEL_DB; ERR_RTV_VEN_DB)
the vendor is not a restricted vendor (VEN_REST)
the departmental organization has not set an ' Purchase Order Total Cannot Exceed' amount (PO_TOT_NOT_EXC)
the requisition has not added alternate vendor names (ALT_VEN_NAM)
the funds will be encumbered in the current fiscal year (REQ_ENCUM_FISCAL_YEAR). The fiscal year determines the APO allowed date range. The date range is determined by the 'ALLOW APO NEXT FY DAYS' parameter.
the requisition does not contain a trade-in and discount line item (REQ_TRAD_IN)
the requisition does not have a capital asset object code on any line items (REQ_CPT_ASST_ITM)
An APO e-Doc can only be created under certain conditions, as specified in the business rules set up by the institution.
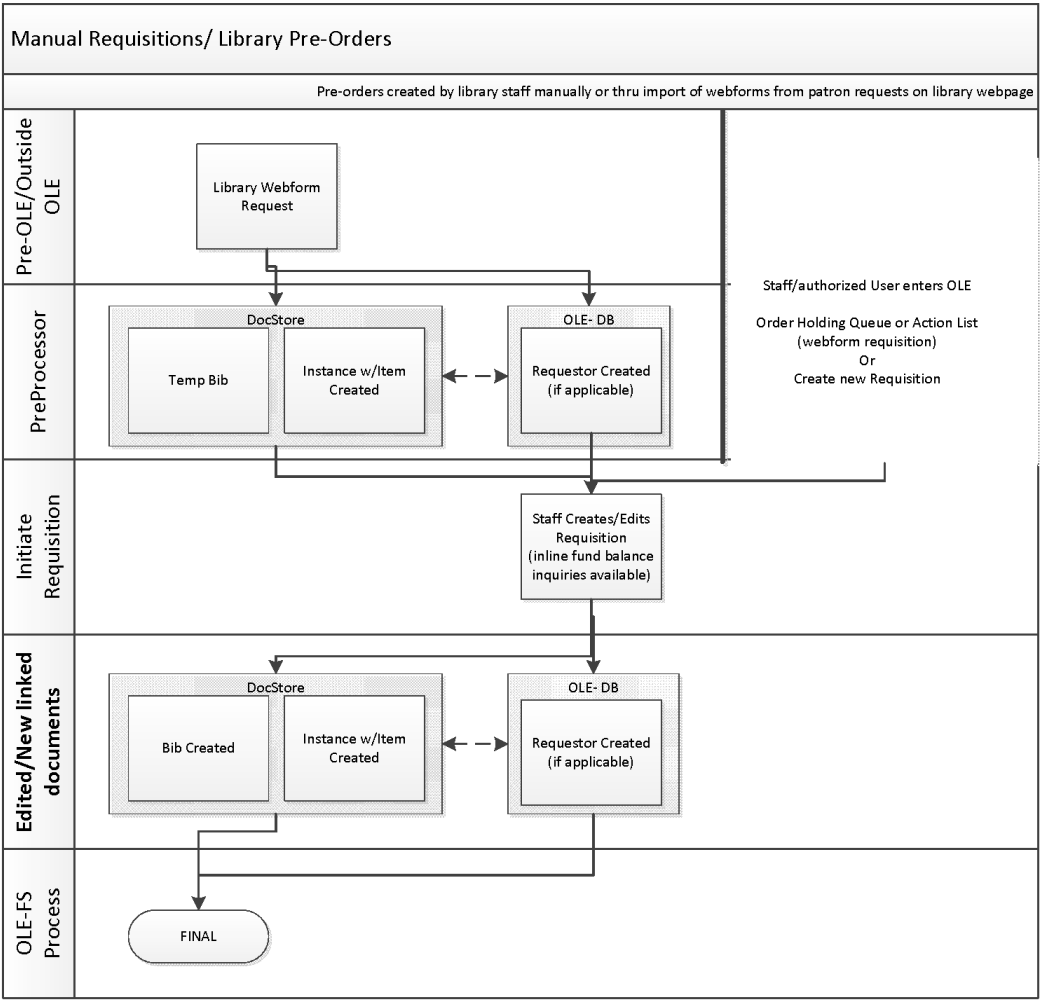
The requisition document routing includes the following special condition routing in addition to the regular account review and organization review hierarchy:
Content routing This type of routing allows the initiator of a requisition to route an incomplete document and have it completed by another OLE user. Content routing is optional and rules are created based on the Chart and Organization values in the requisition’s Requisition Detail section of the Document Overview tab. A user who receives a document via content routing has a request type of 'Complete' for the document in his or her action list. This user may open the document, complete it and send it into normal routing. Content routing is most commonly used for the completion of accounting information.
Sub-account review The requisition allows for approvers to be defined at the sub-account level. If the requisition uses a sub-account on its accounting lines, Workflow checks to see whether there is a specified routing rule for this sub-account. Users can only approve/disapprove the document at this level. Approvers cannot change content.
Fiscal officer routing Approvers can modify and/or add accounting lines for accounts that they own; the only other content that can be modified at this level is the Org Document Number field.
Base/org review routing Optional route level to work groups for the accounts set-up on the document based on the requisition amount total and charts/orgs in use.
Separation of duties This rule routes a requisition to a defined central approver if the amount of the document exceeds an institutionally defined threshold and there have been no approvers other than the document initiator. This routing ensures that requisitions above a specified dollar amount are approved by at least two users. Approvers can only approve/disapprove. Approvers cannot change requisition content.
If certain criteria are met (low dollar limit, vendor has been selected, etc.), the requisition will be fully approved and will generate an automatic purchase order (APO) and the PO will begin routing.
Based on the rules described in the Additional Workflow Details (above), an approval of a requisition can generate an Automatic Purchase Order (if vendor information was entered into the requisition). To search for an Automatic Purchase Order click the Search link under the Purchase Orders section of the Select/Acquire tab.
From the purchase order screen, you can send notifications using the send ad hoc request button. You can also void order, amend the order, indicate payment hold or proceed to directly to the receiving step by using the buttons at the bottom of the form:

Note
For more information on searching, see Searching OLE on the Guide to OLE Basic Functionality and Key Concepts.
For information about the account review and organization review see Route Levels and Workflow Routing on the Guide to OLE Basic Functionality and Key Concepts.
If you submitted a requisition but the submission did not create a Purchase Order as expected, it may not have met all the rules for APO. To find the Requisition and correct the error, conduct a Requisitions Search.
Note
For more information about Requisition searches, see Custom Document Searches.


