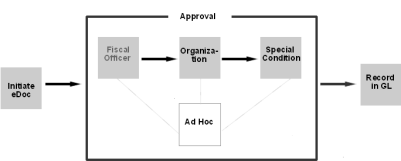
Documents route by progressing through a series of route levels (also called 'route nodes'). Many of the financial e-docs on the Select/Acquire menu, and other e-docs throughout OLE, support both pre-established workflow routing and ad hoc routing. Here is an example of the approval route nodes that a typical financial processing document passes through:
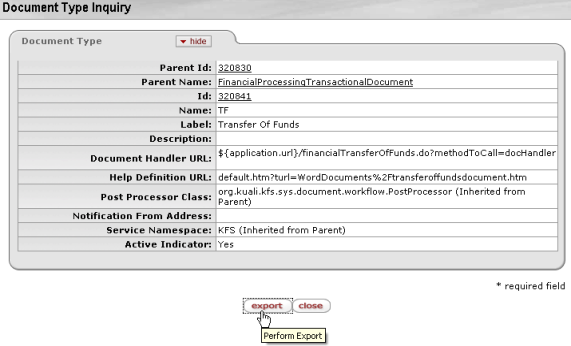
In workflow routing, a document's type (General Error Correction, Transfer of Funds, etc.) determines the route levels it passes through. Route nodes are defined by document type within the workflow process definition file. To view workflow process definitions in XML, use the export button on the Document Type Inquiry.
 |
You may need technical assistance to understand or modify a workflow process definition file. Given that assistance, the file can easily be modified to change a document's routing behavior.
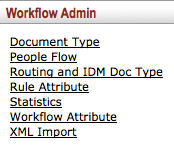
An easier view for functional users is located in the Routing & IDM Doc Type (Routing and Identity Management Document Type Hierarchy) option in the Workflow Admin submenu on the Admin menu.
The KEW arranges OLE document types in a hierarchical fashion, with some document types being 'parent' to the document types below them in the hierarchy. 'Child' document types inherit attributes from their parents. The Routing & IDM Doc Type Hierarchy screen displays documents in their respective positions in this hierarchy and also displays the route nodes associated with each document type. Nodes are listed in the order in which the document progresses through them.
The following example shows route nodes associated with the Transfer of Funds document type viewed through the Routing & IDM Doc Type Hierarchy.
 |
Note
Routing and roles inherited from KFS continue to exist within OLE. Many of the route nodes remain listed but are passed over in OLE. These options remain available for institutions that wish to implement them.
Most, but not all, Kuali financial documents are able to progress through three route levels: account level, organization hierarchy, and special conditions.
Each account in OLE is assigned a designated approver called a fiscal officer. This individual is responsible for maintaining the fiscal integrity of an account and is often one of the first approvers to review a document that impacts the account. Most financial processing documents are routed to the fiscal officer for each of the accounts identified in the document. For example, Sue is the fiscal officer for account 1012300. All financial transactions involving this account are routed to Sue for approval.
Every account belongs to an organization. The organization develops customized routing to appropriate roles based on criteria such as document type, dollar amount and override code. This routing may take advantage of the Chart of Accounts organization hierarchy, meaning that approvals are set up at different levels in the organization hierarchy. A document proceeding through this hierarchy routing might route to someone at the department level, then route to someone else at this department's school or college.
Organization hierarchy routing (corresponding to the AccountingOrganizationHierarchy route node) is very flexible and may be customized to be as simple or complex as needed. For example, it can be set up to accommodate appropriate routing when the head of acquisitions wants to approve every Transfer of Funds document over $1,000 that involves an account reporting to his organization.
Some documents without dollar amounts (such as account maintenance documents) also use organization hierarchy routing. While technically distinct, this type of routing functions exactly as described above without regard to dollar amount or override code.
Special condition routing is a blanket term for additional route levels that might be triggered by various attributes of a transaction. Special conditions often represent special administrative approvals that may be required. This routing may be based on the type of document, attributes of the accounts being used, or other attributes of the transaction.
Examples of special conditions routing
|
Routing Type |
Description |
E-Docs |
| Content Routing | If the document's content is incomplete, routes the document to an appropriate individual for completion. | Requisition |
| Separation of Duties | If the amount of the document exceeds an institutionally-defined threshold and there have been no approvers other than the document initiator, routes the document to a defined central approver. | Requisition |
| Sub-Account Routing | If the document uses a sub-account and the sub-account has a routing rule established, routes the document to the person, group or role for which the rule has been established. | Purchasing related e-docs |
| Sub-Fund Routing | If a sub-fund derived from an account appearing on the document has a routing rule established, the document routes to the person, group or role for which the rule has been established. | Financial transactions e-docs |
Ad hoc routing allows a document initiator or approver to add additional individuals or groups to the routing of a specific document. In most cases, ad hoc approvers inserted into the routing interrupt the regular routing process. For example, when a user initiates a financial document and ad hoc routes it to another user for approval, the document routes to the ad hoc approver before it routes to the fiscal officer.
Tip
Ad hoc acknowledge and FYI routing do not interrupt the regular routing process.
Financial processing documents with these types of ad hoc requests still pending post to the General Ledger as soon as all other approvals are obtained. The system does not put them on hold while waiting for the acknowledgment to take place or for the FYI to be cleared.
The following steps describe how to add an ad hoc recipient in the Ad Hoc Recipients tab.
Select an action requested from the Action Requested list. To route the document to an individual, select this option in the Person Requests section. To send the request to a group, select this option in the Ad Hoc Group Requests section.
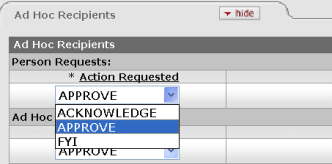
To ad hoc route the document to another person, type the principal name in the Person box in the Ad Hoc Recipients section or use the lookup icon

to search for the appropriate user name.

To ad hoc route the document to a group, in the Namespace Code field in the Ad Hoc Group Requests section, enter the group name or use the Lookup icon

to search for the appropriate group name.

Click
 . The system verifies that the person ID or
group namespace code and name that you have entered for routing is
valid.
 Click
 on the document.
After you complete the Ad Hoc Recipient section and submit the document, the system changes the Node(s) value to 'Adhoc' and changes the Status value to 'ENROUTE'.

The Pending Action Requests tab shows the requested action and the user ID.

When a document is en route, you may send ad hoc requests without taking a
workflow action on the document. To do this follow the steps listed above but
use the  button instead of Submit.
Note
When you review the Route Log immediately after submitting a document, you may not see the Pending Action Requests tab. This is because OLE has not yet received the routing information from Workflow. In this case, wait for a few seconds and click the Refresh button at the top of the Route Log to refresh the screen. You may need to repeat this process a few times until the information appears in the Pending Action Requests tab.

The Pending Action Requests tab shows the requested action and the user ID.
To see the route nodes associated with a particular document type:
Click the
 menu tab.
 Select Routing & IDM Doc Type (Routing and Identity Management Document Type Hierarchy) from the Workflow Admin submenu.

The system displays document types in the hierarchy.
Locate the desired document type route levels.
For example, you might scroll down to Transfer of Funds to view the rules of the Transfer of Funds document route levels.

Beneath the document type, you see the nodes that the document routes through. The system lists these nodes in order from first to last. To view more detail about the KIM responsibilities associated with these route nodes, click the View Document Configuration link.

Scroll down to the Workflow / Responsibilities tab.
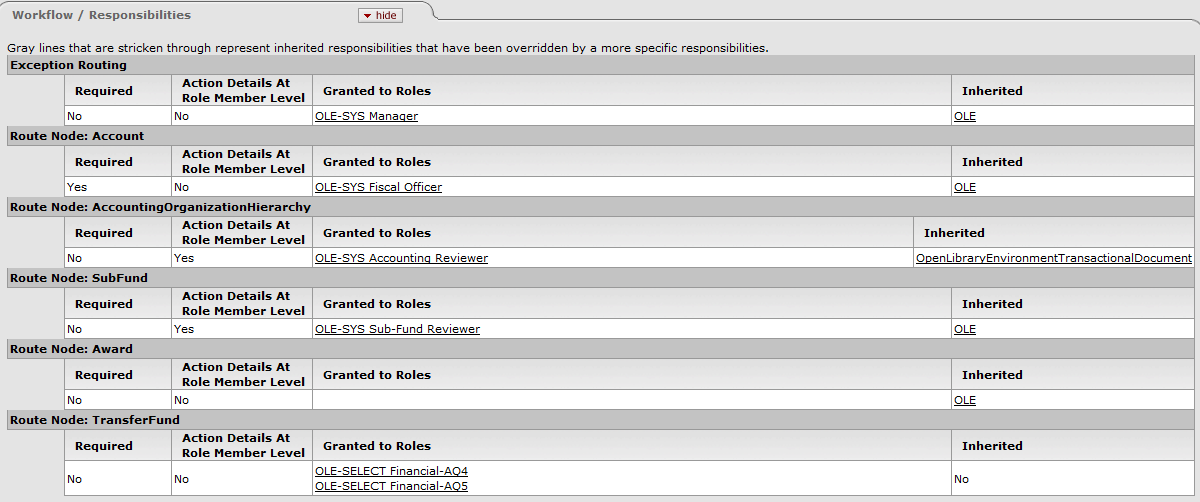
In the Workflow / Responsibilities tab, the system displays the name of each route node along with the associated role(s) and other information. The first entry in the list defines the exception routing for this document type. This entry identifies the role that receives the document if Workflow encounters an error that prevents it from completing the document's normal routing.
Note
In some cases a document may have route nodes that the document passes through based on certain conditions. These split or branching route nodes are indented to distinguish them from the route nodes through which all documents of this type pass.
When a document routes through a particular route level, the KEW evaluates it against the responsibilities that reference this document type and route level. A responsibility acts like a trigger: If the document meets its criteria, the system sends an action request to a particular user or group of users.
Responsibilities are associated with roles in KIM. Roles have members or assignees who are represented in the system as persons, groups, or other roles. Users assigned to a role inherit the role's responsibilities, meaning that they receive action requests from Workflow when specified conditions are met.
To view responsibilities, select the Responsibility option from the Identity
Admin submenu on the  tab.
tab.
Each responsibility includes several attributes (that is, values and details) that determine when it is triggered.
 |
Responsibilities lookup results Definitions
|
Title |
Description |
| Responsibility Detail Values |
Display-only. Additional detail that identifies the document this responsibility generates action requests for, when the requests are generated and how Workflow handles them. Route Node Name: The point in a document's workflow routing at which this responsibility generates requests. Document Type Name: The name of the document type this responsibility will generate action requests for. Action Details At Role Member Level: A 'True' or 'False' indicator that indicates where the details of this workflow action request are defined. If the value is 'True,' action details are collected when members are assigned to the role. If the value is 'False,' the action details are collected when this responsibility is assigned to a role. Required: A 'True' or 'False' value that indicates whether this responsibility is required to generate an action request or send the document into exception status ('True') or is an optional responsibility and can be bypassed if no action requests are generated ('False'). |
| Responsibility Name |
Display-only. The name of this responsibility. In most cases, the responsibility name will be the same as the associated template name (Review). Like permission names, responsibility names are not unique. Thus most OLE responsibilities have a Responsibility Name of 'Review'. |
| Responsibility Namespace | Display-only. The namespace with which the responsibility is associated. This namespace usually corresponds to the namespace of the document type for which the responsibility generates action requests. |
| Template Name | Display-only. The name of the template on which the responsibility is based. The template defines, in a broad sense, what the responsibilities based on it do. Since responsibilities usually generate action requests for user review, most responsibilities have a Template Name of 'Review'. |
| Template Namespace Code | Display-only. The namespace for the responsibility template. Usually, the namespace identifies the application and module the applicable responsibility template pertains to. Because responsibilities pertain to workflow, most responsibility templates are associated with the KR-WKFLW (Kuali Rice-Workflow) namespace. |
While responsibilities are created and maintained in two central locations, users may supply qualifying values when assigning users to a role associated with these responsibilities. These qualifying values generally identify specific circumstances under which the responsibility is invoked. For example, if a departmental user adds a user to a role with a responsibility that refers to an organization hierarchy route node, the departmental user supplies the appropriate chart and organization code. Subsequently, only documents that contain this chart and organization code route to the specified user.
Note
For more information about roles and responsibilities, see KIM Permissions, Responsibilities, and Roles in the Guide to OLE System Administration Functions.
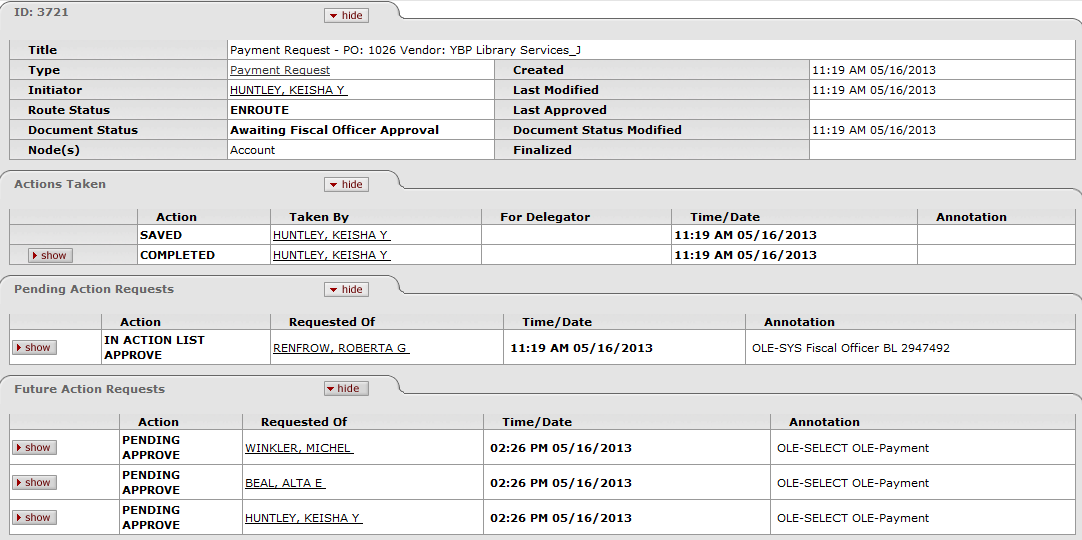
The Route Log tab displayed on all OLE e-docs shows workflow status details. The Route Log can have up to these four subtabs---Document ID, Actions Taken, Pending Action Requests, and Future Action Requests.
 |
Document ID Tab Definitions
|
Title |
Description |
|
Title |
A combination of the document type, description, and the organization document number (if any). |
|
Type |
The document type. The full name of the transaction used to identify this document type in Workflow. |
|
Initiator |
The name of the person who created the document. |
|
Status |
The route status for the document. NoteFor more information, see Route Status. |
|
Node(s) |
The current route node of the document -- that is, the current step that the document is on, on its route path. Route nodes are also referred to as 'route levels'. |
|
Created |
The time and date that the document was created. |
|
Last Modified |
The time and date that the document was modified last. |
|
Last Approved |
The time and date that the last action was taken on this document. |
|
Finalized |
The time and date that the document reached' Final,' 'Canceled,' or 'Disapproved' status. |
The Actions Taken tab displays the history of workflow actions on the e-doc.
 |
This tab lists each action taken, the name of the person who took this action, and the time and date the action was taken. The For Delegator field shows the name of a delegate that took action on someone else's behalf. For example, for account routing the fiscal officer's name would be shown here if this person's delegate took action on the document.
To drill down into the details of each action, click  .
.
 |
The system displays the detail.
Note
Several layers of information may be available for an action request.
The Pending Action Requests tab displays the next action to be taken and shows more detailed routing information about this request. Only action requests at the current route node are displayed.
The following example shows a document that is awaiting approval by one fiscal officers.
 |
The Action field indicates whether the document is in a user or group's action list or is pending their approval. An action of Pending Approve means Workflow has identified other approval actions needed at this route node, but it has not actually sent these requests yet. Pending approval actions may be determined by the Priority attribute on the appropriate workflow responsibilities.
The Requested Of field displays the name of the user or group responsible for the pending action. The value in this field is based on the responsibility at this current route level. In cases where a document routes to a role with more than five members the name of the role will be displayed along with any qualifying values pertaining to the role assignees who received the request.
Note that the Pending Action Requests tab shows pending requests only for the document at its current route node. The system may add new requests when the document transitions to a new route level.
Tip
To identify members of a group whose ID is displayed in the Requested Of field, click the link for the group ID. The system displays information about the group members.
If multiple users are identified as the recipients of a single action request, the number of actions required is controlled by the action policy code associated with the responsibility that generated the request.
If this code is set to 'ALL,' all users specified must take the required action on the document before the request will be cleared.
If the action policy code is 'FIRST,' the first of the specified users to take the action will cause the system to clear the action request for all other users with the same request.
When a document's status is 'saved' or 'enroute,' the Future Action Requests tab on the Route Log shows the action requests that Workflow will generate in the future based on the information currently on the document.
 |
To open this section and view the future action requests, click the  button. Future action requests are listed in the order
in which they are to occur.
As a document routes and users take action on it, the system updates the contents of the Future Action Requests tab to show only those requests that have not yet been made by Workflow. When a document reaches 'Final' or 'Processed' status in Workflow, this tab becomes empty because there are no future requests to display.
The Annotation entry is a message that is generated based on the KIM responsibilities being referenced by Workflow.

To display more detailed routing information about the request, click  .
.
 |
The resulting display contains additional information about the request.
 |
Pending Action Requests Tab Definitions
|
Title |
Description |
|
Node |
The route node at which this request was generated. |
|
Priority |
The priority assigned to this workflow request. If multiple requests are generated at the same workflow node, the system generates requests with low priority numbers before requests with higher priority numbers. |
|
Approval Policy |
A value indicating whether members of a role receiving this request must each take action to fulfill the request or if only a single role member must take action. |
|
Forced Action |
A true/false indicator specifying whether a user must take action on this document even if he or she has acted on it previously. If 'True,' then the user must take another action. If 'False,' then the previous action will automatically fulfill this request. |
Route status indicates where a document is in its routing process. For any given document, the system displays route status in both the Route Log tab and the document header.
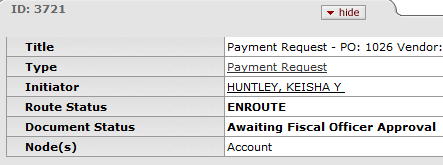
The following table summarizes the meaning of various route statuses in the KEW.
Route Status Definitions
|
Status |
Description |
|
Approved |
The document has been approved. The document is now a valid business transaction in accordance with institutional needs and policies. See note below. |
|
Canceled |
The document is denoted as void and should be disregarded. This status is applied to a document when an initiator creates a document and cancels it before submitting it for approval. |
|
Committed |
The document has been committed to the database. See note below. |
|
Disapproved |
The document has been disapproved by an approver. |
|
Enroute |
The document has pending approval requests. |
|
Exception |
The document has been routed to an exception queue because workflow has encountered an error when trying to process its routing. |
|
Final |
The document has been routed and has no pending approval or acknowledgment requests. Documents in 'Final' status are considered approved in that documents in this status affect the General Ledger or update Chart of Accounts values. |
|
Initialized |
The document has been created but has not yet been saved or submitted. |
|
Processed |
The document has no pending approval requests but still has one or more pending acknowledgment requests. Processed documents are considered approved, so they impact the General Ledger or update Chart of Accounts values. |
|
Saved |
The document has been started but not completed or routed yet. The save action allows the initiator of a document to save his or her work and close the document. The document may be retrieved from the initiator's action list for completion and routing at a later time. |
Note
A user does not ordinarily see a Status value of 'Approved' or 'Committed'. The system displays these statuses to users only as a result of a system error or performance issue.
In OLE, you receive action requests for e-docs through your action list. This list provides summary information about each document that requires your attention, such as document type, title, route status, the type of action requested of you, who initiated the document, when it was created, and whether or not you've received this request because you are a delegate or a member of a group.
Click
 .
.The Workflow system retrieves all documents that you have initiated and saved and any documents that are routed to you to approve, acknowledge, or FYI.

Click the document Id link to open the document.
The system displays a set of buttons at the bottom of the screen. The buttons you see depend on your role and the requested action. For example, you may see:

Click one of the workflow action buttons.
When you open a document, you see various workflow action buttons at the bottom of the page. The buttons vary depending on the document you are opening, the kind of action request you have received for the document and the KIM role(s) to which you belong.
Note
Some additional buttons are available, depending on the e-doc you are viewing. These buttons are described within their particular guide.
Workflow Action Button Definitions
|
Action |
Description |
|
|
Signifies that you have responded to the acknowledgment action request. This button is available only to users to whom a document has been routed for acknowledgment. See FYI below. |
|
|
Signifies that in your judgment the document represents a valid business transaction in accordance with institutional needs and policies. A single document may require approval from several users, at multiple route levels, before it moves to 'Processed' status. |
|
|
Bypasses all subsequent levels of approval and immediately moves a document to 'Processed' or 'Final' status. Anyone who would otherwise have received the document for approval receives an acknowledge request instead. This action may be taken only by roles associated with blanket approve document permission, such as the OLE-SYS Manager role. |
|
|
Denotes that the document is void and should be disregarded. Canceled documents cannot be modified in any way and do not route for approval. |
|
|
Allows you to exit the document. The system displays a message asking whether you want to save the document before closing. No changes to action requests, route logs or document status occur as a result of a close action. If you initiate a document and close it without saving, it is the same as canceling that document. |
|
|
Allows you to create a new document based on the existing document. Not all document types can be copied. |
|
|
Signifies that in your judgment the document does not represent a valid business transaction. A disapprove action from any single approver prevents a document from posting to the GL or updating a maintenance table. |
|
|
Allows you to correct documents by creating a new document that reverses the original transaction. This feature can be used only on documents that have completed the routing process and have been fully approved. Not all document types are eligible for error correction. |
|
|
Signifies that you have responded to the FYI action request. This action is available only to users to whom a document has been routed for FYI. The difference between acknowledgment and FYI is that FYI requests can be cleared directly from the action list without opening the document. FYI requests also have a different effect on the document status than acknowledgments. A document with no pending approval requests but with pending acknowledge requests is in 'Processed' status. A document with no pending approval requests but with pending FYI requests is in 'Final' status. |
|
|
Refreshes the screen and displays the most recently saved information. Changes that are made but not saved prior to reloading a page are not maintained. |
|
|
If you are the initiator of this document, allows you to save your work and close the document. The document may be retrieved from your action list for completion and routing at a later time. If your permissions allow you to edit en route documents, you can also save changes to an en route document in your action list. |
|
|
Moves the document (through workflow) to the next level of approval. After a document is submitted, it remains in 'Enroute' status until all approvals have taken place. |
Special attention should be paid when you select any of the workflow action buttons noted below.
If you are a member of a role with a blanket approve document permission (such as the OLE-SYS Manager role), you have the option to blanket approve a document routed to you for your approval.
Note that you can only blanket approve a document you are initiating or a document for which you already have an approval request.
Click  to approve the document bypassing all other approvals.
Click  .
.
Enter a reason for disapproval, and then click yes to confirm.
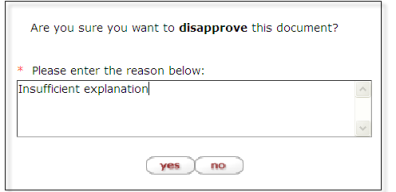
After you complete the disapprove action, the system displays the reason in the Notes and Attachment tab.
 |
Note
Acknowledgments do not interrupt the normal workflow routing of a document. They do not stop a document from routing on to other individuals, groups, or roles who need to take approval actions.
Click  .
.
Note
FYIs do not interrupt the normal workflow routing of a document.
To signify that you have responded to the FYI action, you may take either of two actions:
Click
 when you open the document.
 or, in the action list, select
 in the Actions
column and click

Tip
Setting the default action for FYI: To clear all FYI actions in the action list simultaneously, first set the default action from 'NONE' to 'FYI'.

Next, click apply default (in the upper right corner) and then click take actions.
In financial e-docs, the error correction action allows you to correct documents by creating a new document that reverses the original transaction that has been fully approved. A document created with the error correction action must route and be approved in the same manner as the e-doc it corrects.
Note
The error correction action should not be confused with the financial transaction document type General Error Correction (GEC), which is described in General Error Correction in the Guide to the OLE Select and Acquire Module.
Click

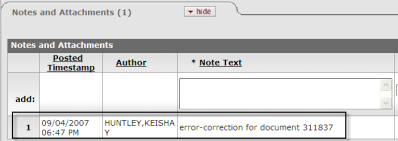
The system creates a new document with a new document ID. The system also displays Corrects Document ID in both the document header and the Notes and Attachment tab of the document.

Amounts are in negative to reverse the original transaction.

The new document has an annotation that is an error correction.
Click
 .
.The header of the corrected document shows the corrected by document ID.

The system allows you to change the automatic refresh rate, action list page size, email notification, and row colors that indicate the status of the document. You may also limit the list of documents in the action list by setting filters for delegators or workflow status. To make any of these changes, click the preferences button in the action list.
 |
The system displays the Workflow Preferences screen.
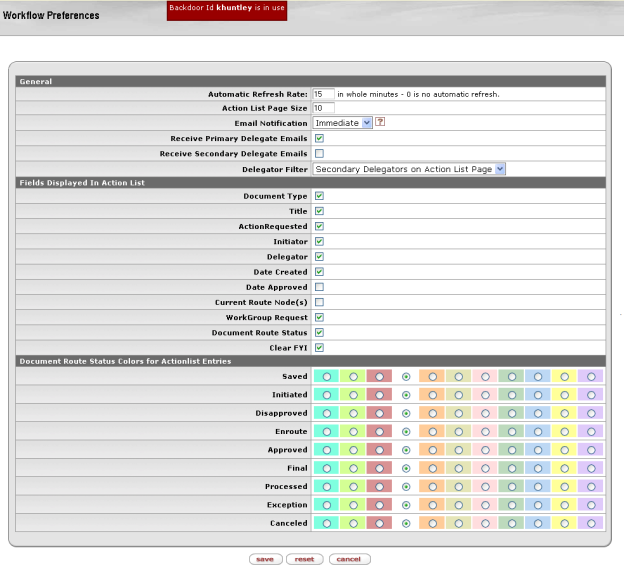 |
Workflow Preferences Field Definitions
|
Title |
Description |
|
Automatic Refresh Rate |
Enter a number in whole minutes. |
| Action List Page Size |
Enter a number of rows to display per page in the action list. |
|
Email Notification |
Select one of the desired email frequencies from the list: 'None,' 'Daily,' 'Weekly' or 'Immediate'. |
|
Receive Primary Delegates Emails |
Check this box to receive an email when a document arrives in your action list for which you are the primary delegate. |
|
Receive Secondary Delegates Emails |
Check this box to receive an email when a document arrives in your secondary delegate action list. |
|
Delegator Filter |
In the list, select 'Secondary Delegators on Action List' or 'Secondary Delegators only on Filter Page' to specify when to show the secondary delegation entries in your action list. |
|
Fields Displayed in Action List |
Check each box to include these items on the action list. |
|
Document Route Status Colors for Action List Entries |
Click one of the color options for each document route status. |
To save your preferences, click  .
.
To return to the default preferences, click  .
.
Note
Color changes do not take place until the next time you log onto the system.

Setting a filter allows you to display a subset of the action list.
To go to the Action List Filter dialog box, click the Filter button.

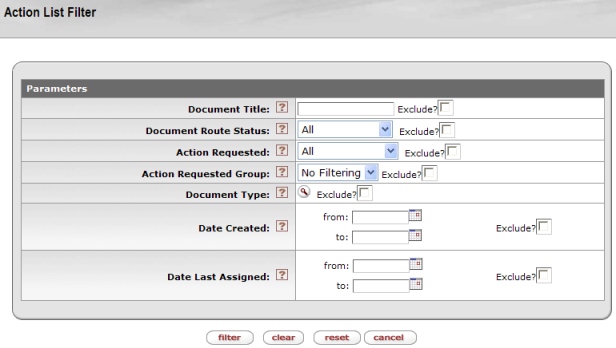
Specify filtering criteria in the Action List Filter dialog box.
Click
 .
.The system displays a message in the upper left corner.

Action List Filter Definitions
|
Title |
Description |
|
Document Title |
Enter a partial or full character string that you are looking for in the document description. For example, enter 'Test' to see all documents that contain 'Test' in the document description. This field is case sensitive. Select the Exclude? check box to exclude documents with the specified title from the list. |
| Document Route Status |
Select the route status you want. The choices are 'All,' 'Approved,' 'Disapproved,' 'Enroute,' 'Exception,' 'Processed and Saved'. Select the Exclude? check box to exclude documents with the selected status from the list. |
|
Action Requested |
Select an action from the list. The choices are 'Acknowledge,' 'Approve,' 'Complete,' and 'FYI'. Select the Exclude? check box to exclude documents with the selected action from the list. |
|
Action Requested Group |
Select the name of the group that is requested to take an action. |
|
Document Type |
Select a document type from the lookup  . Select the Exclude? check box to exclude documents with the selected type from the list. |
|
Date Created |
Enter a date range or select dates from the calendar  to limit the documents based on the date they were created. Select the Exclude? check box to exclude documents that were created during this given time range. |
|
Date Last Assigned |
Enter a date range or select dates
from the calendar |
In Using Doc Search to Find a Document, we introduced the basic search capabilities within the KEW. The system also provides more advanced and sophisticated search capabilities.
When you click the doc search button, the system displays a search screen that initially defaults to a basic search.
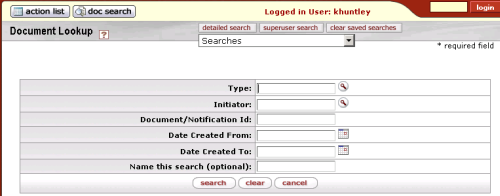
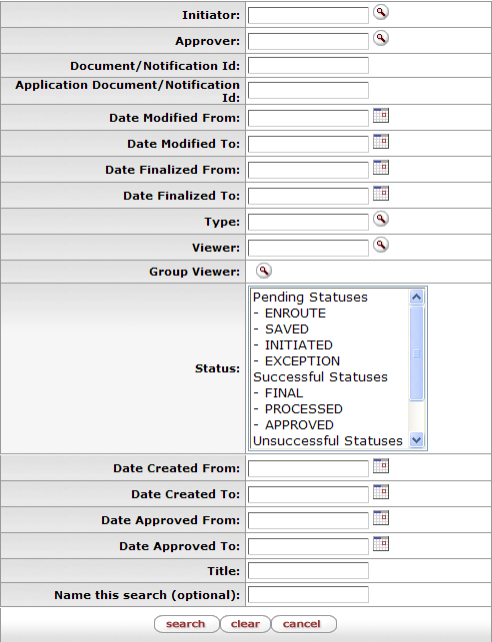
To switch between the basic search and detailed search, click the detailed search or basic search button near the top of the screen. The detailed search screen gives you more options for specifying search criteria.
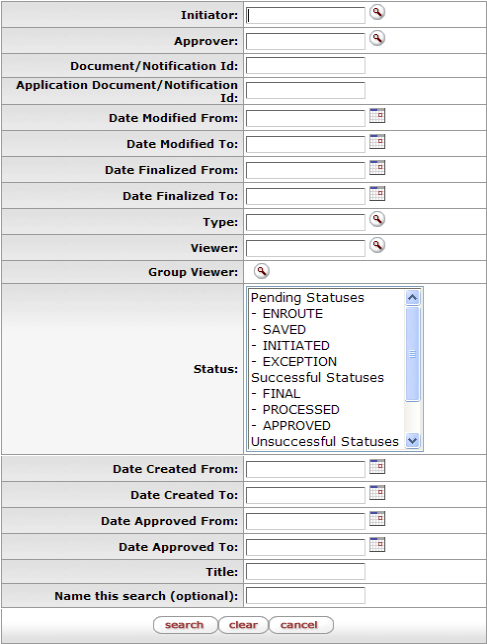
The search screen initially defaults to a non-superuser search mode. If you are a member of a role (e.g., the OLE-SYS Workflow Administrator role) that has the administer routing for document permission, you may switch between non-superuser search and superuser search mode by clicking the Superuser Search or Non-Superuser Search link.
The search screen initially defaults to a non-superuser search mode. If you are a member of a role (e.g., the OLE-SYS Workflow Administrator role) that has the administer routing for document permission, you may switch between non-superuser search and superuser search mode by clicking the Superuser Search or Non-Superuser Search link.
Note
Anyone can search for documents using superuser search, but only users with an appropriate role can actually take special actions on the documents retrieved by the superuser search function.
Document-specific searches allow you to specify additional criteria when you search specific document types or groups of documents such as financial transactions or purchasing/accounts payable documents. In addition to the standard search criteria available in the basic and advanced searches, document-specific searches allow you to specify fields such as dollar amounts, status, and document-specific reference numbers.
Note
For more information about document-specific search, see the help documentation section on the applicable document type in the appropriate guide listed in the OLE Documentation Portal.
You may also access these search options after you click the doc search
button. To access document-specific search at this point, either enter the
document type name and tab out of the field or use the Document Type lookup  . The system displays the appropriate additional search
fields.
When you name a set of search criteria, the system saves your search as a named search. When you later click search, the system displays a list of all named searches you have created in the Searches list.
 |
To clear all of your named searches, click clear saved searches. OLE clears the Searches list.


