 >
>  >
> >
>
The Vendor (PVEN) document allows users to create and maintain a Vendor table to track businesses or other entities your institution has done or plans to do business with. Each record in this table maintains all information pertinent to a vendor, including tax ID, addresses, contacts and other details required for the management of your institution's procurement process.. Vendors created using this document are available for use on various purchasing documents (such as Requisition, Purchase Order, and Disbursement Voucher documents).
Vendors have many different attributes which may in some cases determine how and when they may be used.
There are three situations where you may choose to use this menu:
To add a new vendor ('parent Vendor record')
To create a new division to an existing vendor ('child Vendor record')
To edit information about an existing vendor or division
Wildcards are particularly helpful for searching vendors: *ybp*, harr*.
Note
To learn more about searching, see Searching OLE on the Guide to OLE Basic Functionality and Key Concepts on the Guide to OLE Basic Functionality and Key Concepts.
To create and edit Vendor documents please log in as someone assigned to one of the following roles: OLE-SELECT Acquisitions-AQ3, Acquisitions-AQ4, Acquisitions-AQ5, OLE-Invoicing, OLE_Prepayment, OLE_ACQ-MGR, OLE_Acquisitions, OLE_ACQ-Mgr-serials, OLE_Acquisitions-serials, OLE_License_Mgr, OLE_ERMS and OLE SYS User.
Note
Note: When creating a NEW vendor, if logged in as member of OLE_Acquisitions-AQ3 or AQ4, the new vendor e-doc will be processed, but stops at approval. The OLE ACQ-mgr role may create and blanket approve a new vendor.
If the Vendor is Foreign, then additional fields are required, such as Currency Type shown in the tab below, and Is this a foreign vendor in the Vendor main tab. These data values will tie into currency conversion on requisitions, purchase orders and payment requests, as well as financial accounting with university systems.
The Vendor document offers a unique option from the Vendor Detail Lookup screen, called Create Division. This option is available only for ‘parent’ vendors (that is, vendors for which the Vendor Parent Indicator on the Vendor tab is set to ‘Yes’).
The Create Division option allows you to group entities under the same corporate office with the same Tax ID ('parent vendor'). You might use this feature to add information about the separate divisions or branches, without having to duplicate the corporate information. A division has a different name from the parent.
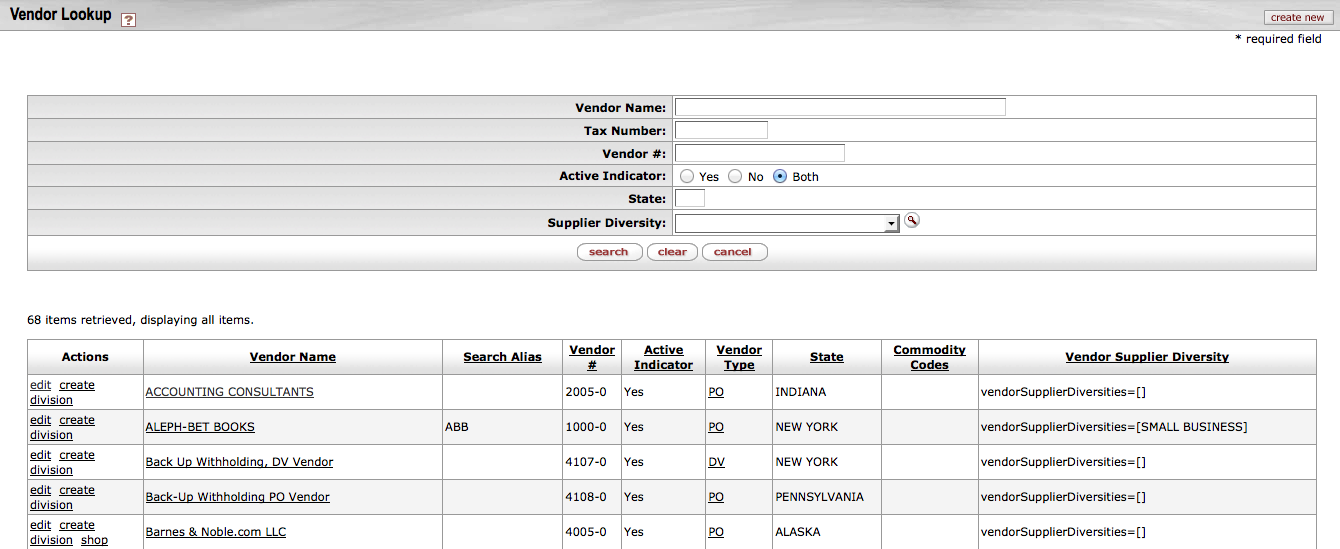 |
The create division link is available only for the 'parent' vendors. When you click the create division link, a new Vendor document is initiated and the information from the Corporate Information section of the Vendor tab is copied from its Corporate Vendor and remains display-only.
This is an inherited function from KFS. Divisions must be used for full Customer Relationship Management (CRM) type functions. However, if you want to account for a library organization’s specific Vendor account number without creating a division, you may enter the customer number and the Organization Code for the Account Number Owner on the Acquisition Unit Vendor Accounts tab. You may also add specific vendor discounts associated with the library organization’s customer number, as well as Standard Delivery Carrier and carrier’s standard interval of service (expressed as days/hours).
In the Vendor document, many tabs allow you to enter multiple sets of information ('Collections') for the tab. For example, you may add multiple addresses, contacts, phone numbers, etc. for a single vendor.
To add additional sets of information, complete the tab again
and click  .
.
When a set of information is added it is collapsed but may be
viewed by clicking  individually.

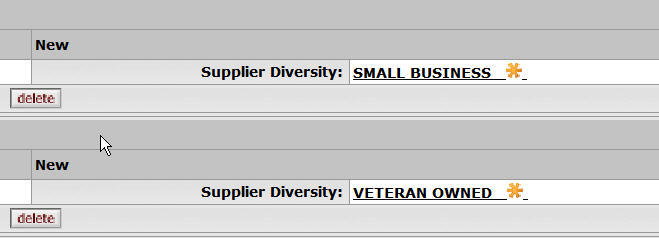
In the Vendor document, not all the tabs are required for the creation of the Vendor record. For example, not all the vendors have supplier diversity requirement or multiple phone numbers. Nonetheless the required fields within these tabs are noted with an asterisk in the event that you decide to complete the information.
The Vendor document has various tabs including the Vendor, Transmission Format, Address, Contact, Supplier Diversity, Shipping Special Conditions, Vendor Commodity Codes, Search Alias, Vendor Phone Number, Acquisitions Unit Vendor Accounts, and Contracts tabs.
The Vendor document is broken into two images below:
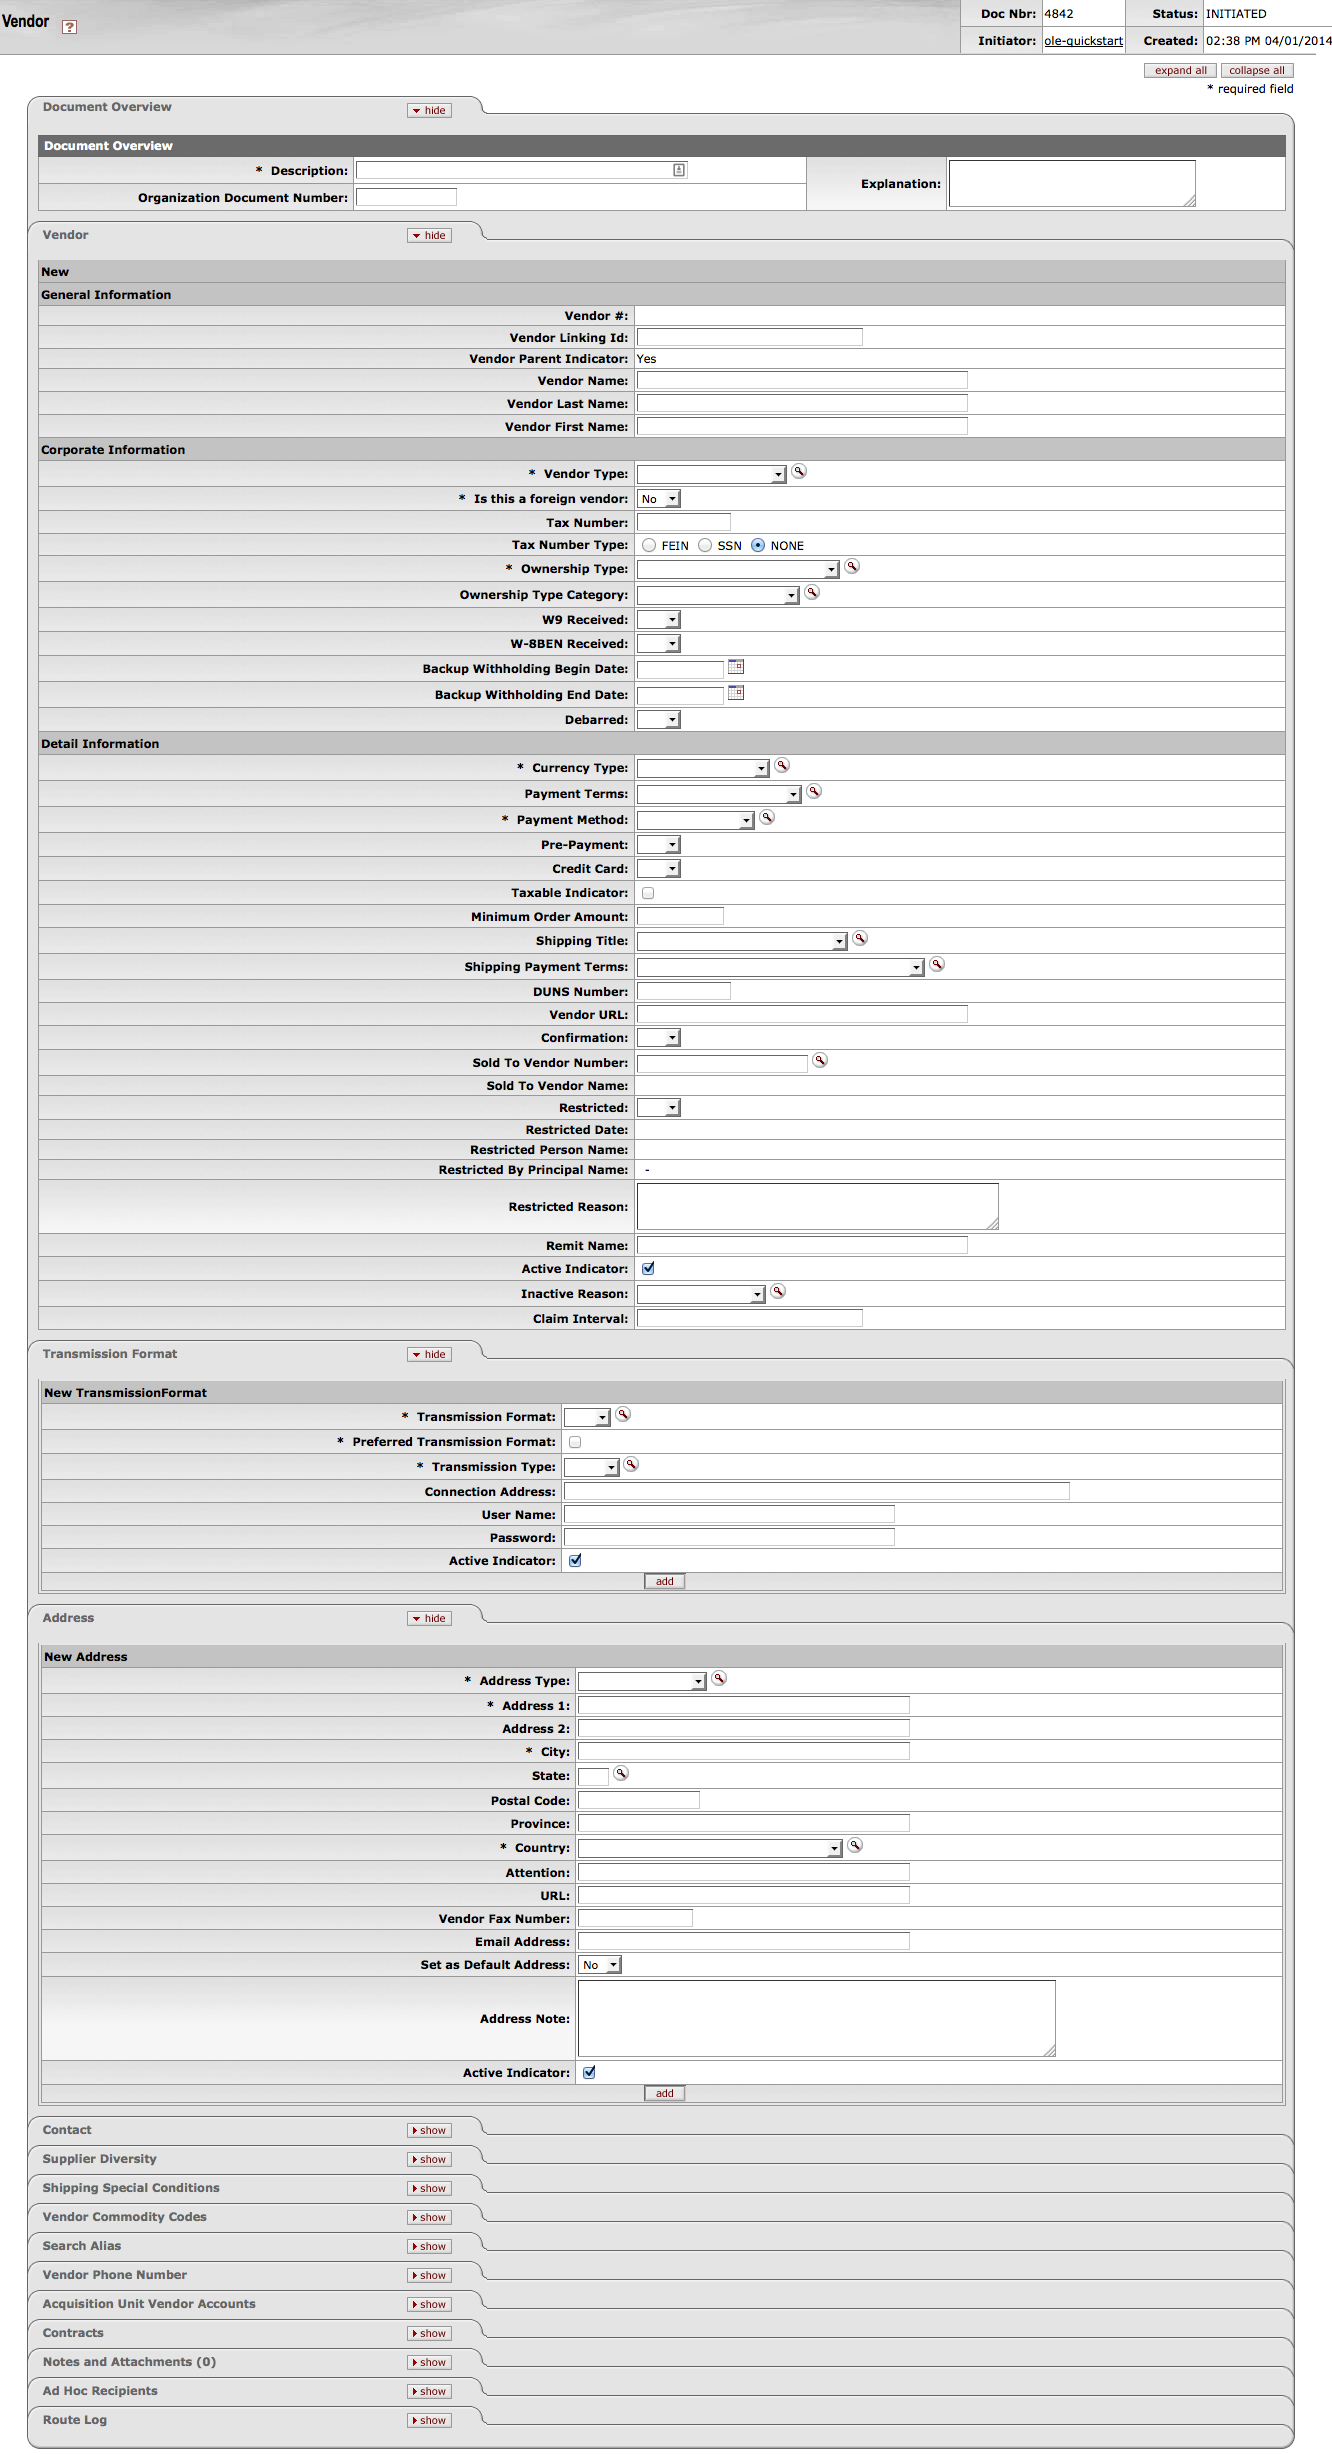 |
The Vendor tab collects fundamental information about a vendor such as the name, tax status and details. It is composed of three sections: General Information, Corporate Information and Detail Information sections.
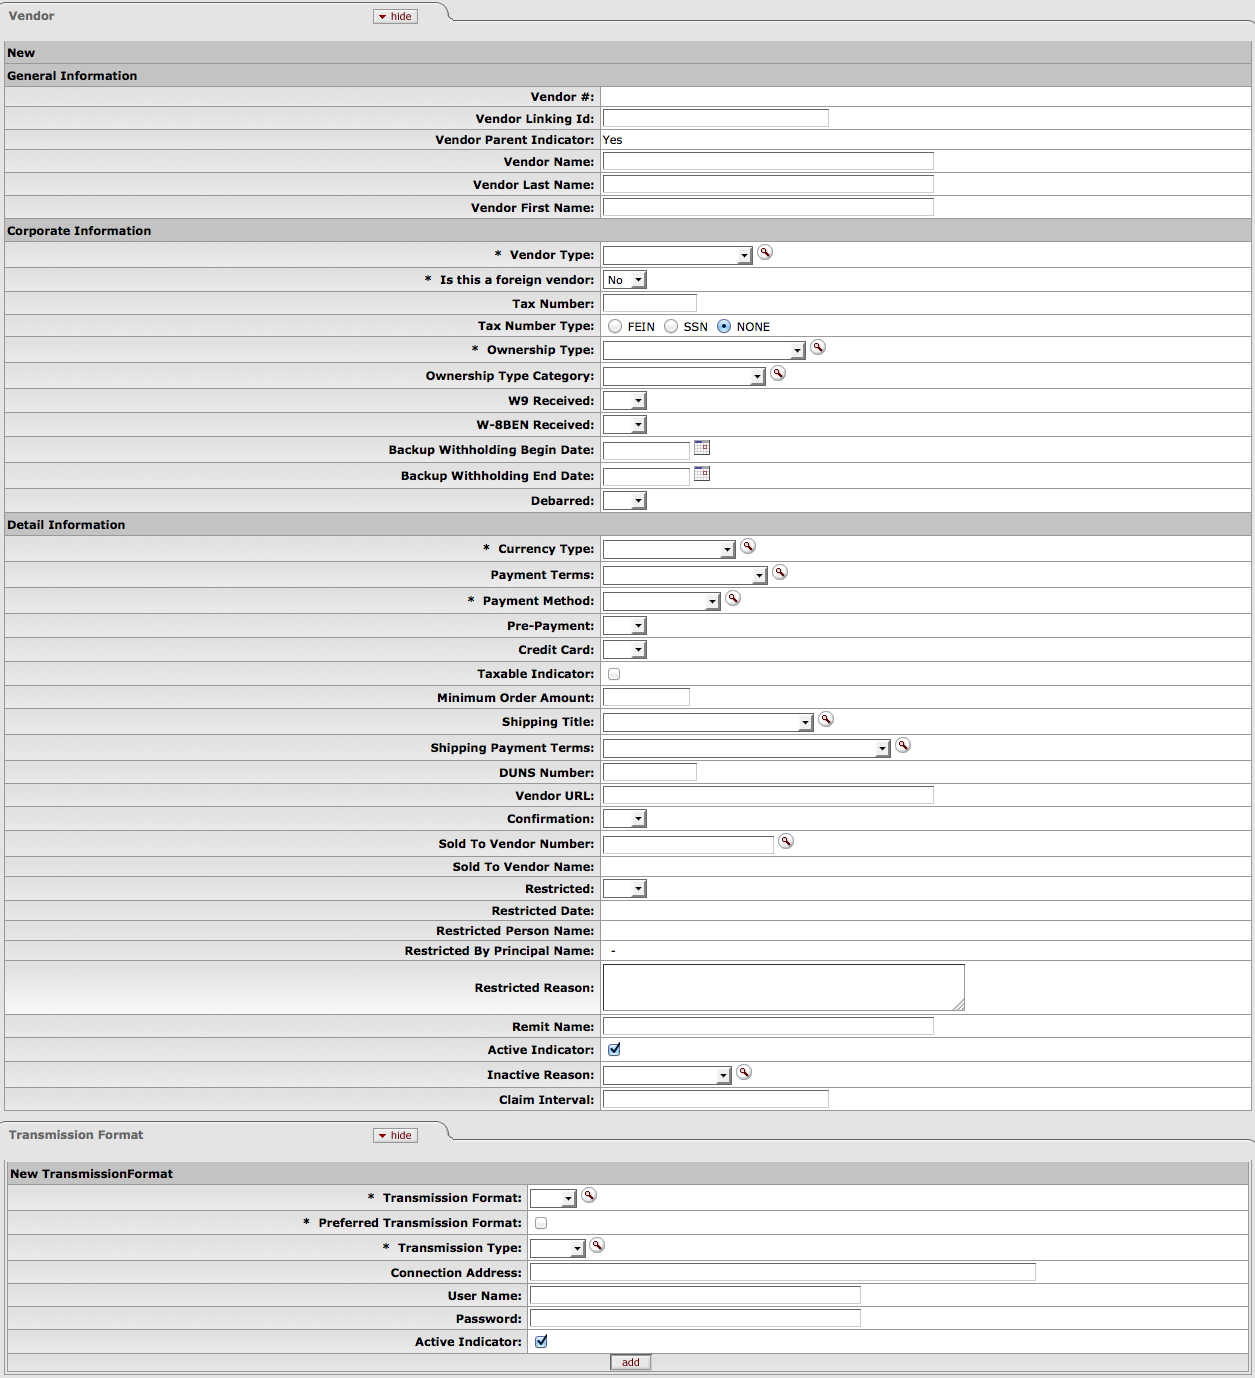 |
General information includes the Vendor Name and a system-assigned Vendor Number. This number is assigned when the document is approved.
 |
General Information section definition
|
Title |
Description |
|
Vendor Number |
Display-only. A unique, system-generated number that identifies this vendor, assigned at the time the document is approved. |
|
Vendor Linking ID |
Locally defined. An identification to link OLE to your university’s accounts payable systems |
|
Vendor Parent Indicator |
Display only. Indicates whether the vendor is a parent or child record. |
|
Vendor Name |
Required if Vendor Last Name and Vendor First Name fields are blank. Enter the vendor name that is not a first and last name. If the vendor should be identified by a first and last name, leave this field blank. |
|
Vendor Last Name |
Required if Vendor Name field is blank. Enter the vendor last name. If the vendor should be identified by a company name or title, leave this field blank and use the Vendor Name field. |
|
Vendor First Name |
Required if Vendor Name field is blank. Enter the vendor first name. If the vendor should be identified by a company name or title, leave this field blank and use the Vendor Name field. |
Note
Either the vendor name or vendor first name and last name are required to identify the vendor.
The Corporate Information section includes the vendor tax information, such as tax number, ownership type, which tax forms are on file and any special withholdings or debarred information.
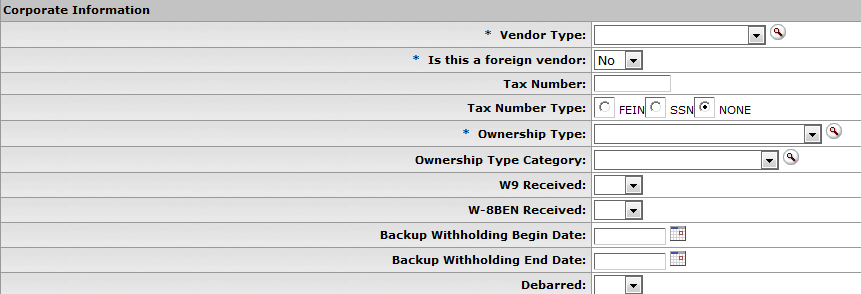
Corporate Information section definition
|
Title |
Description |
|
Vendor Type |
Required. Select the appropriate vendor type from the Vendor Type list or select if from the Vendor Type lookup |
|
Is this a Foreign Vendor? |
Required. Select 'Yes' from the list if the vendor should be identified as foreign. Select 'No' if the vendor is not identified as foreign. |
|
Tax Number |
Required for non-foreign vendors. Enter the vendor's tax ID number or SSN. |
|
Tax Number Type |
Required. Select the Tax Number Type option that describes the tax number entered in the Tax Number field. If no Tax Number was entered, select 'None. |
|
Ownership Type |
Required. Select the appropriate type from the Ownership Type list, or search for it from the Owner Type
lookup |
|
Ownership Category |
Optional. Select the appropriate category from the Ownership Category list, or search for it from the Owner
Category lookup |
|
W9 Received |
Optional. Select 'Yes' or 'No' from the list to indicate if a W9 has been received for this vendor. Certain types of vendors may be required to have a W9 on file before they may be approved for use. |
|
W-8BEN Received? |
Optional. Select 'Yes' or 'No' from the list to indicate if a W-8BEN has been received for this vendor. Certain types of foreign vendors may be required to have a W-8BEN on file before they may be approved for use. |
|
Backup Withholding Begin Date |
Optional. Enter the effective date for backup or select it from the
calendar |
|
Backup Withholding End Date |
Optional. Enter the date to discontinue backup withholding or select it
from the calendar |
|
Debarred |
Optional. Select 'Yes' or 'No' from the list to indicate whether or not this vendor has been debarred. This designation indicates that an institution has been barred from doing business with this vendor by the state or federal government. |
The Detail Information section contains additional data about the vendor including payment and shipping terms and whether or not they are restricted or inactive and why.
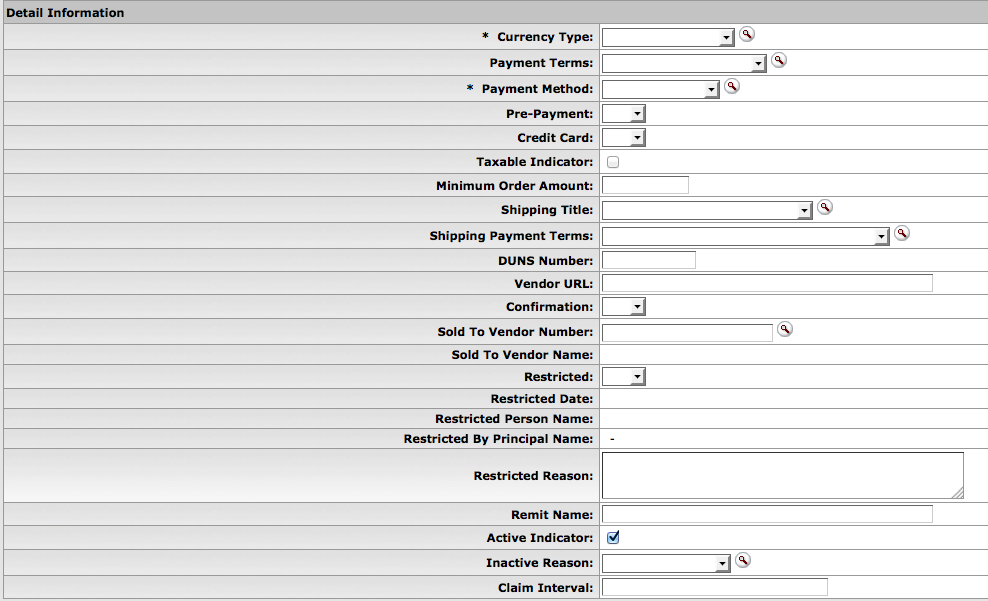 |
Detail Information section definition
The Transmission Formattab allows users to choose how purchase orders will be sent to vendors. Transmission formats could be EDI or PDF files while the transmission type could be set to FTP, Email, Mail, etc.
Be sure to select at least one Preferred Transmission Format on the Transmission format tab.
After entering the new transmission format information, click  to add it to the document.
 |
Transmission Format tab definition
|
Title |
Description |
|
Transmission Format |
Required. Transmission format of the vendor. Select the appropriate
currency type from the Transmission Format list or select from the
Transmission Format lookup |
|
Preferred Transmission Format |
Indicate whether or not the vendor transmission format/type is the preferred one or not. Required. Select the check box if the Transmission Format is the preferred format. Clear the check box if it is not the preferred format. |
|
Transmission Type |
Required. Transmission Type of the
Transmission Format. Select the appropriate currency type
from the Transmission Type
list or select from the Transmission Type lookup NoteDepending on the Transmission Type selected (Email, Fax, or Mail), you must have corresponding address information on an Address Tab with the Address Type set as Purchase Order. For example, if the Transmission Type selected is email, you must add an email address to the Address tab with the Address Type set as Purchase Order. |
|
Connection Address |
Optional. Address of the transmission type. |
|
User Name |
Optional. User Name of the transmission type. |
|
Password |
Optional. Transmission Type password. |
|
Active Indicator |
Required. Select the check box if the Transmission Format is active. Clear the check box if it is inactive. |
The Address tab collects address information for a vendor. Different types of addresses may be entered, such as one for mailing purchase orders and another for remittance of payments. Vendors of a particular type may be required to have at least one address of a certain type (such as at least one 'remit to' address). Every vendor must have one default address.
After entering an address, click  to add it to the document.
Note
For more information about adding multiple addresses, see 'Collections'.
 |
Address tab definition
|
Title |
Description |
|
Address Type |
Required. Select an address type from the Address
Type list or search for it from the Address Type lookup |
|
Address 1 |
Required. Enter the first line of the address information. |
|
Address 2 |
Optional. If necessary, enter the second line of the address information. |
|
City |
Required. Enter the city name for this address. |
|
State |
Optional. Select the state from the State
list or select it from the State Code lookup |
|
Postal Code |
Optional. Enter the postal code for this address. Postal code may be required under certain circumstances (such as when entering a US address). |
|
Province |
Optional. Enter the province for this address. |
|
Country |
Required. Select a country from the
Country list or select it from the Country lookup |
|
Attention |
Optional. Enter to whose attention it should be directed to, if you want this address to have an attention line. |
|
URL |
Optional. Enter a URL you want to associate with this vendor address. |
|
Vendor Fax Number |
Optional. Enter the vendor fax number you want to associate with this address. |
|
Email Address |
Optional. Enter the vendor email address you want to associate with this address. |
|
Set as Default Address |
Required. Select 'Yes' or 'No' from the list to indicate if this address should be used as the default for this vendor or not. Every vendor must have one default address. |
|
Address Note |
Optional. Enter additional information for the vendor’s address. |
|
Active Indicator |
Required. Select the check box if the address is active. Clear the check box if it is inactive. |
The Contact tab collects contact information for a vendor. Different types of contacts may be entered, such as sales, technical and customer service representatives.
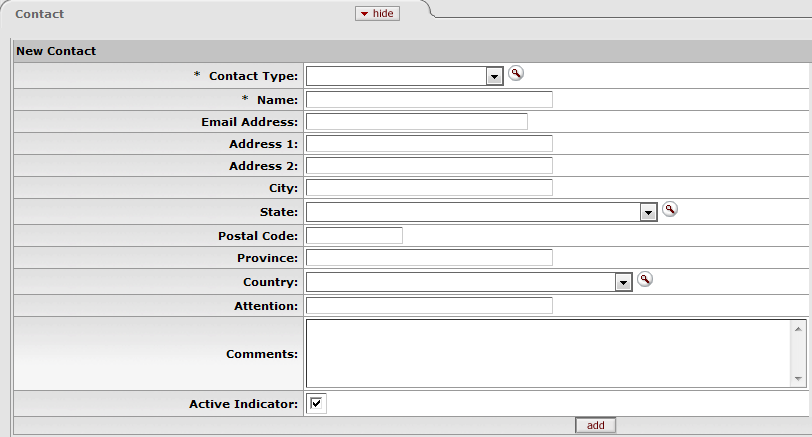
Contact tab definition
|
Title |
Description |
|
Contact Type |
Required. Select contact type from the Contact Type
list or select it from the Contact Type lookup |
|
Name |
Required. Enter the name of the contact. |
|
Email Address |
Optional. Enter the email address for this contact. |
|
Address 1 |
Optional. Enter the first line of the address information for this contact. |
|
Address 2 |
Optional. Enter the second line of the address information for this contact. |
|
City |
Optional. Enter the city name for this contact. |
|
State |
Optional. Select the state from the State
list or select it from the State Code lookup |
|
Postal Code |
Optional. Enter the postal code for this contact. |
|
Province |
Optional. Enter the province name for this contact. |
|
Country |
Optional. Select the country from the Country list or select it from the Country lookup |
|
Attention |
Optional. Enter to whose attention it should be directed to, if you want this address to have an attention line. |
|
Comments |
Optional. Enter any additional comments about this contact. |
|
Active Indicator |
Required. Select the check box if the contact is active. Clear the check box if it is inactive. |
After entering a contact, click  to add it to the document.
Note
For more information about adding multiple contacts, see 'Collections'.
The Supplier Diversity tab is used to indicate if any recognized supplier diversity categories apply to this vendor. The Small Business Administration has defined supplier diversity categories which may be based on size (small business), ownership (woman or minority owned), and/or geographical location (local).

Supplier Diversity definition
|
Title |
Description |
|
Supplier Diversity |
Required when the tab is used. Select the supplier diversity type from the
Supplier Diversity list or select it from the Supplier Diversity
lookup |
|
Active Indicator |
Required. Select the check box if the supplier diversity type is active. Clear the check box if it is inactive. |
After selecting a supplier diversity type, click  to add it to the document.
Note
For more information about adding multiple supplier diversity types, see 'Collections'.
The Shipping Special Conditions tab is used to indicate whether Accounts Payable is allowed to pay for additional freight charged when the vendor invoices for goods or services. Examples might include 'Express,' or 'Insured.'

Shipping Special Conditions tab definition
|
Title |
Description |
|
Shipping Special Conditions |
Required. Select the type from the Shipping Special
Conditions Type list or select it from the Shipping Special
Condition lookup |
|
Active Indicator |
Required. Select the check box if the shipping special conditions type is active. Clear the check box if it is inactive. |
After selecting a shipping special condition, click  to add it to the document.
Note
For more information about adding multiple shipping special condition types, see 'Collections'.
The Vendor Commodity Codes tab is used to assign commodity codes to this vendor. A commodity code may be added only by a Purchasing Department staff member.
The Purchasing Department assigns commodity codes to vendors in order to track spending by category. A vendor may be assigned multiple commodity codes. For example, a local company that both prints and designs documents might have two different commodity codes, one for printing and one for design.
Note
For information about adding commodity codes, see Commodity Code.

Vendor Commodity Codes tab definition
|
Title |
Description |
|
Commodity Code |
Optional. Enter the commodity code. |
|
Commodity Default Indicator |
Optional. Select the check box if this commodity code is to be used as the default for this vendor. This commodity code is used on APOs where an institution has indicated that the commodity code is required on POs but not on requisitions. Clear the check box if this commodity code is not to be used as the default. |
|
Active Indicator |
Optional. Select the check box if this commodity code is active for this vendor. Clear the check box if it is inactive for this vendor. |
After entering a commodity code, click  to add it to the document.
Note
For more information about adding multiple commodity codes, see 'Collections'.
The Search Alias tab is used to define other names that may be used when searching for this vendor. Search aliases can be used in future lookups as abbreviated forms of long vendor names, or to denote external vendor codes or standard address numbers (SAN). Alias types include Abbreviation, Vendor Code, etc.
 |
Search Alias tab definition
|
Title |
Description |
|
Search Alias Name |
Required. Enter the alternate name that may be used to search for this vendor. |
|
Alias Type |
Optional. Identify the search alias type or select the type from the
Alias Type lookup |
|
Active Indicator |
Required. Select the check box if the search alias name is active. Clear the check box if it is inactive. |
After entering a search alias, click  to add it to the document.
Note
For more information about adding multiple aliases, see 'Collections'.
The Vendor Phone Number tab collects phone numbers for this vendor. It may be used to define various types of phone numbers. Examples of different phone number types include 'Toll Free,' 'Mobile,' and 'Purchase Order.'
 |
Vendor Phone Number tab definition
|
Title |
Description |
|
Phone Type |
Required. Select the phone type from the Phone
Type list or select it from the Phone Type lookup |
|
Phone Number |
Required. Enter the phone number. TipForeign vendors will accept foreign phone numbers (for example (12) 34 567 1234, (345) 123-1234, 91 522 6565, 91-522-6565) however the Is this a foreign vendor? field must be marked as "yes". |
|
Extension |
Optional. Enter the extension for the phone number. |
|
Active Indicator |
Required. Select the check box if the vendor phone number is active. Clear the check box if it is inactive. |
After entering a phone number, click  to add it to the document.
Note
For more information about adding multiple phone numbers, see 'Collections'.
The Acquisition Unit Vendor Account tab collects information about numbers the vendor uses to identify your institution. Multiple customer numbers may exist for the same vendor and they are specific to a chart and organization.
This is where libraries can record local account information for different departments purchasing authority within the same vendor e-doc.

Acquisition Unit Vendor Accounts tab definition
|
Title |
Description |
|
Acquisition Unit’s Vendor account / Vendor Info Customer # |
Required. Enter the number this vendor uses to identify your institution or organization as a customer. |
|
Chart Code |
Required. Select the chart this customer number should be associated with
from the Chart Code list or select it from the Chart lookup |
|
Account Number Owner (Organization Code) |
Optional. Enter an organization code to associate with this customer number
or select it from the Organization Code lookup |
|
Discount |
Optional. Enter the value of the discount. |
|
Discount Type |
Optional. Select the type of discount. |
|
Standard Delivery Carrier |
Optional. Enter the Delivery Carrier or select it from the Carrier lookup |
|
Standard Delivery Carrier Interval |
Optional. Enter the days from order date to delivery; used as default claim interval in POs |
|
Active Indicator |
Required. Select the check box if the customer number is active. Clear the check box if it is inactive. |
After entering a phone number, click  to add it to the document.
The Contracts tab collects information about contracts your institution has with this vendor. It includes information such as who manages the contract for your institution, when it begins and ends, any special payment or shipping terms that may specifically apply to the vendor. The Contracts tab is viewable only by the members of the OLE-PURAP Purchasing Processor role.
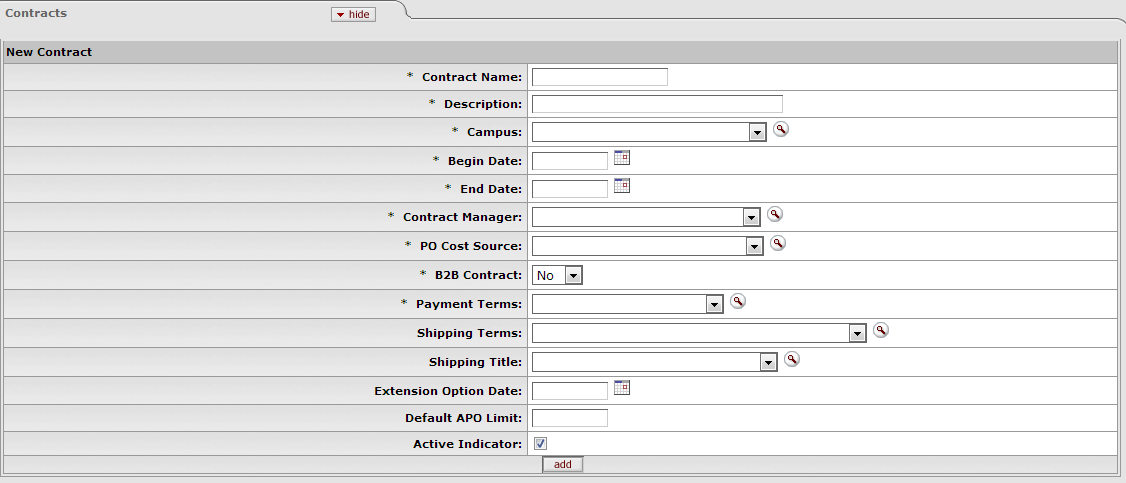 |
Contracts tab definition
|
Title |
Description |
|
Contract Name |
Required. Enter the name used to identify this vendor contract. |
|
Description |
Required. Enter a text description that describes the contract. |
|
Campus |
Required. Select what institution campus this contract is associated with
from the Campus list or select it from the
Campus lookup |
|
Begin Date |
Required. Enter the effective date of the contract or select it from the
calendar |
|
End Date |
Required. Enter the expiration date of the contract or select it from the
calendar |
|
Contract Manager |
Required. Select the name of the person at your institution who manages
this contract from the Contract Manager list or search for it from
the Contract Manager lookup |
|
PO Cost Source |
Required. Select a cost source for this contract from the PO
Cost Source list or search for it from the Purchase Order Cost Source lookup |
|
B2B Contract |
Select the business-to-business contract (yes, no) from the list |
|
Payment Terms |
Required. Select the payment terms for this contract from the Payment Terms list or search for it from the Payment
Term Type lookup |
|
Shipping Terms |
Optional. Select the shipping terms for this contract from the Shipping Terms list or search for it from the Shipping
Payment Terms lookup |
|
Shipping Title |
Optional. Select a shipping title for this contract from the Shipping Title list or search for it from the Shipping
Title lookup |
|
Extension Option Date |
Optional. Enter the date up until the contract may be extended or select it
from the calendar |
|
Default APO Limit |
Optional. Enter the upper dollar amount for which automatic purchase orders (APOs) under this contract may be created. |
|
Active Indicator |
Required. Select the check box if the contract is active. Clear the check box if it is inactive. |
After entering a contract, click  to add it to the document.
Note
For more information about adding multiple contracts, see 'Collections'.
Staff with appropriate levels of security can add, modify or delete data in the vendor record.
Either Vendor Name or Vendor Last Name and Vendor First Name fields must be filled.
If Vendor Name field is entered, Vendor First Name and Vendor Last Name fields must be blank.
If Vendor First Name and Vendor Last Name fields have been entered, the Vendor Name field must be blank.
Tax number must be 9-digits and cannot be all zeros.
The first three digits of an SSN cannot be '000' or '666.
The middle two digits of an SSN cannot be '00.
The last four digits of an SSN cannot be '0000.
The first two digits of a FEIN cannot be '00.
The vendor's Tax Number must be unique unless it is a division of a parent vendor.
Vendors of type 'Purchase Order' must have an address of the type 'Purchase Order.
Vendors of type 'Disbursement Voucher' must have an address of the type 'Remit.
A vendor must have one and only one address marked as a default address.
If a country for an address is 'United States' then state and zip code are required.
Phone and fax numbers must be formatted as ###-###-####.
If the Category Allowed Indicator for a specific ownership type is 'N' (No) then vendor category must be left blank.
If the SSN Allowed Indicator for this ownership type is 'N' (No) then the tax number type must not be SSN.
If the FEIN Allowed Indicator for this ownership type is 'N' (No) then the tax number type must not be FEIN.
Contract begin date must be earlier than contract end date.
Note
Note: In many of the tabs, at least one address or contact etc. must have Active Indicator checked. Otherwise when the user tries to submit the Vendor e-doc, the system will display an error message. If you input any information on the other tabs, then their local tab requirements are noted with asterisks as well.


