Table of Contents
This guide provides information about using Describe and Manage functions. The Describe and Manage Module strives to achieve two goals:
To describe the library’s materials so staff and the public can find them and access their contents.
To manage the library’s physical and electronic inventory so that it is accurately represented in the system.
Note
To learn more about the Describe Module, see the Describe Overview on the OLE Documentation Portal.
This guide is organized to follow the layout of the Describe tab.
The first section provides explanations of cataloging functions: the workbench, bound-withs, import single bibliographic records, record editors, transfer and browse the catalog.
The second section presents information related to cataloging administration: maintenance documents (documents that control database tables) associated with cataloging.
These sections are divided into subsections covering individual functions. For each function, the applicable subsection presents a breadcrumb trail showing how to access the function and information on the layout and fields on the related screen(s). As appropriate, some subsections include business rules and routing information for e-docs and/or special instructions for performing activities.
Note
In order to work efficiently in the system’s Describe screens, you need to understand the basics of the user interface. For information and instructions on logging on and off, navigating, understanding the components of screens, and performing basic operations in the screens, see the OLE Basic Functionality and Key Concepts.
This guide as well as guides to other OLE modules are available for download from the OLE Documentation Portal.
Tip
Bookmark any page within OLE. This will allow you to easily navigate back to an interface or e-doc in one click, just log in.
Table of Contents
 >
> >
>
On the Describe menu, the Cataloging submenu provides access to additional Describe and Manage functionality that allow users to view and maintain a variety of standard Describe and Manage E-docs.
 >
>  >
>  >
> 
The Describe Workbench is a portal to view and modify records existing within OLE.
Once you have opened the Describe Workbench, perform a search to find the record you wish to modify.
You may select a Document Type and search using Boolean operators as needed. Search results appear below the Search Conditions tab.
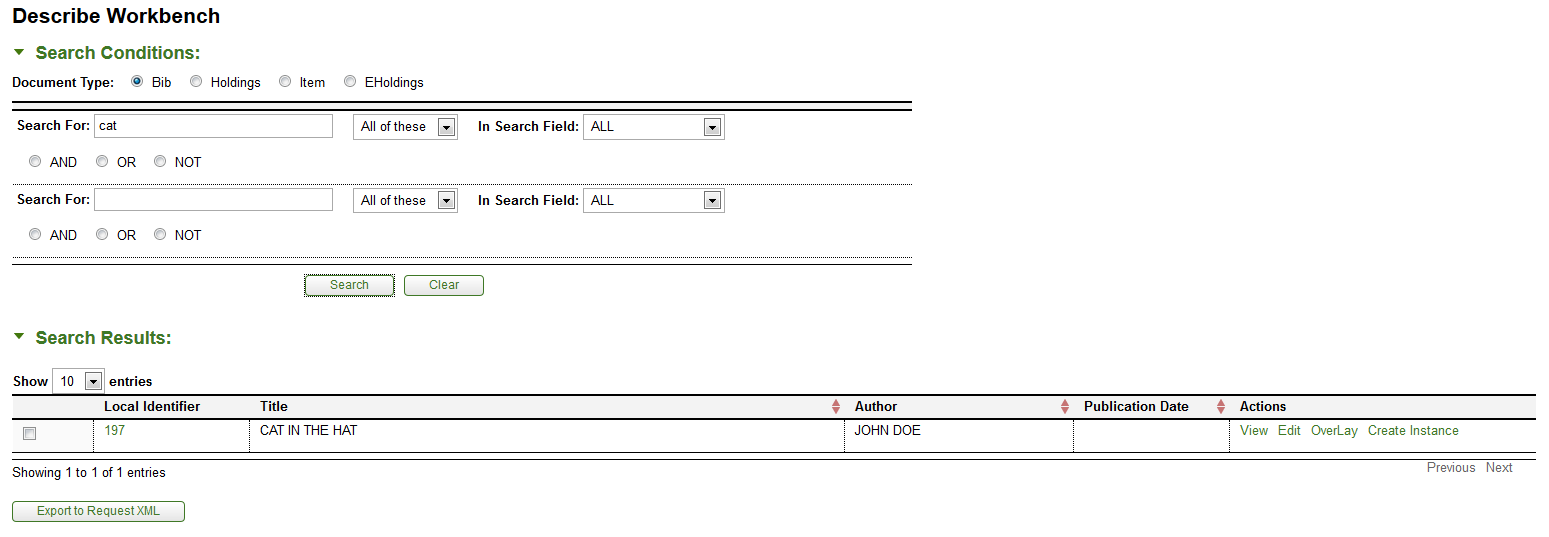
Click View to view the bibliographic record.
Click Edit to open the record editor,
Note
For more information about record editors, see Editor
Click Overlay to open an interface that allows you to overlay records
Note
For more information about overlaying bibliographic records, see Import Bib
Click Create Instance to open the Instance Editor.
Note
For more information about the Instance Editors, see the Instance Editor
 >
>  >
>  >
> 
In special cases it is necessary to link a single OLE Instance (Holdings and Item records) to multiple bibliographic records to account for situations when titles with multiple bibliographic records (i.e., bibliographically unrelated works) are joined together in a single physical volume (i.e., are “bound-with” each other).
Depending on an OLE site’s cataloging policies, it would also be possible for two or more OLE Instances to share an Item record because of a bound-with situation, and also for one or more of those OLE Instances to have additional Item records attached because the library holds multiple copies of a work, some of which are not bound-withs.
Tip
Bound-withs will always need to be setup manually by a library staff member through this interface.
Call up the Bound-with Instance interface.

Search for the OLE Instance that will be shared by multiple bibliographic records. You may select a Document Type and search using Boolean operators as needed. Search results appear below the Search Conditions tab.
When the correct record is displayed, select it and click Copy to Tree1.
Search for the additional bibliographic records with which the OLE Instance will be shared (in some cases these may not exist. You will need to create the records prior to beginning the bound-with process).
When the correct record is displayed, select it and click Copy to Tree2.
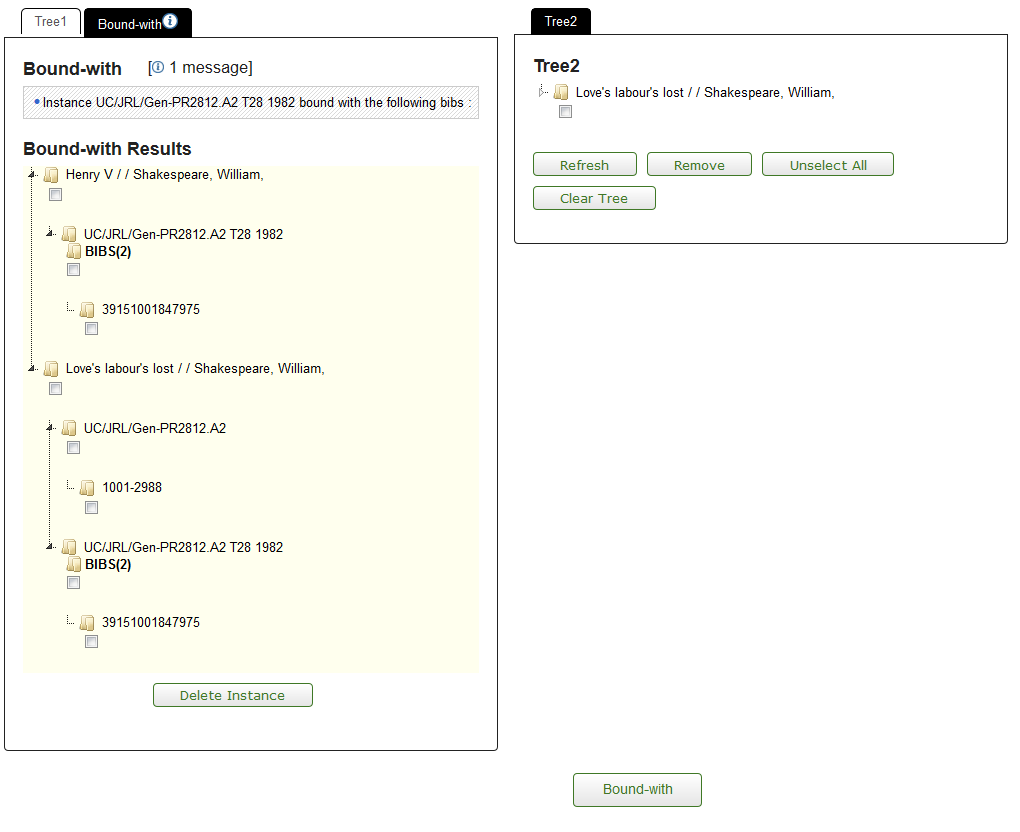
Each Tree will show the bibliographic record. You may branch down to the Instance or item level by clicking the arrow next to the folder.
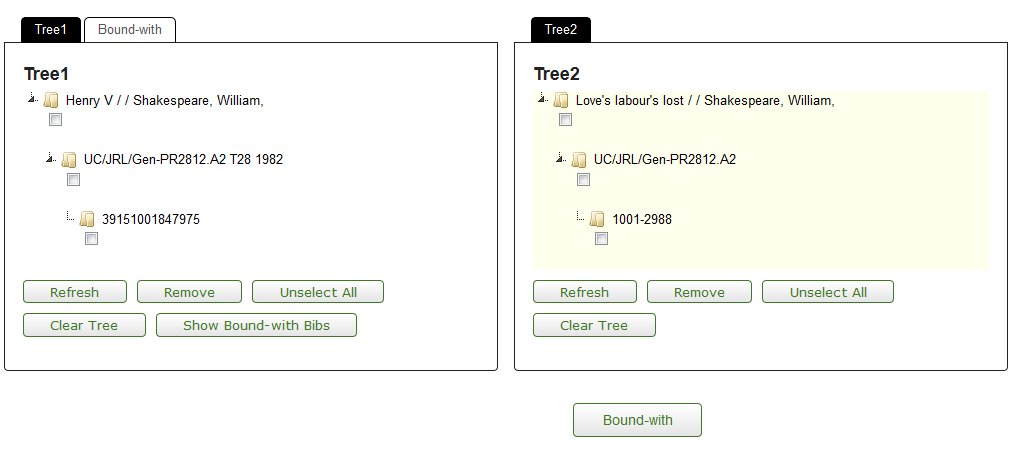
Select the holdings record for the holdings and item to be retained in Tree 1.
Select the bibliographic description to join the holdings record from Tree 2.
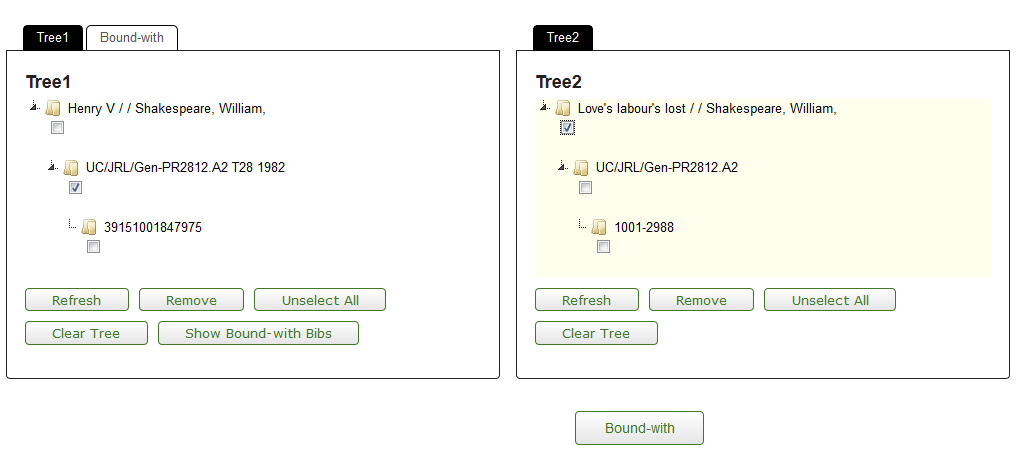
Click
 .
.
Since every bibliographic record must have at least one attached OLE Holdings, setting up a bound-with will frequently result in one or more existing OLE Holdings becoming redundant. You will need to delete the redundant OLE Holdings manually as part of the workflow. The items attached to these holdings will also be deleted.
Select the extraneous instances attached to the bibliographic descriptions.
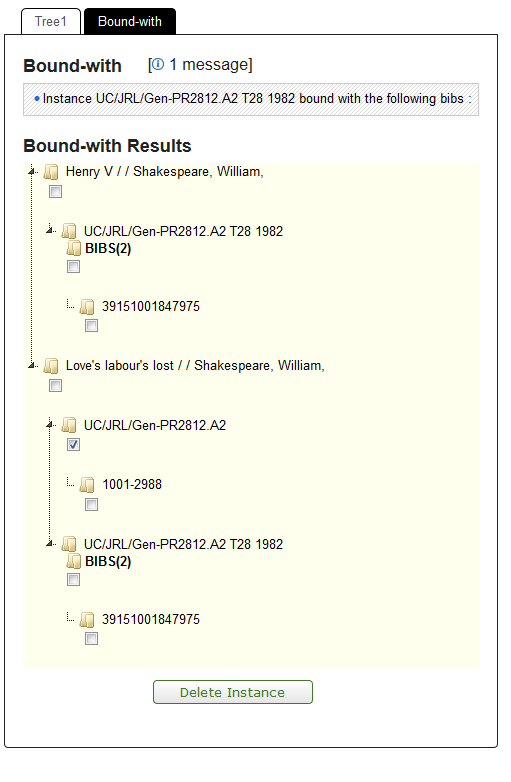
Click
 .
.Click Continue to confirm the deletion.
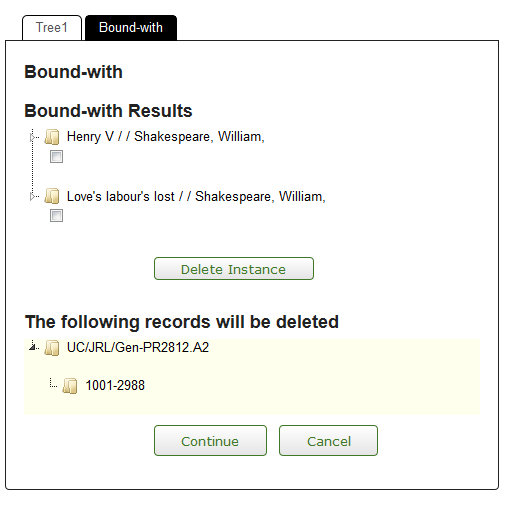
A Bibliographic record is not required to have an OLE Instance, but it may have one, zero, or many OLE Instances.
A Holdings record may have zero, one, or many Item records.
An Item record must be linked to a Holdings record – if there are zero Holdings records, there must be zero Item records.
A user must be authorized to perform the bound-with function in order to use it, and must be authorized to perform it for the appropriate work unit depending on local configuration options.
All titles linked by the bound-with process will share the same item record, including the item record’s associated call number, item ID, and locations.
 >
>  >
> >
>
This interface provides the ability to import a single Bibliographic Record or a file of Bibliographic Records one at a time into the OLE database. This allows catalogers to download records from outside sources such as OCLC. The import may be to add a new title, in which case, a new OLE holdings record and item record will also be created, or to replace an existing Bibliographic Description from a different source. If the Bibliographic Description is replacing another, no OLE Instance will be created. If you need to add an additional OLE Instance or Item or modify an existing one, you will need to do so through the editor.
You will be able to edit both the Bibliographic Description being imported and any OLE Instance(s) linked to it during the import process. Once the import process has been completed, only those fields designated as “protected from overlay” will remain from the original Bibliographic Description when replacing an existing bibliographic description. Linkages to purchase orders, circulation records, etc. will also be unaffected.
Note
Import Bib is not intended for batch imports.
Note
For more information about importing batch records, see the Batch Framework section of the OLE Guide to System Administration Functions. This and other OLE user guides are available for download from OLE Documentation Portal.
Call up the Import Bib interface.
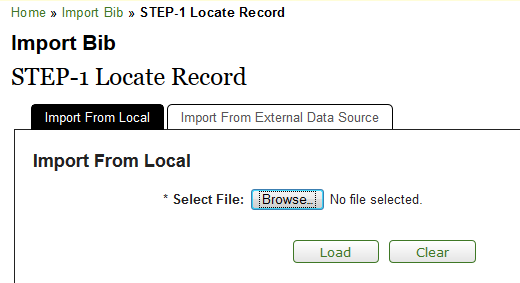
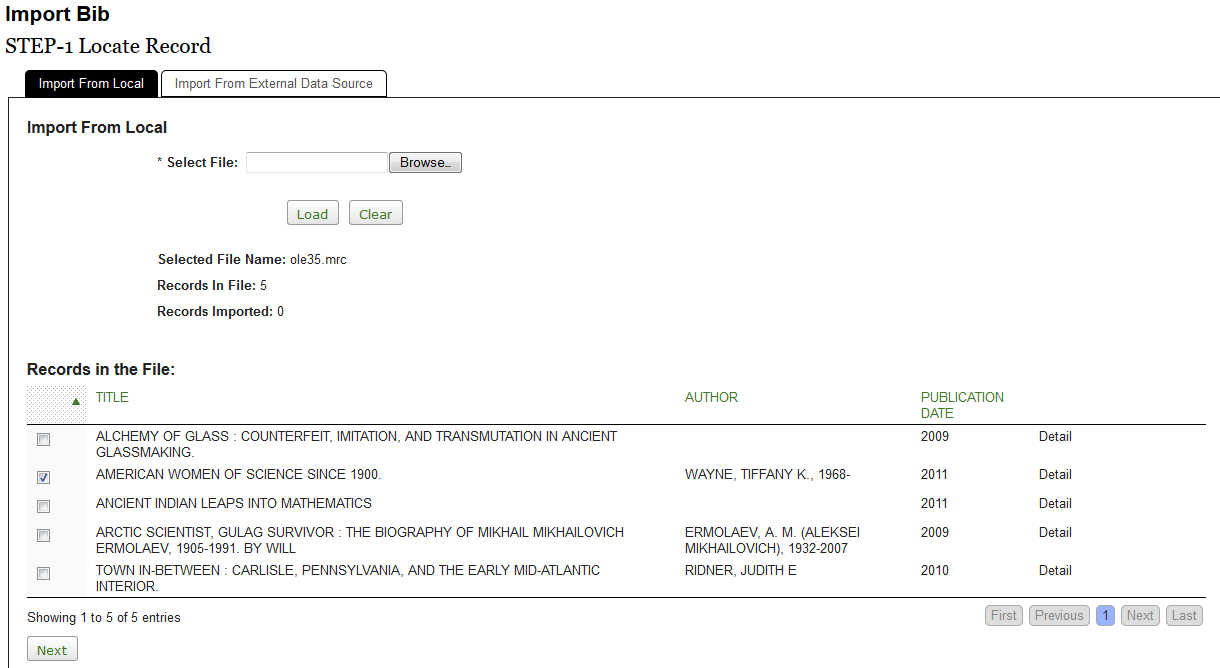
Click browse to search for the file from your local machine.
Click
 .
.Records in the File will contain the records loaded.
Click Detail to view the MARC record.
Select the record you wish to load and click
 .
.
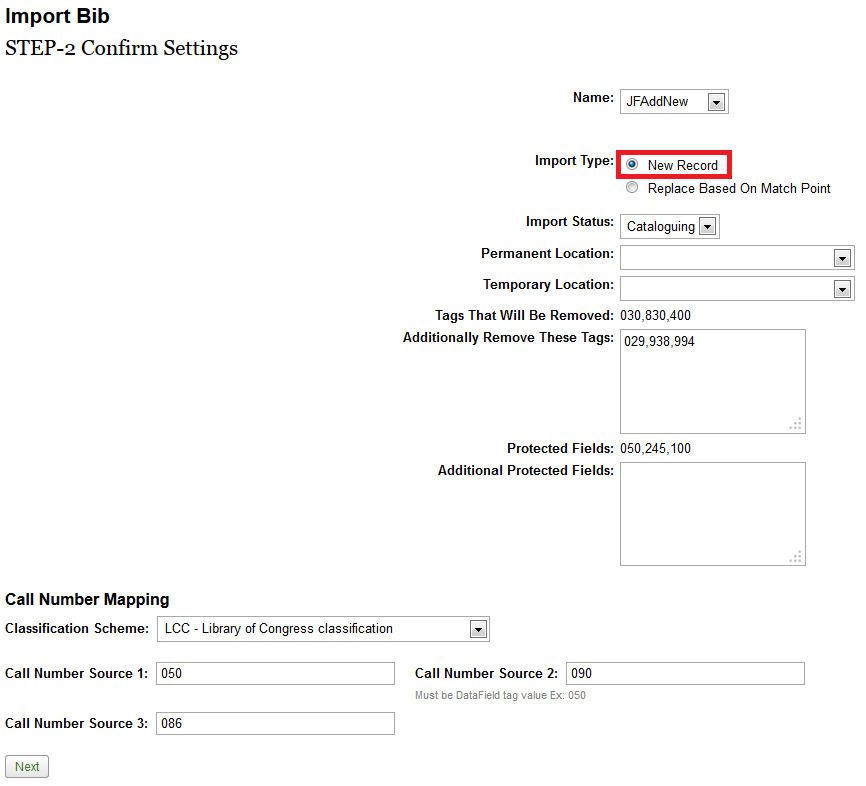
Confirm the Settings by selecting a Name from the dropdown list. This will set the User Preferences.
Note
To learn more about creating and modifying User Preferences, see information about Bib Import Preferences under the Batch Process Profile in the OLE Guide to System Administration Functions.

Click
 .
.Choose "New Record" as the Import Type.
Select the Import Status and Permanent Location information from the dropdown lists.
Enter any additional tags to remove and/or fields to protect.
Choose the Classification Scheme and modify the Call Number Source as necessary.
Click
 .
.You may edit the incoming Bibliographic Record as needed when it is displayed. Click Continue Process when you are finished editiong the Bibliographic Record.
Note
For more information about record editors, see Editors
You may enter or modify information on the OLE Holdings as appropriate and click Continue Process.
You may enter or modify information on the OLE Item as appropriate and click Save. Both the Item Type and Item Status fields must have values chosen from the drop-down lists.
Note
For more information about the Instance Editors, see the Instance Editor
On the Import Completion screen, you may choose to import more records or return to the main menu. You may also continue to modify the bibliographic, holding and item records by clicking Edit.

Call up the Import Bib interface.

Click browse to search for the file from your local machine.
Click
 .
.Records in the File will contain the records loaded.
Click Detail to view the MARC record.
Select the record you wish to load or overlay and click
 .
.
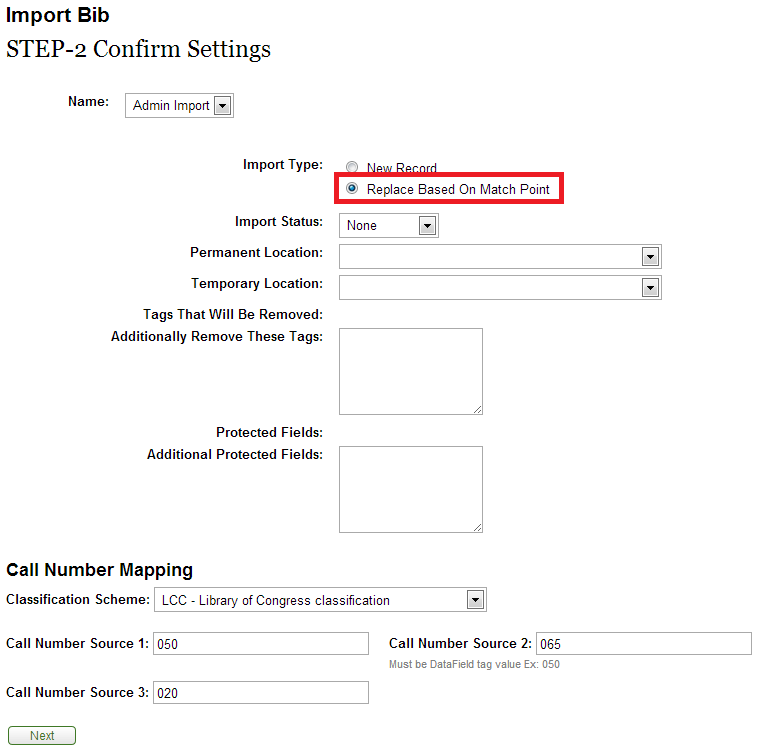
Confirm the Settings by selecting a Name from the dropdown list. This will set the User Preferences.
Note
To learn more about creating and modifying User Preferences, see information about Bib Import Preferences under the Batch Process Profile in the OLE Guide to System Administration Functions.

Click
 .
.Choose "Based on Match Point" as the Import Type.
You may change the Import Status, Permanent Location, Classification Scheme and/or modify the Call Number Source, or you may leave any of these unchanged to retain the settings on the existing record to be overlaid.
Enter any additional tags to remove and/or fields to protect.
Click
 .
.Note
If OLE cannot find the match point to perform an overlay, a new record will be created. Match points can be set via the User Inverface.
Note
To learn more about creating and modifying User Preferences, see information about Bib Import Preferences under the Batch Process Profile in the OLE Guide to System Administration Functions.
If an existing record is found from the match point, you will see a confirmation screen with information about both the existing bibliographic record (to be overlaid) and the incoming bibliographic record:
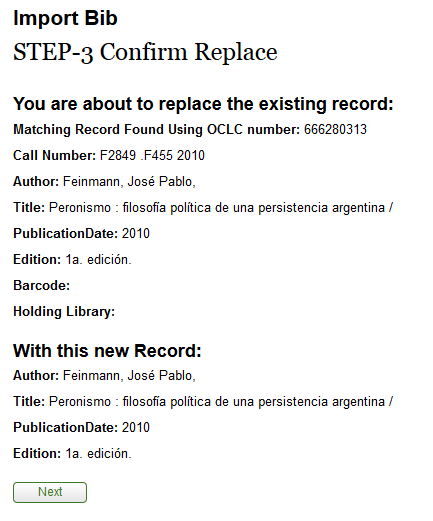
If no bibliographic record is found via the match point, the screen will indicate that a new bibliographic record will be created. Click Next to continue the process.
You may edit the incoming Bibliographic Record as needed when it is displayed. Click Submit to save the bibliographic record.
Note
For more information about record editors, see Editors
In order to edit the Holdings and Item record(s) attached to the overlaid record, you will need to use the Instance Editor. These records cannot be edited during the import process when existing records are overlaid.
This interface is here to show the possibility for institutions to import bibliographic records through a Z39.50 protocol. Because of licensing restrictions, each institution will have to implement this feature themselves. For implementation documentation see Searching External Datasources with Z39.50.
Imported MARC bibliographic records must be in UTF8 format.
Imported MARC bibliographic records must be in a file with the file extension “.mrc”
A Bibliographic record may have zero, one, or many OLE Instances.
An OLE Instance cannot exist without being linked to a Bibliographic record.
An OLE Instance must have one Holdings record, but it cannot have more than one Holdings record.
A Holdings record may have zero, one, or many Item records.
An Item record must be linked to a Holdings record. If there are zero Holdings records, there must be zero Item records.
New Bibliographical records created via “Single Bib Import” will by default have one Holdings record with one Item Record created and attached to the Bibliographic record upon import.
Any Holdings or Item records attached to an existing Bibliographic record replaced via “Single Bib Import” will not be affected by the import process.
Linkages to purchase orders, circulation records, etc. will not be affected by the import process.
 >
>  >
>  >
> 
Development of the MARC Editor has continued to be developed for the 1.0 release. This proof of concept editor is built on KRAD, or Kuali Rapid Application Development, to create more flexible and ergonomic user interfaces that allow editing of the DocStore, standardized doctypes and the Describe Workbench. Significant enhancements are scheduled to be implemented for future releases however building this first document editor in KRAD/Rice 2.0 provides the framework for editing and managing future document types. Editors for MARC authority records and MARC holding records are also anticipated in future releases. .
The Bibliographic (Bib) Editor may be accessed through other menu items listed
below the Describe submenu as well as through the edit or create new buttons in transactional
line items of Requisitions, Purchase Orders, Receiving, etc. or by clicking on the  link below a MARC description in the DocStore.
Tip
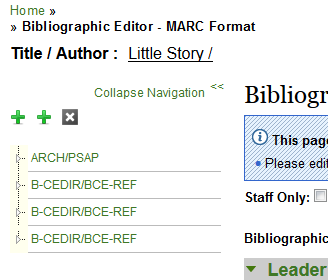
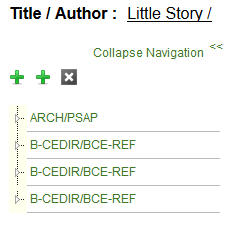
See the left panel navigation. This navigation panel will allow you to add
(click the  ) and delete (click the
  ) Bibliographic, OLE Instance (Holding and Item) and E-Instance records.
Tip
Check Staff Only to retain this record from the public display.
Once you have opened the Marc Editor, select a Bibliographic Record Status from the dropdown menu.
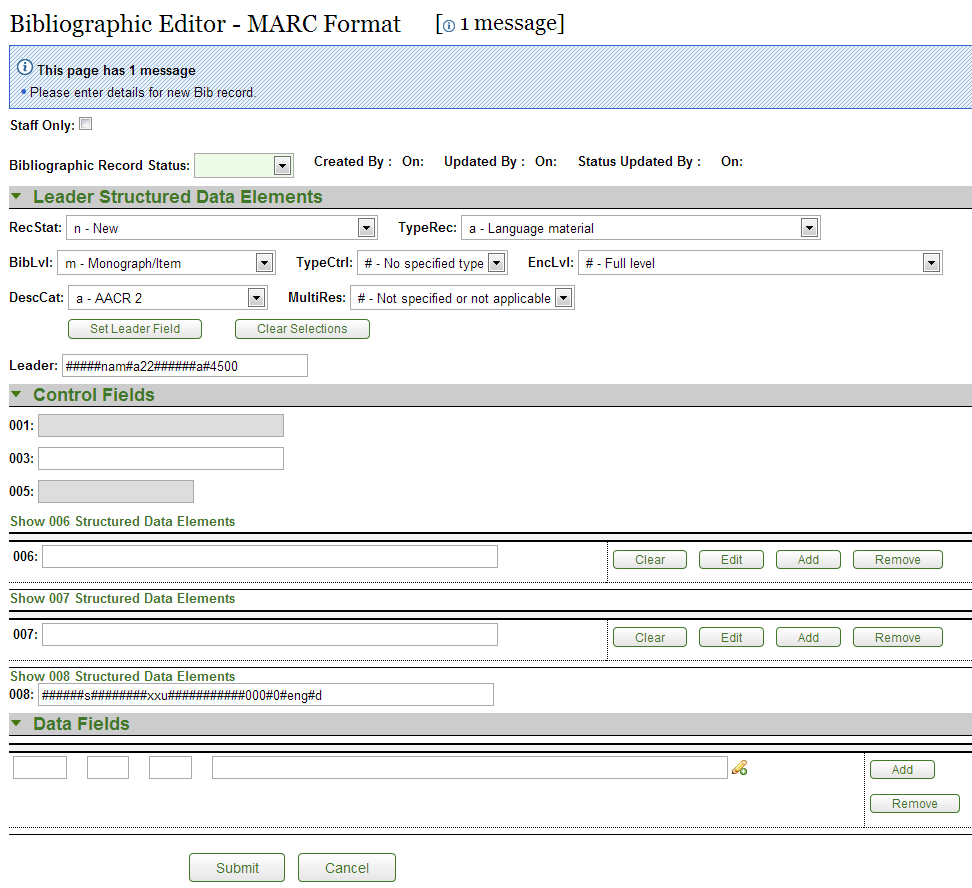
Enter data. The following data fields are required, at a minimum:
one leader field:
Select a valid element from the field's drop down lists and click Set Leader Field.
Click Clear Selections to remove the selected elements and return to the default settings.
When set, the Leader Field will appear in a single line below the data elements:

Click the down arrow to collapse the Leader Structured Data Elements display.

one 008 control field
Select a valid element for the field's drop down lists and click Set Control Field.
Click Clear Selections to remove the selected elements and return to the default settings.
When set, the 008 will appear in a sing line below the data elements:
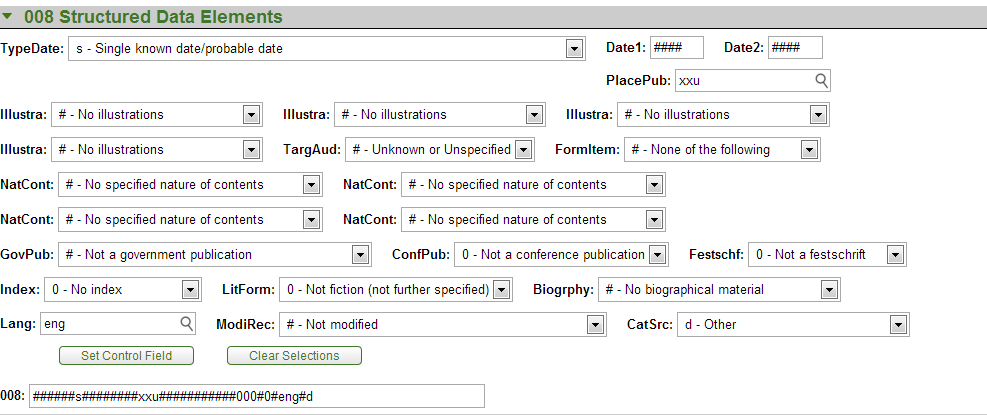
Click the down arrow to collapse the 008 Structured Data Elements display.
Note
The first option in the drop down menu is the default option and will appear again in order within the drop-down menu.
Note
Character positions 00-05 in the 008 field will first appear as ###### when a new record is being created and will update with the Date Entered on File once the bibliographic record has been submitted.
one 245 field
Data Fields (also known as variable fields) must have a three-digit numeric tag and values in both indicator positions (blanks are allowed). Variable fields 01X through 8XX must start with a delimiter and a subfield code (a letter or number) and include some text in the body of the field.
Enter the data field information. Click
 to add additional data fields. Click
  to expand the displayed field size.
Tip
Future enhancements include templates to prepopulate fields.
Click
 .
.OLE will refresh the screen and redisplay the record.
Click
 to cancel the edits and return to your original screen.
Click
 to cancel the edits and close the window.
If you submit an invalid record, OLE will display an error message.

On the left navigation panel, click the first top level plus sign  to add an OLE Instance Holding records.
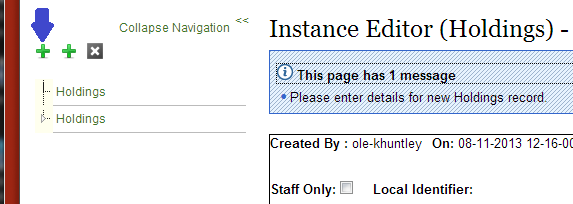
Note
For more information about the OLE Instance Holdings and Item Editor, see Instance Editor
Click the second top level plus sign  to add an OLE E-Instance EHoldings records.

Right click on the call number to delete a holdings record or add an item record.

Click the top level  to delete the current bibliographic record.

A bibliographic record may have zero, one, or many item records attached.
Note
When displayed in the left pane, only a maximum of 5000 items per holding will be displayed.
Tips for Editor
Leader field: ___________________ (ex., format should be “00337nam a2200109z 4500”)
Control fields:
tags can be any 002-008 value
entries must contain text (no edit checks occur so anything will work)
Content Fields:
___ ___ _______________ (ex, format “020 __ __ |a9780748436358”)
one required entry for the group of lines is a 245 field
the 245 subfield must start with delimiter |a (pipe, small a)
Do not leave a blank line from “adding” any tags before submitting
Note
Keyboard shortcuts are planned for 1.0.
 >
>  >
>  >
> 
The Dublin Core Editor described in this document represents a utility (that is a part of OLE) that will allow users to update and created bibliographic records. The records being updated will have previously been imported and indexed by OLE (OLE-DocStore).
Note
For more information about importing batch records, see the Batch Framework section of the OLE Guide to System Administration Functions.
Tip
You will notice the left panel navigation. This navigation panel will allow
you to navigate to other editors (bibliographic,OLE Instance: holding or item, or E-Instance) as
well as add (click the  ) and delete (click the
  ) records.
Each element is repeatable; there is an add tag button under each initial box to add another. There is no limit to the number of occurrences for an individual element. If a drop-down list is provided for an element, then the drop-down list for that element should be repeated as well when an element is repeated. When the Dublin Core element name differs from the recommended label for the element in a public view, the label is given in parentheses after the element name.
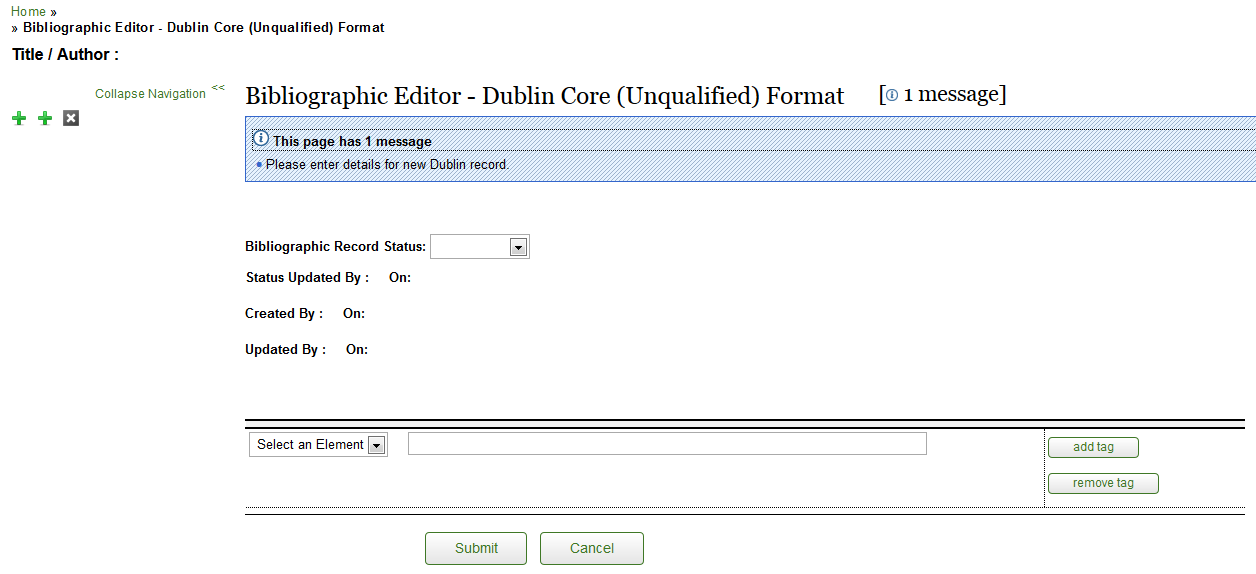
To add a Dublin Core Record to the OLE DocStore:
Select Title from the element drop down Enter the name by which the resource is formally known.
Click

Select Creator from the drop down of the new tag line. Enter the entity primarily responsible for making the content of the resource
Click

Continue to add tags and entering information into the fields until the Dublin Core Record is complete.
Note
Dublin core tags and descriptions are available to Kuali users through Google Docs. (You will need to be logged into KIS to access this document.)
Click

OLE will refresh the screen and redisplay the record.
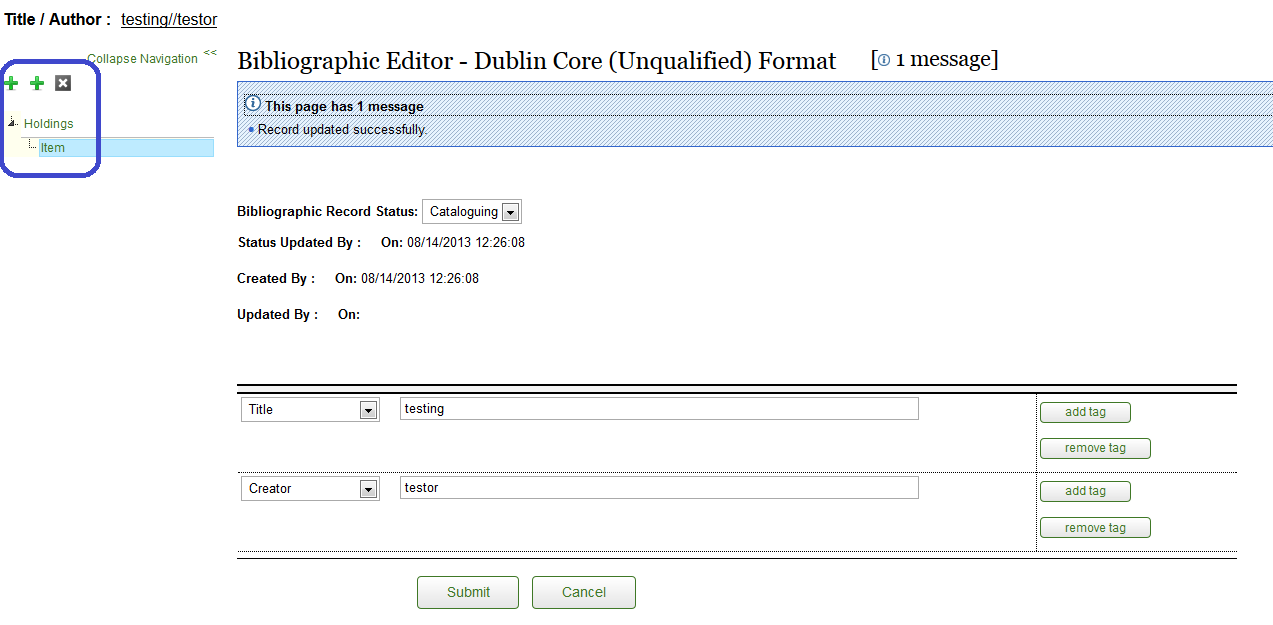
If the record is new, OLE will create placeholder Holdings and Item. Click Holdings to modify the Holdings record. Click Item to modify the Item record.
Note
For more information about the OLE Instance Holdings and Item Editor, see Instance Editor
Click the top level
 s to add additional OLE Instance or E-Instance records.
The OLE Instance document is a collective term for the holdings and item records associated with a bibliographic record. Holdings and item records may be created automatically when bibliographic records are imported individually or in batch, but they can also be created, edited, or deleted using the Instance Editor. A bibliographic record may have zero, one, or many holdings records associated with and subordinate to it. A holdings record may have zero, one, or many item records associated with and subordinate to it. In the case of a “bound-with,” a holdings record can be attached to more than one bibliographic record. In OLE 1.0, there is another kind of Instance in addition to the OLE Instance, and that is the E-Instance. The E-Instance is intended to support a workflow for electronic resources (see E-Instance Editor documentation for more details). While the use of the E-Instance is not required -- a library may choose to describe its holdings of an electronic resource using an OLE Instance -- it is recommended that institutions utilize the E-Instance for electronic resources.
In this example below, Bibliographic Record #1 has one E-Instance and one OLE Instance attached to it. This might occur if a library chose to attach its holdings for electronic and print versions of a work to the same record. The example also shows that Bibliographic Record #1 and Bibliographic Record #2 share an OLE Instance because of a bound-with situation. A Loan Transaction Record is shown temporarily linked to the item record for the print copy because the item has been checked out to a borrower. A purchase order for the item is also linked to that item record.
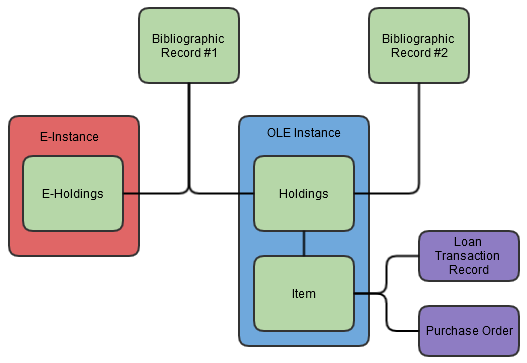
A holdings record contains basic information about a library's holdings of a particular work, such as its location, call number, and, for serials and other multi-part items, a summary statement of the extent of the library's holdings. An item record contains more detailed information about a particular item. For tangible materials, an item record typically describes something that could be or is intended to circulate as a unit, and contains the barcode number that is recorded on the physical piece.
Because holdings and item records do not exist independently within OLE but are always linked to bibliographic records, the Instance Editor is usually not invoked directly but is most often invoked from the display of a particular bibliographic record. However, it is possible to search holdings and item records separately from bibliographic records, and thus invoke the Instance Editor that way. The Instance Editor is not directly accessible from the OLE main menu.

Navigation among the holdings and item records associated with a bibliographic record is done by means of the links provided in the left pane. For a given bibliographic record, this menu will appear on the Bibliographic Editor screen, the Instance Editor (Holdings) screen, and the Instance Editor (Item) screen. The complete list of holdings and items associated with the bibliographic record is always available from the left pane regardless of which screen you are viewing, although the list of items linked to a particular holdings record may be “hidden” under the holdings record and not displayed. To display any hidden items associated with a holdings record, click on the small hollow triangle next to the holdings. If there is no such triangle next to the holdings, that means that the holdings record does not have any item records linked to it. If the items linked to a holdings are displayed, you can hide them by clicking on the small filled-in triangle next to the holdings.
In the left pane, a holdings record is identified by the location, call number, and copy number data elements in the holdings record. Not all of these data elements may be present. If none of them are present, the holdings record will be identified by the word “Holdings” in the left pane. If you are creating a new holdings record, it will be identified in the left pane by the word “Holdings” until you add location, call number, or copy number information to it and save it by clicking on the “Submit” button.
An item record is also shown in the left pane, indented slightly from the holdings record to which it is linked and is preceded in the display by a double slash. An item record is identified by the enumeration, chronology, copy number, and barcode number data elements of the item. Not all of these data elements may be present. If none of these data elements are present, an item record will be identified by the word “Item” in the left pane.
On the left navigation panel, click the first top level plus sign  to add an OLE Instance Holding records.

Right click on the call number to delete a holdings record or add an item record.

Right click on the item record to delete it. You will be asked to confirm that you actually want to delete the item before the command is actually executed. If you do not wish to delete the item, click on "Cancel". Due to a minor bug in the 1.0 release, you will then be returned to the OLE Describe menu instead of to the record you have been working on.

Click the top level  to delete the current bibliographic record. You will be asked to confirm that
you actually want to delete the record before you may proceed. If you do not wish to delete the
record, click on “Cancel”; you will then be returned to the OLE Describe menu instead of the record
you have been working on.

You can remove the entire left pane from the screen display by clicking on the "Collapse Navigation" command at the top of the pane. To restore the left pane, click on the double right arrows (>>).
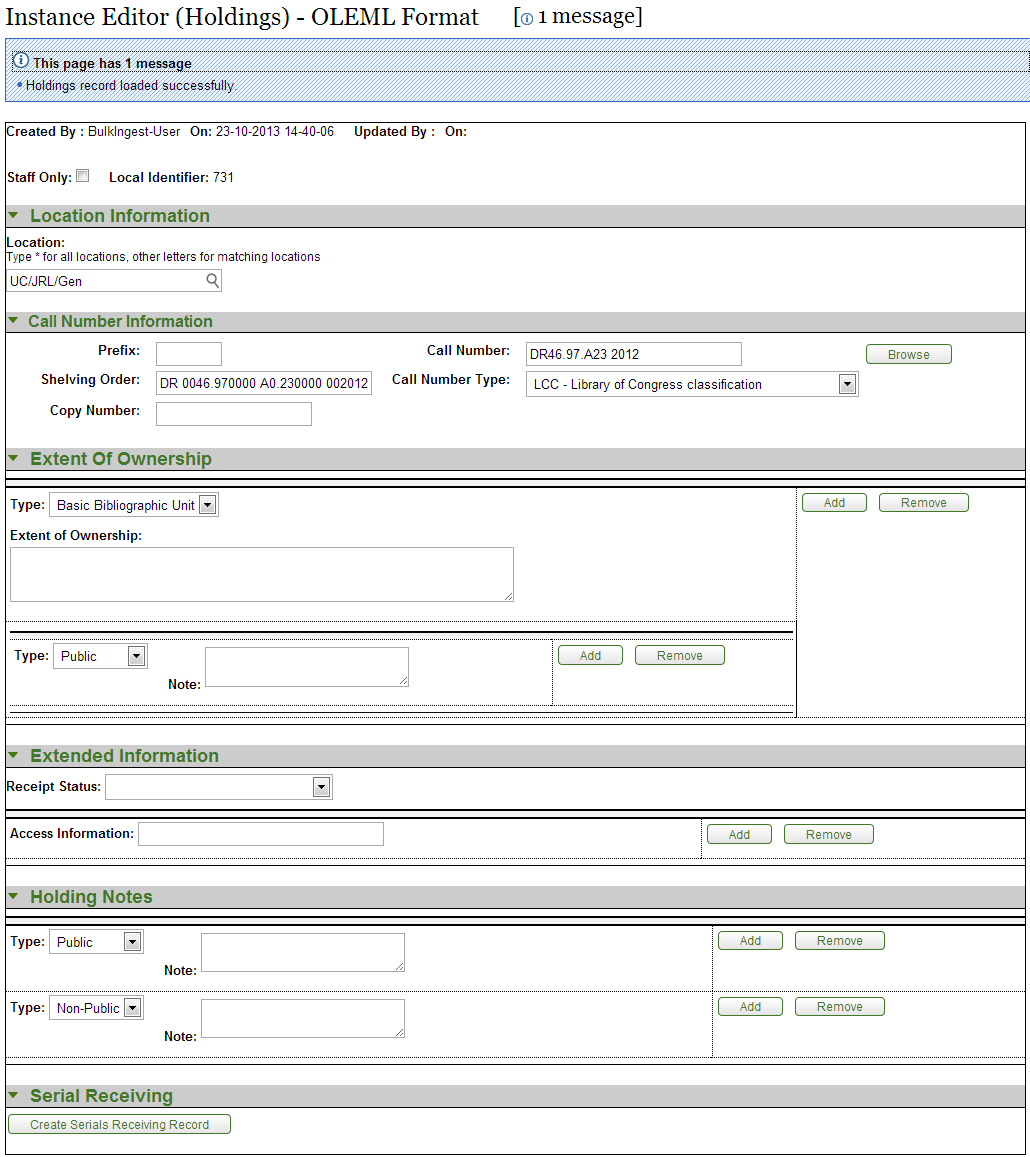
The top of the holdings record shows the ID of the user who created it and the date it was created. If the record has been subsequently updated, the ID of the last user to update it and the date of last update will also be shown.
A check box allows the holdings record to be flagged as Staff Only. The purpose of the flag is to make it possible to hide that particular holdings record from end users in the library's discovery layer (OPAC).
The Local Identifier is the number of the holdings record within the OLE system.
The OLE Instance Holding record includes unique tabs -- Location Information, Call Number Information, Extent of Ownership, Extended Information, Holding Notes, and Serial Receiving.
The location shows where the items described by the holdings record are located. OLE allows locations to be defined as part of a hierarchy of up to five levels (for example, Institution/Campus/Branch Library/Collection/Shelving Location).

Location Information tab definition
|
Title |
Description |
|
Location |
Select the location from the dropdown list: Begin typing and a list of options will appear. Enter “*” (asterisk) to display the complete list. |
The Call Number Information tab contains the call number, classification, and shelving scheme for the holding.

Call Number Information tab definition
|
Title |
Description |
|
Prefix |
Term that precedes a call number. |
|
Shelving Order |
A system-generated version of the call number that OLE uses for call number sorting. Because of the complexity of call numbers, in rare cases it may not be generated correctly to provide for proper sorting, so catalogers can edit it in order to change the sort order. |
|
Copy Number |
Library-assigned to distinguish each copy of the same title. A library may wish to create a separate holdings record for each copy. OLE also permits copies to be identified at the item level rather than the holdings level, as long as the location and call numbers are the same (for example, two copies of the same monograph shelved together in the same place in the same branch library). |
|
Call Number |
The full call number, not subfielded. Click NoteFor more information on the interface, seeCall Number Browse |
|
Call Number Type |
Scheme used to shelve a bibliographic item in the collections of the reporting organization. Select the Call Number Type from the drop down. |
The Extent of Ownership tab contains the summary holdings and notes (public or private) for institutions.
Click  to add additional Extent of Ownership lines or notes.
Click  to remove excess Extent of Ownership lines or notes.

Extent of Ownership tab definition
|
Title |
Description |
|
Type |
Select the type for extent of ownership from the drop down list. Three types are provided for: Base Bibliographic Unit, Supplementary Material, and Indexes. These correspond to fields 866, 867, and 868, respectively, in the MARC Holdings format. |
|
Extent of Ownership |
Record here in free text form a summary statement of the library’s holdings for a particular copy and a particular type (Base Bibliographic Unit, Supplementary Material, or Indexes). An Extent of Ownership statement is not normally used for single-part items. |
|
Type |
Select public or nonpublic type from the drop down list to determine whether the note will be viewable from the discovery layer. |
|
Note |
A free-text field to record information about a particular copy and type of holding. |
The Extended Information tab contains receipt status and access information.
Click  to add additional Access Information URLs.
Click  to remove excess Access Information URLs.

Extended Information tab definition
|
Title |
Description |
|
Receipt Status |
Select the Receipt Status from the drop down list. The values correspond to those used in the MARC Holdings format, field 008/06, and include the following: Unknown, Other receipt or acquisition status, Received and complete or ceased, On order, Currently received, Not currently received. |
|
Access Information |
The purpose of this field is to record a URL for a particular copy of an electronic item. In a consortial environment, different institutions or campuses may be given different URL’s from a vendor for accessing the same item. |
The Holding Notes tab contains public and nonpublic notes that apply to the holding record.
Click  to add additional notes.
Click  to remove excess notes.

Holding Notes tab definition
|
Title |
Description |
|
Type |
Select public or Nonpublic from the drop down list to determine whether the note will be viewable from the discovery layer. |
|
Note |
A free-text field to record information about the holdings for this particular copy. |
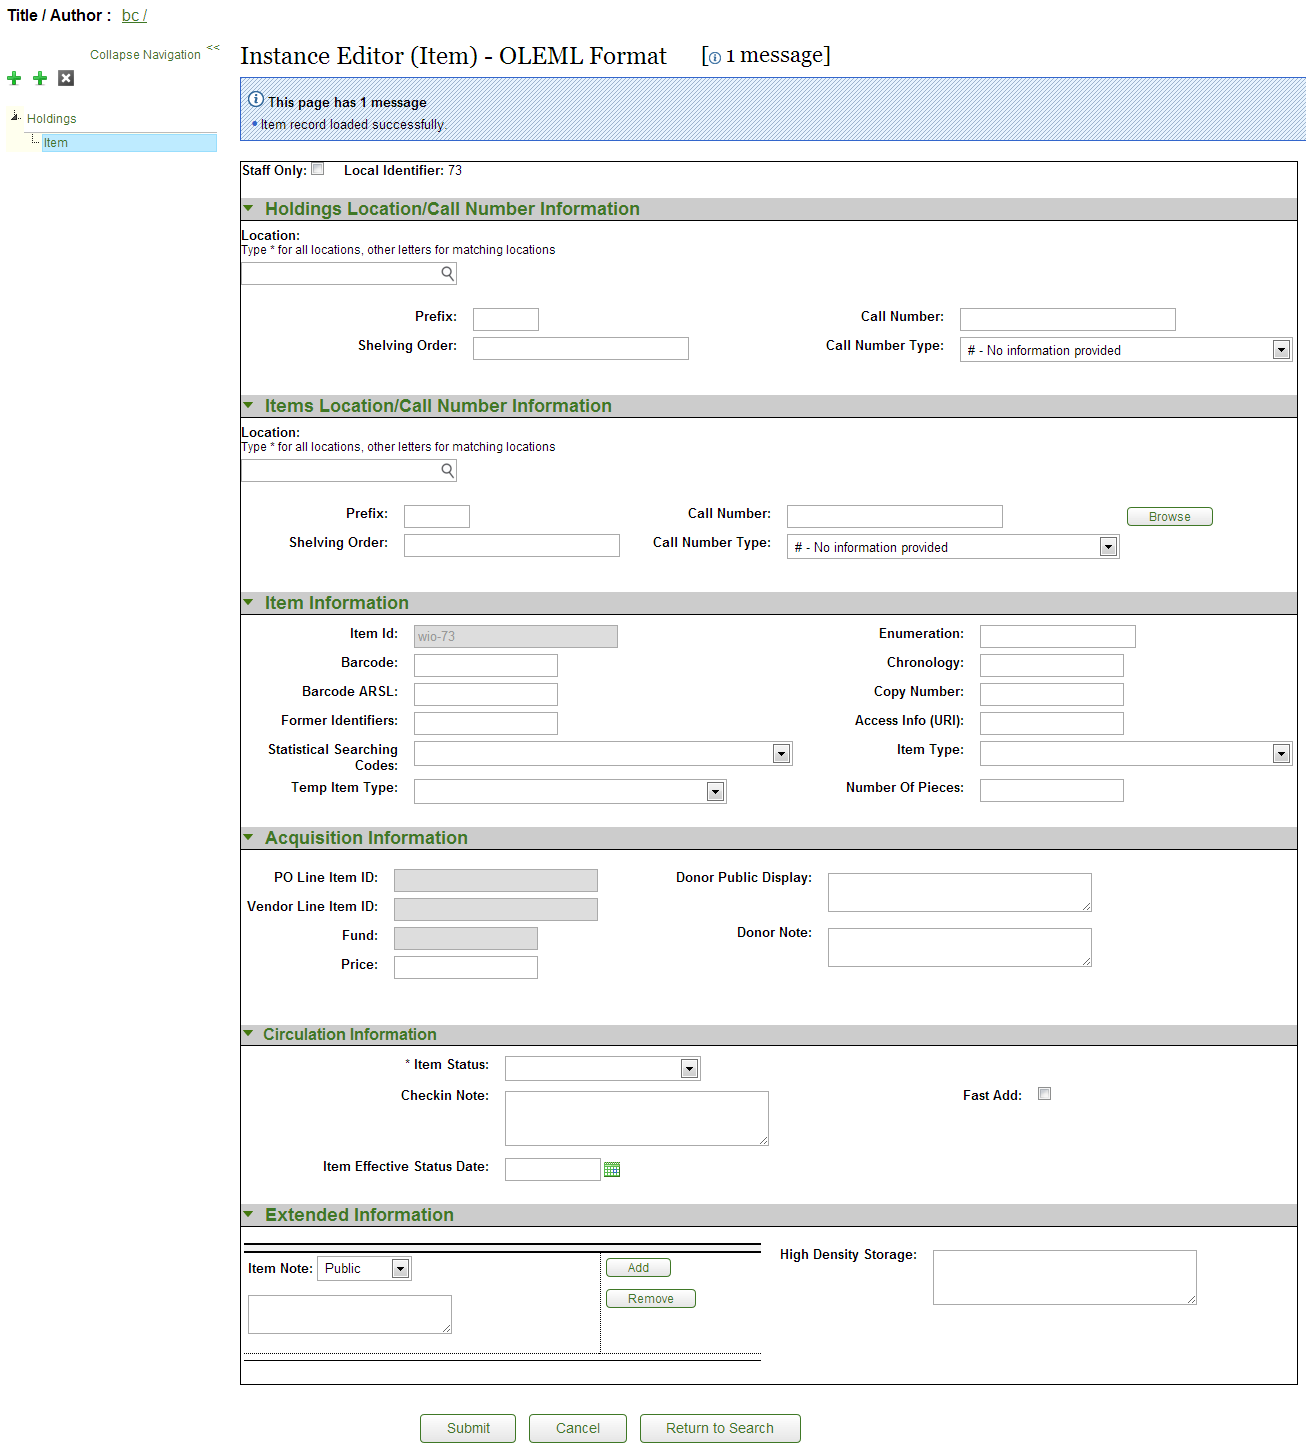
The top of the item record shows the ID of the user who created it and the date it was created. If the record has been subsequently updated, the ID of the last user to update it and the date of last update will also be shown.
A check box allows the holdings record to be flagged as Staff Only. The purpose of the flag is to make it possible to hide that particular holdings record and any associated item records from end users in the library's discovery layer (OPAC).
The Local Identifier is the number of the holdings record within the OLE system.
The OLE Instance Item record includes unique tabs with some information inherited from the Holding record -- Holding Location/Call Number Information, Item Location/Call Number Information, Item Infromation, Acquisition Information, Circulation Information, and Extended Information.
The Holdings Location/Call Number Information tab contains call number information inherited from the Holdings record. It is not editable from the item record.

The Items Location/Call Number Information tab contains the call number, classification, and shelving scheme for the item. Most often this information is inherited by the holdings but on occasion an item requires unique location/call numbers, such as temporary locations (Course Reserves).

Items Location/Call Number Information tab definition
|
Title |
Description |
|
Prefix |
Term that precedes a call number. |
|
Shelving Order |
A system-generated version of the call number that OLE uses for call number sorting. Because of the complexity of call numbers, in rare cases it may not be generated correctly to provide for proper sorting, so catalogers can edit it in order to change the sort order. |
|
Call Number |
The full call number, not subfielded. Click NoteFor more information on the interface, seeCall Number Browse |
|
Call Number Type |
Scheme used to shelve a bibliographic item in the collections of the reporting organization. Select the Call Number Type from the drop down. |
The Item Information tab contains information unique to the item – barcode, identification number, copy and volume numbers, etc.

Item Information tab definition
|
Title |
Description |
|
Item ID |
System supplied unique ID. |
|
Barcode |
A free text field for the identifier physically attached to an item as a unique identifier. Indexed to permit retrieval when the barcode is scanned or typed in as a search term. Used for identification of physical item and for circulation purposes. |
|
Barcode ARSL |
A free-text field for a separate barcode for the Automated Retrieval System Location (ARSL). Must conform to site's locally configurable validation scheme. |
|
Former Identifiers |
A free text field for recording previous barcodes of an item here in order to track changes and replacements. At the present time, this data element is not indexed. |
|
Statistical Searching Codes |
Locally defined value to be used in searching for/limiting searches for items and for statistical reporting. |
|
Temp Item Type |
To temporarily change the item type, select a temporary item type from the dropdown list. For example, an item on reserve needs to circulate according to a different circulation rule for a while. |
|
Enumeration |
Designation used to identify a specific part of a multipart title. |
|
Chronology |
Designation used to identify the issue date of a specific part of a multipart title. Enumeration and/or chronology data are typically included at the end of a call number to identify the specific volume of a multi-part item. |
|
Copy Number |
Library-assigned to distinguish each copy of the same title. If two or more copies of a work with the same call number are shelved together in the same place, you may record the copy number here. If different copies have different call numbers and/or shelve in different locations, it is recommended that different holdings records be used and that the copies not be identified at the holdings level. |
|
Access Info (URI) |
Optionally, record here the URL associated with a particular part of a multi-part electronic resource. |
|
Item Type |
Used in conjunction with Patron Type to determine a circulation policy for a particular item when a circulation transaction occurs. Each OLE library determines what Item Types it wishes to use. Typically, Item Types identify either a particular format of material (“Book”) or a particular loan length (“2-hour loan”). |
|
Number Of Pieces |
Record here the number of pieces of an item intended to circulate as a unit. For example, if the item is a book with an accompanying map in a separate pocket, you may wish to record “2” here. Note that this is an uncontrolled free-text field, so it is possible, if not necessarily desirable, to enter something other than a number. |
Information from the purchase order is stored here. You may also track information about a donor if applicable.

Acquisition Information tab definition
|
Title |
Description |
|
PO Line Item ID |
System-supplied identifier for purchase order line item. Not editable. |
|
Vendor Line Item ID |
Captures the vendor ordering identifier to enable easier matching of additional information provided by the vendor after an initial order is placed. Not editable from within the item record. |
|
Fund |
This is the account number from the Purchase Order line item that appears in the accounting lines and represents the fund used to purchase the item. Not editable from within the item record. |
|
Price |
The price of the item from the Purchase Order. Free text, editable. |
|
Donor Public Display |
A free-text, editable note regarding the donor of a particular item, to be used in the library’s discover layer (OPAC). |
|
Donor Note |
A free-text, editable note regarding the donor of a particular item, or other source of acquisition, to be used by library staff only. Example: gifts |
The Circulation Information tab allows circulation and cataloging staff to communicate.

Circulation Information tab definition
|
Title |
Description |
|
Item Status |
Required. Select the item status from the drop down list. |
|
Check in Note |
Can be used to communicate messages to circulation staff when they are checking in the item |
|
Item Effective Status Date |
Date on which the item status was assigned to the item. Use the calendar
icon |
|
Fast Add |
Can be used to trigger an automatic "route to cataloging" message upon return of Item from circulation (or simply to identify the Item as a "fast add" for purposes of later reporting). Default is set at the operator level. |
|
Staff Only |
Staff only indicator. Check to keep the item from public view. |
|
Current Borrower |
Identifies, by OLE record ID number, the patron record of the person to whom the item is currently checked-out. Not editable. |
|
Claims Return Flag |
This flag may be checked if a borrower claims to have returned an item from circulation but there has been no circulation check-in transaction for the item. |
|
Due Date Time |
Date and time when a checked-out item must be returned. |
The Extended Information tab contains notes for the public or for staff and identifies high density storage information.
Click  to add additional notes.
Click  to remove excess notes.

Extended Information tab definition
|
Title |
Description |
|
Item Note |
Select public or nonpublic type from the drop down list to determine whether the note will be viewable from the discovery layer. |
|
Enter a note about the item. | |
|
High Density Storage |
A free-text field intended to identify the row, module, shelf, and tray information for the item's high density storage location. |
Adding a New OLE Instance to an Existing Bibliographic Description
Identify the bibliographic description to which an OLE Instance is to be added.
Click the
 to call up Instance Editor from the bibliographic record.
Note
Alternatively, you may click Create Instance from the Describe Workbench.
Input required and optional data elements on the Holdings and Items tabs.
Click
 .
.
Editing an Existing OLE Instance (Holdings Description and/or Item record)
Identify bibliographic description and OLE Instance to be edited.
Edit selected data elements and add new as necessary
Click
 .
.
A holdings record must be linked to an existing bibliographic record (and, in the case of a bound-with, may be linked to more than one bibliographic record).
An item record record must be linked to an existing holdings record.
A bibliographic record may have zero, one, or many item records attached.
Note
When displayed in the left pane, only a maximum of 5000 items per holding will be displayed.
The E-Instance and E-Instance Editor (new in 1.0) are intended to support electronic resources. The E-Instance (also sometimes called EHoldings) stands on its own; it does not have any associated item records. Instead, it combines some information from both OLE holdings and item records into a single record and adds other fields that are useful for managing electronic resources. A bibliographic record may have zero, one, or many E-Instance records associated with and subordinate to it, in addition to OLE Instances. An E-Instance can also be linked to an E-Resource record to represent its participation in a larger electronic resource package. E-Instances can be created automatically when bibliographic records are imported or manually using the E-Instance editor.
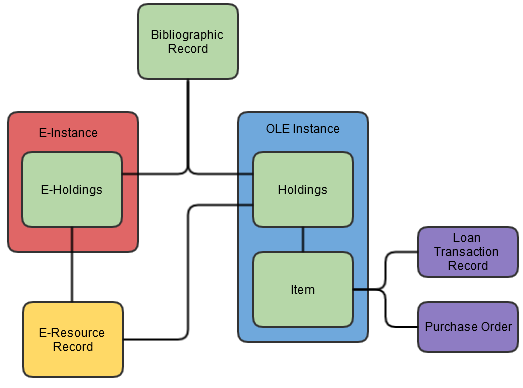
A user can create E-Instance records to store and view data about individual titles that make up an E-Resource purchase. The E-Instance record stores data that is unique to the title level, such as URL, coverage dates, and post-cancellation access dates. The E-Instance also inherits data from its parent E-Resource record. In some cases, however, this inherited data could vary and will require customization at the E-Instance level.
Because E-Instance records do not exist independently within OLE but are always linked to bibliographic records, the E-Instance Editor is most often invoked from the display of a particular bibliographic record. However, it is possible to search EHoldings records separately from bibliographic records, and thus invoke the E-Instance Editor that way. The E-Instance Editor is not directly accessible from the OLE main menu.
Users may create an E-Instance from two different locations.
From an E-Resource Record: On the Select/Acquire tab, under the Acquisition menu, click E-Resource.
On the Instance tab of the E-Resource Record, click
 .
.Note
For additional information about the E-Resource Record, see the appropriate section in the OLE Guide to Select and Acquire
From a Bibliographic Record: On the Describe tab, under the Cataloging menu, you may search for a bibliographic record from the Describe Workbench or create a new record directly from the Bib Editor.
Note
For more information about Bibliographic Editors, see Bib Editor
For more information about the Describe Workbench, see Describe Workbench

Navigation among the Bibliographic record, OLE Instances (holdings and items) and E-Instances is done by means of the links provided in the left pane. For a given bibliographic record, this menu will appear on the Bibliographic Editor screen, the Instance Editor (Holdings) screen, the Instance Editor (Item) screen, and the E-Instance Editor screen. The complete list of holdings, items, and E-Instances associated with the bibliographic record is always available from the left pane regardless of which screen you are viewing
In the left pane, an E-Instance record is shown at the same level as a holdings record. It is identified by Location and E-Resource name elements in the E-Instance record. Not all of these data elements may be present. If neither of them are present, the E-Instance record will be identified by the word “eHoldings” in the left pane until you add a Location or link it to an E-Resource and save it by clicking on the “Save” button. .
Click the second top level plus sign  to attach a new E-Instance EHoldings record to a bibliographic record in the
Bib/Instance Editor. Hover over either of the two "+" signs to see a pop-up note identifying which
creates an Instance verses an E-Instance. When creating a new E-Instance, the ‘eHoldings’ label
will appear in the left pane after clicking Save if you do not add
a Location field and the E-Instance is not linked to an E-Resource.

Right click on the call number to delete an Instance or E-Instance record or add an item record.

If you delete the E-Instance, it will be removed immediately without requiring any confirmation. You can also select the E-Instance in the left pane and click the Delete button in the E-Instance Editor. This will also delete the E-Instance immediately without requiring confirmation.
Click the top level  to delete the current bibliographic record. You will be asked to confirm that
you actually want to delete the record before you may proceed. If you do not wish to delete the
record, click on “Cancel”; you will then be returned to the OLE Describe menu instead of the record
you have been working on.

Note
Although you will still be viewing the E-Instance in the editor, if you navigate away from it you will find it has been fully deleted.
Note
In future releases, you will receive an error message if you attempt to delete an EInstance that is linked to a PO.
You can hide the entire left pane from the screen display by clicking on the "Collapse Navigation" command at the top of the pane. To restore the left pane, click on the double right arrows (>>).
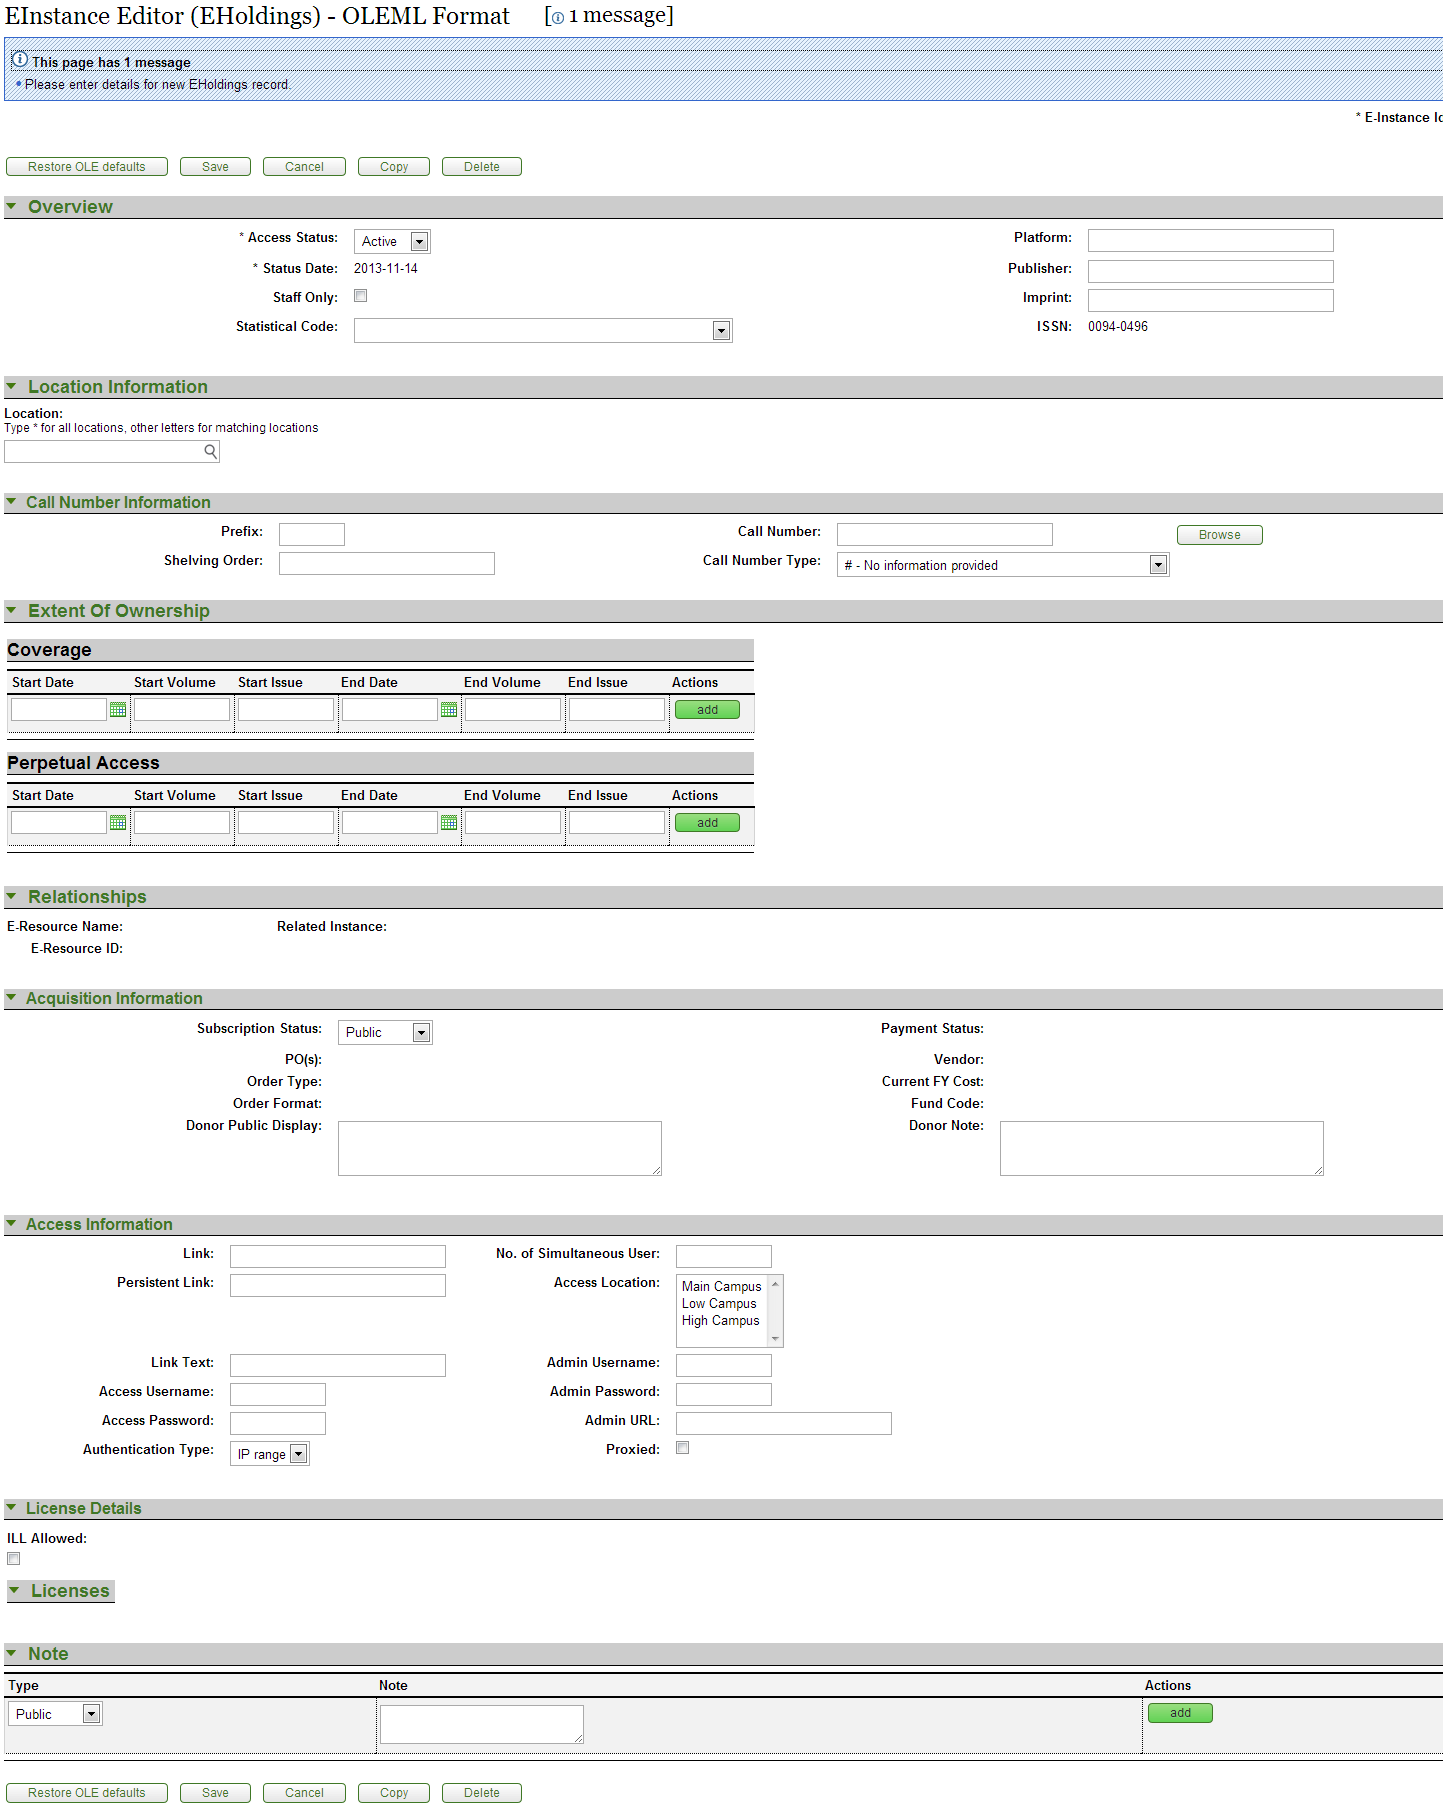
The E-Instance ID is a system generated identification number.
The E-Instance Holdings record includes these tabs -- Overview, Location Information, Call Number Information, Extent of Ownership, Relationships, Acquisition Information, Access Information and License Details.
The Overview tab contains a summary of critical information about the E-Instance.

Overview tab definition
The Location Information tab includes locations set up at each institution to describe where a resource is available or otherwise categorize it for searching / reporting / display purposes.

Location Information tab definition
|
Title |
Description |
|
Location |
Select the location from the drop down list. Begin typing and a list of options will appear. Enter “*” (asterisk) to display the complete list. |
The Call Number Information tab contains the call number, classification, and shelving scheme for the e-holdings.

Call Number Information tab definition
|
Title |
Description |
|
Prefix |
Term that precedes a call number. |
|
Shelving Order |
A system-generated version of the call number that OLE uses for call number sorting. Because of the complexity of call numbers, in rare cases it may not be generated correctly to provide for proper sorting, so catalogers can edit it in order to change the sort order. |
|
Call Number |
The full call number, not subfielded. Click NoteFor more information on the interface, see Call Number Browse |
|
Call Number Type |
Scheme used to shelve a bibliographic item in the collections of the reporting organization. Select the Call Number Type from the drop down. |
The Extent of Ownership tab contains the coverage and perpetual access start and end dates and issues for institutions. It is stored as specific dates, volumes, and issues, rather than as textual summary holdings, to allow for data that could be utilized by a link resolver in the future. There can be multiple Coverage dates and multiple Perpetual Access dates for a single E-Instance.
Note
If no Perpetual Access or Coverage Dates have been set on the E-Instance and the E-Instance is tied to an E-Resource, any dates set on the E-Resource will display here.
Click  to add Coverage or Perpetual Access lines. Click Delete to remove an existing Coverage or Perpetual Access line.
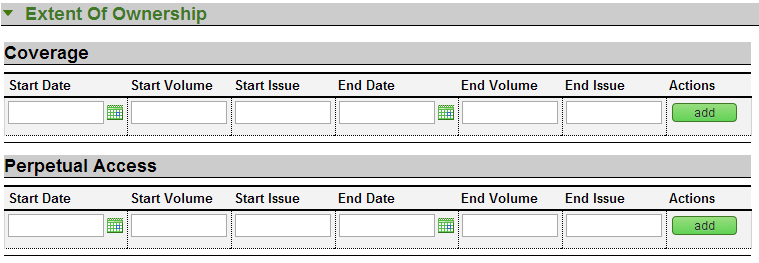
Extent of Ownership tab: Coverage and Perpetual Access definitions
|
Title |
Description |
|
Start Date |
Start date of electronic coverage / perpetual access. As of OLE 1.0, this must be speicfied as DD/MM/YY. This is pulled from the E-Resource record but can be modified. |
|
Start Volume |
Start volume of electronic coverage / perpectual access. This is pulled from the E-Resource record but can be modified. |
|
Start Issue |
Start issue of electronic coverage / perpetual access. This is pulled from the E-Resource record but can be modified. |
|
End Date |
End date of electronic access / perpetual access. As of OLE 1.0, this must be speicfied as DD/MM/YY. This is pulled from the E-Resource record but can be modified. |
| End Volume | End volume of electronic coverage / perpetual access. This is pulled from the E-Resource record but can be modified. |
| End Issue | End issue of electronic coverage / perpetual access. This is pulled from the E-Resource record but can be modified. |
The Relationships tab identifies any associated E-Resource and Instance records. No data on this tab can be modified from the E-Instance editor in OLE 1.0. If an E-Resource is linked to this E-Instance, the name and ID of that E-Resource will display in this section, along with a link to the E-Resource record.
Note
For additional information about the E-Resource Record and linking E-Instances, see the appropriate section in the OLE Guide to Select and Acquire

The Acquisition Information tab contains the relevant purchasing information from the Purchase Order and Invoice.
Note
In 1.0, Purchase Orders and Invoices cannot be linked to E-Instances, so this data will not appear in the E-Instance.

Acquisition Information tab definition
|
Title |
Description |
|
Subscription Status |
Current subsciption status of the electronic resource. Locally configurable. |
|
PO(s) |
Display-only. ID of the purchase order(s) to which the E-Instance is linked. |
|
Order Type |
Display-only from the PO(s). Order type of the purchase order(s) to which the E-Instance is linked. For example "subscription" or "one-time purchase". |
|
Order Format |
Display-only from the PO(s). Format of the current purchase order(s) to which the E-instance is linked. |
|
Donor Public Display |
A free-text, editable note regarding the donor of a particular electronic resource, to be used in the library’s discover layer (OPAC). |
|
Payment Status |
Display-only from the Invoice. If a current FY payment has been made, status will be Paid; if no current FY payment, status will be Not Paid |
|
Vendor |
Display-only from the PO(s). The vendor of the electronic resource. |
|
Current FY Cost |
Display-only from the Invoice. The sum total of the current year's payment for the electronic resource. |
|
Fund Code |
Display-only from the Invoice. The account number for the electronic resource. |
|
Donor Note |
A free-text, editable note regarding the donor of a particular electronic resource to be used by library staff only. Example: gifts |
The Access Information tab contains all information about accessing the electronic title including the links, usernames and passwords.
Note
A number of the fields on the Access Information tab are inherited from the E-Resource so that if they have not been set on the E-Instance and the E-Instance is tied to an E-Resource, any dates set on the E-Resource will display here.

Access Information tab definition
|
Title |
Description |
|
Link |
The URL for users to access the electronic resource. |
|
Persistent Link |
The locally assigned persistant URL for the electronic resource. |
|
Link Text |
Publicly displayable information aside from coverage statement associated with a specific link. For example "PDF version". |
|
Access Username |
The username to use to access the electronic resource, if necessary. This is pulled from the E-Resource record but can be modified. |
|
Access Password |
The password to use to access the electronic resource, if necessary. This is pulled from the E-Resource record but can be modified. |
|
Authentication Type |
The type of Authentication needed for the electronic resource. Select the type from the dropdown list. This is pulled from the E-Resource record but can be modified. |
|
No. of Simultaneous Users |
The number of users who can simultaneously access the electronic resource at one time. This is pulled from the E-Resource record but can be modified. |
|
Access Location |
The institutional location(s) where the electronic resource may be accessed. Select a locally configured option(s) from the dropdown list. This is pulled from the E-Resource record but can be modified. |
|
Admin Username |
The administrative username used to access the plaform portal to manage the electronic resource. |
|
Admin Password |
The administrative password used to access the platform portal to manage the electronic resource. |
|
Admin URL |
The administrative URL to access the platform portal to manage the electronic resource. This is site users would go to enter their IP ranges, input their link-resolver URL, manage the look and feel of the platform for their users, gather usage stats, etc. |
|
Proxied |
Check the box if access to the electronic resource is proxied. |
The License Details tab identifies any License Requests that are associated with an E-Resource to which this E-Instance is linked and stores manually entered simple ILL permissions.
License Requests are pulled from the linked E-Resource Record. In 1.0, this is the only way to link E-Instances with License Requests.
Note
For more information on License Requests and E-Resource Record, see the appropriate sections in the OLE Guide to Select and Acquire.

The Note tab contains public and nonpublic notes that apply to the E-Instance record.
Click  to add notes.
Click delete to remove existing notes.

Note tab definition
|
Title |
Description |
|
Type |
Select public or Non-Public from the drop down list to determine whether the note will be viewable from the discovery layer. |
|
Note |
A free-text field to record information about this E-Instance. |
Adding a New E-Instance to an Existing Bibliographic Description
Identify the bibliographic description to which an E-Instance is to be added.
Click the
 to call up E-Instance Editor from the bibliographic record.
Input required and optional data elements on the EHoldings tabs.
Click
 .
.
Editing an Existing E-Instance
Identify bibliographic description and E-Instance to be edited.
Edit selected data elements and add new as necessary.
Click
 .
.You may revert all E-Instance fields back to the default OLE record values by clicking button labeled Restore OLE defaults.
Unlike the Instance Editor, the E-Instance Editor has a repeated series of buttons at the top and bottom of the editor.

The
 button will re-set any fields on the E-instance that are inherited from the
E-Resource back to the default values specified on the E-Resource, overwriting any local changes.
This includes fields like Statistical Code, Coverage Dates, Perpetual Access Dates, Authentication
Type, Number of Simultaneous Users, and Access Location.
button will re-set any fields on the E-instance that are inherited from the
E-Resource back to the default values specified on the E-Resource, overwriting any local changes.
This includes fields like Statistical Code, Coverage Dates, Perpetual Access Dates, Authentication
Type, Number of Simultaneous Users, and Access Location.The
 button will save any edits to the E-Instance.
The
 button will close the E-Instance editor without saving any changes to the
E-Instance.
button will close the E-Instance editor without saving any changes to the
E-Instance.The
 button will create a new E-Instance with all of the same metadata except the
E-Instance ID. The new E-Instance will retain any linkages to the E-Resource Record that were part
of the original E-Instance.
 The
 button will delete the E-Instance immediately.
 Note
Although you will still be viewing the E-Instance in the editor, if you navigate away from it you will find it has been fully deleted.
 >
>  >
>  >
> 
The Transfer Instance/Item interface allows OLE users to transfer Instance records from one bibliographic record to another and transfer Item record from one Instance to another.
Call up the Transfer Instance/Item interface.
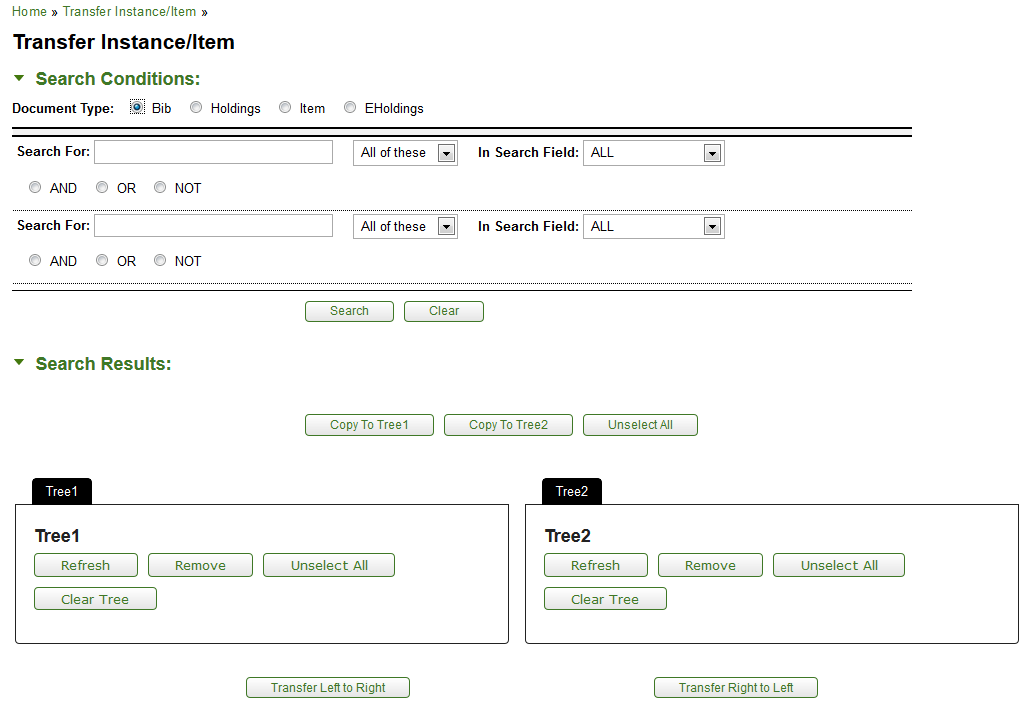
Search for the record that you wish to transfer. You may select a Document Type and search using Boolean operators as needed. Search results appear below the Search Conditions tab.
When the correct record is displayed, select it and click Copy to Tree1.
Search for the additional bibliographic records with which the OLE Instance or Item will be transferred.
When the correct record is displayed, select it and click Copy to Tree2.
Tip
Click View to confirm the correct record.
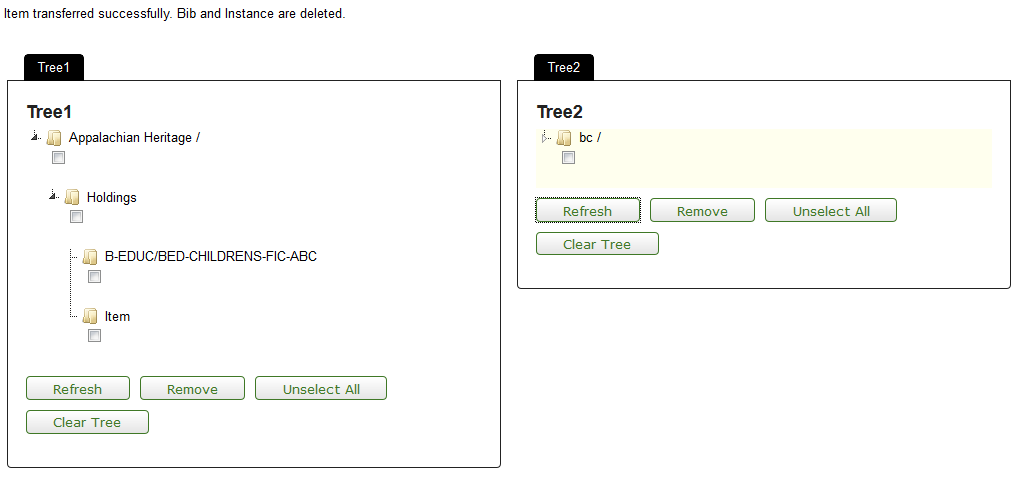
Each Tree will show the bibliographic record. You may branch down to the Instance or item level by clicking the arrow next to the folder.

Check the box to specify what level you wish to perform the transfer on.
Click the appropriate button to transfer the Instance or Item from the left to the right or vice versa. In this example, the Instance record in Tree 2 is selected and will be transferred Right to Left to the checked Bibliographic description in Tree 1.
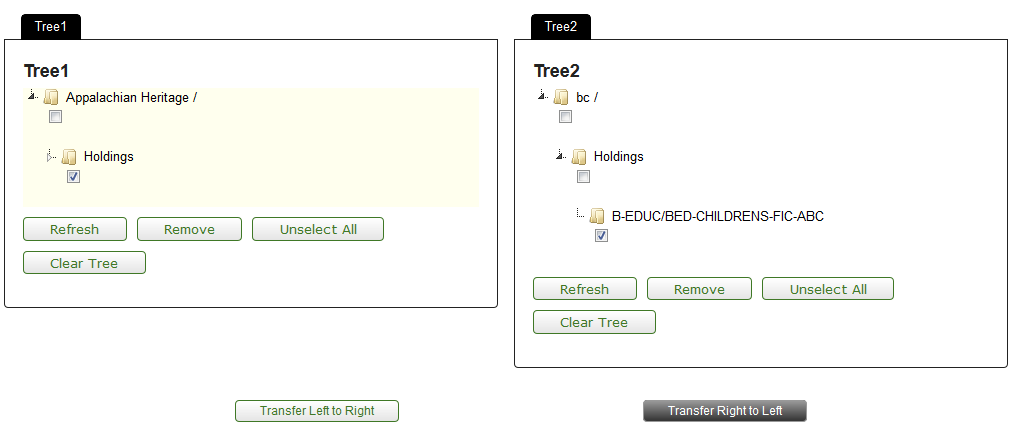
If there is only one item or holdings, OLE will delete the records. Click Delete to confirm this and to continue with the transfer.
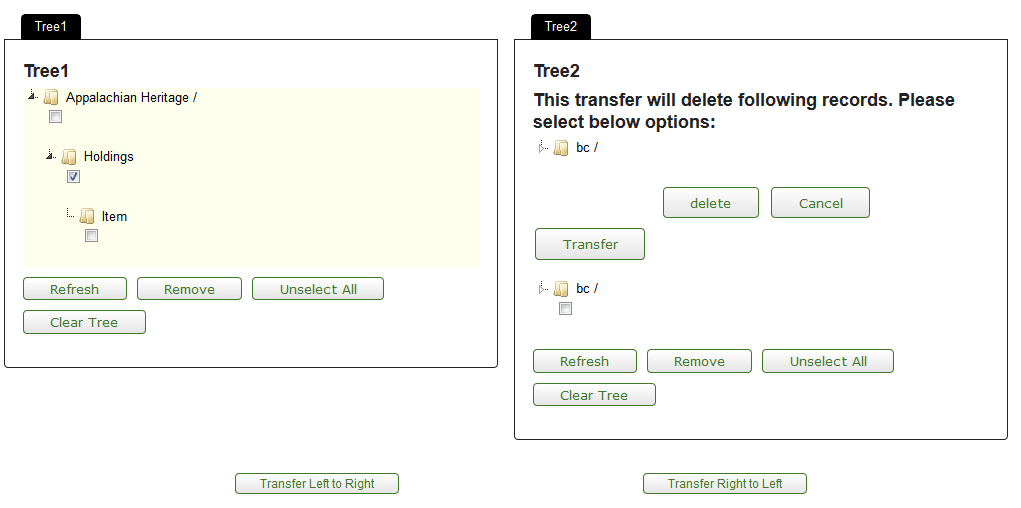
OLE will provide a confirmation message. Click Refresh in Tree 1 to see the transferred Holdings or Item record.
An OLE Instance must have one Item record and may have many Item records.
Note
This rule is under review for future releases.
An Item record can only be transferred to an OLE Instance.
If the transfer of an Item record would result in an OLE Instance with no Item records, that OLE Instance will be deleted.
An OLE Instance must have at least one associated Bibliographic Description. One OLE Instance may be associated with many Bibliographic Descriptions (to account for “bound-withs”).
A Bibliographic Description must have at least one OLE Instance and may have many OLE Instances.
An OLE Instance may only be transferred to a Bibliographic Description.
If the transfer of an OLE Instance would result in a Bibliographic Description with no OLE Instance, that Bibliographic Description will be deleted.
A user may not transfer an OLE Instance to or from Bibliographic Descriptions that the user’s work unit does not “own”. A user may not transfer Item records to or from OLE Instances that the user’s work unit does not own.
Note
Work units are being defined for the 1.5 release.
 >
>  >
>  >
> 
The following classification schemes are indexed and sorted in OLE: Library of Congress (LCC), Dewey Decimal Classification (DDC), National Library of Medicine (NLM), and Superintendent of Documents (SuDoc). The sort rules associated with these systems are based on the type of the classification scheme coded in the OLE holding record Call Number Type.
Note
NOTE: Local classification schema may also be coded. These schemas will, by default, be sorted character by character; if institutions require OLE to sort beyond character by character then this need will have to identified and documented by each institution.
In order to find an appropriate classification number for a topic or similar items within the collection, OLE has the call number browse interface.
Call up the Call Number Browse interface.
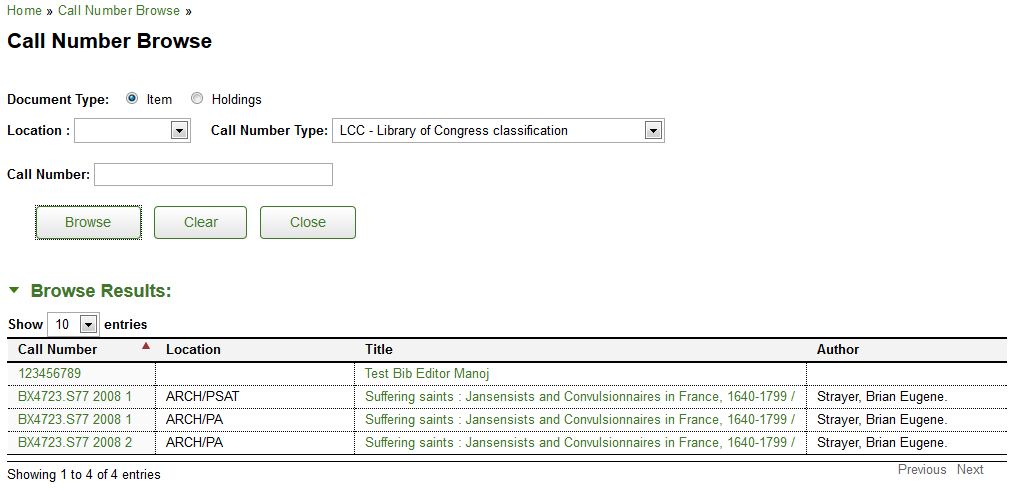
The Document Type is set to “Item” to account for enumeration but may be changed to “Holdings” if you wish to search only base call numbers.
Choose a Location from the dropdown menu to limit the search to a particular place.
Choose a Call Number Type from the dropdown menu to change the classification system.
Enter a Call Number to browse items that surround the entered number.
Click
 .
.OLE is set to show 10 records but you may click the dropdown to show more results.
Select a call number to open the Instance Editor.
Note
For more information about the Instance Editors, see the Instance Editor.
Select a title to open the Bibliographic Editor.
Note
For more information about Bibliographic Editors, see Editor
Table of Contents
 >
>  >
> 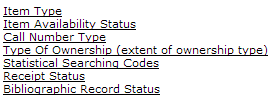
Bibliographic and Instance attribute maintenance e-docs are available via the Cataloging submenu on the Rice 2 menu tab.
 >
>  >
>  >
>  >
> 
The Item Type maintenance document defines library items types. Some examples include DVD, 2-hour reserve, 24 hour loan. The Item Type is used to determine loan periods for circulating library materials.

The Item Type document includes the Add/Edit Item Type tab. The system automatically enters data into both the Old and New sections in this tab. Selected data fields are available for editing.
Add/Edit Item Type tab definition
|
Title |
Description |
|
Item Type Code |
The code to identify the Instance item type. Maximum length is 30 characters. |
|
Item Type Name |
Required. The familiar title of the Instance item type. Maximum length is 100 characters. |
|
Item Type Desc |
The familiar description of the Instance item type |
|
Source |
Required. The source of the Instance item type. |
|
Source Date |
Required. The date for which the Instance item type was retrieved from the source. |
|
Active Indicator |
Indicates whether the Instance item type is active or inactive. Remove the checkmark to deactivate this code |
 >
>  >
>  >
>  >
> 
The Item Availability Status maintenance document defines the status of an item. Some examples include on order, available, loaned and intransit.

The Item Availability Status document includes the Add/Edit Item Availability Status tab. The system automatically enters data into both the Old and New sections in this tab. Selected data fields are available for editing.
Add/Edit Item Availability Status tab definition
|
Title |
Description |
|
Item Availability Status Code |
The code to identify the item availability status. Maximum length is 30 characters. |
|
Item Availability Status Name |
Required. The familiar title of the item availability status. Maximum length is 100 characters. |
|
Active Indicator |
Indicates whether the item availability status is active or inactive. Remove the checkmark to deactivate this code |
 >
>  >
>  >
>  >
> 
The Call Number Type maintenance document defines what type of classification system is used. Some examples include Library of Congress, Dewey Decimal.
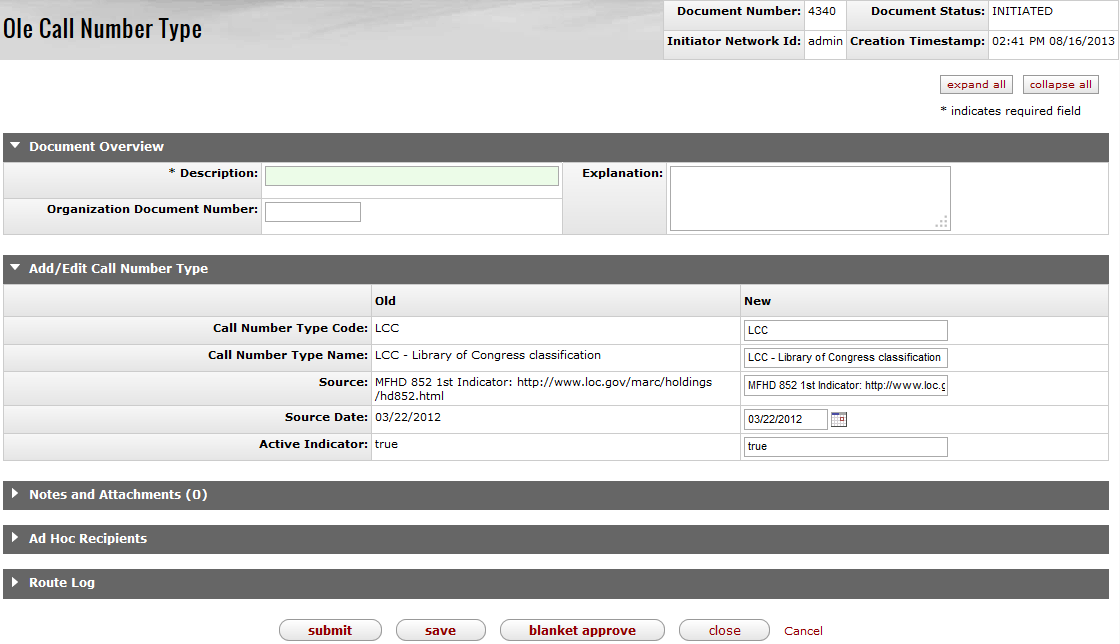
The Call Number Type document includes the Add/Edit Call Number Type tab. The system automatically enters data into both the Old and New sections in this tab. Selected data fields are available for editing.
Add/Edit Call Number Type tab definition
|
Title |
Description |
|
Call Number Type Code |
The code to identify the call number type. Maximum length is 30 characters. |
|
Call Number Type Name |
Required. The familiar title of the call number type. Maximum length is 100 characters. |
|
Source |
Required. The hyperlink to the source of the call number type. |
|
Source Date |
Required. The date for which the call number type was retrieved from the source. |
|
Active Indicator |
Indicates whether the call number type is active or inactive. Remove the checkmark to deactivate this code |
 >
>  >
>  >
>  >
> 
The Type of Ownership maintenance document describes the type of information to be captured for the extent of ownership. Some examples include basic, supplementary, and indexes.
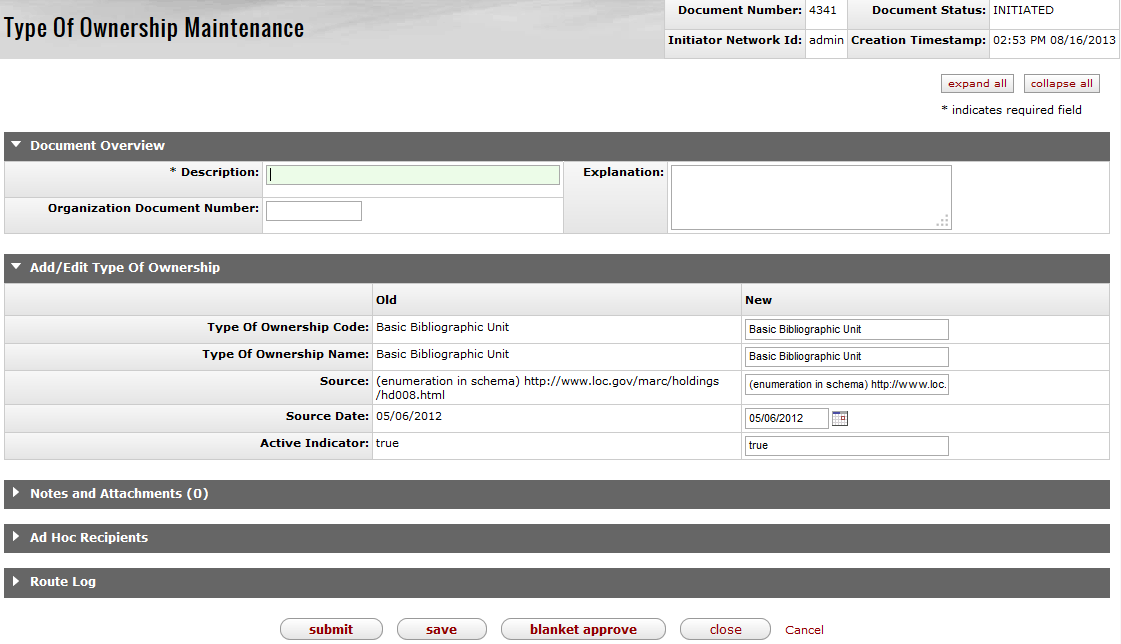
The Type of Ownership document includes the Add/Edit Type of Ownership tab. The system automatically enters data into both the Old and New sections in this tab. Selected data fields are available for editing.
Add/Edit Type of Ownership tab definition
|
Title |
Description |
|
Type Of Ownership Code |
The code to identify the type of ownership. Maximum length is 100 characters. |
|
Type Of Ownership Name |
Required. The familiar title of the type of ownership. Maximum length is 100 characters. |
|
Source |
Required. The hyperlink to the source of the type of ownership. |
|
Source Date |
Required. The date for which the type of ownership was retrieved from the source. |
|
Active Indicator |
Indicates whether the type of ownership is active or inactive. Remove the checkmark to deactivate this code |
 >
>  >
>  >
>  >
> 
The Statistical Searching Code maintenance document defines items. It is used to help limit items when searching and used for reporting. Some examples include Juvenile, CD, Microfiche and GovDocs.
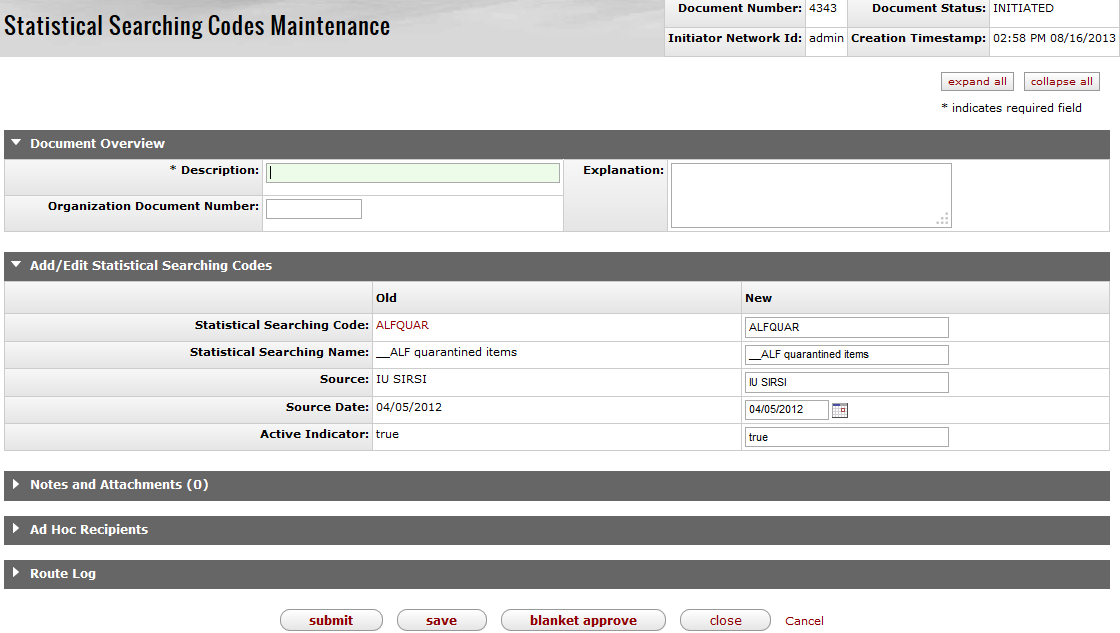
The Statistical Searching Codes document includes the Add/Edit Statistical Searching Codes tab. The system automatically enters data into both the Old and New sections in this tab. Selected data fields are available for editing.
Add/Edit Statistical Searching Codes tab definition
|
Title |
Description |
|
Statistical Searching Code |
The code to identify the statistical searching code. Maximum length is 30 characters. |
|
Statistical Searching Name |
Required. The familiar title of the statistical searching code. Maximum length is 30 characters. |
|
Source |
Required. The hyperlink to the source of the statistical searching code. |
|
Source Date |
Required. The date for which the statistical searching code was retrieved from the source. |
|
Active Indicator |
Indicates whether the statistical searching code is active or inactive. Remove the checkmark to deactivate this code |
 >
>  >
>  >
>  >
> 
The Receipt Status maintenance document describe the status of newly published parts of a mulitpart or serial item.

The Receipt Status document includes the Add/Edit Receipt Status tab. The system automatically enters data into both the Old and New sections in this tab. Selected data fields are available for editing.
Add/Edit Receipt Status tab definition
|
Title |
Description |
|
Receipt Status Code |
The code to identify the receipt status. Maximum length is 30 characters. |
|
Receipt Status Name |
Required. The familiar title of the receipt status. Maximum length is 100 characters. |
|
Source |
Required. The hyperlink to the source of the receipt status. |
|
Source Date |
Required. The date for which the receipt status was retrieved from the source. |
|
Active Indicator |
Indicates whether the receipt status is active or inactive. Remove the checkmark to deactivate this code |
 >
>  >
>  >
>  >
> 
The Bibliographic Record Status maintenance document is used to assign a status to a bibliographic record. Some examples include cataloging complete, on order, electronic resource.
Only system administrators will be able to create and add Bibliographic Record Statuses.

The Bibliographic Record Status document includes the Add/Edit Bibliographic Record Status tab. The system automatically enters data into both the Old and New sections in this tab. Selected data fields are available for editing.
Add/Edit Bibliographic Record Status tab definition
|
Title |
Description |
|
Bibliographic Record Status Code |
The code to identify the bibliographic record status. Maximum length is 30 characters. |
|
Bibliographic Record Status Name |
Required. The familiar title of the bibliographic record status. Maximum length is 100 characters. |
|
Source |
Required. The source of the bibliographic record status. |
|
Source Date |
Required. The date for which the bibliographic record status was retrieved from the source. |
|
Active Indicator |
Indicates whether the bibliographic record status is active or inactive. Remove the checkmark to deactivate this code |
Table of Contents
|
Term |
Definition |
|
Bibliographic Record |
An OLE document that describes a bibliographic entity as published. OLE will initially support two kinds of bibliographic records: (1) Those in the USMARC bibliographic formats, and (2) Dublin Core records. Synonym: Bibliographic Description |
|
Bound-with |
A physical object where two or more titles are joined together under one cover. The object is represented in a system as a single item which links to more than one bibliographic record. |
|
[Element] Classification |
The set of data elements within the OLE Instance Schema that, taken together, make up the “call number” and state what classification/call number system (e.g., Library of Congress, Superintendent of Documents, and Dewey Decimal) the call number conforms to. |
|
Code |
An individual Code within a Code List. A Code within a table of Codes will have the attribute, Display Value. See also Display Value. |
|
Code List |
A list of valid values for a particular data element within OLE. For example, there will be a Code List for Locations; a user cannot assign a Location value within an Item unless it is part of the library’s Location Code List (which might be shown in an OLE editor in the form of a pull-down menu). Ideally, the user could not assign the Code for a Location unless the user were authorized to assign that particular Code (in which case the OLE editor should show the user a pull-down menu of Locations that included only those Locations that the user is allowed to use). |
|
Copy |
A single specimen of an intellectual entity, e.g., a library can have one (or more) Copies of a multi-volume set. A single subscription to a journal may also be known as a Copy. A multi-part book (or a serial subscription) is a Copy with as many Items as there are volumes. |
|
Display Value |
An attribute of a Code that specifies an alternate display value for the Code within a particular interface. For example, the code “REGENSTEIN” might have Display Value “Regenstein Library.” The display value could appear in places within the OLE user interface, but could also be used by an external Discovery Tool. |
|
DocStore |
OLE architecture for structured and unstructured metadata (e.g., bib, item, holding, authority, licenses) that works in conjunction with linked transactional data in OLE RDBMS/relational tables (e.g., purchasing, circulation, users, financial, borrowers). |
|
Hide Record |
To mark a record (bibliographic, holdings, item) so that is does not display in a public-facing service. |
|
Holdings |
Describes the extent of a resource available to the user. In the case of continuing resources holdings data may record the pattern of issuance of a resource and/or a summary statement of volumes held. |
|
Import Process |
Batch process for importing bibliographic and/or authority records, as well as accompanying holdings and/or purchase order information |
|
Item |
The smallest unit of a resource that is managed and/or circulated individually. It provides specific information about the physical location when pertinent. |
|
Location |
An element in a library’s system configuration that describes a conceptual entity or institution (e.g., “The University of X Library”) or a building (“John Doe Memorial Library”) or an area “Doe Library, Book stacks”; “Doe Library, Circulation Desk”) where items are shelved or work is performed. All library items are assigned to a Shelving Location and this becomes an attribute for circulation policy. Locations may also refer to library staff work areas at which certain functions (e.g., acquisitions (or ordering and receiving), cataloging, serials receiving, course reserve or circulation are the standard ones) are performed on or with items housed at Shelving Locations; work areas (e.g., circulation location) are identified as part of an operator’s login. |
|
Location Code |
A Code value from a Code List that describes, with a greater or lesser degree of specificity, the Location where an Item is located. |
|
Match Point |
A data element used to determine that a bibliographic record or authority record in a file of records being imported matches an existing record within OLE, such that the incoming record “overlays” and replaces the existing record completely or in part. |
|
OLE Holding |
This section of the OLE Instance records "general" holdings information in a format specific to OLE. |
|
OLE Instance |
OLE XML document type that describes individual Holdings and Items |
|
OLE Source Holding |
This section of the OLE Instance represents "specific" holdings information entered according to some standard external to OLE. Examples are MARC holdings, MODS holdings or any other format specific holdings. |
|
Ownership |
The idea that permissions or policies based on a piece of data in a document (bib control numbers, item location, and ownership field data) could be used to infer ownership, in conjunction with policies. Work Units or Roles would be connected or allowed to complete certain actions based on additional qualifier for ownership. NoteWork units are being defined for the 1.5 release. |
|
Public-facing Service |
Any service/system that allows public users to query a library’s database. Examples include discovery layers (such as VuFind) and Z39.50. |
|
Role or Group Qualifier/ Parameter |
OLE Roles or Groups will be extended to include optional qualifiers or parameters on applied permissions. A Role or Group can continue with no qualifiers, or multiple. |
|
Work Unit |
A location, departmental, or organizational field, used to as an attribute or match point between documents and Roles/Permissions. The Work Unit will be compared between a Document and as a qualifier on a Role, in order for Permissions/Policy to designate what staff can perform which actions on a document. Work units can be designated with parent-child relationships, to allow easier creation of roles/permissions across work units (one parent work unit can include or cover multiple child work units). NoteWhile locations hierarchy could be replicated for Work units, it is more granular than work units or document ownership designations may need to be. Work units and document ownership will frequently be at the Library level. |
For additional OLE terms and definitions, see the OLE glossary
Below are some of the roles that will be authorized to use Describe Workbench, Bound-withs, Import Bib, Editors, Transfers, and Instance maintenance documents. Please see individual e-docs for specific requirements in each workflow.
Note
Sample users are provided for ease of testing and can be replaced with local library users.
|
Role Name |
Sample User |
Functions/ Permissions |
|
OLE_Cataloging_Admin |
admin, admin 1 |
Creates and edits Describe maintenance documents |
| Cataloging Super User | supercat, ole-khuntley | Authorized for all Describe functions; permission to administer cataloging in all work units |
| Cataloger Supervisor | catsup | Authorized for all Describe functions; permission to administer cataloging within assigned work unit(s) |
| Cataloger 1 | cat1 | Authorized for all Describe functions; permission to administer cataloging within assigned work unit |
| Cataloger 2 | cat2 | Authorized for all Describe functions except batch imports and bound-withs; permission to administer cataloging within assigned work unit |
| Temporary (Student) Staff Cataloger 1 | tempcat1 | Authorized to create and edit holdings/items within assigned work unit |
| Full Cataloging | catfull | Authorized for all Describe functions without limitation by ownership, work unit, bibliographic status or any other field-level permission |
| Batch Cataloging | catbatch | Authorized to do batch imports and exports |
| Describe Read only | describereadonly | Authorized only to view records in Describe |
|
<any user-Action List> |
<any Kuali user> |
Most user roles have the permission to view editors. Anyone within OLE can search the Doc Store |
OLE Basic Functionality and Key Concepts.: E-docs, action buttons- basic overview of elements
OLE 1.0 Milestone User Documentation on the wiki

