Some of the documentation in this guide has not been updated to reflect changes for 2.5.19. If you find a problem, please report it in Jira and set the component to Documentation. Indicate the guide and section that has the problem in the Jira. Thanks for your help in improving the documentation!
Table of Contents
- 1. What is Kuali Rice?
- 2. Software Architecture
- 3. Technical Overview
- 4. Global User Section
- 5. High-Level Features Guide
- 6. Global Technical Review Section
- Rice Client Overview
- Global Configuration Parameters
- Rice Service Architecture and Configuration Overview
- Eclipse and Rice
- Overview
- Download the Tools
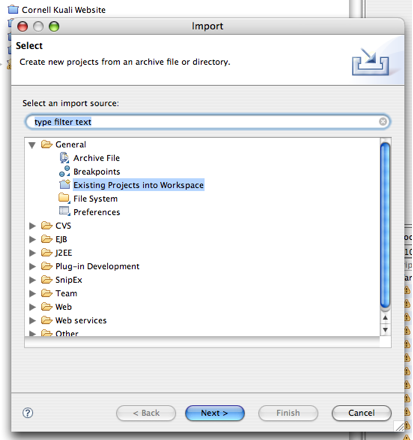
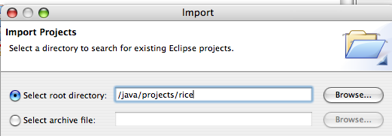
- Import rice into Eclipse as a project (Source distribution only)
- Check out the Rice code (Non-source SVN distribution only)
- Set up database drivers
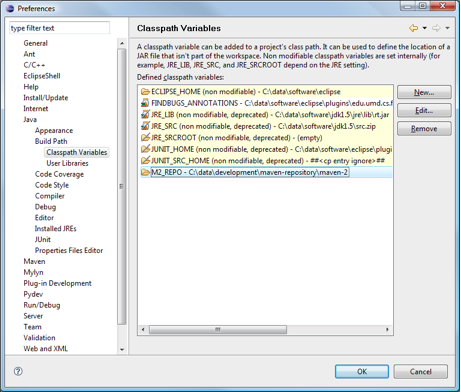
- Set up Eclipse for Maven
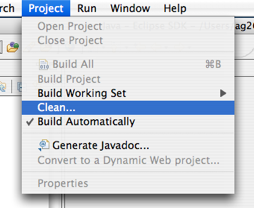
- Rebuild Rice
- Install the database
- Installing the appropriate configuration files
- Run the sample web application
- Changing Rice project dependencies
- Other Notes
- Creating Rice Enabled Applications
- Version Compatibility
- 7. Location
- Glossary
List of Figures
- 3.1. Kuali Rice 2.5.19 Architectural Diagram
- 3.2. Kuali Service Bus
- 3.3. Supported Service Protocols
- 3.4. KIM Architecture Diagram
- 3.5. KIM Architecture Detail
- 3.6. Kuali Nervous System
- 3.7. KIM Architecture Detail
- 3.8. Conceptual Production Architecture, example 1
- 3.9. Conceptual Production Architecture, example 1
- 3.10. Recommended Conceptual Production Architecture
- 3.11. Recommended Conceptual Production Architecture
- 4.1. Ad Hoc Recipients Tab
- 4.2. Ad Hoc Recipients Tab: Person Requests
- 4.3. Ad Hoc Recipients Tab: Group Requests Section
- 4.4. Document Overview Tab
- 4.5. Notes and Attachments Tab
- 4.6. Route Log Tab
- 4.7. Route Log Tab: ID Section
- 4.8. Route Log Tab: Future Action Requests Section
- 4.9. Jira Search: Query options
- 4.10. Create New Jira: Initial Screen
- 4.11. Create New Jira: Detail Section
- 6.1. Diagram of a sample embedded implementation
- 6.2. Diagram of a sample bundled implementation
- 6.3. Diagram of a sample Thin Java Client implementation
- 6.4. Resource Loader Stack
- 6.5. Root Directory Selection
- 6.6. Root Directory Selection Continued
- 6.7. Eclipse Classpath Variables
- 6.8. Eclipse Clean Build
- 6.9. Eclipse Jetty Launch
- 6.10. Update Eclipse Classpath
- 7.1. Identity Channel: Campus Link
- 7.2. Campus Lookup
- 7.3. Campus Lookup: Results Example
- 7.4. Campus Inquiry
- 7.5. Campus Maintenance Document
- 7.6. Campus Maintenane Document: Expanded
- 7.7. Campus Maintenance Document: Edit Campus Tab
- 7.8. Campus Type Lookup
- 7.9. Campus Type Lookup: Results Example
- 7.10. Campus Type Inquiry
- 7.11. Identity Channel: Campus Type Link
- 7.12. Campus Type Lookup
- 7.13. Campus Maintenance Document
- 7.14. Campus Maintenance Document: Overview Tab
- 7.15. Campus Maintenance Document: Edit Campus Type Tab
- 7.16. Identity Channel: Postal Code Link
- 7.17. Postal Code Lookup
- 7.18. Postal Code Lookup: Results Example
- 7.19. Postal Code Inquiry
- 7.20. Postal Code Manintenance Document
- 7.21. Postal Code Manintenance Document: Edit Postal Codes Tab
- 7.22. Postal Code Manintenance Document: Create Postal Codes
- 7.23. Identity Channel: County
- 7.24. County Code Lookup
- 7.25. County Code Lookup: Results Example
- 7.26. County Inquiry
- 7.27. County Maintenance Document
- 7.28. County Mainteance Document: Edit Counties Tab
- 7.29. County Maintenance Document: Create County
- 7.30. Identity Channel: State Link
- 7.31. State Lookup
- 7.32. State Lookup: Results Example
- 7.33. State Inquiry
- 7.34. State Maintenance Document
- 7.35. State Maintenance Document: Add State
- 7.36. State Maintenance Document: Edit States Tab
- 7.37. Country Lookup
- 7.38. Country Lookup: Results Example
- 7.39. Country Inquiry
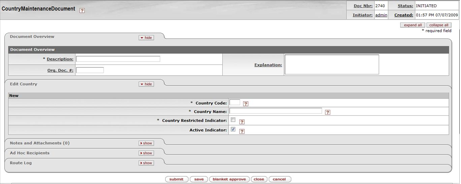
- 7.40. Country Maintenance Document
- 7.41. Country Maintenance Document: Edit Country Tab
List of Tables
- 4.1. Standard Rice Buttons
- 4.2. Lookup Wildcards
- 4.3. Account Number (String) Example of Wildcard Use
- 4.4. Proposal Number (String) Example of Wildcard Use
- 4.5. Create Date (Date) Example of Wildcard Use
- 4.6. Ad Hoc Recipients: Person Requests attributes
- 4.7. Ad Hoc Recipients: Group Requests attributes
- 4.8. Document Overview Tab: Attributes
- 4.9. Notes and Attachments Tab: Attributes
- 4.10. Route Log Tab: ID Section Attributes
- 6.1. Global Configuration Parameters
- 7.1. Campus Maintenance Document: Edit Campus Attributes
- 7.2. Campus Maintenance Document: Edit Campus Type Attributes
- 7.3. Postal Code Maintenance Document: Create Postal Codes Attributes
- 7.4. County Maintenance Document: Create County Attributes
- 7.5. States Maintenance Document: Edit States Attributes
- 7.6. Country Maintenance Document: Edit Country Attributes
Table of Contents
Kuali Rice is an open source, module-based, enterprise class, set of integrated middleware products that allow both Kuali and non-Kuali applications to create custom end-user business applications quickly and efficiently. Services are exposed through the Kuali Service Bus (KSB) and can be consumed by other Rice applications.
Rice employs the Service Oriented Architecture (SOA) concept and is structured with both a server-side piece and a client-side piece. This framework allows end developers to build robust systems with common enterprise workflow functionality and with customizable and configurable user interfaces that have a clean and universal look and feel.
On the server side, Kuali Rice is implemented as a group of services within a Servlet container. This allows developers to design software that adds dynamic content to web servers using the Java programming language. Servlets are a server side technology that responds to web clients (typically web browsers) through a request/response paradigm.
On the client side, Kuali Rice has a flexible framework of pieces that can be included in a Rice client application.
The Rice Standalone Server is built on the client-server model and is provided as a web archive file (WAR). The Standalone version allows client applications to be configured to interface with the Rice server.
Rice is designed with a modular architecture where each module performs a specific function that offers services to applications. The Rice architecture has six major modules:
Kuali Service Bus (KSB)
Kuali Enterprise Workflow (KEW)
Kuali Enterprise Notification (KEN)
Kuali Identity Management (KIM)
Kuali Rapid Application Development (KRAD)
Kuali Rules Management System (KRMS)
Kuali Nervous System (KNS) is the original development framework which is planned to be deprecated in the next major release of Rice.
Note
Development frameworks are not administered from the Rice Standalone Server.
Rice provides reusable development frameworks that encourages a simplified approach to developing true business functionality in modular applications.
Application and service developers can focus on solutions to solve business issues rather than on the technology. Rice takes care of complex technical issues so that each application or service that adopts the framework can interoperate with little or no complexity. The framework also simplifies interoperation with services exposed by other applications.
In addition, Rice supports the sophisticated workflow processes typically required in higher education. It addresses workflow processes that involve human interaction (i.e., approval) as part of the flow.
Table of Contents
Kuali Rice is available for two types of implementations, Standalone Server and Bundled (packaged with Kuali applications).
The Standalone Server is the most versatile implementation of Rice. It is a web application that can provide services to multiple applications that integrate with Kuali Rice at your institution. The server distribution contains a web archive or WAR file for the Kuali Rice standalone server. The Standalone Server distribution is the one you should use when your enterprise wants to run multiple Kuali applications or when you want to integrate other applications with Rice.
When an application bundles all of the Rice functionality (including what is usually handled by the standalone server) into the client application, it's called a Bundled Distribution. Kuali Financial Systems (KFS), Kuali Coeus (KC), and Kuali Student (KS) all offer bundled distributionswhere you do not need to set up and install a Rice standalone server; the necessary Rice functionality is bundled with the application. Bundled Distributions are not recommended for enterprise implementations, but are good for quick start, testing, and demonstrations.
The Source Code Distribution is available if you want to build Rice from scratch and create the standalone or binary libraries yourself.
The Binary Distribution (also known as the client distribution) is a collection of JAR files. It is used when other applications need to use your Rice implementation and you won't be using the Rice web application. It is designed for embedding Rice and can be used as a set of libraries for client applications.
The Binary Distribution of Kuali Rice is implemented as an application framework consisting of application programming interfaces (APIs), libraries, and the web framework. This allows you to construct a Kuali Rice application. All JARs and web content are included in this version.
In a typical enterprise deployment of Kuali Rice, a Standalone Rice server hosts numerous shared services and provides the most versatility. The composition of Rice contains an application framework — the APIs, Libraries, and web framework that are used to construct a Rice application. You can configure subsequent Rice client applications to interact with these services as needed.
All three distributions, as well as the source code of the latest production release are available at http://kuali.org/rice/download.
Table of Contents
This is a high-level picture of what an Enterprise Deployment of Rice might look like. This diagram includes representations of various client applications interacting with the Rice standalone server:
Kuali Rice has six core modules, linked together by the Kuali Service Bus (KSB):
KSB (Kuali Service Bus )
Kuali Service Bus is a simple service bus geared toward easy service integration in an SOA.
KEW (Kuali Enterprise Workflow)
Kuali Enterprise Workflow provides a common routing and approval engine that facilitates the automation of business processes across the enterprise. KEW was specifically designed to address the requirements of higher education, so it is particularly well suited for routing mediated transactions across departmental boundaries.
KEN (Kuali Enterprise Notification)
Kuali Enterprise Notification acts as a enabler for all university business-related communications by allowing end-users and other systems to push informative messages to the campus community in a secure and consistent manner.
KIM (Kuali Identity Management)
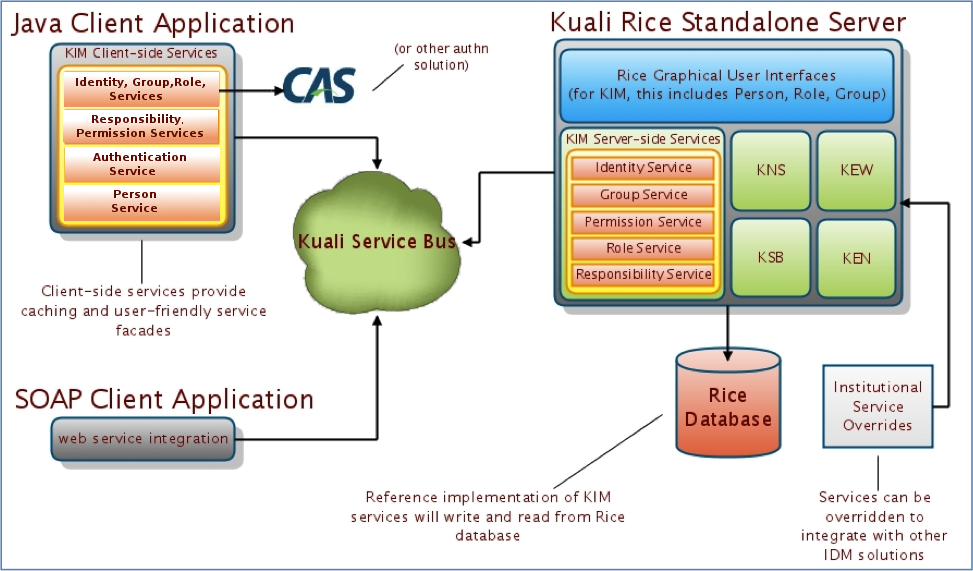
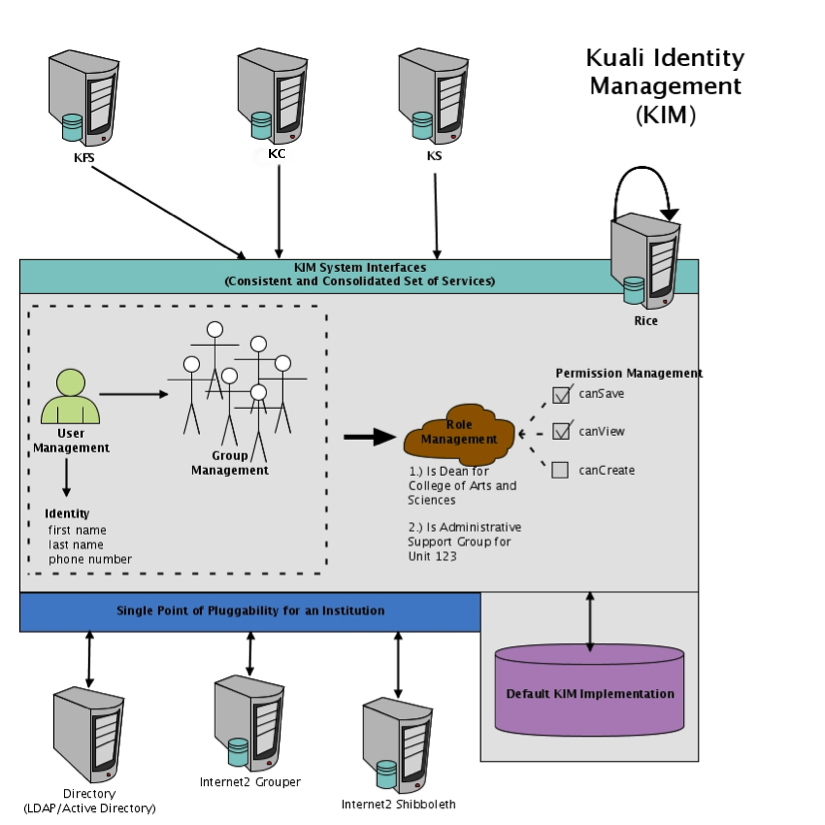
Kuali Identity Management provides central management features for person identity characteristics, groups, roles, permissions, and their relationships to each other. All integration with KIM is accomplished using simple and consistent service APIs (Java or Web Service). KIM is built like all of the Kuali applications with Spring at its core, so that you can implement your own Identity Management (IdM) solutions behind the Service APIs. This provides you with the option to override the reference service implementations with your own to integrate with other Identity and Access Management systems at your enterprise.
KNS (Kuali Nervous System)/KRAD
Kuali Nervous System/KRAD is a software development framework that enables developers to quickly build business applications in an efficient and agile fashion. KNS is an abstracted layer of "glue" code that provides developers easy integration with the other Rice components.
KRMS (Kuali Rules Management System)
Kuali Rules Management System is a new module of Kuali Rice that allows business rules that were previously coded within electronic documents or applications to be externalized into a rules repository with its own set of user interfaces. Removing this critical logic from being coded into the document allows for the maintenance of rules in a fashion that does not require application deployment or development for updates. In addition to the rules, a new routing option called PeopleFlow has been introduced to provide a streamlined way to view and update routing actions without having to have a deep understanding the KEW and its user interfaces or the impact changes may incur.
Kuali Rice is designed to run in a clustered environment and can be run on virtual machines.
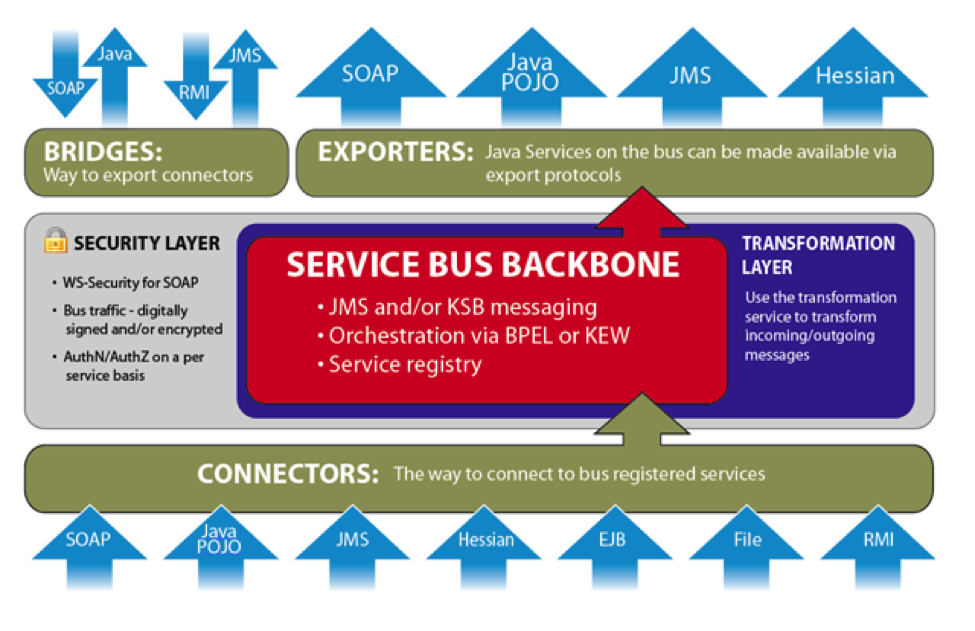
The Kuali Service Bus (KSB) is a lightweight service bus designed so developers can quickly develop and deploy services for remote and local consumption. You deploy services to the bus either using the Spring tool or programmatically. Services must be named when they are deployed to the bus. Services are acquired from the bus using their name.
At the heart of the KSB is a service registry. This registry is a listing of all services available for consumption on the bus. The registry provides the bus with the information necessary to achieve load balancing, failover, and more.
Transactional Asynchronous Messaging – Call services asynchronously to support a 'fire and forget' model of calling services. Messaging participates in any existing JTA transactions (messages are not sent until the current running transaction is committed and are not sent if the transaction is rolled back). This increases the performance of service-calling code because it does not wait for a response.
Synchronous Messaging - Call any service on the bus using a request-response paradigm.
Queue Style Messaging - Execute Java services using message queues. When a message is sent to a queue, only one of the services listening for messages on the queue is given the message.
Topic Style Messaging - Execute Java services using messaging topics. When a message is sent to a topic, all services listening for messages on the topic receive the message.
Quality of Service - This KSB feature determines how queues and topics handle messages with problems. Time-to-live is supported, giving the message a configured amount of time to be handled successfully before exception handling is invoked for that message type. Messages can be given a specified number of retry attempts before exception handling is invoked. An increasing delay separates each calling. Exception handlers can be registered with each queue and topic for custom behavior when messages fail and Quality of Service limits have been reached.
Discovery - Automatically discover services along the bus by service name. You do not need end-point URLs to connect to services.
Reliability - Should problems arise, messages sent to services via queues or synchronous calls automatically fail-over to any other services bound to the same name on the bus. Services that are not available are removed from the bus until they come back online, at which time they will be rediscovered for messaging.
Persisted Callback - Send callback objects with any message. These objects will be called each time a service is "requested." This provides a mechanism to pass along a message. In this way, deployed services can communicate back to a "callback registrant," such as an application registering a callback, with application data even as that data is moving through the system.
Primitive Business Activity Monitoring - If turned on, each call to every service, including the parameters passed into that service, is recorded.
Spring-Based Integration - KSB is designed with Spring-based integration in mind. For example, you might make an existing Spring-based POJO available for remote asynchronous calls.
Programmatic Integration - If you do not use Spring configuration, you can configure KSB programmatically. Services can also be added and removed from the bus programmatically at runtime.
Typically, KSB programming is centered on exposing Spring-configured beans to other calling code using a number of different protocols. Using this paradigm, the client developer and the organization can rapidly build and consume services.
Note
This drawing is conceptual and not representative of true deployment architecture.
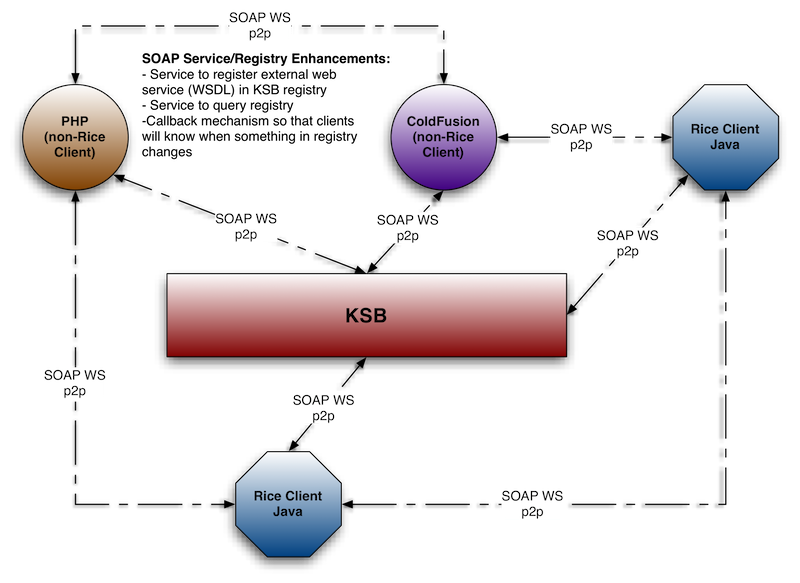
Essentially, the KSB is a registry with service-calling behavior on the client end (for Java clients). All policies and behaviors (aysnc vs. sync) are coordinated on the client.
KSB offers clients some very attractive messaging features:
Synchronization of message sending with currently running transaction (In other words, all messages sent during a transaction are ONLY sent if the transaction is successfully committed.)
Failover: If a call to a service comes back with a 404 (or various other network-related errors), the client will try to call other services of the same name on the bus. This is for both sync and async calls.
Load balancing: Clients will round-robin call services of the same name on the bus. Proxy instances are, however, bound to single machines. This is useful if you want to keep a line of communication open to a single machine for long periods of time
Topics and Queues: Used for controlling the execution of services
Persistent messages: When using message persistence, a message cannot be lost. It will be persisted until it is sent.
Message Driven Service Execution: Bind standard JavaBean services to messaging queues for message-driven beans
The Kuali Enterprise Workflow (KEW) is a content-based routing engine. To enter the routing process, a user creates a document from a process definition and submits it to the workflow engine for routing. The engine then makes routing decisions based on the XML content of the document.
KEW is built for educational institutions to use for business transactions in the form of electronic documents that require approval from multiple parties. For example, these types of transactions are capably handled with KEW:
Transfer funds
Hire and terminate employees
Complete and approve timesheets
Drop a course
KEW is a set of services, APIs, and GUIs with these features:
Action List for each user, also known as a user's work list
Document searching
Route log: Document audit trail
Flexible process definition: Splits, joins, parallel branches, sub-processes, dynamic process generation
Rules engine
Email notification
Notes and attachments
Wide array of pluggable components to customize routing and other pieces of the system
eDocLite: Framework for creating simple documents quickly
Plugin architecture: Packaging and deployment of application plugins or deployment of routing components to the Rice standalone server at runtime
Kuali Enterprise Notification (KEN) acts as a broker for all university business-related communications by allowing end-users and other systems to push informative messages to the campus community in a secure and consistent manner. All notifications process asynchronously and are delivered to a single list where other messages such as workflow-related items (KEW action items) also reside. In addition, end-users can configure their profile to have certain types of messages delivered to other end-points such as email, mobile phones, etc.
Easily leverage its functionality through the KSB or over SOAP
Access a full list of archives and logs so that you can easily find messages that were sent in the past
Eliminate sifting through your email inbox to find what you need
It guarantees delivery of messages, even to large numbers of recipients
A Single List for All Notifications: Find the things you have to do, things you want to know about, and things you need to know about. This includes workflow items from KEW, all in one place.
Eliminate Email Pains: Don't sift through piles of spam to find that one thing you need to do. You control who uses KEN, so there is no spam.
Flexible Content Types: No core programming is needed to customize the fields and data for a notification. You may use XML, XSD, and XSL to dynamically extend, validate, and render new content types.
Multiple Integration Interfaces: Use KEN's Java services and web services (exposed on the KSB) to send messages from one system to another, or use the Rice generic message-sending form (with workflow built in) to send messages by hand.
Audit Trail: Track exactly who received a notification and when they received it.
Multiple Ways to Notify: All messages are sent to a user's notification list; however, users can also choose to have "ticklers" sent to their email inboxes, their mobile phones, and more. You can also build pluggable "ticklers" using the KEN framework.
Robust Searching and List Capabilities: Search for notifications by multiple fields such as priority, type, senders, and more. Save searches for later, and take actions on your notifications right from your list.
Security: Basic authorization comes out of the box along with single-sign-on. In addition, web service calls support SSL transport encryption and digital signing using X.509 certificates. KEN also allows you to build your own security plugins.
User and Group Management: Basic user and group management are provided, along with hooks for customizing KEN to point at other identity management systems, such as LDAP.
The Kuali Identity Management (KIM) provides identity and access management services to Rice and other applications. All KIM services are available on the service bus with both SOAP and Java serialization endpoints. KIM provides a service layer and a set of GUIs that you can use to maintain identity information.
KIM provides a reference implementation of services. It also allows customization and/or replacement to facilitate integration with institutional services or other third-party identity management solutions. This allows the core KIM services to be overridden piecemeal. For example, you can override the Identity Service, but keep the Role Service.
KIM consists of these services, which encompass its API:
services:
IdentityService
GroupService
PermissionService
RoleService
ResponsibilityService
AuthenticationService
A permission service that evaluates permissions: KIM provides plug points for implementing custom logic for permission checking, such as permission checks based on hierarchical data.
A more detailed visual of the KIM architecture:
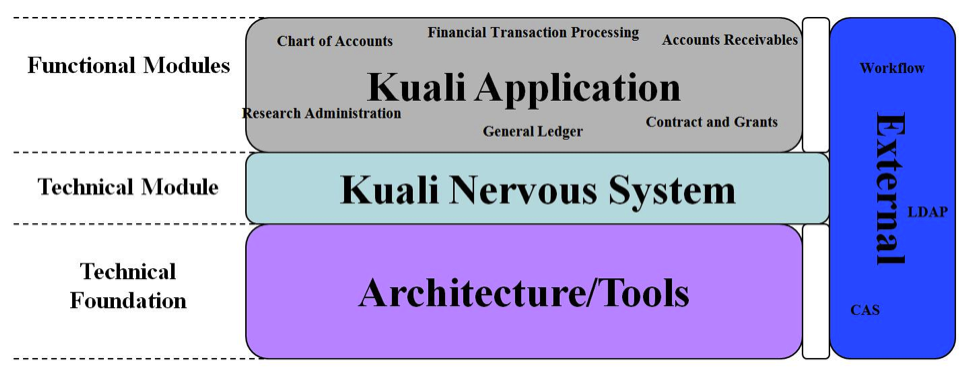
The Kuali Nervous System (KNS) is the core of the Kuali Rice system. It embraces a document- centric (business process) model that uses workflow as a central concept. It is also the web application development framework for Rice and is the core technical module in Rice, leveraging reusable code components to provide functionality.
The Kuali Nervous System is a:
Framework to enforce consistency
Means to adhere to development standards and architectural principles
Stable core for efficient development
Means of reducing the amount of code written through code re-use
Since the builders of the Rice platform constructed it on open source technologies, your scale and use of Rice software determine the layout of the logical and physical hardware you need to support your implementation. Below are several conceptual models for implementation of Rice that are certainly not end solutions. Your solution depends on your implementation scale and budget.
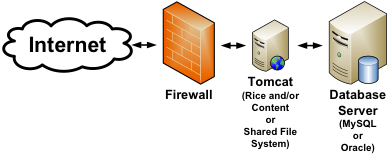
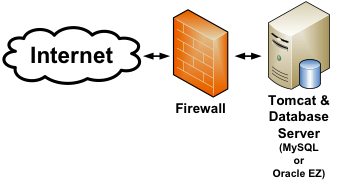
The production platform that you deploy for your implementation can vary quite widely. The first example, the most basic platform structure, would be the most economical solution in terms of hardware. The Tomcat server can serve up all web service and HTTP requests and store all content. (Of course, you could load-balance multiple Tomcat servers across machines.) A picture of the logical structure:
For this architecture, we recommend this minimum:
Server running Tomcat container: Minimum 2 GB main memory
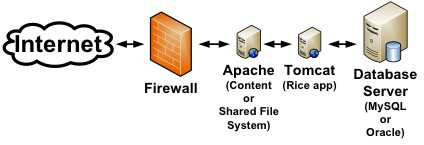
The next example has you offload the web requests and content to an Apache HTTP server in front of the Tomcat server:
For this architecture, we recommend this minimum:
Server running Apache: Minimum 1 GB main memory
Server running Tomcat container: Minimum 2 GB main memory
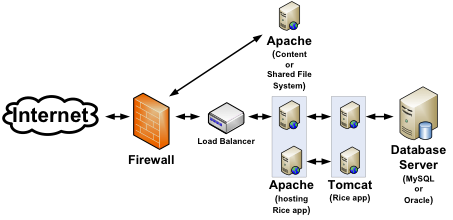
And finally, the recommended solution, where the focus of the environment structure is based upon maximal scaling for the Rice application:
For this architecture, we recommend this minimum:
Load Balancer
Each server running Apache: Minimum 1 GB main memory
Each server running Tomcat container: Minimum 2 GB main memory
The most basic platform for development has the Tomcat container and a MySQL server running on the same machine as your development tools:
The best option is to use the Tomcat container to serve up web service and HTTP requests. This has the least number of software layers between your development/debugging/IDE environment and the Tomcat container.
Table of Contents
It is important that you have a general understanding of how Rice is a part of a larger Kuali community before you begin to use this as a reference.
The Kuali Foundation employs staff to coordinate partner efforts and to manage and protect the Foundation's intellectual property. The Kuali Foundation manages a growing portfolio of enterprise software applications for colleges and universities. A lightweight Foundation staff coordinates the activities of Foundation members for critical software development and coordination activities such as source code control, release engineering, packaging, documentation, project management, software testing and quality assurance, conference planning, and educating and assisting members of the Kuali Partners program.
Kuali Rice is a higher-education, community-source software project that is merely a spoke in the wheel of the larger Kuali Community. The Kuali Community is the hub of a wheel of a growing number of communities, each of which are made up of people and functions. Together they form a comprehensive suite of open, modular and distributed administrative software systems that bring the proven functionality of legacy applications to the ease and universality of online services. The Kuali Foundation serves them all, with specific responsibilities related to keeping the wheel in motion. Each individual community shares a similar organizational structure and some modular functionality while its components are able to stand alone to perform unique functions. While all are designed for seamless integration with each other, each project is made up of modules that offer a variety of implementation combinations to suit any Carnegie-class institution's unique business needs.
Should you want to learn more detail about how the Rice community is organized, structured and operates you should reference the Rice Charter which is available for review in the Foundation archives.
Kuali Rice software is licensed under the Educational Community License, Version 2.0. You may obtain a copy of the License here. See the License for the specific language governing permissions and limitations.
If you have any questions about Kuali Intellectual property, please contact the Kuali Foundation at licensing@kuali.org.
Please see this Project Dependency Management page for the list of third party licenses used by this release of the Rice project.
This work is licensed under a Creative Commons Attribution-ShareAlike 2.5 License. To view a copy of this license, visit http://creativecommons.org/licenses/ or send a letter to Creative Commons, 543 Howard Street, 5th Floor, San Francisco, California, 94105, USA.
You are free:
to copy, distribute, display, and perform the work
to make derivative works
to make commercial use of the work under the following conditions:
Attribution: You must attribute the work in the manner specified by the Kuali Foundation, author and licensor.
For any reuse or distribution, you must make the licensing terms of this work clear to others.
Any of these conditions can be waived if you get permission from the copyright holder.
Your fair use and other rights are in no way affected by the aforementioned conditions.
The table of contents leads you to headings and subtopic headings that provide information ranging from simple notes to a thorough review of what to do and why, with frequent examples. Sequential tasks are numbered, notes and action results are indented, and user interface element references are formatted to enhance readability. Mouse pointer icons and callouts are used frequently to show you what to click on at each process step.
Each chapter is comprised of sections or subsections that correspond to modules within Rice. In order to reduce the required effort for documentation maintenance, the documentation is structured so as to not repeat the same material across various chapters/sections/subsections.
Likewise, the chapters are designed to cross-reference appendices such as the Data Element Dictionary, Glossary of Terms, Report Catalog and Index, to reduce redundant information within the chapter bodies and give you one common location for information lookup.
This document adheres to specific documentation standards and style conventions to optimize readability. The formatting of text used to name user interface elements is typically bold to enhance visual comprehension and improve usability.
If you have received a printed copy of this user guide, please note that as Rice is improved and enhanced, corresponding updated releases of the documentation are available online. To ensure you have the latest and most current user guide at any time, consult the links from the Documentation page on the Rice web site and compare the versioning.
Cross-references, indexes, and the electronic table of contents are provided wherever possible to allow for efficient navigation to sections and subsections of instructional information (or external Web resources). Each underlined topic functions as a hyperlink that causes a new section to appear.
User documentation made available for online viewing, download and printing may require the use of Portable Document Format (PDF) reader software, such as Adobe Acrobat Reader. Refer to http://www.adobe.com for complete instructions regarding downloading and installing this free software.
Note
A plug-in may be available to allow you to view .pdf documents in Web browsers as either .pdf or HTML formats. Consult your Web browser's Help links to explore these viewing options. HTML pages can be printed using your computer's default printer.
Table 4.1. Standard Rice Buttons
| Feature | Button | Description |
|---|---|---|
|
Action List Button |  |
Displays the Action List screen |
|
Add Button |  |
Use to add notes or attachments |
|
Calendar Button |  |
This button displays a pop-up calendar from which you can select a specific date. The date you select is then automatically entered in the field next to the Calendar button. |
|
Cancel Button |  |
Returns you to the main menu screen |
|
Clear Button |  |
Clears the content in all the fields on this screen |
|
Clear Save Searches Button |  |
Clears all saved searches. (If you give a search a name, you can save it permanently. This button clears all of those saved searches.) |
|
Close Button |  |
Closes a pop-up screen and returns you to the previous screen |
| Create New Button |  | Displays a screen where you can create a new document |
| Collapse All Button |  | Collapses an expanded list (in other words, it hides the detailed information below the main items in a list); use the Expand All button to display the entire list again. |
| Detailed Search Button |  | Opens the Detailed Search screen. This lets you do searches for documents using more specific information. |
| Doc Search Button |  | Displays the Document Search screen |
| Dropdown Arrow |  | Click the down-arrow on the right end of the box to display a list of options. Click an option in this list to automatically put that item in the field. |
| Error Mark |  | Symbol displayed by Rice when it finds an error on a required screen or field |
| Expand All Button |  | Expands a list (in other words, it shows the detailed information below each item in a list); use the Collapse All button to hide the detailed information again. |
| Field Lookup Button |  | Some fields have a magnifying glass button so you can search for information to put in that field. Click the magnifying glass icon to go to the Lookup screen where you can do a search for that field. |
| Help Button |  | When you click a Help button, a small window appears with information about the field that was next to the Help button. |
| Hide Button |  | Hides the contents of a tab, so you only see the small tab itself; use the Show button to display the contents again. |
| Inquiry Button |  | Find the Inquiry button next to some dropdown lists. Click it to display more information about the item in the dropdown field. (Rice displays the information in an Inquiry screen.) |
| Preferences Button |  | Allows you to customize the appearance and features of your screen |
| Search Button |  | Begins a Search using the information you entered in the search fields |
| Show Button |  | Shows the contents of a tab; use the Hide button to hide the contents again. |
| Submit Button |  | Click this button to send this screen's information to Rice for processing |
| Superuser Search Button |  | Click this button to search and then use Superuser functions with the search results. |
One of the beauties of Rice is that it shows you just the screens and fields that are useful for your Rice Role and the function you need. For example, if your Role in Rice lets you create new Rice documents, then you can see a create new button on appropriate screens. If you click this button, you go directly to the screen for creating new documents. People whose Role doesn't create new documents aren't bothered with this button on their screens.
Screens with information or functions that can be used in many places in Rice are very conveniently linked to those places, so useful screens are always at your fingertips. For example, screens that use Person information display a link to the Person Lookup screen. This lets you search for the exact Person you need and enter that Person's information automatically on those screens. (In Rice, a Person is a set of information about a real person or something that stands for real people, like a job title.)
Not only will you find links to a useful screen like Person Lookup on many other screens, but what you see on that useful screen may depend on how you get to it. For example, if you go to the Person Lookup screen from an Administration menu and search for a Person, the search results list has Actions in the left column, and the link for each Person in the Actions column takes you to the edit screen for that Person.
On the other hand, if you go to a Person Lookup screen from other locations, the left column of your search results list has a return value link. You can click this link on the row for the Person you need to close the Person Lookup screen and automatically enter the information for that Person on the original screen (the screen where you clicked the magnifying glass icon).
Dates should be entered as mm/dd/yyyy.
Wildcards in searches: You may use the asterisk (*) and the percent symbol (%) as wildcards in searches. If you need more information about using wildcards in searches, do a search in your favorite Internet search engine to find one of many explanations of wildcards.
Range operators allowed on numbers and dates in searches: >, <, >=, <=, or '..'. All operators except '..' should be before a date. Use operators to separate dates. If you need more information about using range operators in searches, do a search in your favorite Internet search engine to find one of many explanations of range operators in searches.
Each column in your list of search results has a link on the header (the title of the column) for sorting. Click the column title once to sort the search results list in ascending order by that column and click again to sort it in descending order.
Some fields have links to the Inquiry screen for that field. If you click the link, the inquiry appears in a new window with information about that field.
Click the return value link on a row to enter information from that row in your previous page. Select return with no value or click the cancel button if you wish to go back to your previous page without entering anything from your search list.
The create new link in the upper left corner of the lookup screen displays a maintenance screen where you can create a new record for this lookup type. For example, the create new button on a Person Lookup screen takes you to the screen to create a new Person in Rice.
On each row in your search results list, the Actions column displays edit and copy links:
The edit link takes you to a maintenance screen for editing that record.
The copy link takes you to a new document screen with information from that item already entered in the fields for the new document.
Rice allows you to use wildcards in the Lookup process. The available wildcards and their functions:
Table 4.2. Lookup Wildcards
| Operator | Name | Compatible Data Types | Precedence | Notes |
|---|---|---|---|---|
| | | Or | All | Always | |
| && | And | All | Always | |
| ! | Not Equal to | String | 1 | If used repeatedly, e.g. !1031490!1031491, an && is assumed, leading to !1031490&&!1031491 |
| ?, * | Like | String | 7 | ? will match any one character and * will match any number of characters. These will still be used if ! has been used, but not if any of the range criteria below have been used. |
| > | Greater Than | String, Number, Date | 3 | |
| < | Less Than | String, Number, Date | 4 | |
| >= | Greater Than or Equal To | String, Number, Date | 5 | |
| <= | Less Than or Equal To | String, Number, Date | 6 | |
| .. | Greater Than or Equal to and Less Than or Equal to | String, Number, Date | 2 |
Examples of how some of the wildcards operate:
Table 4.3. Account Number (String) Example of Wildcard Use
| Wildcard | Action |
|---|---|
| >=1031490 | Accounts with an account number greater than or equal to 1031490 |
| >1031490&&<1111500 | Accounts with an account number greater than 1031490 and less than 1111500 |
| >=1031490&&<=1111500 | Accounts with an account number greater or equal to 1031490 and less than or equal to 1111500 |
| 1031490..1111500 | Accounts with an account number greater than or equal to 1031490 and less than or equal to 1111500 |
| 103* | Accounts with an account number starting with 103 |
| 103?490 | Accounts with an account number 1031490, 1032490, 1033490… The ? will match any one character with 103 before it and 490 after it |
| 1031490..1111500&&1123400 | Accounts with an account number greater than or equal to 1031490 and less than or equal to 1111500 and accounts with account number like 1123400 |
| 103149*|105167* | Accounts with an account number that starts with 103149 or 105167 |
| 103149|105167 | Accounts with an account number that starts with 103149 or 105167 |
| *1111* | Accounts with an account number with 1111 somewhere in it |
| !1031490&&!1031491 | Accounts except those with account numbers 1031490 and 1031491 |
| !1031490!1031491 | Accounts except those with account numbers 1031490 and 1031491 |
Table 4.4. Proposal Number (String) Example of Wildcard Use
| Wildcard | Action |
|---|---|
| >1031490&&<1111500 | Proposals with a proposal number between 1031490 and 111500 |
| 103* | Will not parse as a number, so it will not be included in criteria |
Table 4.5. Create Date (Date) Example of Wildcard Use
| Wildcard | Action |
|---|---|
| 10/07/1976..10/07/1983 | Accounts with a create date greater than or equal to 10/07/1976 and less than or equal to 10/07/1983 |
| 10* | Will not parse as a date, so will not be included in criteria |
Some lookups for certain business entities in Rice return different numbers of results than the system default; as a result, system administrators may need to be able to limit this set of returned results on an entity-by-entity basis.
To make it easier to do your work, Rice often provides access to the same information from several screens. Some of the most frequently used are described here:
The Ad Hoc Recipients tab allows you to interrupt the normal workflow routing of a document and include other individuals or groups in its routing path. Ad Hoc Routing does not replace the normal workflow routing of the document; it adds people or groups to the normal routing.
The Ad Hoc Recipients tab has two sections: Person Requests and Ad Hoc Group Requests. Use one or both of the sections to route the document to an additional person, group, or both.
Table 4.6. Ad Hoc Recipients: Person Requests attributes
| Field | Description |
|---|---|
| Action Requested | Required field. Select the desired action from the Action Requested list. The choices are APPROVE, ACKNOWLEDGE, and FYI. |
| Person | Required when you want to route the document to an individual. Enter a user ID or select it using the UserID lookup button. |
When you click the Add button, Rice adds this person to the routing path for this document.
Follow the same guidelines as the Person Requests Section of the Ad Hoc Recipients Tab, using a group instead of a person.
Table 4.7. Ad Hoc Recipients: Group Requests attributes
| Field | Description |
|---|---|
| Namespace Code | Optional field. The Rice code for the Namespace being acted upon. |
The Document Overview tab contains the short description for a document and two other optional fields. This tab is used for many documents.
Table 4.8. Document Overview Tab: Attributes
| Field | Description |
|---|---|
| Description | Required field. Enter the short description for the document. The description appears in Inquiry screens, standard reports, Action Lists, and Document Searches as the primary identification for a document. |
| Org Doc # | Optional field. Enter the Org Doc # assigned by your institution. This number may provide departmental or organizational information for the document. This number is not the same as the Document Number, which is assigned by Rice. |
| Explanation | Optional field. Enter a more detailed explanation than the information supplied in the description field. |
The Notes and Attachments tab has fields for user notes, attachments, and system-generated remarks about the document. The number of notes and/or attachments for the current document is displayed on the tab, in parentheses next to the tab title.
Table 4.9. Notes and Attachments Tab: Attributes
| Field | Description |
|---|---|
| Posted Timestamp | Display-only field. The time and date when the attachment or note was posted |
| Author | Display-only field. The full name of the user who added the notes or attachments |
| Note Text | Required field. Enter comments about the document. |
| Attached File | Optional field. Select the file to attach by clicking Browse and using Window's standard Choose File dialog box. Click CANCEL if you want to clear the file name that you select. |
| Actions | You have only one Action available if you are going to add a note or attachment, which is to Add it. Click the add button to add the note or attachment. |
The Route Log tab displays details of the workflow status.
Table 4.10. Route Log Tab: ID Section Attributes
| Field | Description |
|---|---|
| Title | A combination of the Document Type, Description, and the Organization Document Number |
| Type | Type of transaction. The full name of the transaction, used to identify this Document Type in Workflow |
| Initiator | The User ID of the person who created the document |
| Status | Workflow document status |
| Node(s) | The steps that a document takes through the different levels of routing are also referred to as Route Nodes. This field shows the current Route Node of the document. |
| Created | Time and date that the document was created |
| Last Modified | Time and date that the document was last modified |
| Last Approved | Time and date that the last action was taken on this document |
| Finalized | Time and date that the document reaches Final, Canceled, or Disapproved status |
Once a document is Saved or ENROUTE, this section shows the action requests that Workflow will generate in the future, based on the information currently on the document.
Future requests appear in the order in which they are to occur.
An issue is a problem or error that you see in Kuali Rice. When you report an issue, you help us improve Rice and make it work better for everyone.
Thank you for taking the time to report this issue!
Kuali Rice keeps an online list of issues (bugs and suggested improvements and new features) using an issue tracking application called Jira. Your first step is to find out if the issue you have has already been reported by someone.
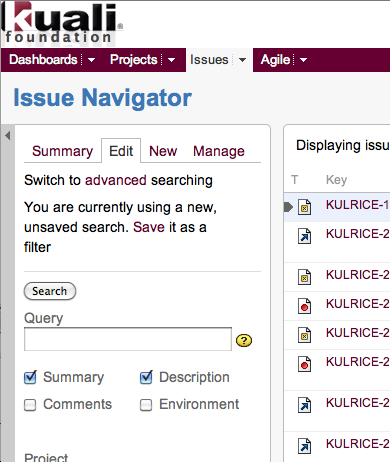
Go to the Jira Issue Navigator page to search through the issues that have already been reported for Kuali Rice, looking for an issue like yours: https://jira.kuali.org.
Find the Text Search section at the top of the of the Issue Navigator page.
In the Query field of the Text Search section, enter some text that describes your issue. Try to use words that other people would also use to describe this issue.
After you enter some text in the Query field, press the Enter key to begin the search.
In a moment or two, Issue Navigator displays all the existing issues that contain your Query text. These are displayed in the main body of the page. Look through these to see if there is one that is similar to your issue.
If you don't find an issue similar to the one you want to report, try searching with different text in the query field.
If you do find an issue that is similar to the new one that you want to report, don't enter a new issue. Simply add a comment to that existing issue that describes any differences in your issue or adds information about the issue.
After trying a few searches, if you don't find an issue that is similar to the one you want to report, please proceed with the instructions below.
If you didn't find a similar issue on the Issue Navigator page, then please create a new issue in JIRA. (If you are a developer, you also determined that this is an issue with Kuali Rice and not with your application.)
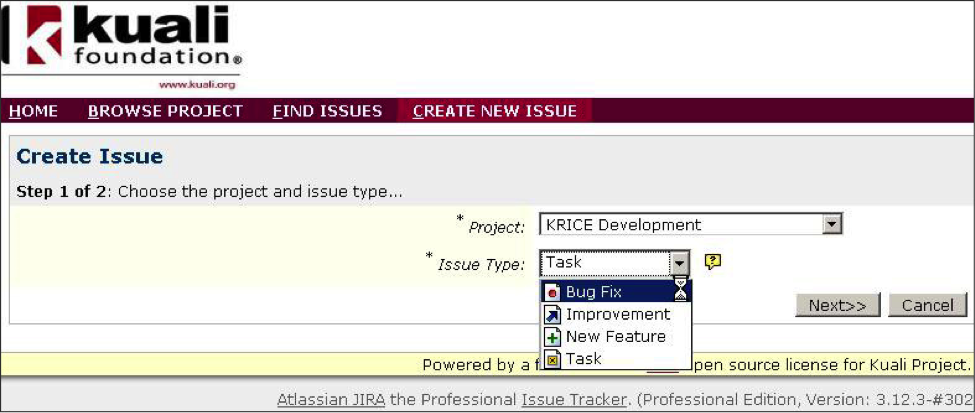
Go to Kuali JIRA (https://jira.kuali.org/secure/CreateIssue!default.jspa).
In the Project field, select Kuali Rice Development from the dropdown list.
Select the appropriate Issue Type from the dropdown list:
For bugs, select Bug Fix.
For enhancements, select either Improvement or, for something that's not yet developed: New Feature, as appropriate.
DO NOT select Task.
Click the Next>> button.
Note
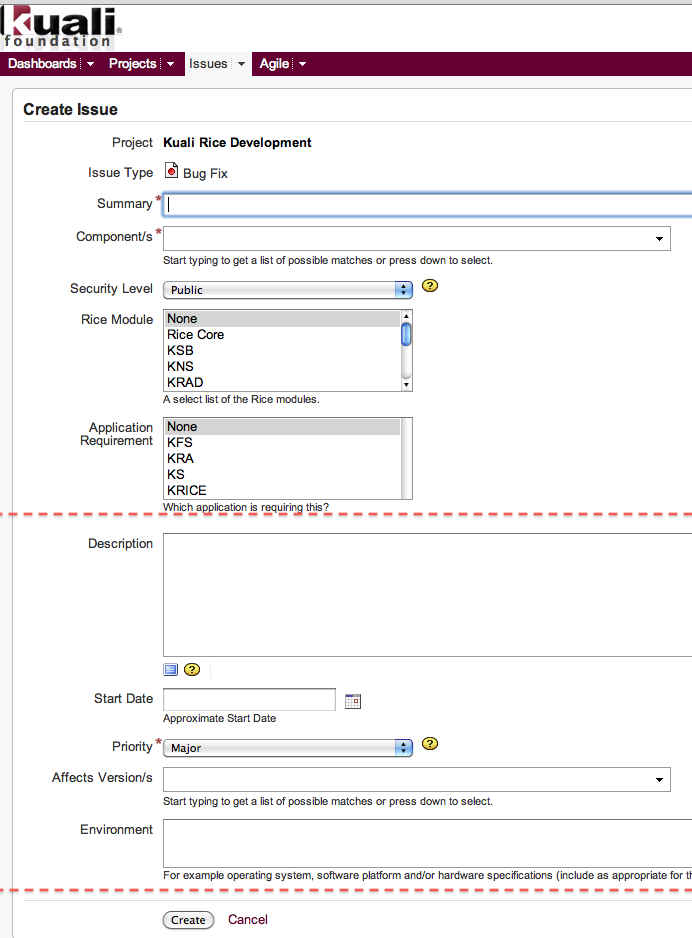
JIRA only displays fields that are appropriate to the Issue Type that you selected on the previous page. You may not see all of the fields listed below, and the fields you see may be in a different order. Complete the fields from this list that you do see.
Only enter information in these fields:
Summary: Enter a short, descriptive title for this issue.
Application Requirement: Select the application for which this issue is a requirement.
Description: Describe the issue in full. Provide enough information that the person who tries to fix this issue can find it easily and understand the bug or the improvement or feature you are suggesting.
Priority: Select the correct priority:
Blocker: Blocks development and/or testing work, production cannot run.
Critical: Crashes, loss of data, severe memory leak.
Major: Major loss of function.
Minor: Minor loss of function or other problem where an easy workaround is available.
Trivial: Cosmetic problem like misspelled words or misaligned text.
Affects Version/s: If this is a bug, select the version(s) of Rice in which it appears.
Environment: Enter specific information about the operating system, software platform, and/or hardware as appropriate for this issue. Ignore all other fields. Do not change them. Other people use those fields. This screen print is from the Bug Fix screen. The screens for Improvement and for New Feature are slightly different. The fields in which you need to enter information are highlighted in this screen print.
Ignore all other fields. Do not change them. Other people use those fields.
This screen print is from the Bug Fix screen. The screens for Improvement and for New Feature are slightly different. The fields in which you need to enter information are highlighted in this screen print.
Table of Contents
This document is planned as a high level overview of what the various modules of Rice have to offer. For a more in depth view please refer to the User's Guide or Technical Guide that we also provide. If you don't already have a Rice environment to use, please visit this site to download the latest version of Rice for yourself.
The Kuali Nervous System (KNS) is a software development framework aimed at allowing developers to quickly build web-based business applications in an efficient and agile fashion. KNS is an abstracted layer of "glue" code that provides developers easy integration with the other Rice components. In this scope, KNS provides features to developers for dynamically generating user interfaces that allow end users to search, view details about records, interact electronically with business processes, and much more. KNS adds visual, functional, and architectural consistency to any system that is built with it, helping to ensure easier and more efficient maintainability of your software.
Kuali Service Bus (KSB) is a simple service bus geared towards easy service integration in a SOA architecture. In a world of difficult to use service bus products KSB focuses on ease of use and integration.
Kuali Enterprise Workflow provides a common routing and approval engine that facilitates the automation of electronic processes across the enterprise. The workflow product was built by and for higher education, so it is particularly well suited to route mediated transactions across departmental boundaries. Workflow facilitates distribution of processes out into the organizations to eliminate paper processes and shadow feeder systems. In addition to facilitating routing and approval workflow can also automate process-to-process related flows. Each process instance is assigned a unique identifier that is global across the organization. Workflow keeps a permanent record of all processes and their participants for auditing purposes.
Flexiable Routing
Nodes
By Document
Actions
Delegation
Action List - regardless of what application is using KEW, a single action list is used as a single point for a user to get access to any documents requiring their attention.
Filters and Preferences - users level tools are provided to allow a user to quickly filter their action list or to setup presentation preferences for setting up a personalized feel to their list.
eDocLite - eDocLite is a framework for developing and getting form based electronic documents, backed by a flexible workflow, out to users in a rapid fashion
PeopleFlow is a new feature in Rice 2.0, that enables simple routing of actions and notifications based on business rules. PeopleFlow can be integrated with enterprise-wide workflow management in KEW, or can be used without KEW, with the Kuali Rules Management System (KRMS) engine that is also new in Rice 2.0. This offers a light-weight way to manage business rules and routing across applications.
Kuali Enterprise Notification (KEN) acts as a broker for all university business related communications by allowing end-users and other systems to push informative messages to the campus community in a secure and consistent manner. All notifications are processed asynchronously and are delivered to a single list where other messages such as workflow related items (KEW action items) also reside. In addition, end-users can configure their profile to have certain types of messages delivered to other end points such as email, mobile phones, etc.
Channels - A channel is a stream used to organize notifications by topic or audience. These channels can be self-subscribed to by the user or pushed out automatically to users.
Priority - each notification is given a priority of importance to determine how the notification is presented.
Kuali Identity Management (KIM) provides central identity and access management services. It also provides management features for Identity, Groups, Roles, Permissions, and their relationships with each other. All integration with KIM is through a simple and consistent service API (Java or Web Services). The services are implemented as a general-purpose solution that could be leveraged by both Kuali and non-Kuali applications alike.
Furthermore, the KIM services are architected in such a way to allow for the reference implementations to be swapped out for custom implementations that integrate with other 3rd party Identity and Access Management solutions. The various services can be swapped out independently of each other. For example, many institutions may have a directory solution for identity, but may not have a central group or permission system. In cases like this, the Identity Service implementation can be replaced while the reference implementations for the other services can remain intact.
Kuali Rule Management System (KRMS) is a common rules engine for defining decision logic, commonly refereed to as business rules. KRMS facilities the creation and maintenance of rules outside of an application for rapid update and flexible implementation that can be shared across applications.
Includes a repository for storing business rules in a database, accessible remotely via web services
Provides user interface that sits on top of the rule repository and allows for authoring of business rules
UI contains numerous plug points and ability to allow for custom attributes and data elements to be collected during rule authoring (i.e. associating organizational codes with business rules, etc.)
An execution engine which can be embedded inside of the client application but which loads rules for execution from the remote rule repository
The ability to plug in other sources for business rules into the KRMS execution model
The business rule model supports the following concepts
Business Rule - decision logic that is used by an operational system, consists of a "condition" and an "action"
Condition - made of multiple propositions that evaluate to true or false, combined using Boolean algebra (such as AND, OR, NOT)
Proposition - a function that evaluates to true or false, potentially made up of term evaluations or custom functions
Term - defines a piece of business data that can be used in the construction of proposition (i.e. student GPA, account number, salary, etc.)
Action - is executed when a rule evaluates to true, can contain any arbitrary logic which (i.e. route an approval request, raise a validation message, send a notification, etc.)
Agenda - an execution plan for a set of rules
Context - contains multiple agendas and business rules, typically tied to some logical module or component of an application (i.e. a context containing agendas and business rules or Proposal Development in Kuali Coeus)
The execution engine is invoked by passing context and agenda selection criteria (which it will use to go to the remote rule repository and load the appropriate rules) as well as a set of "facts"
a fact is a value for an instance of a term (i.e. "student id" might be the term but "student id = 123456" is a fact)
In general, the majority of KRMS is pluggable as well, there are features built in for what we are calling "term resolution" where certain terms can be derived based on values for other terms/facts that are supplied to the rule execution engine.
Has built-in integration with KEW at the moment for doing routing rules these integrations though are built in using the standard "Action" capability that KRMS provides, so you can really integrate it with anything through the use of custom actions
New for Rice 2.0, Kuali Rapid Application Development (KRAD) is a framework that eases the development of enterprise web applications by providing reusable solutions and tooling that enables developers to build in a rapid and agile fashion. KRAD is a complete framework for web developers that provides infrastructure in all the major areas of an application (client, business, and data), and integrates with other modules of the Rice middleware project. In future releases, KNS will be absorbed into and replaced by KRAD.
User Interface Framework (UIF) components
Built upon a rich JQuery library of standards that, among other items, includes
Light-boxes
Messages and Notifications
Progressive Dsiclosure
Client Side Validation
Table Tools
Themes
AJAX Enabled Fields
More UI Flexibility
No longer limited to the "vertical" tab layouts of KNS
Improved Configuration and Tooling
Inquiries
Lookups
Maintenance Documents
Transactional
Web MVC
Rules
Data Dictionary Enhancements
Min, Max, Valid Characters
Conditional Constraints
Custom Constraints
Lookup Constraints
Business objects
Improved Accessibility of Rice and its components
Table of Contents
- Rice Client Overview
- Global Configuration Parameters
- Rice Service Architecture and Configuration Overview
- Eclipse and Rice
- Overview
- Download the Tools
- Import rice into Eclipse as a project (Source distribution only)
- Check out the Rice code (Non-source SVN distribution only)
- Set up database drivers
- Set up Eclipse for Maven
- Rebuild Rice
- Install the database
- Installing the appropriate configuration files
- Run the sample web application
- Changing Rice project dependencies
- Other Notes
- Creating Rice Enabled Applications
- Version Compatibility
You can integrate your application with Rice using several methods, each described below.
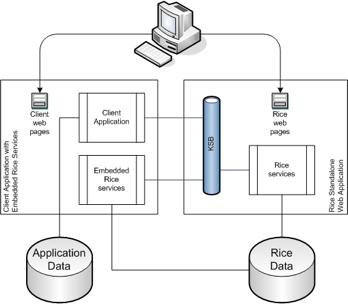
This method includes embedding some or all of the Rice services into your application. When using this method, a standalone Rice server for the Rice web application is still required to host the GUI screens and some of the core services.
To embed the various Rice modules in your application, you configure them in the RiceConfigurer using Spring. For more details on how to configure the RiceConfigurer for the different modules, please read the Configuration Section for the module you want to embed.
KEN - Kuali Enterprise Notification
KEW - Kuali Enterprise Workflow
KIM - Kuali Identity Management
KSB Spring / KSB Quartz - Kuali Service Bus
KRMS - Kuali Rules Management System
Integration of database transactions between client application and embedded Rice (via JTA)
Performance: Embedded services talk directly to the Rice database
No need for application plug-ins on the server
Great for Enterprise deployment: It's still a single Rice web application, but scalability is increased because there are multiple instances of embedded services.
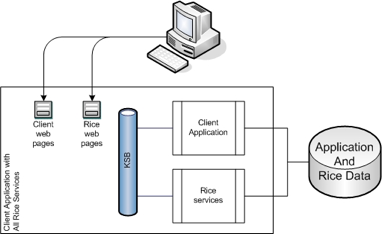
This method includes the entire Rice web application and all services into your application. This method does not require a standalone Rice server.
Each of the Rice modules provides a set of JSPs and tag libraries that you include in your application. These are then embedded and hooked up as Struts Modules. For more details on how the web portion of each module is configured, please read the Configuration Guide for each of the modules.
All the advantages of Embedded Method
No need to deploy a standalone Rice server
Ideal for development or quick-start applications
May ease development and distribution
Can switch to Embedded Method for deployment in an Enterprise environment
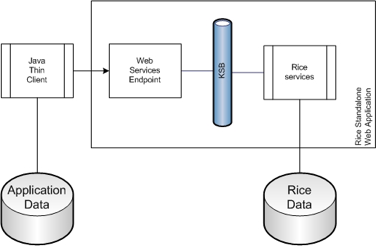
This method utilizes some pre-built classes to provide an interface between your application and web services on a standalone Rice server.
Many of the Rice services are exposed by the KSB as Java service endpoints. This means they use Java Serialization over HTTP to communicate. If desired, they can also be secured to provide access to only those callers with authorized digital signatures.
This means directly using web services to access a standalone Rice server. This method utilizes the same services as the Thin Java Client, but does not take advantage of pre-built binding code to access those services.
Table 6.1. Global Configuration Parameters
| Configuration Parameter | Description | Sample value |
|---|---|---|
| app.code | Together with environment, forms the app.context.name which then forms the application URL. | kr |
| application.id | The unique ID for the application. A value should be chosen which will be unique within the scope of Kuali Rice deployment and integration. There is no default for this value but it must be defined in order for portions of Kuali Rice to function properly. | |
| application.host | The name of the application server the application is being run on. | localhost |
| application.http.scheme | The protocol the application runs over. | http |
| cas.url | The base URL for CAS services and pages. | https://test.kuali.org/cas-stg |
| config.obj.file | The central OJB configuration file. | |
| config.spring.file | Used to specify the base Spring configuration file. The default value is "classpath:org/kuali/rice/kew/config/KEWSpringBeans.xml" | |
| credentialsSourceFactory | The name of the org.kuali.rice.core.security.credentials.CredentialsSourceFactory bean to use for credentials to calls on the service bus. | |
| datasource.accessToUnderlying ConnectionAllowed | Allows the data source's pool guard access to the underlying data connection. See: http://commons.apache.org/dbcp/apidocs/org/apache/commons/dbcp/BasicDataSource.html #isAccessToUnderlyingConnectionAllowed() | true |
| datasource.initialSize | The initial number of database connections in the data source pool. See: http://commons.apache.org/dbcp/apidocs/org/apache/commons/dbcp/ BasicDataSource.html#initialSize | 7 |
| datasource.minIdle | The number of connections in the pool which can be idle without new connections being created. See: http://commons.apache.org/dbcp/apidocs/org/apache/commons/dbcp/ BasicDataSource.html#minIdle | 7 |
| datasource.ojb.sequenceManager. className | The class used to manage database sequences in databases which do not support that feature. Default value is "org.apache.ojb.broker.platforms.KualiMySQLSequenceManagerImpl" | |
| datasource.pool.maxActive | The maximum number of connections allowed in the data source pool. See: http://commons.apache.org/dbcp/apidocs/org/apache/commons/dbcp/ BasicDataSource.html#maxActive | 50 |
| environment | The name of the environment. This will be used to determine if the environment the application is working within is a production environment or not. It is also used generally to express the "name" of the environment, for instance in the URL. | dev |
| http.port | The port that the application server uses; it will be appended to all URLs within the application. | 8080 |
| log4j.settings.props | The log4j properties of the application, set up in property form. | |
| log4j.settings.xml | The log4j properties of the application, set up in XML form. | |
| rice.additionalSpringFiles | A comma delimited list of extra Spring files to load when the application starts. | |
| additional.config.locations | A comma delimited list of additional configuration file locations to load after the main configuration files have been loaded. Note that this parameter only applies to the Rice standalone server. | |
| rice.custom.ojb.properties | The file where OJB properties for the Rice application can be found. The default is "org/kuali/rice/core/ojb/RiceOJB.properties" | org/kuali/rice/core/ojb/RiceOJB.properties |
| rice.cache.disableAllCaches | Flag to disable all Spring caching in Rice | false |
| rice.cache.disableDistributedCacheFlush | Flag to disable flushing distributed caches via the KSB messaging service | false |
| rice.cache.disabledCaches | Flag to disable specific Spring caches in Rice by name. The cache names should be comma separated. | http://rice.kuali.org/kim/v2_0/PermissionType, http://rice.kuali.org/kim/v2_0/TemplateType{Permission} |
| rice.logging.configure | Determines whether the logging lifecycle should be loaded. | false |
| rice.url | The main URL to the Rice application. | ${application.url}/kr |
| security.directory | The location where security properties exist, such as the user name and password to the database. | /usr/local/rice/ |
| transaction.timeout | The length of time a transaction has to complete; if it goes over this value, the transaction will be rolled back. | 300000 |
| version | The version of the Rice application. | 03/19/2007 01:59 PM |
This document describes how the Rice Service Architecture operates.
The Rice System consists of a stack of ResourceLoader objects that contain configuration information and expose service implementations (potentially from remote sources). Each module supplies its own Spring context containing it's services. These Spring contexts are then wrapped by a ResourceLoader which is used to locate and load those services.
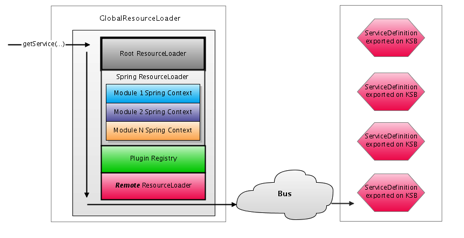
Rice is composed of a set of modules that provide distinct functionality and expose various services. Each module loads it's own Spring context which contains numerous services. These Spring contexts are wrapped by a ResourceLoader class that provides access to those services. A ResourceLoader is similar to Spring's BeanFactory interface, since you acquire instances of services by name. Rice adds several additional concepts, including qualification of service names by namespaces. When the RiceConfigurer is instantiated, it constructs a GlobalResourceLoader which contains an ordered chain of ResourceLoader instances to load services from:
All application code should use the GlobalResourceLoader to obtain service instances. The getService(…) method iterates through each registered ResourceLoader to locate a service registered with the specified name. In it's default configuration, the GlobalResourceLoader contacts the following resource loaders in the specified order:
Spring ResourceLoader – wraps the spring contexts for the various Rice modules
Plugin Registry – allows for services and classes from to be loaded from packaged plugins
Remote ResourceLoader – integrates with the KSB ServiceRegistry to locate and load remotely deployed services
As shown above, the last ResourceLoader on the list is the one registered by KSB to expose services available on the service bus. It's important that this resource loader is consulted last because it gives priority to using locally deployed services over remote services (if the service is available both locally and remotely). This is meant to help maximize performance.
To implement a thin client version of Rice, modify the configuration files as per the following
config.xml:
<config>
    <param name="environment" override="false">dev</param>
    <param name="application.id">rice-remote-test-client</param>
    <param name="message.persistence">false</param>
    <param name="kim.mode">THIN</param>
    <param name="kew.mode">THIN</param>
    <param name="ksb.mode">THIN</param>
    <param name="standalone.application.id">TRAVEL</param>
	<param name="config.location">/data/jenkins/kuali/main/${environment}/rice-remote-test-client-config.xml</param>
    <param name="config.location">classpath:META-INF/common-config-defaults.xml</param>
</config>
SpringBeans.xml:
<beans xmlns="http://www.springframework.org/schema/beans"
       xmlns:xsi="http://www.w3.org/2001/XMLSchema-instance"
       xmlns:p="http://www.springframework.org/schema/p"
       xsi:schemaLocation="http://www.springframework.org/schema/beans
                           http://www.springframework.org/schema/beans/spring-beans-3.1.xsd">

<bean id="jtaTransactionManager" class="org.springframework.transaction.jta.JotmFactoryBean">
    <property name="defaultTimeout" value="3600"/>
</bean>

<bean id="bootstrapConfig" class="org.kuali.rice.core.impl.config.property.ConfigFactoryBean"
            p:initialize="true">
    <property name="configLocations">
			<list>
				<value>classpath:config.xml</value>
			</list>
	</property>
</bean>

<bean id="coreConfigurer" class="org.kuali.rice.core.impl.config.module.CoreConfigurer" depends-on="bootstrapConfig"
          p:transactionManager-ref="jtaTransactionManager"
          p:userTransaction-ref="jtaTransactionManager"/>

<bean id="ksbConfigurer" class="org.kuali.rice.ksb.messaging.config.KSBConfigurer"/>

<bean id="kimConfigurer" class="org.kuali.rice.kim.config.KIMConfigurer"/>

<bean id="kewConfigurer" class="org.kuali.rice.kew.config.KEWConfigurer"/>

</beans>
In addition to programmatically acquiring service references, you can also import Rice services into a Spring context with the help of the ResourceLoaderServiceFactoryBean:
<!-- import a Rice service from the ResourceLoader stack -->
<bean id="aRiceService" class="org.kuali.rice.resourceloader.support.ResourceLoaderServiceFactoryBean"/>
This class uses the GlobalResourceLoader to locate a service named the same as the ID and produces a bean that proxies that service. The bean can thereafter be wired in Spring like any other bean.
Rice includes a Spring bean that extends the Spring auto-wire process (unlike the current version of Spring, the auto-wire process in the version of Spring that's included with Rice cannot be extended). With this bean configured into your application, you can use the @RiceService annotation to identify Rice services to auto-wire.
Add this bean definition to the top of your Spring configuration file to configure the Spring extension:
<bean class="org.kuali.rice.core.util.GRLServiceInjectionPostProcessor"/>
Add the @RiceService annotation to any field or method, following the normal Spring rules for injection annotations. The annotation requires a name property that specifies the name of the service to inject. If the name requires a namespace other than the current context namespace, you must specify the namespace as a prefix (for example, "{KEW}actionListService").
@RiceService(name="workflowDocumentService")
protected WorkflowDocumentService workflowDocumentService;
In certain cases, it may be desirable to publish all beans in a particular Spring context to the Resource Loader stack. Fortunately, there is an easy way to accomplish this using the RiceSpringResourceLoaderConfigurer as shown below:
<!—- Publish all services from this Spring context to the GRL -->
<bean class="org.kuali.rice.core.resourceloader.RiceSpringResourceLoaderConfigurer"/>

<bean id="myService1" class="my.app.package.MyService1"/>

<bean id="myService2" class="my.app.package.MyService2"/>
In the above example, both myService1 and myService2 would be added to a Resource Loader that would be put at the top of the Resource Loader stack. The names of these services would be "myService1" and "myService2" with no namespace. To load these services you would use the following call to the Global Resource Loader:
MyService1 myService1 = GlobalResourceLoader.getService("myService1");
The most common reason that one would want to override services in Kuali Rice is to customize the implementation of a particular service for the purposes of institutional customization.
A good example of this is the Kuali Identity Management (KIM) services. KIM is bundled with reference implementations that read identity (and other) data from the KIM database tables. In many cases an implementer will already have an existing identity management solution that they would like to integrate with. By overriding the service reference implementation with a custom one, it's possible to integrate with other institutional services (such as LDAP or other services).
An alternative to using the RiceSpringResourceLoaderConfigurer to publish beans from a Spring context to the Rice Resource Loader framework is to inject a root Resource Loader into the RiceConfigurer.
You can create an implementation of ResourceLoader that returns a custom bean instead of the Rice bean, or you can use a built-in resource loader like the SpringBeanFactoryResourceLoader which wraps a Spring context in a ResourceLoader. Your configuration needs to inject this bean as the RootResourceLoader of the RiceConfigurer using the rootResourceLoader property, as shown below:
<!-- a Rice bean we want to override in our application -->
<bean id="overriddenRiceBean" class="my.app.package.MyRiceServiceImpl"/>


<!-- supplies services from this Spring context -->
<bean id="appResourceLoader"
 class="org.kuali.rice.core.resourceloader.SpringBeanFactoryResourceLoader"/>

<bean id="rice" class="org.kuali.rice.core.config.RiceConfigurer">
    <property name="rootResourceLoader" ref="appResourceLoader"/>
    ...
</bean>
Warning
Application Resource Loader and Circular Dependencies
Be careful when mixing registration of an application root resource loader and lookup of Rice services via the GlobalResourceLoader. If you are using an application resource loader to override a Rice bean, but one of your application beans requires that bean to be injected during startup, you may create a circular dependency. In this case, you have to make sure you are not unintentionally exposing application beans (which may not yet have been fully initialized by Spring) in the application resource loader, or you have to arrange for the GRL lookup to occur lazily, after Spring initialization has completed (either programmatically, or via some sort of proxy).
A Rice-enabled web application (including the Rice Standalone distribution) contains a RiceConfigurer (typically defined in a Spring XML file) that loads the Rice modules. You can override services from the various modules by injecting a list of additional spring files to load as in the following example:
<bean id="rice" class="org.kuali.rice.core.config.RiceConfigurer">
    ...
    <property name="additionalSpringFiles" ref="appResourceLoader">
        <list>
            <value>classpath:my/app/package/MyCustomSpringFile.xml</value>
        </list>
    </property>
    ...
</bean>
You will need to ensure that any Spring XML files and necessary classes they reference are in the classpath of your application. If you are overriding things in the Rice standlone application itself, then you would need to place classes in the WEB-INF/classes directory of the war and any jars in the WEB-INF/lib directory.
It's a standard behavior of Spring context loading that the last beans found in the context with a particular id will be the versions loaded during context initialization. The additionalSpringFiles property will put any Spring files specified at the end of the list loaded by the RiceConfigurer. So any beans defined in that file with the same id as beans in the internal Rice Spring XML files will effectively override the out-of-the-box version of those services.
When working with the packaged Rice standalone server, you won't have access to the Spring XML file which configures the RiceConfigurer. In this case, you can specify additional spring files using a configuration parameter in your Rice configuration XML, as in the following example:
<param name="rice.additionalSpringFiles"
value="classpath:my/app/package/MyCustomSpringFile.xml"/>
Warning
Recent change in Eclipse setup
Due to its unreliability, we have recently stopped relying on the Maven plugin for Eclipse to manage the project build path. Instead, we are using the eclipse:eclipse plugin for Maven to generate a static build path. Please note the changes in the Eclipse project setup.
This document describes how to set up an Eclipse environment for running Rice from source and/or for developing on the Kuali Rice project. To create your own Kuali Rice client application, see the instructions in Creating a Rice-Enabled Application.
Install Java 5 SDK - http://java.sun.com.
Install the Eclipse Europa Bundle for Java Developers - http://www.eclipse.org/europa/
You need to allocate at least 768MB of memory for the Eclipse runtime and at least 512MB of memory for the JVM that Eclipse uses when it runs Java programs and commands.
Go to Eclipse Preferences.
On Windows: Window --> Preferences --> Java --> Installed JREs.
On Mac OS X: Eclipse --> Preferences --> Java --> Installed JREs.
Select the JRE and click Edit.
Add -Xmx768m to Default VM Arguments
Install Maven2 for command line usage:
Download Maven2.0.9 from http://maven.apache.org/download.html.
Install Maven2 into C:\maven on Windows or /opt/maven on Linux. This directory is called the Maven Root directory.
Register Maven on your computer's PATH so that it can be invoked as an executable without have to run the mvn command from the <maven_root>/bin directory all of the time.
Set the M2_HOME environment variable on your system to the location of your Maven2 installation.
Update .m2 repository directory (WINDOWS ONLY) By default (on Windows) maven places the .m2 repo directory in the user directory inside the Documents and Settings folder. The space characters can cause issues. To avoid them we need to do the following:
Figure out where you want your local maven repository to be stored, i.e. C:\work\m2
Make sure you turn off eclipse if it has auto updating maven turned on.
Move everything from your old maven directory to your new one. This will save you a considerable amount of time. If you do not do this then maven will re-download all repositories to the new location.
Update your settings.xml file. This should be located in C:\Documents and Settings\user\.m2\settings.xml. Add this line to the file somewhere inside the <settings> tag:
<localRepository>C:\work\m2</localRepository>
Note: You only need to follow these instructions if you downloaded the source distribution of Rice as a zip file. If you are a contributing developer who will be committing code to CVS, please skip this step (Importing rice into Eclipse as a Project) and go to the next one instead.
Open Eclipse.
Choose File --> Import --> Existing Projects into Workspace.
Browse for and select /java/projects/rice (or where ever you unzipped the source distribution to) as the root project directory and click Finish.
Note: You do not need to perform the steps in this section if you have downloaded the source distribution of Rice as a zip file.
We recommend installing Subclipse as a plugin from your Eclipse instance (http://subclipse.tigris.org/install.html)
Set up a new GitHub repository in Eclipse: https://github.com/kuali/rice
Check out the Rice code from the appropriate branch of code (i.e. branches/rice-release-1-0-0-br)
If this is the first time you've set up Eclipse to work with Rice, Maven won't find the Oracle drivers in the Kuali repository.
If you do not already have an Oracle driver saved in /java/drivers as ojdbc14.jar, you can download one from http://www.oracle.com/technology/software/tech/java/sqlj_jdbc/index.html. Save it as /java/drivers/ojdbc14.jar
Run this command from the command line (this should all be on one line when you enter it):
UNIX
mvn install:install-file -DgroupId=com.oracle -DartifactId=ojdbc14
 -Dversion=10.2.0.3.0 -Dpackaging=jar -Dfile=/java/drivers/ojdbc14.jar
Windows
mvn install:install-file -DgroupId=com.oracle -DartifactId=ojdbc14
 -Dversion=10.2.0.3.0 -Dpackaging=jar -Dfile=c:/java/drivers/ojdbc14.jar
Or, run the equivalent Ant target:
ant install-oracle-jar
The driver for MySQL is already referenced by the Kuali Rice project. Rice does not have out-of-the-box support for other RDBMS at this point in time. However, if you want to use other databases, it is possible to add database support for that particular database as long as it's supported by the Apache OJB project (http://db.apache.org/ojb).
If this is the first time you are using Eclipse with a project build path generated by the eclipse:eclipse Maven plugin, you need to define the M2_REPO Classpath Variable in your Eclipse: Java > Build Path > Classpath Variable, under the Preferences menu.
The Rice project contains auto-generated build path entries that rely on the presence of this M2_REPO variable to determine the location of dependency libraries.
If dependency libraries have been added or removed from the Rice project, including the first time you check out Rice, you should run the retrieve-maven-dependencies Ant target to pull down all necessary libraries.
Note: For the Maven2 Ant tasks to work, Ant has to know where your Maven2 home is. If you have set the M2_HOME variable in your system environment, it will be recognized automatically. If not, or if for some reason you want to use a different location (e.g., if you want to have multiple Maven installations), then you can set the maven.home.directory property in /data/jenkins/kuali-build.properties.
Add the build.xml file in the root of the Rice project to your Ant view, or open a shell to the Rice project directory and run the retrieve-maven-dependencies target. You should see Maven retrieving any required dependencies. If you are running this Ant task in Eclipse, then you must recognize the PATH environment variable under Run > External Tools > Open External Tools Dialog > Environment.
Optionally, if you have trouble running this Ant target, you can just run an mvn compile from the command line to invoke a Maven compilation. This will download all dependencies into your local maven repository.
Execute a clean build of the project in Eclipse:
If your build was previously broken due to the M2_REPO classpath variable being undefined or due to missing libraries, it should now have been built successfully.
To set up the database, please follow the instructions in the Installation Guide under Preparing the Database.
Note: Be sure to use an appropriate editor such as vi or Notepad when editing configuration files. For example, we have found that WordPad can corrupt the configuration file.
To install the configuration file for the Kuali Rice sample application, you can do an Ant-based setup or a manual setup.
Execute the prepare-dev-environment Ant target in the build.xml file located in the root of the project.
This creates: <user home>/kuali/main/dev/sample-app-config.xml
Copy the config/templates/sample-app-config.template.xml file to <user home>/kuali/main/dev/sample-app-config.xml.
For Windows, your user home is: C:\Documents and Settings\<user name>
For Unix/Linux, your user home is: /home/<user name>
For Mac OS X, your user home is: /Users/<user name>
Add the appropriate database parameters to <user home>/kuali/main/dev/sample-app-config.xml
Oracle
<param name="datasource.url">jdbc:oracle:thin:@localhost:1521:XE</param>
<param name="datasource.username">oracle.username</param>
<param name="datasource.password">oracle.password</param>
MySQL
<param name="datasource.url">jdbc:mysql://localhost:3306/kulrice</param>
<param name="datasource.username">mysql.username</param>
<param name="datasource.password">mysql.password</param>
Back in Eclipse, locate and run the rice - JettyServer.launch file:
Point your browser to the following url: http://localhost:8080/kr-dev
If you change any of the dependencies in any of the Rice pom.xml files, you must run the update-eclipse-classpath Ant target to regenerate the top-level Eclipse .classpath file for the project.
If you change the dependencies and commit the change, when others update their local source copy they must run the corresponding retrieve-maven-dependencies target again.
Note
Refresh your Eclipse project if dependencies (and therefore the Eclipse.classpath file) have changed.
If this is the first time that you have installed the Maven plugin into your Eclipse environment, you may need to add a file called settings.xml in your <user home>/.m2 directory.
The easiest way to tell if you need to do this is that there will be a warning in the console after building, stating that the settings.xml file is missing. All you need to do is create a settings.xml file with this content:
<settings/>
Rebuild, and the warning should no longer appear.
Note
You do NOT ever need to run any of the context menu Maven commands from inside Eclipse.
You do NOT need to run any Maven commands from the command line.
The Eclipse Maven2 plugin is a little bit flaky sometimes. You might need to close Eclipse to flush its memory.
If your default workspace JDK is not 1.5, you need to reconfigure the Maven external tools definitions for Rice this way:
Open Run->External Tools->External Tools Dialog... menu item.
Find the m2 build category.
Select each preconfigured Rice external tool configuration, select the JRE tab, and ensure the JRE is set to 1.5.
The default Maven2 repository location is in your user directory; however, if you have a pre-existing repository (or for some other reason don't want it in your user directory), you can alter Maven2's repository location. The current version of the Maven2 plugin has a bug that does not allow this to work (see http://jira.codehaus.org/browse/MNGECLIPSE-314), but the 0.0.11 development version available from the update site http://m2eclipse.codehaus.org/update-dev/ allows you to specify a custom local repository.
Note
If you make this change, you may have to delete and re-add the Maven Managed Dependencies library to your project build path if you have an existing, invalid, Maven-managed dependencies library.
If your default workspace JDK is not 1.5, then you also need to set the JDK compliance level to the appropriate version for the project. You can find this by right-clicking on the Project -> Properties -> Java Compiler -> Compiler compliance level. Be sure the Enable project specific settings checkbox is checked.
Be sure to turn off validation at the project level by right-clicking on the Project, then clicking Properties -> Validation -> Suspend all Validators. This can be adjusted once a successful Rice project is up and running.
If you start seeing java.sql.SQLException: Listener refused the connection with the following error: ORA-12519, TNS:no appropriate service handler found, there are a couple of things that may remedy the problem.
Increase the Oracle XE connection limit:
alter system set processes=150 scope=spfile;
alter system set sessions=150 scope=spfile;
Lower the pool size in your rice config.xml:
<param name="datasource.pool.maxSize">10</param>
Disconnect any other clients and then restart Oracle-XE.
In order to install a Rice client as a standalone server, please see the installation guide instructions for Standalone Server Setup section in the Installation Guide.
Once you have completed the installation, you will need to import your project into eclipse and reorder the eclipse classpath to account for a change in how the classpath was generated by maven. Navigate to your project properties and select the Order and Export tab from the Java Build Path project property. There will be an entry for JRE System Library at the bottom of the list that should be moved to the very top.
The Rice Configuration System is an XML-based solution which provides capabilities similar to Java property files, but also adds some additional features. The configuration system lets you:
Configure keys and values
Aggregate multiple files using a single master file
Build parameter values from other parameter values
Use the parameters in Spring
Override configuration values
Below is an example of a configuration XML file. Note that the white space (spaces, tabs, and new lines) is stripped from the beginning and end of the values.
<config>
    <param name="client1.location">/data/jenkins/slave/workspace/COR-Rice-Release-Sitedeploy-2.5/app/src/test/clients/TestClient1</param>
    <param name="client2.location">/data/jenkins/slave/workspace/COR-Rice-Release-Sitedeploy-2.5/app/src/test/clients/TestClient2</param>
    <param name="ksb.client1.port">9913</param>
    <param name="ksb.client2.port">9914</param>
    <param name="ksb.testharness.port">9915</param>
    <param name="threadPool.size">1</param>
    <param name="threadPool.fetchFrequency">3000</param>
    <param name="bus.refresh.rate">3000</param>
    <param name="keystore.alias">rice</param>
    <param name="keystore.password">super-secret-pw</param>
    <param name="keystore.file">/data/jenkins/slave/workspace/COR-Rice-Release-Sitedeploy-2.5/app/src/test/resources/keystore</param>
</config>
Here is an example of the Java code required to parse the configuration XML file and convert it into a Properties object:
Config config = new SimpleConfig(configLocations, properties);
config.parseConfig();
In the sample above, configLocations is a List<String> containing file locations using the standard Spring naming formats (examples: file:/whatever and classpath:/whatever). The variable properties is a Properties object containing the default property values.
Here is an example of retrieving a property value from Java code:
String val = ConfigContext.getCurrentContextConfig().getProperty("keystore.alias");The Rice Configuration System has a special parameter, config.location, which you use to incorporate the contents of another file. Typically, you use this to include parameters that are maintained by system administrators in secure locations. The parameters in the included file are parsed as if they had been in the original file at that place. Here is an example:
<config>
    <param name="config.location">file:/my_secure_dir/my_secure_file.xml</param>
</config>Once you have defined a parameter, you can use it in the definition of another parameter. For example:
<config>
    <param name="apple">red delicious</param>
    <param name="taste">yummy yummy</param>
    <param name="apple.taste">${apple} ${taste}</param>
</config>
When this example is parsed, the value of the parameter apple.taste will be set to red delicious yummy yummy.
Because the parameters are converted into a Properties object, you can retrieve the complete list of parameters using this code:
config.getProperties()
You typically use this in Spring to parse a configuration and put its properties in a PropertyPlaceHolderConfigurer so that the parameters are available in the Spring configuration file:
<bean id="config" class="org.kuali.rice.core.config.spring.ConfigFactoryBean">
    <property name="configLocations">
        <list>
            <value>classpath:my-config.xml</value>
        </list>
    </property>
</bean>

<bean id="configProperties"
 class="org.springframework.beans.factory.config.MethodInvokingFactoryBean">
    <property name="targetObject" ref="config" />
    <property name="targetMethod" value="getProperties" />
</bean>

<bean class="org.springframework.beans.factory.config.PropertyPlaceholderConfigurer">
    <property name="properties" ref="configProperties" />
</bean>
Once this is complete, the configuration parameters can be used like standard Spring tokens in the bean configurations:
<bean id="dataSource" class="org.kuali.rice.core.database.XAPoolDataSource">
    <property name="transactionManager" ref="jotm" />
    <property name="driverClassName" value="${datasource.driver.name}" />
    <property name="url" value="${datasource.url}" />
    <property name="maxSize" value="${datasource.pool.maxSize}" />
    <property name="minSize" value="${datasource.pool.minSize}" />
    <property name="maxWait" value="${datasource.pool.maxWait}" />
    <property name="validationQuery" value="${datasource.pool.validationQuery}" />
    <property name="username" value="${datasource.username}" />
    <property name="password" value="${datasource.password}" />
</bean>The Config object can be injected into the RiceConfigurer that's configured in Spring and it will initialize the configuration context with those configuration parameters.
This is done as follows:
<bean id="config" class="org.kuali.rice.core.config.spring.ConfigFactoryBean">
    ...
</bean>

<bean id="rice" class="org.kuali.rice.core.config.RiceConfigurer">
    <property name="rootConfig" ref="config"/>
</bean>The primary purpose of overriding configuration values is to provide a set of default values in a base configuration file and then provide a separate file that overrides the values that need to be changed. You can also update a parameter value multiple times in the same file. Parameter values can be changed any number of times; the last value encountered while parsing the file will be the value that is retained.
For example, when parsing the file:
<config>
    <param name="taste">yummy yummy</param>
    <param name="taste">good stuff</param>
</config>
The final value of the parameter taste will be good stuff since that was the last value listed in the file.
As another example, when parsing the file:
<config>
    <param name="taste">yummy yummy</param>
    <param name="apple.taste">apple ${taste}</param>
    <param name="taste">good stuff</param>
</config>
The final value of the parameter apple.taste will be apple yummy yummy. This demonstrates that parameters that appear in the value are replaced by the current value of the parameter at that point in the configuration file.
Additionally, you can define certain parameters in such that they won't override an existing parameter value if it's already set.
As an example of this, consider the following configuration file:
<config>
    <param name="taste" override="false">even yummier</param>
    <param name="brand.new.param" override="false">brand new value</param>

</config>
If this file was loaded into a configuration context that had already parsed our previous example, then it would notice that the taste parameter has already been set. Since override is set to false, it would not override that value with even yummier. However, since brand.new.param had not been defined previously, it's value would be set.
The Kuali Rice software require a Java Transaction API (JTA) environment in which to execute database transactions. This allows for creation and coordination of transactions that span multiple data sources. This feature is something that would typically be found in a J2EE application container. However, Kuali Rice is designed in such a way that it should not require a full J2EE container. Therefore, when not running the client or web application inside of an application server that provides a JTA implementation, you must provide one. The default JTA environment that Kuali Rice uses is JOTM. There are other open-source options available, such as Atomikos TransactionsEssentials, and there are also commercial and open source JTA implementations that come as part of an application server (i.e. JBoss, WebSphere, GlassFish). Alternatively, Kuali Rice can be configured to use Bitronix.
If installing Rice using the standalone server option and a full Java application server is not being utilized, then the libraries required for JTA will need to be moved to the servlet server which is being used. These libraries have already been retrieved by Maven during project set up; it is a simple matter of moving them from the Maven repository to the libraries directory of the servlet server. Assuming, for instance, that Tomcat is being used, the following files need to be copied from the Maven repository to $TOMCAT_HOME/common/lib:
{Maven repository home}/repository/javax/transaction/jta/1.0.1B/jta-1.0.1B.jar
{Maven repository home}/repository/jotm/jotm/2.0.10/jotm-2.0.10.jar
{Maven repository home}/repository/jotm/jotm_jrmp_stubs/2.0.10/jotm_jrmp_stubs-1.0.10.jar
{Maven repository home}/repository/xapool/xapool/1.5.0-patch3/xapool-1.5.0-patch3.jar
{Maven repository home}/repository/howl/howl-logger/0.1.11/howl-logger-0.1.11.jar
{Maven repository home}/repository/javax/resource/connector-api/1.5/connector-api-1.5.jar
{Maven repository home}/repository/javax/resource/connector/1.0/connector-1.0.jar
{Maven repository home}/repository/org/objectweb/carol/carol/2.0.5/carol-2.0.5.jar
Additionally, the {Rice project home}config/jotm/carol.properties configuration file needs to be moved to $TOMCAT_HOME/common/classes, this time from the built Rice project.
Configure the JOTM transaction manager and user transaction objects as Spring beans in your application's Spring configuration file. Here is an example:
<bean id="transactionManagerXAPool" class="org.springframework.transaction.jta.JotmFactoryBean">
    <property name="defaultTimeout" value="3600"/>
</bean>

<alias name="transactionManagerXAPool" alias="jtaTransactionManager"/>
<alias name="transactionManagerXAPool" alias="jtaUserTransaction"/>
You can use these beans in the configuration of Spring's JTA transaction manager and the Rice configurer. This configuration might look like the following:
<bean id="springTransactionManager" class="org.springframework.transaction.jta.JtaTransactionManager">
    <property name="userTransaction">
        <ref local="userTransaction" />
    </property>
    <property name="transactionManager">
        <ref local="jtaTransactionManager" />
    </property>
</bean>

<bean id="rice" class="org.kuali.rice.core.config.RiceConfigurer">
    <property name="transactionManager" ref="jtaTransactionManager" />
    <property name="userTransaction" ref="jtaUserTransaction" />
    ...
</bean>JTA requires that the datasources that are used implement the XADataSource interface. Some database vendors, such as Oracle, have pure XA implementations of their datasources. However, internally to Rice, we use wrappers on plain datasources using a library called XAPool. When configuring transactional data sources that will be used within JOTM transactions, you should use the org.kuali.rice.core.database.XAPoolDataSource class provided with Rice. Here is an example of a Spring configuration using this data source implementation:
<bean id="myDataSource" class="org.kuali.rice.core.database.XAPoolDataSource">
    <property name="transactionManager" ref="jtaTransactionManager" />
    <property name="driverClassName" value="${datasource.driver.name}" />
    <property name="url" value="${datasource.url}" />
    <property name="maxSize" value="${datasource.pool.maxSize}" />
    <property name="minSize" value="${datasource.pool.minSize}" />
    <property name="maxWait" value="${datasource.pool.maxWait}" />
    <property name="validationQuery" value="${datasource.pool.validationQuery}" />
    <property name="username" value="${datasource.username}" />
    <property name="password" value="${datasource.password}" />
</bean>When using the built-in instance of the Quartz scheduler that Rice creates, you will need to inject a non-transactional data source into the RiceConfigurer in addition to the JTA transactional instance. This is to prevent deadlocks in the database and is required by the Quartz software (the Quartz web site has an FAQ entry with more details on the problem). Here is an example of a non-transactional data source configuration:
<bean id="nonTransactionalDataSource"
 class="org.apache.commons.dbcp.BasicDataSource" destroy-method="close">
    <property name="driverClassName" value="${datasource.driver.name}"/>
    <property name="url" value="${datasource.url}"/>
    <property name="maxActive" value="${datasource.pool.maxActive}"/>
    <property name="minIdle" value="7"/>
    <property name="initialSize" value="7"/>
    <property name="validationQuery" value="${datasource.pool.validationQuery}"/>
    <property name="username" value="${datasource.username}" />
    <property name="password" value="${datasource.password}" />
    <property name="accessToUnderlyingConnectionAllowed"
 value="${datasource.dbcp.accessToUnderlyingConnectionAllowed}"/>
</bean>
You need to either inject this non-transactional data source into the Quartz SchedulerFactory Spring bean (if you are explicitly defining it) or into the rice bean in the Spring Beans config file as follows:
<bean id="rice" class="org.kuali.rice.config.RiceConfigurer">
    ...
    <property name="nonTransactionalDataSource" ref="nonTransactionalDataSource" />
    ...
</bean>Configure the Bitronix transaction manager and user transaction objects as Spring beans in your application's Spring configuration file. Here is an example:
<bean id="btmConfig" factory-method="getConfiguration"
          class="bitronix.tm.TransactionManagerServices" lazy-init="true"/>
<bean id="transactionManagerBitronix" class="bitronix.tm.TransactionManagerServices"
          factory-method="getTransactionManager" depends-on="btmConfig" destroy-method="shutdown" lazy-init="true"/>

<alias name="transactionManagerBitronix" alias="jtaTransactionManager"/>
<alias name="transactionManagerBitronix" alias="jtaUserTransaction"/>
You can use these beans in the configuration of the Rice configurer. This configuration might look like the following:
<bean id="rice" class="org.kuali.rice.core.config.RiceConfigurer">
    <property name="transactionManager" ref="jtaTransactionManager" />
    <property name="userTransaction" ref="jtaUserTransaction" />
  ...
</bean>An example configuration of Btironix Transactional Data Sources:
<bean id="riceDataSourceBitronixXa" class="bitronix.tm.resource.jdbc.PoolingDataSource" init-method="init"
         destroy-method="close" lazy-init="true">
    <property name="className" value="oracle.jdbc.xa.client.OracleXADataSource" />
    <property name="uniqueName" ref="ds-random-string" />
    <property name="minPoolSize" value="${datasource.pool.minSize}" />
    <property name="maxPoolSize" value="${datasource.pool.maxSize}" />
    <property name="useTmJoin" value="true" />
    <property name="testQuery" value="${datasource.pool.validationQuery}" />
    <property name="allowLocalTransactions" value="true" />
    <property name="driverProperties">
      <props>
        <prop key="URL">${datasource.url}</prop>
        <prop key="user">${datasource.username}</prop>
        <prop key="password">${datasource.password}</prop>
      </props>
    </property>
</bean>

<bean id="ds-random-string" class="org.springframework.beans.factory.config.MethodInvokingFactoryBean">
    <property name="staticMethod" value="org.apache.commons.lang.RandomStringUtils.randomAlphanumeric"/>
    <property name="arguments"><list><value>20</value></list></property>
</bean>Notice the addition of the driverClassName prop in the dirverProperties in the non-transaction data source configuration
<bean id="riceDataSourceBitronix" class="bitronix.tm.resource.jdbc.PoolingDataSource" init-method="init"
        destroy-method="close" lazy-init="true">
    <property name="className" value="bitronix.tm.resource.jdbc.lrc.LrcXADataSource" />
    <property name="uniqueName" ref="ds-random-string" />
    <property name="minPoolSize" value="${datasource.pool.minSize}" />
    <property name="maxPoolSize" value="${datasource.pool.maxSize}" />
    <property name="useTmJoin" value="true" />
    <property name="testQuery" value="${datasource.pool.validationQuery}" />
    <property name="allowLocalTransactions" value="true" />
    <property name="driverProperties">
      <props>
        <prop key="Url">${datasource.url}</prop>
        <prop key="driverClassName">${datasource.driver.name}</prop>
        <prop key="user">${datasource.username}</prop>
        <prop key="password">${datasource.password}</prop>
      </props>
    </property>
</bean>

<bean id="ds-random-string" class="org.springframework.beans.factory.config.MethodInvokingFactoryBean">
    <property name="staticMethod" value="org.apache.commons.lang.RandomStringUtils.randomAlphanumeric"/>
    <property name="arguments"><list><value>20</value></list></property>
</bean>From version 2.0 of Kuali Rice up to at least version 3.0, the project is committed to providing what it refers to as "middleware" or "client-server" service compatibility. This essentially means that an application which is a client of the Kuali Rice Standalone Server (either it's services or it's database) should be able to continue to function properly even if the Rice Standalone Server or it's database is upgraded to a newer version.
More information on the scope of version compatibility in Kuali Rice can be found in the Kuali Rice Version Compatibility Statement.
There are a few rules that a client application using the Kuali Rice apis must following in order to ensure the client application remains compatible once the Kuali Rice Standalone Server is updated. These rules only apply in situations where there is a standalone instance of Kuali Rice which is being integrated with. In the case that an application is running Kuali Rice "bundled", then compatibility is not a concern since that application forms a single software bundle with Kuali Rice included.
First, client-server compatibility only pertains to the components of Rice which have client-server interaction, that includes the following components and their sub-modules:
Core Service
KSB
KEW
KIM
KEN
KRMS
Location
There are some components of Rice which are "framework-only" and don't contain any client-server remoting components. These include:
Core
KNS
KRAD
There are, additionally, some modules of Rice which only run as part of the standalone server (or in bundled mode) and those include eDocLite and the various "web" modules of Rice.
Only the first set of "client-server" Rice components are presently under the constraints of version compatibility.
A summary of the rules a client application needs to follow in order to ensure they remain version compatible is as follows:
If integrated with a standlone Kuali Rice server, do not configure any of the Kuali Rice components with a run mode of LOCAL. The LOCAL run mode is only for a fully bundled configuration of Kuali Rice as it interacts directly with all of the Kuali Rice database tables instead of using remotely accessible services.
In application code, only use classes in the api or framework modules of the "client-server" components. This should be evident from the package names for the module as they should have "api" or "framework" in the package name (i.e.
org.kuali.rice.kew.api.*andorg.kuali.rice.kim.framework.*).Do not write custom code which interacts directly with the Kuali Rice database tables which are part of any of the previously mentioned "client-server" components.
When writing code against the Rice apis or frameworks, be sure to read the javadocs and be sure to conform to the contracts specified therein.
When implementing "callback" services, ensure that you are using the
CallbackServiceExporterproperly as specified in the KSB Guide
Table of Contents
The Location module contains common "location" based options that can be used with Rice and other client applications. This currently includes screens and services for Campus, Country, State, County, and Postal Code.
The Campus Lookup screen provides detailed information about the campuses defined in your system.
To get to the Campus Lookup function, click Campus on the Rice Administration Menu.
This takes you to the Campus Lookup screen where you have the option to create a new Campus by clicking the create new button in the upper right corner under the Login box or to perform a search of campuses already defined in Rice. If you choose to create a new Campus, KIM displays the CampusMaintenanceDocument, which is discussed in the Campus Maintenance section below.
Another way to get to the Campus Lookup screen is to click the Field Lookup button next to the Campus Code field on any screen where it appears. If you do this, you see the Campus Lookup screen without the create new button.
Enter information in one or more of the fields on the Campus Lookup screen and then click the search button to see a list of Campuses that fit your search.
Note
Leave all of the search fields blank to get a list of all Campuses.
If you did NOT begin your Campus Lookup from the Administration menu, your list of search results looks like this:
If you did begin your search from the Administration menu, you see edit and copy as links for each Campus instead of return value. These options are explained in the Campus Maintenance section below.
Click one of the underlined column titles on the search results list to sort the list by that column. Click it again to sort the list in the opposite order.
You can also export the search results list in CSV, spreadsheet, or XML format. Click the appropriate link at the bottom of the search results list to do this.
If you did NOT begin your Campus Lookup from the Administration menu, the Return Value column has a return value link for each campus. Click this return value link for the Campus Code for which you need information and Rice goes back to the screen you were on before and automatically enters the information about that campus on the screen for you.
You can find information about the fields on this screen under Edit Campus Tab in the Campus Maintenance section of this User Guide.
Display this screen by clicking Campus Code in the search results list after you do a Campus Lookup:
You can find information about the fields on this screen in the Edit Campus Tab section under Campus Maintenance, below.
Use a Campus document for each of the different fiscal and physical operating entities of an institution. A campus may be identified as a fiscal entity, a physical entity, or both.
Click Campus on the Rice Administration menu for KIM to display the Campus Lookup screen, then click the create new button. KIM displays the CampusMaintenanceDocument.
The fields on this document are described in the Document Layout section below. Enter information in all required fields and other fields appropriate to this campus, then click the save button to create your new Campus.
If you want to edit information about an existing Campus:
Begin at the Administration menu and do a Campus Lookup to find the campus you need to edit.
On the list of search results, click edit for that Campus.
KIM displays the CampusMaintenanceDocument for that campus:
Change the information in the fields that you need to edit, then click the save button at the bottom of the document.
The Campus Maintenance Document has five sections:
Document Overview
Edit Campus
Notes and Attachments
Ad Hoc Recipients
Route Log
You can find documentation on all of the tabs in this document except Edit Campus in the Common Features and Functions section of the User Guide.
In edit mode, the Edit Campus Tab presents a display-only set of fields on the left and editable fields on the right in which you may enter changes. When this tab is displayed in the Create New process, only the editable fields are displayed.
Table 7.1. Campus Maintenance Document: Edit Campus Attributes
| Field Name | Description |
|---|---|
| Campus Code | The unique identifying code assigned to a campus. |
| Campus Name | Required. The familiar name for a specific university campus. |
| Campus Short Name | Required. An abbreviated name for a specific campus; used in reports in which space is limited. |
| Campus Type Code | Required. Indicates the type of campus. Valid values are:
|
The Campus Type Lookup function displays detailed information about specific Campus Type Codes.
To display this screen:
Go to the Campus Lookup screen.
Select a valid Campus Type Code from the dropdown list.
Click the Field Lookup button next to the Campus Type Code field.
There are two ways to search for information using this screen:
Enter information in one or more fields on the Campus Type Lookup screen and then click the Search button. This displays a list of campus types that match the information you entered, similar to the list in the screen print just below.
Leave the fields on the Campus Type Lookup screen blank and click the Search button. This displays a list of all available campus types, similar to this:
You can export the search results list in CSV, spreadsheet, or XML format. Click the appropriate link at the bottom of the search results list to do this.
The Return Value column has a return value link for each Campus Type Code. Click this return value link for the Campus Type Code you need, and Kuali goes back to the screen you were on before and automatically enters the information about that Campus Type Code on the screen for you.
Field information on this screen can be found in the Edit Campus Tab section above.
Use the Campus Type Inquiry screen to see the Campus Type Code and Name and the Active Indicator for a particular campus.
To display this screen:
Go to the Campus Lookup screen.
Select a valid Campus Type Code from the dropdown list.
Click the Inquiry button next to the Campus Type Code field.
Field information on this screen can be found in the Edit Campus Tab section above.
To create or perform maintenance on a Campus Type, click Campus Type on the Administration Menu.
From the Campus Type Lookup screen, you may either create a new Campus Type or search for an existing one.
Note
If you don't have a create new button in the top right corner of the Campus Type Lookup screen, you did not open the screen from the Administration menu.
When you search for and find an existing Campus Type (see instructions above), you have the option to edit or copy it. After you click the create new, edit, or copy button, KIM displays the Campus Type Maintenance document. This document lets you add and update Campus Types.
The CampusTypeMaintenance document contains four standard tabs and the Edit Campus Type tab. The standard tabs are documented in the Common Features and Functions section of this User Guide. The Edit Campus Type tab is described below.
The Edit Campus Type tab displays the fields that are unique to each Campus Type.
Table 7.2. Campus Maintenance Document: Edit Campus Type Attributes
| Field | Description |
|---|---|
| Campus Type Code | Required. The code used by Rice to identify this type of Campus. Valid values are:
|
| Campus Type Name | Required. The descriptive name for this Campus Type |
| Active Indicator | Required. Indicates whether the Campus Code is active or inactive. Remove the checkmark to deactivate a Campus Type. Removing the checkmark will also remove this Campus Type from the dropdown list on Campus documents. |
The Postal Code Lookup screen provides detailed information about the postal codes (zip codes) defined in KIM.
You access the Postal Code Lookup screen by clicking Postal Code in the Identity section of the Administration menu.
A search produces a list similar to the example below.
Note
You may also enter a city and state to search for the associated zip code(s).
Descriptions of the fields in this list can be found in the Postal Code Maintenance section below.
Clicking edit takes you to the Postal Code Maintenance screen.
Clicking copy also takes you to the Postal Code Maintenance screen and populates some of the fields in the Edit Postal Codes tab with information from the item you copied.
Clicking a Country Code from the list takes you to the Country Code Inquiry screen.
Clicking a Postal Code from the list takes you to the Postal Code Inquiry screen.
Clicking a State Code from the list takes you to the State Code Inquiry screen.
Information about these fields can be found in the Postal Code Maintenance section below.
The Postal Code Maintenance Document defines the postal (zip) code by city and state. When you click the Postal Code option on the Administration screen, KIM displays the Postal Code Lookup screen. At this point you can perform a lookup and select a postal code to edit or click the create new button, KIM displays the PostalCodeMaintenanceDocument screen.
To create a new Postal Code, enter information in the required fields in the Document Overview and Edit Postal Codes tabs, then click the submit button at the bottom of the screen.
All of the tabs on this screen are standard, except the Edit Postal Codes tab. You can find information on standard tabs in the Common Features and Functions section of this User Guide.
In edit mode, the Edit Postal Codes tab presents a display-only set of fields on the left and editable fields on the right, in which you may enter changes. The tab looks like this:
In create mode, the Edit Postal Codes tab presents only a set of fields in which you may enter information.
Table 7.3. Postal Code Maintenance Document: Create Postal Codes Attributes
| Field | Description |
|---|---|
| Country Code | The country code for the country associated with the zip (postal) code |
| Postal Code | A Postal Service zip code |
| State | Required. The state associated with the postal (zip) code |
| County Code | The KIM identifying code for the county associated with the postal (zip) code |
| City Name | Required. The name of the city associated with the postal (zip) code |
| Active Indicator | Indicates whether the postal code is active or inactive. Remove the checkmark to deactivate this postal code. |
The County Lookup screen provides information on counties defined in KIM.
Access the County Code Lookup screen by clicking County in the Identity section of the Administration Menu.
Click the create new button to go to the County Maintenance function, where you can create a new County in Rice.
Conducting a search from this screen returns a list similar to this:
Clicking the edit or copy link in the Action column allows you to edit the county information you selected or to create a new county in Rice, beginning with a copy of the information from this county. This link takes you to the County Maintenance Document.
Clicking a Country Code takes you to the Country Inquiry function for that code.
Clicking a County Code takes you to the County Inquiry function for that code.
Clicking a State code takes you to the State Inquiry function for that code.
This screen provides a snapshot of the important information about a County:
You can find information about the fields on this screen in the County Maintenance section below.
Use the County Maintenance document to assign specific identifying codes to county names. When you click the County option on the Administration screen, KIM displays the County Lookup screen. After you select to edit a county or click the create new button, KIM displays the CountyMaintenanceDocument screen:
To create a new County, enter valid information in the required fields in the Document Overview and Edit Counties tabs, then click the Submit button at the bottom of the screen.
All of the tabs on this screen are standard, except the Edit Counties tab. Information on standard tabs can be found in the Common Features and Functions section of this User Guide.
In edit mode, the Edit Counties tab presents a display-only set of fields on the left and editable fields on the right, in which you may enter changes. The tab looks like this:
In create mode, the Edit Counties tab presents only a set of fields in which you may enter information.
Table 7.4. County Maintenance Document: Create County Attributes
| Field | Description |
|---|---|
| Country Code | Required. The country code for the country in which this county is located. |
| County Code | Required. A unique identifying code assigned to this county. |
| State | Required. The state abbreviation assigned by the U.S. Postal Service to the state in which this county is located. |
| County Name | Required. The actual name of this county. |
| Active Indicator | Optional. Indicates whether the county code is active or inactive. Remove the check mark to deactivate this county code. |
The State Code Lookup function provides a convenient way to find key information pertaining to states that are defined in Rice.
You can display the State Code Lookup screen by clicking State on the Rice Administration menu.
Enter information in one or more of the fields on the State Code Lookup screen and then click the search button to see a list of States that fit your criteria.
Note
Leave all of the search fields blank to display a list of all States.
Click edit or copy in the Actions column to go to the StateMaintenanceDocument screen, where you can edit the existing State or use a copy of it as a base for establishing a new State in KIM.
Click an underlined Country Code to go to the Country Inquiry screen for that Country Code.
You can also export the search results list in CSV, spreadsheet, or XML format. Click the appropriate link at the bottom of the search results list to do this.
The State Inquiry screen provides a snapshot of the most important information defined in Rice for a State.
The State document defines the U.S. Postal Service codes used to identify states. When you choose the State option on the Administration menu, KIM displays the State Code Lookup screen. After you click edit for a State or click the create new button, KIM displays the StateMaintenanceDocument.
This screen contains five tabs:
Document Overview
Edit States
Notes and Attachments
Ad Hoc Recipients
Route Log
The Edit States tab is unique to this screen and is described below. The other four tabs are described in the Common Features and Functions section of this User Guide.
The Edit States tab can be displayed with two different sets of fields. Which you see depends on whether you are creating a new State or editing an existing State.
The version of the tab above is displayed when you are creating a new State.
Pictured above in edit mode, the Edit States tab presents a display-only set of fields on the left and editable fields on the right, in which you may enter changes.
Table 7.5. States Maintenance Document: Edit States Attributes
| Field | Description |
|---|---|
| Country Code | A unique identifying code assigned to a country Required for a new State Display-only when editing a State |
| State Abbreviation | The state abbreviation assigned by the U.S. Postal Service Required for a new State Display-only when editing a State |
| State Name | The full name of the state Required for a new State When editing, this field can be modified but not deleted. |
| Active Indicator | Optional. Indicates whether the State code is active or inactive. Remove the checkmark to deactivate the State code. |
This screen provides information about Country Codes and is accessed directly off the Administration menu.
Performing a search on a Country Code produces results similar to this:
Selecting edit or copy in the Actions column takes you to the Country Maintenance Document screen, where you can edit the existing Country Code or use a copy of it as a base for establishing a new Country Code.
Selecting an underlined Country Code takes you to the Country Inquiry screen for that Country Code.
You can also export the search results list in CSV, spreadsheet, or XML format. Click the appropriate link at the bottom of the search results list to do this.
The Country Inquiry screen displays details about a Country in Rice. You get to this screen by clicking a Country Code in the list of search results after you do a Country Lookup.
The Country document is used to assign specific identifying codes to country names.
When you choose the Country option on the Administration menu, KIM displays the Country Lookup screen. After you select a country or click the create new button, KIM presents the CountryMaintenanceDocument screen.
All of the tabs in the CountryMaintenanceDocument are standard with the exception of the Edit Country tab. Documentation on standard tabs can be found in the Common Features and Functions section of the User Guide.
Table 7.6. Country Maintenance Document: Edit Country Attributes
| Field | Description |
|---|---|
| Country Code | A unique identifying code assigned to a country. |
| Country Name | Required. The actual name of a specific country. |
| Country Restricted Indicator | Required. Check the box to indicate if the country is restricted from use in procurement. Clear the check box if it is not restricted. |
| Active Indicator | Indicates whether this country code is active or inactive in Rice. Remove the checkmark to deactivate this country code. |
A
- Action List
A list of the user's notification and workflow items. Also called the user's Notification List. Clicking an item in the Action List displays details about that notification, if the item is a notification, or displays that document, if it is a workflow item. The user will usually load the document from their Action List in order to take the requested action against it, such as approving or acknowledging the document.
- Action List Type
This tells you if the Action List item is a notification or a more specific workflow request item. When the Action List item is a notification, the Action List Type is "Notification."
- Action Request
A request to a user or Workgroup to take action on a document. It designates the type of action that is requested, which includes:
Approve: requests an approve or disapprove action.
Complete: requests a completion of the contents of a document. This action request is displayed in the Action List after the user saves an incomplete document.
Acknowledge: requests an acknowledgment by the user that the document has been opened - the doc will not leave the Action List until acknowledgment has occurred; however, the document routing will not be held up and the document will be permitted to transaction into the processed state if neccessary.
FYI: a notification to the user regarding the document. Documents requesting FYI can be cleared directly from the Action List. Even if a document has FYI requests remaining, it will still be permitted to transition into the FINAL state.
- Action Request Hierarchy
Action requests are hierarchical in nature and can have one parent and multiple children.
- Action Requested
The action one needs to take on a document; also the type of action that is requested by an Action Request. Actions that may be requested of a user are:
Acknowledge: requests that the users states he or she has reviewed the document.
Approve: requests that the user either Approve or Disapprove a document.
Complete: requests the user to enter additional information in a document so that the content of the document is complete.
FYI: intended to simply makes a user aware of the document.
- Action Taken
An action taken on a document by a Reviewer in response to an Action Request. The Action Taken may be:
Acknowledged: Reviewer has viewed and acknowledged document.
Approved: Reviewer has approved the action requested on document.
Blanket Approved: Reviewer has requested a blanket approval up to a specified point in the route path on the document.
Canceled: Reviewer has canceled the document. The document will not be routed to any more reviewers.
Cleared FYI: Reviewer has viewed the document and cleared all of his or her pending FYI(s) on this document.
Completed: Reviewer has completed and supplied all data requested on document.
Created Document: User has created a document
Disapproved: Reviewer has disapproved the document. The document will not being routed to any subsequent reviewers for approval. Acknowledge Requests are sent to previous approvers to inform them of the disapproval.
Logged Document: Reviewer has added a message to the Route Log of the document.
Moved Document: Reviewer has moved the document either backward or forward in its routing path.
Returned to Previous Node: Reviewer has returned the document to a previous routing node. When a Reviewer does this, all the actions taken between the current node and the return node are removed and all the pending requests on the document are deactivated.
Routed Document: Reviewer has submitted the document to the workflow engine for routing.
Saved: Reviewer has saved the document for later completion and routing.
Superuser Approved Document: Superuser has approved the entire document, any remaining routing is cancelled.
Superuser Approved Node: Superuser has approved the document through all nodes up to (but not including) a specific node. When the document gets to that node, the normal Action Requests will be created.
Superuser Approved Request: Superuser has approved a single pending Approve or Complete Action Request. The document then goes to the next routing node.
Superuser Cancelled: Superuser has canceled the document. A Superuser can cancel a document without a pending Action Request to him/her on the document.
Superuser Disapproved: Superuser has disapproved the document. A Superuser can disapprove a document without a pending Action Request to him/her on the document.
Superuser Returned to Previous Node: Superuser has returned the document to a previous routing node. A Superuser can do this without a pending Action Request to him/her on the document.
- Activated
The state of an action request when it is has been sent to a user's Action List.
- Activation
The process by which requests appear in a user's Action List
- Activation Type
Defines how a route node handles activation of Action Requests. There are two standard activation types:
Sequential: Action Requests are activated one at a time based on routing priority. The next Action Request isn't activated until the previous request is satisfied.
Parallel: All Action Requests at the route node are activated immediately, regardless of priority
- Active Indicator
An indicator specifying whether an object in the system is active or not. Used as an alternative to complete removal of an object.
- Ad Hoc Routing
A type of routing used to route a document to users or groups that are not in the Routing path for that Document Type. When the Ad Hoc Routing is complete, the routing returns to its normal path.
- Annotation
Optional comments added by a Reviewer when taking action. Intended to explain or clarify the action taken or to advise subsequent Reviewers.
- Approve
A type of workflow action button. Signifies that the document represents a valid business transaction in accordance with institutional needs and policies in the user's judgment. A single document may require approval from several users, at multiple route levels, before it moves to final status.
- Approver
The user who approves the document. As a document moves through Workflow, it moves one route level at a time. An Approver operates at a particular route level of the document.
- Attachment
The pathname of a related file to attach to a Note. Use the "Browse..." button to open the file dialog, select the file and automatically fill in the pathname.
- Attribute Type
Used to strongly type or categorize the values that can be stored for the various attributes in the system (e.g., the value of the arbitrary key/value pairs that can be defined and associated with a given parent object in the system).
- Authentication
The act of logging into the system. The Out of the box (OOTB) authenticaton implementation in Rice does not require a password as it is intended for testing puposes only. This is something that must be enabled as part of an implementation. Various authentication solutions exist, such as CAS or Shibboleth, that an implementer may want to use depending on their needs.
- Authorization
Authorization is the permissions that an authenticated user has for performing actions in the system.
- Author Universal ID
A free-form text field for the full name of the Author of the Note, expressed as "Lastname, Firstname Initial"
B
- Base Rule Attribute
The standard fields that are defined and collected for every Routing Rule These include:
Active: A true/false flag to indicate if the Routing Rule is active. If false, then the rule will not be evaluated during routing.
Document Type: The Document Type to which the Routing Rule applies.
From Date: The inclusive start date from which the Routing Rule will be considered for a match.
Force Action: a true/false flag to indicate if the review should be forced to take action again for the requests generated by this rule, even if they had taken action on the document previously.
Name: the name of the rule, this serves as a unique identifier for the rule. If one is not specified when the rule is created, then it will be generated.
Rule Template: The Rule Template used to create the Routing Rule.
To Date: The inclusive end date to which the Routing Rule will be considered for a match.
- Blanket Approval
Authority that is given to designated Reviewers who can approve a document to a chosen route point. A Blanket Approval bypasses approvals that would otherwise be required in the Routing For an authorized Reviewer, the Doc Handler typically displays the Blanket Approval button along with the other options. When a Blanket Approval is used, the Reviewers who are skipped are sent Acknowledge requests to notify them that they were bypassed.
- Blanket Approve Workgroup
A workgroup that has the authority to Blanket Approve a document.
- Branch
A path containing one or more Route Nodes that a document traverses during routing. When a document enters a Split Node multiple branches can be created. A Join Node joins multiple branches together.
- Business Rule
Describes the operations, definitions and constraints that apply to an organization in achieving its goals.
A restriction to a function for a business reason (such as making a specific object code unavailable for a particular type of disbursement). Customizable business rules are controlled by Parameters.
C
- Campus
Identifies the different fiscal and physical operating entities of an institution.
- Campus Type
Designates a campus as physical only, fiscal only or both.
- Cancel
A workflow action available to document initiators on documents that have not yet been routed for approval. Denotes that the document is void and should be disregarded. Canceled documents cannot be modified in any way and do not route for approval.
- Canceled
A routing status. The document is denoted as void and should be disregarded.
- CAS - Central Authentication Service
http://www.jasig.org/cas - An open source authentication framework. Kuali Rice provides support for integrating with CAS as an authentication provider (among other authentication solutions), and Kuali also provides an implementation of a CAS server that integrates with Kuali Identity Management.
- Client
A Java Application Program Interface (API) for interfacing with the Kuali Enterprise Workflow Engine.
- Client/Server
The use of one computer to request the services of another computer over a network. The workstation in an organization will be used to initiate a business transaction (e.g., a budget transfer). This workstation needs to gather information from a remote database to process the transaction, and will eventually be used to post new or changed information back onto that remote database. The workstation is thus a Client and the remote computer that houses the database is the Server.
- Close
A workflow action available on documents in most statuses. Signifies that the user wishes to exit the document. No changes to Action Requests, Route Logs or document status occur as a result of a Close action. If you initiate a document and close it without saving, it is the same as canceling that document.
- Comma-separated value
A file format using commas as delimiters utilized in import and export functionality.
- Complete
A pending action request to a user to submit a saved document.
- Completed
The action taken by a user or group in response to a request in order to finish populating a document with information, as evidenced in the Document Route Log.
- Country Restricted Indicator
Field used to indicate if a country is restricted from use in procurement. If there is no value then there is no restriction.
- Creation Date
The date on which a document is created.
- CSV
D
- Date Approved
The date on which a document was most recently approved.
- Date Finalized
The date on which a document enters the FINAL state. At this point, all approvals and acknowledgments are complete for the document.
- Deactivation
The process by which requests are removed from a user's Action List
- Delegate
A user who has been registered to act on behalf of another user. The Delegate acts with the full authority of the Delegator. Delegation may be either Primary Delegation or Secondary Delegation.
- Delegate Action List
A separate Action List for Delegate actions. When a Delegate selects a Delegator for whom to act, an Action List of all documents sent to the Delegator is displayed.
For both Primary and Secondary Delegation the Delegate may act on any of the entries with the full authority of the Delegator.
- Disapprove
A workflow action that allows a user to indicate that a document does not represent a valid business transaction in that user's judgment. The initiator and previous approvers will receive Acknowledgment requests indicating the document was disapproved.
- Disapproved
A status that indicates the document has been disapproved by an approver as a valid transaction and it will not generate the originally intended transaction.
- Doc Handler
The Doc Handler is a web interface that a Client uses for the appropriate display of a document. When a user opens a document from the Action List or Document Search, the Doc Handler manages access permissions, content format, and user options according to the requirements of the Client.
- Doc Handler URL
The URL for the Doc Handler.
- Doc Nbr
See Document Number.
- Document
Also see E-Doc.
An electronic document containing information for a business transaction that is routed for Actions in KEW. It includes information such as Document ID, Type, Title, Route Status, Initiator, Date Created, etc. In KEW, a document typically has XML content attached to it that is used to make routing decisions.
- Document Id
See Document Number.
- Document Number
A unique, sequential, system-assigned number for a document
- Document Operation
A workflow screen that provides an interface for authorized users to manipulate the XML and other data that defines a document in workflow. It allows you to access and open a document by Document ID for the purpose of performing operations on the document.
- Document Search
A web interface in which users can search for documents. Users may search by a combination of document properties such as Document Type or Document ID, or by more specialized properties using the Detailed Search. Search results are displayed in a list similar to an Action List.
- Document Status
See also Route Status.
- Document Title
The title given to the document when it was created. Depending on the Document Type, this title may have been assigned by the Initiator or built automatically based on the contents of the document. The Document Title is displayed in both the Action List and Document Search.
- Document Type
The Document Type defines the routing definition and other properties for a set of documents. Each document is an instance of a Document Type and conducts the same type of business transaction as other instances of that Document Type.
Document Types have the following characteristics:
They are specifications for a document that can be created in KEW
They contain identifying information as well as policies and other attributes
They defines the Route Path executed for a document of that type (Process Definition)
They are hierarchical in nature may be part of a hierarchy of Document Types, each of which inherits certain properties of its Parent Document Type.
They are typically defined in XML, but certain properties can be maintained from a graphical interface
- Document Type Hierarchy
A hierarchy of Document Type definitions. Document Types inherit certain attributes from their parent Document Types. This hierarchy is also leveraged by various pieces of the system, including the Rules engine when evaluating rule sets and KIM when evaluating certain Document Type-based permissions.
- Document Type Label
The human-readable label assigned to a Document Type.
- Document Type Name
The assigned name of the document type. It must be unique.
- Document Type Policy
These advise various checks and authorizations for instances of a Document Type during the routing process.
- Drilldown
A link that allows a user to access more detailed information about the current data. These links typically take the user through a series of inquiries on different business objects.
- Dynamic Node
An advanced type of Route Node that can be used to generate complex routing paths on the fly. Typically used whenever the route path of a document cannot be statically defined and must be completely derived from document data.
E
- ECL
An acronym for Educational Community License.
All Kuali software and material is available under the Educational Community License and may be adopted by colleges and universities without licensing fees. The open licensing approach also provides opportunities for support and implementation assistance from commercial affiliates.
- E-Doc
An abbreviation for electronic documents, also a shorthand reference to documents created with eDocLite.
- eDocLite
A framework for quickly building workflow-enabled documents. Allows you to define document screens in XML and render them using XSL style sheets.
- Embedded Client
A type of client that runs an embedded workflow engine.
- Employee Status
Found on the Person Document; defines the employee's current employment classification (for example, "A" for Active).
- Employee Type
Found on the Person Document; defines the employee's position classification (for example, "P" for Professional).
- Entity
An Entity record houses identity information for a given Person, Process, System, etc. Each Entity is categorized by its association with an Entity Type.
- Entity Attribute
Entities have directory-like information called Entity Attributes that are associated with them
Entity Attributes make up the identity information for an Entity record.
- Entity Type
Provides categorization to Entities. For example, a "System" could be considered an Entity Type because something like a batch process may need to interfact with the application.
- Exception
A workflow routing status indicating that the document routed to an exception queue because workflow has encountered a system error when trying to process the document.
- Exception Messaging
The set of services and configuration options that are responsible for handling messages when they cannot be successfully delivered. Exception Messaging is set up when you configure KSB using the properties outlined in KSB Module Configuration.
- Exception Routing
A type of routing used to handle error conditions that occur during the routing of a document. A document goes into Exception Routing when the workflow engine encounters an error or a situation where it cannot proceed, such as a violation of a Document Type Policy or an error contacting external services. When this occurs, the document is routed to the parties responsible for handling these exception cases. This can be a group configured on the document or a responsibility configured in KIM. Once one of these responsible parties has reviewed the situation and approved the document, it will be resubmitted to the workflow engine to attempt the processing again.
- Extended Attributes
Custom, table-driven business object attributes that can be established by implementing institutions.
- Extension Rule Attribute
One of the rule attributes added in the definition of a rule template that extends beyond the base rule attributes to differentiate the routing rule. A Required Extension Attribute has its "Required" field set to True in the rule template. Otherwise, it is an Optional Extension Attribute. Extension attributes are typically used to add additional fields that can be collected on a rule. They also define the logic for how those fields will be processed during rule evaluation.
F
- Field Lookup
The round magnifying glass icon found next to fields throughout the GUI that allow the user to look up reference table information and display (and select from) a list of valid values for that field.
- Final
A workflow routing status indicating that the document has been routed and has no pending approval or acknowledgement requests.
- Flexible Route Management
A standard KEW routing scheme based on rules rather than dedicated table-based routing.
- FlexRM (Flexible Route Module)
The Route Module that performs the Routing for any Routing Rule is defined through FlexRM. FlexRM generates Action Requests when a Rule matches the data value contained in a document. An abbreviation of "Flexible Route Module." A standard KEW routing scheme that is based on rules rather than dedicated table-based routing.
- Force Action
A true/false flag that indicates if previous Routing for approval will be ignored when an Action Request is generated. The flag is used in multiple contexts where requests are generated (e.g., rules, ad hoc routing). If Force Action is False, then prior Actions taken by a user can satisfy newly generated requests. If it is True, then the user needs to take another Action to satisfy the request.
- FYI
A workflow action request that can be cleared from a user's Action List with or without opening and viewing the document. A document with no pending approval requests but with pending Acknowledge requests is in Processed status. A document with no pending approval requests but with pending FYI requests is in Final status. See also Ad Hoc Routing and Action Request.
G
- Group
A Group has members that can be either Principals or other Groups (nested). Groups essentially become a way to organize Entities (via Principal relationships) and other Groups within logical categories.
Groups can be given authorization to perform actions within applications by assigning them as members of Roles.
Groups can also have arbitrary identity information (i.e., Group Attributes hanging from them. Group Attributes might be values for "Office Address," "Group Leader," etc.
Groups can be maintained at runtime through a user interface that is capable of workflow.
- Group Attribute
Groups have directory-like information called Group Attributes hanging from them. "Group Phone Number" and "Team Leader" are examples of Group Attributes.
Group Attributes make up the identity information for a Group record.
Group Attributes can be maintained at runtime through a user interface that is capable of workflow.
I
- Initialized
The state of an Action Request when it is first created but has not yet been Activated (sent to a user's Action List).
- Initiated
A workflow routing status indicating a document has been created but has not yet been saved or routed. A Document Number is automatically assigned by the system.
- Initiator
A user role for a person who creates (initiates or authors) a new document for routing. Depending on the permissions associated with the Document Type, only certain users may be able to initiate documents of that type.
- Inquiry
A screen that allows a user to view information about a business object.
J
- Join Node
The point in the routing path where multiple branches are joined together. A Join Node typically has a corresponding Split Node for which it joins the branches.
K
- KC - Kuali Coeus
TODO
- KCA - Kuali Commercial Affiliates
A designation provided to commercial affiliates who become part of the Kuali Partners Program to provide for-fee guidance, support, implementation, and integration services related to the Kuali software. Affiliates hold no ownership of Kuali intellectual property, but are full KPP participants. Affiliates may provide packaged versions of Kuali that provide value for installation or integration beyond the basic Kuali software. Affiliates may also offer other types of training, documentation, or hosting services.
- KCB – Kuali Communications Broker
KCB is logically related to KEN. It handles dispatching messages based on user preferences (email, SMS, etc.).
- KEN - Kuali Enterprise Notification
A key component of the Enterprise Integration layer of the architecture framework. Its features include:
Automatic Message Generation and Logging
Message integrity and delivery standards
Delivery of notifications to a user's Action List
- KEW – Kuali Enterprise Workflow
Kuali Enterprise Workflow is a general-purpose electronic routing infrastructure, or workflow engine. It manages the creation, routing, and processing of electronic documents (eDocs) necessary to complete a transaction. Other applications can also use Kuali Enterprise Workflow to automate and regulate the approval process for the transactions or documents they create.
- KFS – Kuali Financial System
Delivers a comprehensive suite of functionality to serve the financial system needs of all Carnegie-Class institutions. An enhancement of the proven functionality of Indiana University's Financial Information System (FIS), KFS meets GASB and FASB standards while providing a strong control environment to keep pace with advances in both technology and business. Modules include financial transactions, general ledger, chart of accounts, contracts and grants, purchasing/accounts payable, labor distribution, budget, accounts receivable and capital assets.
- KIM – Kuali Identity Management
A Kuali Rice module, Kuali Identity Management provides a standard API for persons, groups, roles and permissions that can be implemented by an institution. It also provdies an out of the box reference implementation that allows for a university to use Kuali as their Identity Management solution.
- KNS – Kuali Nervous System
A core technical module composed of reusable code components that provide the common, underlying infrastructure code and functionality that any module may employ to perform its functions (for example, creating custom attributes, attaching electronic images, uploading data from desktop applications, lookup/search routines, and database interaction).
- KPP - Kuali Partners Program
The Kuali Partners Program (KPP) is the means for organizations to get involved in the Kuali software community and influence its future through voting rights to determine software development priorities. Membership dues pay staff to perform Quality Assurance (QA) work, release engineering, packaging, documentation, and other work to coordinate the timely enhancement and release of quality software and other services valuable to the members. Partners are also encouraged to tender functional, technical, support or administrative staff members to the Kuali Foundation for specific periods of time.
- KRAD - Kuali Rapid Application Development
TODO
- KRMS - Kuali Rules Management System
TODO
- KS - Kuali Student
Delivers a means to support students and other users with a student-centric system that provides real-time, cost-effective, scalable support to help them identify and achieve their goals while simplifying or eliminating administrative tasks. The high-level entities of person (evolving roles-student, instructor, etc.), time (nested units of time - semesters, terms, classes), learning unit (assigned to any learning activity), learning result (grades, assessments, evaluations), learning plan (intentions, activities, major, degree), and learning resources (instructors, classrooms, equipment). The concierge function is a self-service information sharing system that aligns information with needs and tasks to accomplish goals. The support for integration of locally-developed processes provides flexibility for any institution's needs.
- KSB – Kuali Service Bus
Provides an out-of-the-box service architecture and runtime environment for Kuali Applications. It is the cornerstone of the Service Oriented Architecture layer of the architectural reference framework. The Kuali Service Bus consists of:
A services registry and repository for identifying and instantiating services
Run time monitoring of messages
Support for synchronous and asynchronous service and message paradigms
- Kuali
Pronounced "ku-wah-lee". A partnership organization that produces a suite of community-source, modular administrative software for Carnegie-class higher education institutions. See also Kuali Foundation
(n.) A humble kitchen wok that plays an important role in a successful kitchen.
- Kuali Foundation
Employs staff to coordinate partner efforts and to manage and protect the Foundation's intellectual property. The Kuali Foundation manages a growing portfolio of enterprise software applications for colleges and universities. A lightweight Foundation staff coordinates the activities of Foundation members for critical software development and coordination activities such as source code control, release engineering, packaging, documentation, project management, software testing and quality assurance, conference planning, and educating and assisting members of the Kuali Partners program.
- Kuali Rice
Provides an enterprise-class middleware suite of integrated products that allow both Kuali and non-Kuali applications to be built in an agile fashion, such that developers are able to react to end-user business requirements in an efficient manner to produce high-quality business applications. Built with Service Oriented Architecture (SOA) concepts in mind, KR enables developers to build robust systems with common enterprise workflow functionality, customizable and configurable user interfaces with a clean and universal look and feel, and general notification features to allow for a consolidated list of work "action items." All of this adds up to providing a re-usable development framework that encourages a simplified approach to developing true business functionality as modular applications.
L
M
- Maintenance Document
An e-doc used to establish and maintain a table record.
- Message
The full description of a notification message. This is a specific field that can be filled out as part of the Simple Message or Event Message form. This can also be set by the programmatic interfaces when sending notifications from a client system.
- Message Queue
Allows administrators to monitor messages that are flowing through the Service Bus. Messages can be edited, deleted or forwarded to other machines for processing from this screen.
N
- Namespace
A Namespace is a way to scope both Permissions and Entity Attributes Each Namespace instance is one level of scoping and is one record in the system. For example, "KRA" or "KC" or "KFS" could be a Namespace. Or you could further break those up into finer-grained Namespaces such that they would roughly correlate to functional modules within each application. Examples could be "KRA Rolodex", "KC Grants", "KFS Chart of Accounts".
Out of the box, the system is bootstrapped with numerous Rice namespaces which correspond to the different modules. There is also a default namespace of "KUALI".
Namespaces can be maintained at runtime through a maintenance document.
- Note Text
A free-form text field for the text of a Note
- Notification Content
This section of a notification message which displays the actual full message for the notification along with any other content-type-specific fields.
- Notification Message
The overall Notification item or Notification Message that a user sees when she views the details of a notification in her Action List. A Notification Message contains not only common elements such as Sender, Channel, and Title, but also content-type-specific fields.
O
- OOTB
Stands for "out of the box" and refers to the base deliverable of a given feature in the system.
- Optimistic Locking
A type of "locking" that is placed on a database row by a process to prevent other processes from updating that row before the first process is complete. A characteristic of this locking technique is that another user who wants to make modifications at the same time as another user is permitted to, but the first one who submits their changes will have them applied. Any subsequent changes will result in the user being notified of the optimistic lock and their changes will not be applied. This technique assumes that another update is unlikely.
- Optional Rule Extension Attribute
An Extension Attribute that is not required in a Rule Template. It may or may not be present in a Routing Rule created from the Template. It can be used as a conditional element to aid in deciding if a Rule matches. These Attributes are simply additional criteria for the Rule matching process.
- Org Doc #
The originating document number.
- Organization
Refers to a unit within the institution such as department, responsibility center, campus, etc.
- Organization Code
Represents a unique identifier assigned to units at many different levels within the institution (for example, department, responsibility center, and campus).
P
- Parameter Component Code
Code identifying the parameter Component.
- Parameter Description
This field houses the purpose of this parameter.
- Parameter Name
This will be used as the identifier for the parameter. Parameter values will be accessed using this field and the namespace as the key.
- Parameter Type Code
Code identifying the parameter type. Parameter Type Code is the primary key for its' table.
- Parameter Value
This field houses the actual value associated with the parameter.
- Parent Document Type
A Document Type from which another Document Type derives. The child type can inherit certain properties of the parent type, any of which it may override. A Parent Document Type may have a parent as part of a hierarchy of document types.
- Parent Rule
A Routing Rule in KEW from which another Routing Rule derives. The child Rule can inherit certain properties of the parent Rule, any of which it may override. A Parent Rule may have a parent as part of a hierarchy of Rules.
- Permission
Permissions represent fine grained actions that can be mapped to functionality within a given system. Permissions are scoped to Namespace which roughly correlate to modules or sections of functionality within a given system.
A developer would code authorization checks in their application against these permissions.
Some examples would be: "canSave", "canView", "canEdit", etc.
Permissions are aggregated by Roles.
Permissions can be maintained at runtime through a user interface that is capable of workflow; however, developers still need to code authorization checks against them in their code, once they are set up in the system.
Attributes
Id - a system generated unique identifier that is the primary key for any Permission record in the system
Name - the name of the permission; also a human understandable unique identifier
Description - a full description of the purpose of the Permission record
Namespace - the reference to the associated Namespace
Relationships
Permission to Role - many to many; this relationship ties a Permission record to a Role that is authorized for the Permission
Permission to Namespace - many to one; this relationship allows for scoping of a Permission to a Namespace that contains functionality which keys its authorization checking off of said
- Person Identifier
The username of an individual user who receives the document ad hoc for the Action Requested
- Person Role
Creates or maintains the list used in selection of personnel when preparing the Routing Form document.
- Pessimistic Locking
A type of lock placed on a database row by a process to prevent other processes from reading or updating that row until the first process is finished. This technique assumes that another update is likely.
- Plugins
A plugin is a packaged set of code providing essential services that can be deployed into the Rice standalone server. Plugins usually contains only classes used in routing such as custom rules or searchable attributes, but can contain client application specific services. They are usually used only by clients being implemented by the 'Thin Client' method
- Post Processor
A routing component that is notified by the workflow engine about various events pertaining to the routing of a specific document (e.g., node transition, status change, action taken). The implementation of a Post Processor is typically specific to a particular set of Document Types. When all required approvals are completed, the engine notifies the Post Processor accordingly. At this point, the Post Processor is responsible for completing the business transaction in the manner appropriate to its Document Type.
- Posted Date/Time Stamp
A free-form text field that identifies the time and date at which the Notes is posted.
- Postal Code
Defines zip code to city and state cross-references.
- Preferences
User options in an Action List for displaying the list of documents. Users can click the Preferences button in the top margin of the Action List to display the Action List Preferences screen. On the Preferences screen, users may change the columns displayed, the background colors by Route Status, and the number of documents displayed per page.
- Primary Delegation
The Delegator turns over full authority to the Delegate. The Action Requests for the Delegator only appear in the Action List of the Primary Delegate. The Delegation must be registered in KEW or KIM to be in effect.
- Principal
A Principal represents an Entity that can authenticate into the system. One can roughly correlate a Principal to a login username. Entities can exist in KIM without having permissions or authorization to do anything; therefore, a Principal must exist and must be associated with an Entity in order for it to have access privileges. All authorization that is not specific to Groups is tied to a Principal.
In other words, an Entity is for identity while a Principal is for access management.
Also note that an Entity is allowed to have multiple Principals associated with it. The use case typically given here is that a person may apply to a school and receive one log in for the application system; however, once accepted, they may receive their official login, but use the same identity information set up for their Entity record.
- Processed
A routing status indicating that the document has no pending approval requests but still has one or more pending acknowledgement requests.
R
- Recipient Type
The type of entity that is receiving an Action Request. Can be a user, workgroup, or role.
- Required Rule Extension Attribute
An Extension Attribute that is required in a Rule Template. It will be present in every Routing Rule created from the Template.
- Responsibility
See Responsible Party.
- Responsibility Id
A unique identifier representing a particular responsibility on a rule (or from a route module This identifier stays the same for a particular responsibility no matter how many times a rule is modified.
- Responsible Party
The Reviewer defined on a routing rule that receives requests when the rule is successfully executed. Each routing rule has one or more responsible parties defined.
- Reviewer
A user acting on a document in his/her Action List and who has received an Action Request for the document.
- Rice
An abbreviation for Kuali Rice.
- Role
Roles aggregate Permissions When Roles are given to Entities (via their relationship with Principals) or Groups an authorization for all associated Permissions is granted.
- Route Header Id
Another name for the Document Id.
- Route Log
Displays information about the routing of a document. The Route Log is usually accessed from either the Action List or a Document Search. It displays general document information about the document and a detailed list of Actions Taken and pending Action Requests for the document. The Route Log can be considered an audit trail for a document.
- Route Module
A routing component that the engine uses to generate action requests at a particular Route Node. FlexRM (Flexible Route Module) is a general Route Module that is rule-based. Clients can define their own Route Modules that can conduct specialized Routing based on routing tables or any other desired implementation.
- Route Node
Represents a step in the routing process of a document type. Route node "instances" are created dynamically as a document goes through its routing process and can be defined to perform any function. The most common functions are to generate Action Requests or to split or join the route path.
Simple: do some arbitrary work
Requests: generate action requests using a Route Module or the Rules engine
Split: split the route path into one or more parallel branches
Join: join one or more branches back together
Sub Process: execute another route path inline
Dynamic: generate a dynamic route path
- Route Path
The path a document follows during the routing process. Consists of a set of route nodes and branches. The route path is defined as part of the document type definition.
- Route Status
The status of a document in the course of its routing:
Approved: These documents have been approved by all required reviewers and are waiting additional postprocessing.
Cancelled: These documents have been stopped. The document's initiator can 'Cancel' it before routing begins or a reviewer of the document can cancel it after routing begins. When a document is cancelled, routing stops; it is not sent to another Action List.
Disapproved: These documents have been disapproved by at least one reviewer. Routing has stopped for these documents.
Enroute: Routing is in progress on these documents and an action request is waiting for someone to take action.
Exception: A routing exception has occurred on this document. Someone from the Exception Workgroup for this Document Type must take action on this document, and it has been sent to the Action List of this workgroup.
Final: All required approvals and all acknowledgements have been received on these documents. No changes are allowed to a document that is in Final status.
Initiated: A user or a process has created this document, but it has not yet been routed to anyone's Action List.
Processed: These documents have been approved by all required users, and is completed on them. They may be waiting for Acknowledgements. No further action is needed on these documents.
Saved: These documents have been saved for later work. An author (initiator) can save a document before routing begins or a reviewer can save a document before he or she takes action on it. When someone saves a document, the document goes on that person's Action List.
- Routed By User
The user who submits the document into routing. This is often the same as the Initiator. However, for some types of documents they may be different.
- Routing
The process of moving a document through its route path as defined in its Document Type. Routing is executed and administered by the workflow engine. This process will typically include generating Action Requests and processing actions from the users who receive those requests. In addition, the Routing process includes callbacks to the Post Processor when there are changes in document state.
- Routing Priority
A number that indicates the routing priority; a smaller number has a higher routing priority. Routing priority is used to determine the order that requests are activated on a route node with sequential activation type.
- Routing Rule
A record that contains the data for the Rule Attributes specified in a Rule Template It is an instance of a Rule Template populated to determine the appropriate Routing. The Rule includes the Base Attributes, Required Extension Attributes, Responsible Party Attributes, and any Optional Extension Attributes that are declared in the Rule Template. Rules are evaluated at certain points in the routing process and, when they fire, can generate Action Requests to the responsible parties that are defined on them.
Technical considerations for a Routing Rules are:
Configured via a GUI (or imported from XML)
Created against a Rule Template and a Document Type
The Rule Template and it's list of Rule Attributes define what fields will be collected in the Rule GUI
Rules define the users, groups and/or roles who should receive action requests
Available Action Request Types that Rules can route
Complete
Approve
Acknowledge
FYI
During routing, Rule Evaluation Sets are "selected" at each node. Default is to select by Document Type and Rule Template defined on the Route Node
Rules match (or 'fire') based on the evaluation of data on the document and data contained on the individual rule
Examples
If dollar amount is greater than $10,000 then send an Approval request to Joe.
If department is "HR" request an Acknowledgment from the HR.Acknowledgers workgroup.
- Rule Attribute
Rule attributes are a core KEW data element contained in a document that controls its Routing. It participates in routing as part of a Rule Template and is responsible for defining custom fields that can be rendered on a routing rule. It also defines the logic for how rules that contain the attribute data are evaluated.
Technical considerations for a Rule Attribute are:
They might be backed by a Java class to provide lookups and validations of appropriate values.
Define how a Routing Rule evaluates document data to determine whether or not the rule data matches the document data.
Define what data is collected on a rule.
An attribute typically corresponds to one piece of data on a document (i.e dollar amount, department, organization, account, etc.).
Can be written in Java or defined using XML (with matching done by XPath).
Can have multiple GUI fields defined in a single attribute.
- Rule QuickLinks
A list of document groups with their document hierarchies and actions that can be selected. For specific document types, you can create the rule delegate.
- Rule Template
A Rule Template serves as a pattern or design for the routing rules. All of the Rule Attributes that include both Required and _Optional_ are contained in the Rule Template; it defines the structure of the routing rule of FlexRM. The Rule Template is also used to associate certain Route Nodes on a document type to routing rules.
Technical considerations for a Rule Templates are:
They are a composition of Rule Attributes
Adding a 'Role' attribute to a template allows for the use of the Role on any rules created against the template
When rule attributes are used for matching on rules, each attribute is associated with the other attributes on the template using an implicit 'and' logic attributes
Can be used to define various other aspects to be used by the rule creation GUI such as rule data defaults (effective dates, ignore previous, available request types, etc)
S
- Save
A workflow action button that allows the Initiator of a document to save their work and close the document. The document may be retrieved from the initiator's Action List for completion and routing at a later time.
- Saved
A routing status indicating the document has been started but not yet completed or routed. The Save action allows the initiator of a document to save their work and close the document. The document may be retrieved from the initiator's action list for completion and routing at a later time.
- Searchable Attributes
Attributes that can be defined to index certain pieces of data on a document so that it can be searched from the Document Search screen.
Technical considerations for a Searchable Attributes are:
They are responsible for extracting and indexing document data for searching
They allow for custom fields to be added to Document Search for documents of a particular type
They are configured as an attribute of a Document Type
They can be written in Java or defined in XML by using Xpath to facilitate matching
- Secondary Delegation
The Secondary Delegate acts as a temporary backup Delegator who acts with the same authority as the primary Approver/the Delegator when the Delegator is not available. Documents appear in the Action Lists of both the Delegator and the Delegate. When either acts on the document, it disappears from both Action Lists.
Secondary Delegation is often configured for a range of dates and it must be registered in KEW or KIM to be in effect.
- Service Registry
Displays a read-only view of all of the services that are exposed on the Service Bus and includes information about them (for example, IP Address, or Endpoint URL).
- Simple Node
A type of node that can perform any function desired by the implementer. An example implementation of a simple node is the node that generates Action Requests from route modules.
- SOA
An acronym for Service Oriented Architecture.
- Special Condition Routing
This is a generic term for additional route levels that might be triggered by various attributes of a transaction. They can be based on the type of document, attributes of the accounts being used, or other attributes of the transaction. They often represent special administrative approvals that may be required.
- Split Node
A node in the routing path that can split the route path into multiple branches.
- Spring
The Spring Framework is an open source application framework for the Java platform.
- State
Defines U.S. Postal Service codes used to identify states.
- Status
On an Action List; also known as Route Status. The current location of the document in its routing path.
- Submit
A workflow action button used by the initiator of a document to begin workflow routing for that transaction. It moves the document (through workflow) to the next level of approval. Once a document is submitted, it remains in 'ENROUTE' status until all approvals have taken place.
- Superuser
A user who has been given special permission to perform Superuser Approvals and other Superuser actions on documents of a certain Document Type.
- Superuser Approval
Authority given Superusers to approve a document of a chosen Route Node. A Superuser Approval action bypasses approvals that would otherwise be required in the Routing. It is available in Superuser Document Search. In most cases, reviewers who are skipped are not sent Acknowledge Action Requests.
- Superuser Document Search
A special mode of Document Search that allows Superusers to access documents in a special Superuser mode and perform administrative functions on those documents. Access to these documents is governed by the user's membership in the Superuser Workgroup as defined on a particular Document Type.
T
- Thread pool
A technique that improves overall system performance by creating a pool of threads to execute multiple tasks at the same time. A task can execute immediately if a thread in the pool is available or else the task waits for a thread to become available from the pool before executing.
- Title
A short summary of the notification message. This field can be filled out as part of the Simple Message or Event Message form. In addition, this can be set by the programmatic interfaces when sending notifications from a client system.
This field is equivalent to the "Subject" field in an email.
U
V
W
- Web Service Client
A type of client that connects to a standalone KEW server using Web Services.
- Wildcard
A character that may be substituted for any of a defined subset of all possible characters.
- Workflow
Electronic document routing, approval and tracking. Also known as Workflow Services or Kuali Enterprise Workflow (KEW). The Kuali infrastructure service that electronically routes an e-doc to its approvers in a prescribed sequence, according to established business rules based on the e-doc content. See also Kuali Enterprise Workflow.
- Workflow Engine
The component of KEW that handles initiating and executing the route path of a document.
- Workflow QuickLinks
A web interface that provides quick navigation to various functions in KEW. These include:
Quick EDoc Watch: The last five Actions taken by this user. The user can select and repeat these actions.
Quick EDoc Search: The last five EDocs searched for by this user. The user can select one and repeat that search.
Quick Action List: The last five document types the user took action with. The user can select one and repeat that action.
X
- XML
See also XML Ingester.
An acronym for Extensible Markup Language.
Used for data import/export.
- XML Ingester
A workflow function that allows you to browse for and upload XML data.
- XML RuleAttribute
Similar in functionality to a RuleAttribute but built using XML only

