Table of Contents
List of Figures
- 1.1. Address Type Lookup with results
- 2.1. Campus Maintenance Document, create mode
- 3.1. Campus Type Lookup document
- 3.2. Campus Type Maintenance document
- 4.1. Country Maintenance document, create mode
- 5.1. County Maintenance document, create mode
- 6.1. Document Type document
- 6.2. Edit Document Type tab
- 6.3. Fields Available for Retroactive Application tab
- 6.4. Document Type Inquiry
- 7.1. Group document
- 7.2. Group Overview tab
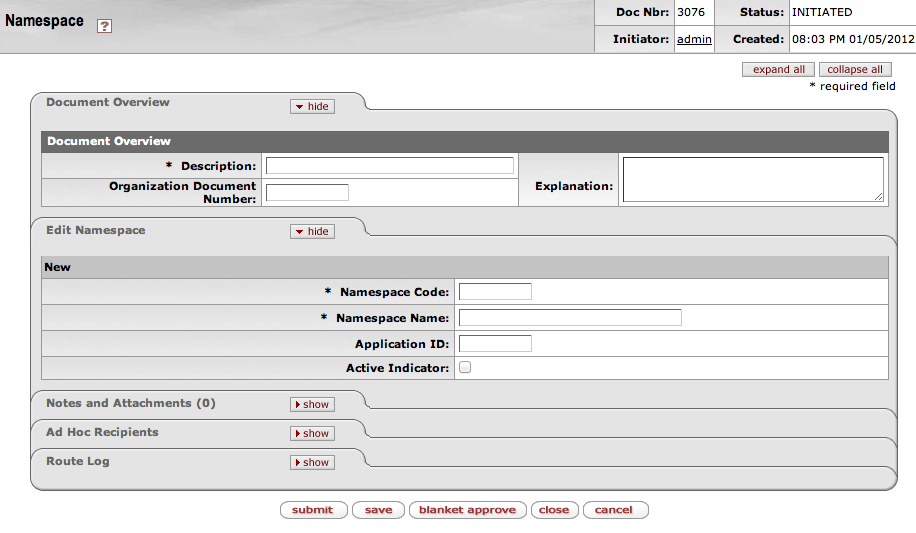
- 8.1. Namespace document
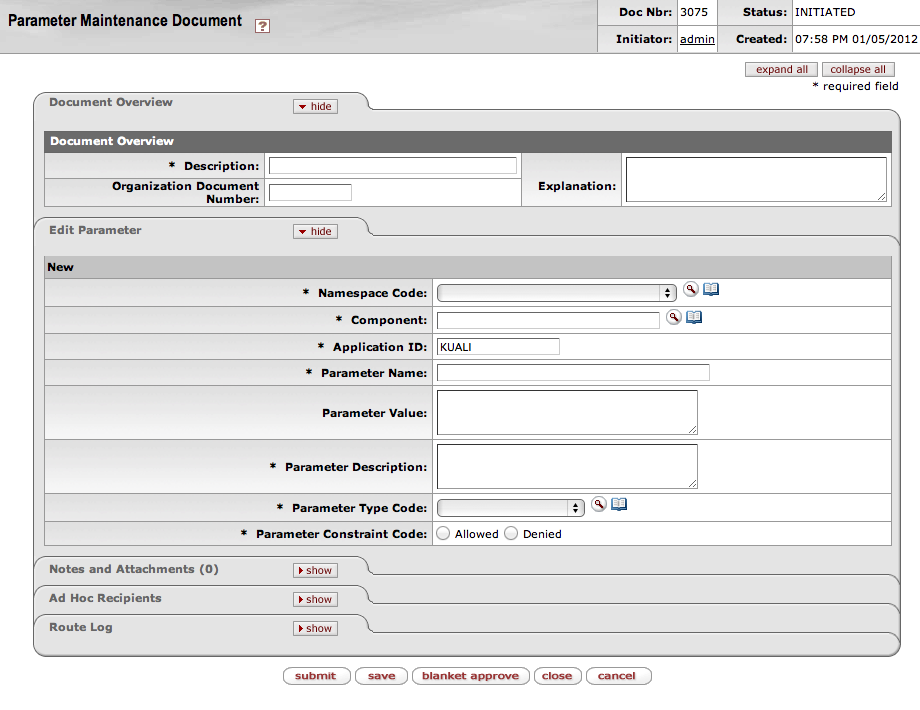
- 9.1. Parameter document
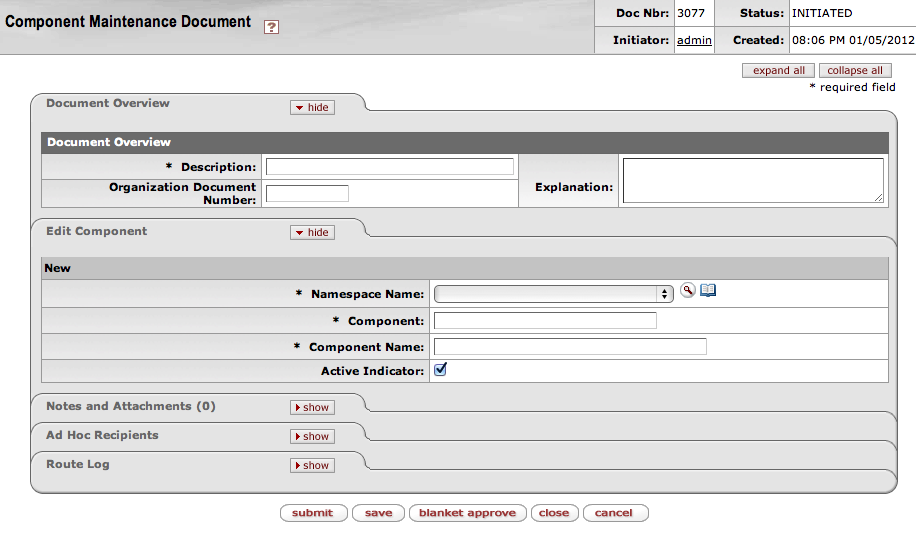
- 10.1. Component document
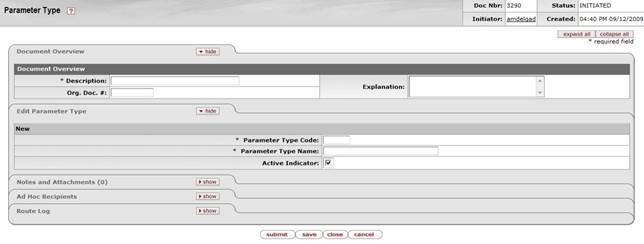
- 11.1. Parameter Type document
- 12.1. Permission Lookup
- 12.2. Permission Lookup results
- 12.3. Permission Inquiry
- 12.4. Permission document
- 12.5. Permission Info tab
- 12.6. Permission Details tab
- 13.1. Person Document
- 13.2. Faculty and staff Employment Information
- 13.3. Contact tab
- 13.4. Names section
- 13.5. Addresses section
- 13.6. Phone Numbers section
- 13.7. Email Addresses section
- 13.8. Privacy Preferences tab
- 13.9. Membership tab
- 14.1. Phone Type Lookup with results
- 15.1. Postal Code Maintenance document, create mode
- 16.1. Responsibility Lookup
- 16.2. Responsibility Lookup results
- 16.3. Responsibility Inquiry
- 16.4. Responsibility document
- 16.5. Responsibility Info tab
- 16.6. Responsibility Details tab
- 17.1. KIM Type Lookup
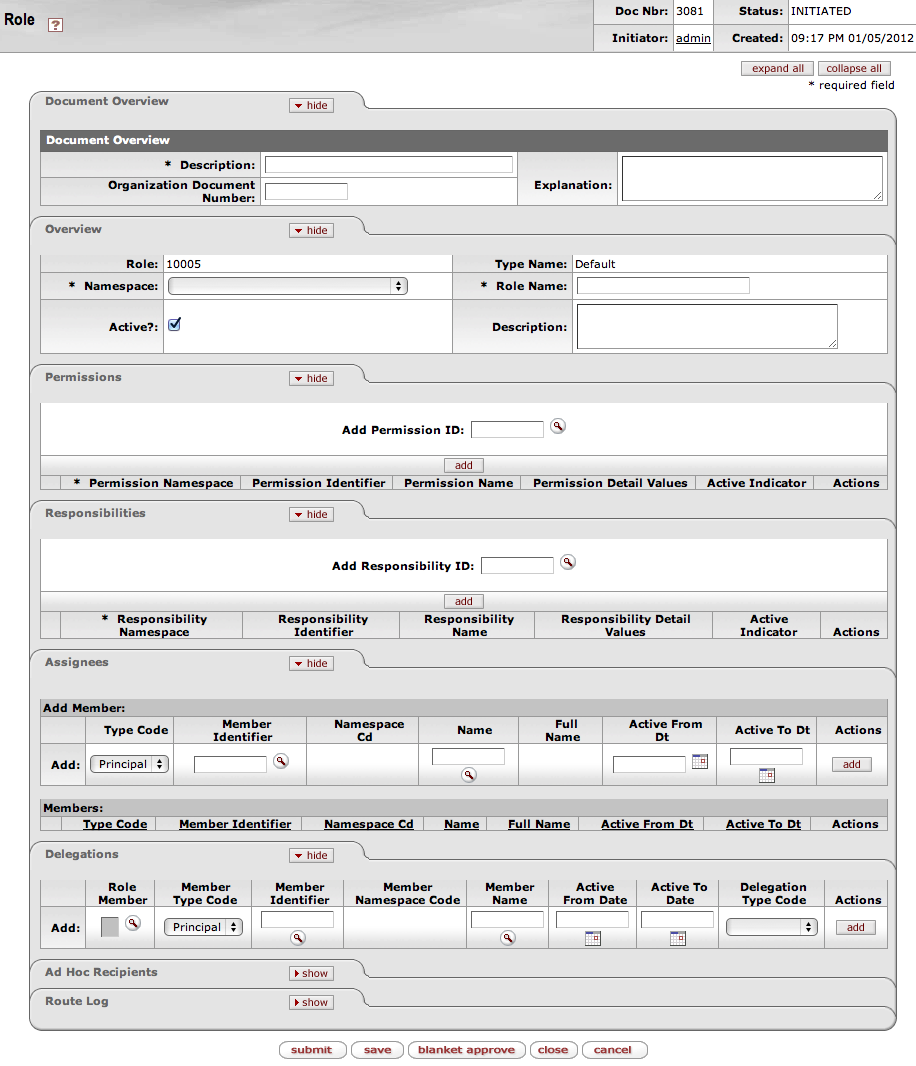
- 17.2. Role document
- 17.3. Role Overview tab
- 17.4. Permissions tab
- 17.5. Responsibilities tab
- 17.6. Responsibility details displayed
- 17.7. Responsibility Action details
- 17.8. Assignees tab
- 17.9. Delegations tab
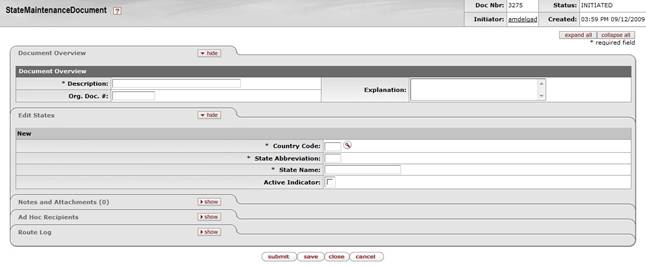
- 18.1. State Maintenance document, create mode
List of Tables
- 1.1. Address Type Lookup results definition
- 2.1. Edit Campus tab definition
- 3.1. Edit Campus Type tab definition
- 3.2. Edit Campus Type tab definition
- 4.1. Edit Country tab definition
- 5.1. Edit Counties tab definition
- 6.1. Edit Document Type tab definition
- 6.2. Fields Available for Retroactive Application tab definition
- 6.3. Document Type Inquiry definition
- 7.1. Overview tab definition
- 7.2. Assignees tab definition
- 8.1. Edit Namespace tab definition
- 9.1. Edit Parameter tab definition
- 10.1. Edit Parameter Detail Type tab definition
- 11.1. Edit Parameter Type tab definition
- 12.1. Permission Lookup search criteria
- 12.2. Permission Lookup results fields
- 12.3. Permission Info tab definition
- 12.4. Permission Details tab definition
- 13.1. Overview section definition
- 13.2. Affiliations section definition
- 13.3. Employment Information fields definition
- 13.4. Names section definition
- 13.5. Addresses section definition
- 13.6. Phone Numbers section definition
- 13.7. Email Address section definition
- 13.8. Privacy Preferences tab definition
- 13.9. Groups section definition
- 13.10. Roles section definition
- 13.11. Delegations section definition
- 14.1. Phone Type Lookup results definition
- 15.1. Edit Postal Codes tab definition
- 16.1. Responsibility Lookup search criteria
- 16.2. Responsibility Lookup results fields
- 16.3. Permission Info tab definition
- 16.4. Responsibility Details tab definition
- 17.1. Overview tab definition
- 17.2. Permissions tab definition
- 17.3. Permissions tab definition, results set
- 17.4. Responsibilities tab definition
- 17.5. Responsibilities tab definition, continued
- 17.6. Responsibility Action Subsection definition
- 17.7. Assignees Member tab definition
- 17.8. Delegations tab definition
- 18.1. Edit States tab definition
Table of Contents
Administration > Identity > Reference > Address Type
The Address Type Lookup displays the types of addresses that may be associated with Person records in KIM.
Note
Address types cannot be edited via the interface. Technical assistance is required to add new or edit existing address types.
| Title | Description |
|---|---|
| Address Type Code | Display-only. The unique code for this type of address. |
| Address Type Name | Display-only. The familiar title of this address type. |
| Display Sort Code | Display-only. An alphabetical character used to determine the order in which address types are displayed in the dropdown list on the Person document. |
| Active Indicator | Display-only. Indicates whether this address type is active (in which case the system displays it in the Address Type dropdown list on the Person document). |
Table of Contents
Administration > Identity > Locations > Campus
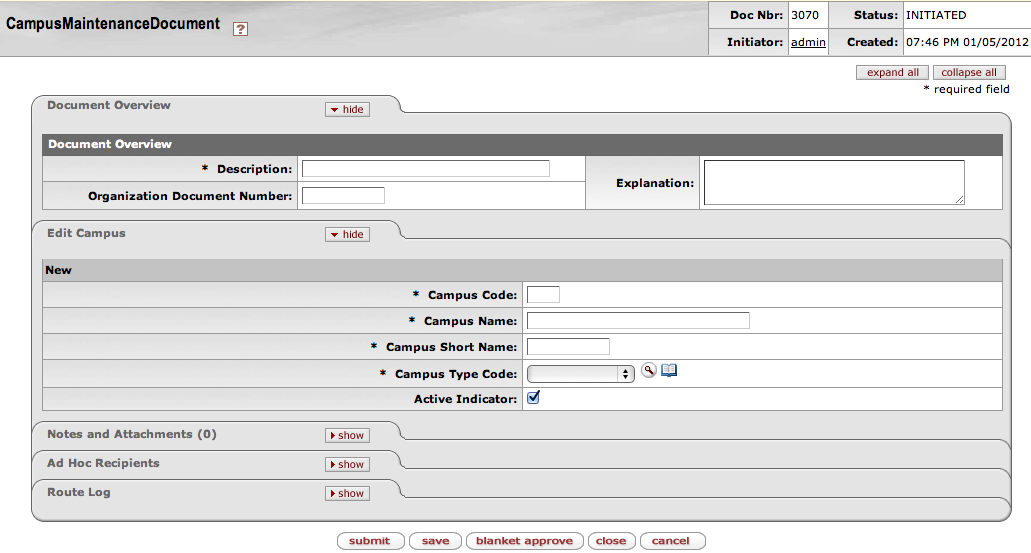
The CampusMaintenanceDocument is used to identify the different fiscal and physical operating entities of an institution. A campus may be identified as a fiscal entity, a physical entity, or both.
When the user chooses the Campus option, the system displays the Campus Lookup screen. After the user selects a campus or clicks the create new button, the system presents the CampusMaintenanceDocument.
The Campus Maintenance Document includes the Edit Campus tab.
In edit mode, the Edit Campus tab presents a display-only set of fields on the left and editable fields on the right in which the user may enter changes.
| Title | Description |
|---|---|
| Campus Code | Required. The unique identifying code assigned to a campus. |
| Campus Name | Required. The familiar name for a specific university campus. |
| Campus Short Name | Required. An abbreviated name for a specific campus; used in reports in which space is limited. |
| Campus Type Code | Required. Indicates the type of campus. Valid values are: B - Both F - Fiscal P - Physical |
| Active Indicator | Check box for showing the Campus as an active one for use. |
Table of Contents
Administration > Identity > Reference > Campus Type
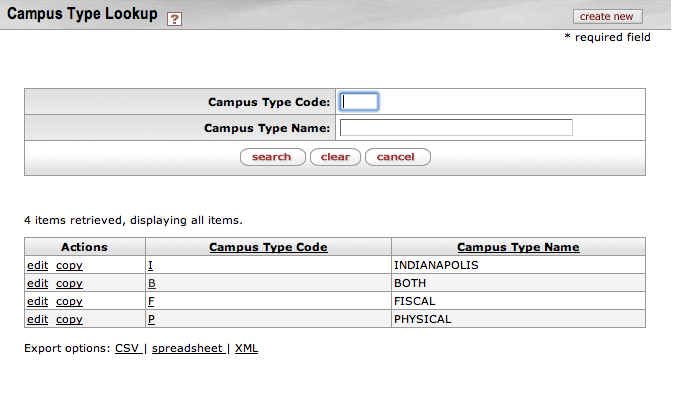
When the user selects Campus Type from the Administration menu tab, the system displays the Campus Type Lookup. From this screen, the user may either create a new type or search for an existing type. This defines the valid types of campuses that can be selected when creating a new campus.
After performing a search based on user-specified criteria, the system displays a results table. The user may then choose to edit or copy a retrieved record.
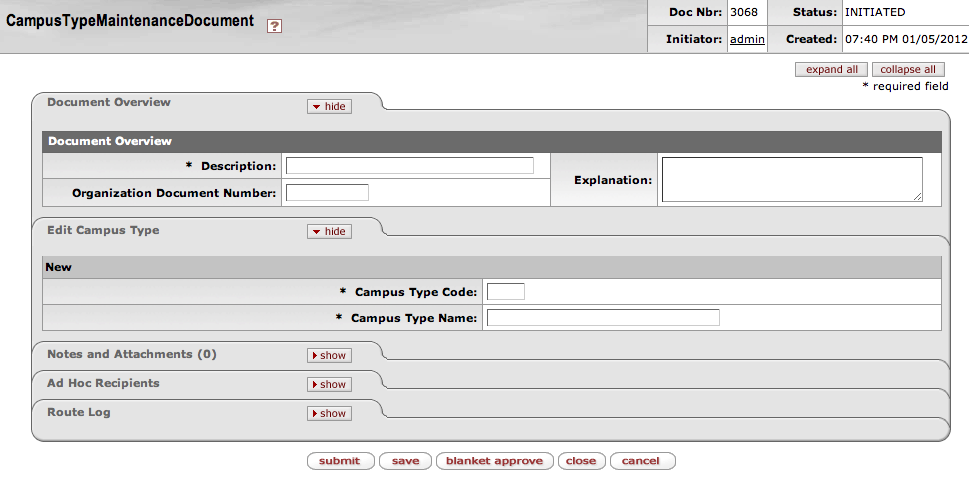
After the user selects create new, edit, or copy, the system displays the Campus Type Maintenance document. This document allows users to add and maintain campus types.
Note
While anyone can view the current values for campus type, only members with application specific manager or KR-SYS Technical Manager roles can create new campus types or edit existing values. This document does not route for approval.
The Campus Type lookup document includes:
| Title | Description |
|---|---|
| Campus Type Code | A unique code to identify this type of campus. |
| Campus Type Name | A descriptive name for this campus type. |
The Campus Type maintenance document includes:
| Title | Description |
|---|---|
| Campus Type Code | Required. Enter a code to identify this type of campus. |
| Campus Type Name | Required. Enter a descriptive name for this campus type. |
Table of Contents
Administration > Identity > Locations > Country
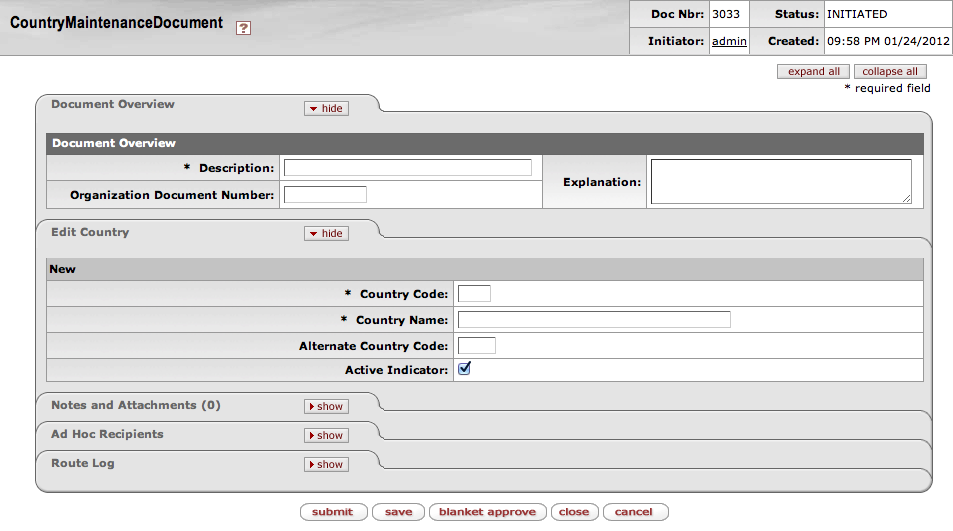
The Country Maintenance document is used to assign specific identifying codes to country names.
When the user chooses the Country option from the menu, the system displays the Country Lookup screen. After the user selects a country or clicks the create new button, the system presents the Country Maintenance document.
The Country Maintenance document includes the Edit Country tab.
In edit mode, the Edit Country tab presents a display-only set of fields on the left and editable fields on the right in which the user may enter changes.
| Title | Description |
|---|---|
| Country Code | Required. A unique identifying code assigned to a country. |
| Country Name | Required. A familiar name of a specific country. |
| Country Restricted Indicator | Required. Check the box to indicate that that the country is restricted. This has implications for the Purchasing /Accounts Payable module where restricted countries may not be used in Vendor addresses. Clear the check box if it is not. |
| Active Indicator | Indicates whether this country code is active or inactive. Remove the check mark to deactivate this country code. |
Table of Contents
Administration > Identity > Locations > County
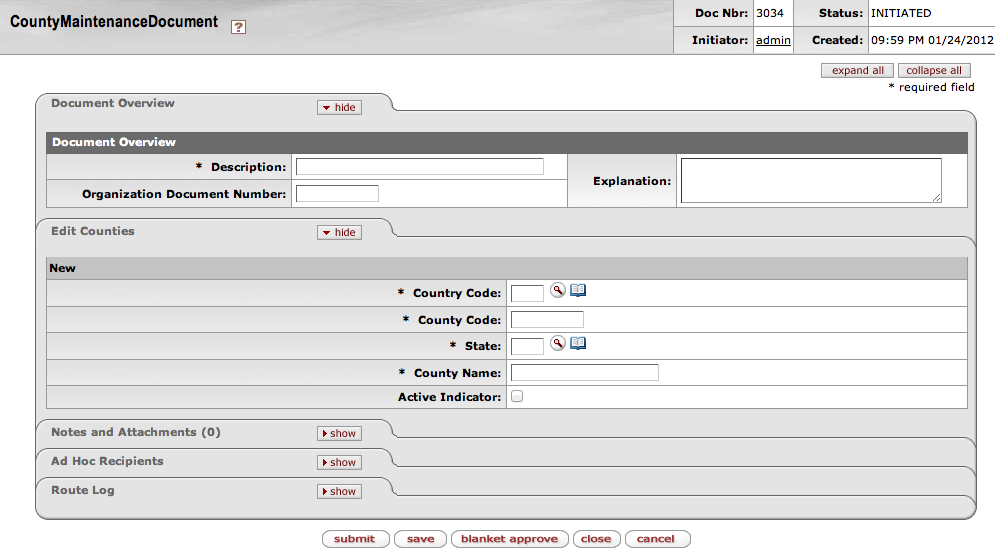
The County Maintenance document is used to assign specific identifying codes to county names.
When the user chooses the County option from the Administration menu tab, the system displays the County Lookup screen. After the user selects a county or clicks the create new button, the system presents the County Maintenance document.
The County Maintenance document includes the Edit Counties tab.
In edit mode, the Edit Counties tab presents a display-only set of fields on the left and editable fields on the right in which the user may enter changes.
| Title | Description |
|---|---|
| Country Code | The country code for the country in which this county is located. |
| County Code | A unique identifying code assigned to this county. |
| State | The state abbreviation assigned to the state in which a county is located. |
| County Name | Required. The familiar name of this county. |
| Active Indicator | Indicates whether the county code is active or inactive. Remove the check mark to deactivate this county code. |
Table of Contents
Administration > Workflow > Document Type
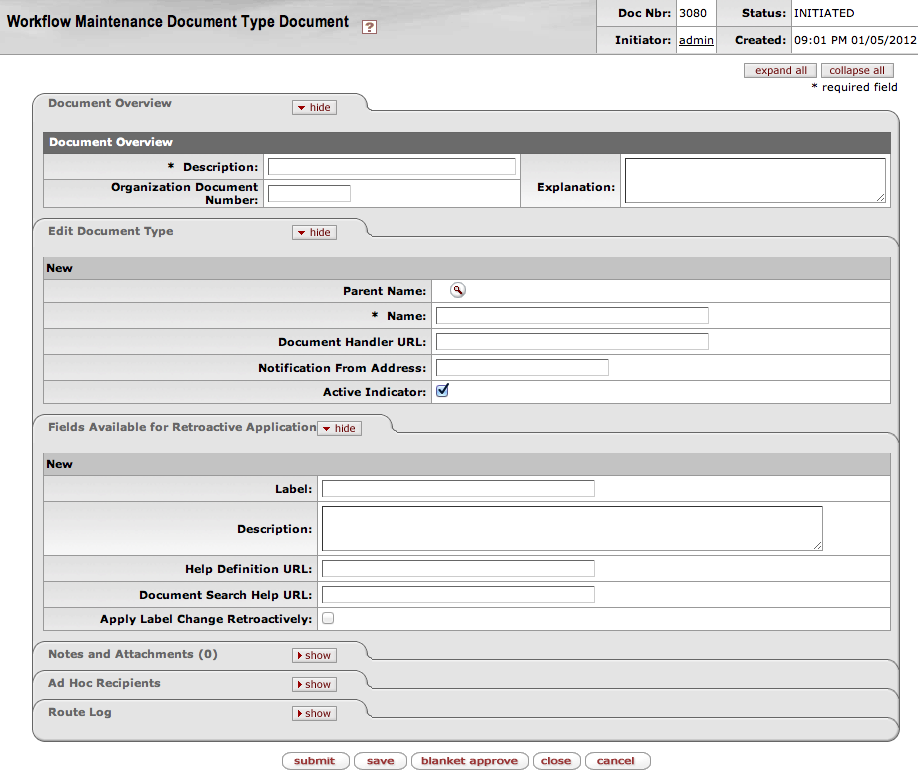
The Document Type document defines basic information about the document types that exist in applications. It also defines document types specific to workflow and KIM. Many attributes of a document type not defined here are included in its workflow process definition and the data dictionary (a technical resource). The workflow process definition for a document type can be viewed using the Document Type lookup.
Document Type documents can only be created by members of the KR-SYS Technical Administrator or suitable application roles and they do not route for approval.
The Document Type document contains the Edit Document Type tab and the Fields Available for Retroactive Application tab.
| Title | Description |
|---|---|
| Parent Name | Required. Every document type must answer to another document type in a parent/child relationship. Use the lookup to search for the document type to which this document type will answer. Document types can inherit important attributes from their parent document types, including permissions and responsibilities. |
| Name | Required. The common name of the document type. |
| Document Handler URL | Optional. (Technical) Identifies the basic URL that will take a user to this document type. |
| Notification From Address | Optional. The email address that will appear as the 'From' address on any action list notifications sent by workflow for this document type. This allows several applications using workflow to maintain separate notification email addresses. |
| Active | Required. The box should be checked if the document type is active and available for use. Uncheck the box to inactivate the document type. |
These are Document Type attributes that can be edited retroactively if need be. This means that should you decide to change one of these values for a given document type it is possible to apply the change retroactively to any documents of this type already created. For example, if you decided to change the Label of the Budget Adjustment document type you could choose that have that label change apply to historical Budget Adjustment documents in your KFS system.
| Title | Description |
|---|---|
| Label | Optional. The Label appears in most places where document types are displayed in results (including the action list and document search screens) and is commonly longer than the document Name, which is often an abbreviation. |
| Description | Optional. A text description of this document type. |
| Help Definition URL | Optional. (Technical) Identifies the URL where the online help content for this document type resides. |
| Document Search Help URL | Optional. (Technical) Identifies the URL where the online document search help content for this document type resides. |
| Apply Label Change Retroactively | Optional. Check this box only when updating an existing document type and only if you wish the fields on this tab to be updated on previously created versions of documents of this type. |
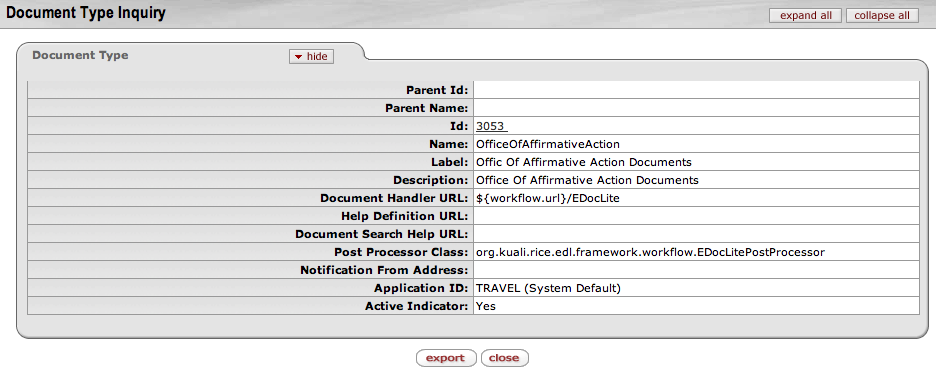
The Document Type Inquiry contains some additional fields that are not defined on this document but referenced from their source (either the corresponding workflow process definition or data dictionary information). These fields are defined below.
| Title | Description |
|---|---|
| Parent ID | Display only. The unique, system-generated ID number that identifies the parent document of this Document Type. |
| ID | Display only. The unique, system-generated ID number that identifies this document type. |
| Post Processor Class | Display only. (Technical.) Identifies the post processor this document type calls upon reaching a completed workflow status (usually 'Final' or 'Processed'). The post processor is the code that tells and application what tables to update when a document is approved. |
| Service Namespace | Display only. The namespace (large functional category) that is associated with this document type. |
Table of Contents
Administration > Identity > Identity > Group
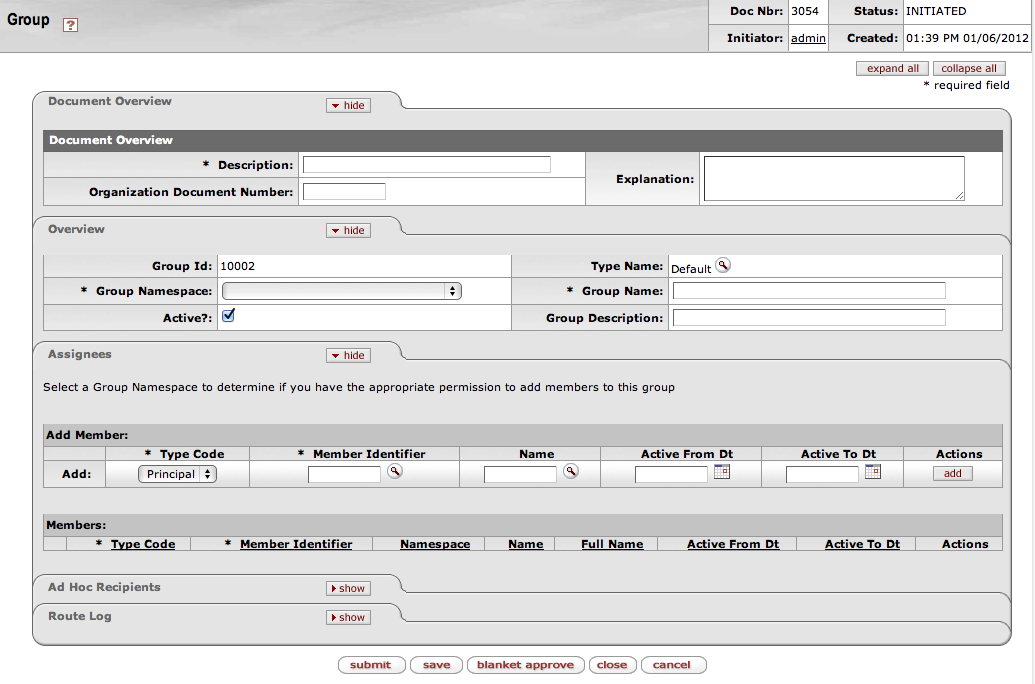
The Group document allows you to associate persons, roles or other groups with each other in order to assign the same role to all group members.
Groups have no inherent permissions or responsibilities of their own. Only by associating a group with a role do the members of that group become associated with permissions and responsibilities.
The Group document includes Document Overview, Overview, Attributes and Assignees tabs.
This tab identifies the group with a unique system-assigned ID number, a namespace and a name. Each group also has a type that specifies any qualifiers that this group might require.
| Title | Description |
|---|---|
| Group ID | Display-only. The unique system-assigned ID number that identifies this group. The system completes this field when you submit the document. |
| Type Name | Required. The type of attributes that will be associated with this group. Some group types, such as the Default Type, require no attributes to be collected. When creating a new group, you must select the Type before the system can generate the document. |
| Group Namespace | Required. An indicator that associates the group with a particular application and module. |
| Group Name | Required. The common descriptive name by which this group is known. |
| Active | Check this box to indicate that this Group is active and is a valid choice for assigning to roles. Uncheck the box to indicate that this group is inactive (no longer valid when making role assignments). |
| Group Description | An optional explaination of the group's need and use. |
This tab contains the members who belong to this group. It can also be used to add new members or edit the values associated with existing members.

| Title | Description |
|---|---|
| Type Code | Required. Select the type of member you are adding to this group. Group members can be principals (as defined on the Person document), roles or other groups. |
| Member Identifier | Required. Enter the ID that identifies the member you are adding or use the lookup to search for and select a valid Member ID. The lookup directs you to the Principal, Group or Role lookup based on your Member Type Code selection. |
| Name | Display only. Displays the name of the member you've selected. |
| Active From Date | Optional. To specify the earliest date on which this member is to be considered a valid member of this group, enter a From Date. |
| Active To Date | Optional. To specify a date on which this member is no longer to be considered a valid member of this group, enter a To Date. Note that you cannot delete or inactivate group members. To remove a member from a group enter an Active To Date. |
| Actions | Click the Add button to add this member to the group. |
Table of Contents
Administration > Configuration > Namespace
The Namespace document allows you to add new or maintain existing namespace codes. Namespace codes are used to identify various pieces of functionality and generally correspond to large functional areas. The namespaces in an applications base data normally take the form of a Kuali application followed by one of that application's modules. For example the KFS Purchasing /Accounts Payable module would be associated with the namespace KFS-PURAP.
This document can only be initiated by members of the KR-SYS Technical Administrator role or a suitable application role and does not route for approval.
The Namespace document contains the Edit Namespace tab.
| Title | Description |
|---|---|
| Namespace | Required. Enter the namespace code for this namespace. The convention for most namespaces is application abbreviation and module abbreviation separated by a dash (KFS-PURAP, KR-WKFLW, etc.) |
| Namespace Name | Required. A longer text description for this namespace code. |
| Application ID | Optional. An additional namespace identifier which identifies which application should recognize this namespace code. This is generally only used in instances where the regular namespace code is not enough to make an attribute unique. This attribute is normally used directly on the Parameter document and not assigned specifically to a namespace on this table. |
| Active Indicator | Required. Leave checked to indicate that this namespace is active and can be associated with permissions, responsibilities, roles and Kuali data elements organized by namespace. Uncheck the box to inactivate this namespace and make it an invalid choice. |
Table of Contents
Administration > Configuration > Parameter
The Parameter document is used to define parameters and business rules in Rice and Rice Applications. A specific value of a parameter can vary based on what the parameter is used to define. Some parameters create business rules. These rules create restrictions and enforce valid values and combinations on various document types or batch processes. Other parameters simply define institution-specific values not defined elsewhere in Rice and Rice Applications. The value may, for example, be text that Rice and Rice Applications are to display in a given location or it may be a simple yes or no value to turn an option on or off.
Only members of the KR-SYS Technical Administrator or suitable application roles can create or edit Parameter documents.
The Parameter document does not route for approval.
The Parameter document includes the Edit Parameter tab. This tab is where you define the modules, type, rules, and description of the parameters.
| Title | Description |
|---|---|
| Namespace Code | Required. Select the appropriate Namespace code for the parameter from the Namepsace Code list or search for it from the lookup. |
| Component | Required. Enter the parameter component code or search for it from the Parameter Component lookup. |
| Application ID | Required. Enter the application namespace to identify the application to which this parameter applies. Note that the same parameter can have different values for different applications. |
| Parameter Name | Required. Enter the name of the parameter being defined. |
| Parameter Value | Required. Enter the value for the parameter. The nature of a given parameter determines what form the parameter value should take. In some cases it is text for a user to view or it could be a value such as an account number or an object code. In cases where multiple values are allowed they should be separated by a semi-colon. Consult with technical resources if you are unsure what format a specific parameter value should take. |
| Parameter Description | Required. Describe the purpose and usage of the parameter. The description is used for a documentation purpose. |
| Parameter Type Code | Required. Select the parameter type code from the Parameter Type list or search for it from the lookup. Default types include: System Configuration: Used to establish institution values not specific to validation. Document Validation: Used to establish business rules for documents. |
| Parameter Constraint Code | Required. Select Allowed if the parameter is to allow the defined parameter value within an application. Select Denied if the parameter is to deny the defined parameter value within the application. Consult with technical resources if you are unsure of the appropriate constraint code for a given parameter. |
Table of Contents
Administration > Configuration > Component
The Component document defines valid components that can be associated with a parameter. Components indicate a general or specific piece of functionality to which a parameter applies. Some Components are generic (batch, lookup, all) while others are very specific and refer to particular documents or even specific tabs or fields on documents.
Only members of the KR-SYS Technical Administrator or an equivalent application role can create or edit Component documents.
The Parameter Component document includes the Edit Parameter Detail Type tab.
| Title | Description |
|---|---|
| Namespace Name | Required. Select the appropriate Namespace code for the parameter from the Namespace Name list or search for it from the lookup. |
| Component | Required. Enter the parameter component code or search for it from the Component lookup. |
| Component Name | Required. Enter the descriptive name of the parameter component being defined. |
| Active Indicator | Required. Leave checked to indicate that this parameter component is active and can be associated with parameters. Uncheck the box to inactivate this component and make it an invalid choice. |
Table of Contents
Administration > Configuration > Parameter Type
The parameter type broadly defines what a parameter is used for. In an application's base data there may be only two parameter types: parameters used for document validation (such as business rules) and parameters used for System Configuration (customizing applications for your institution).
The Parameter Type document allows you to create new or edit existing parameter types. Code must be developed to support any additional types or changes to existing types.
Only members of the KR-SYS Technical Administrator or suitable application role can create or edit Parameter Type documents and they do not route for approval.
The Parameter Type document includes the Edit Parameter Type tab.
| Title | Description |
|---|---|
| Parameter Type Code | Required. Enter the code by which this parameter type will be identified. |
| Parameter Type Name | Required. Enter the long descriptive name for this parameter type. |
| Active Indicator | Required. Check the box to make this parameter type active and available for selection when creating parameters. Uncheck the box if you wish to inactivate this type of parameter and prevent its selection when creating new parameters. |
Table of Contents
Administration > Identity > Identity > Permission
The Permission document allows you to create new permissions or edit existing ones. The Permission Lookup allows you to search for and view existing permissions. You can view summarized information about the permission detail values as well as the roles that are currently associated with this permission.
Only members of an applicable application specific role can create or modify Permission documents. These documents do not route for approval.
Caution
Extreme caution should be exercised when modifying existing permissions or adding new ones. Even small changes can have application-wide consequences. Changes should be made only after sufficient testing with your local configuration.
| Title | Description |
|---|---|
| Template Namespace | Optional. To search for a permission based on its template namespace (that is, the name of the application and module to which its template belongs), select the appropriate namespace. |
| Template Name | Optional. To search for a permission based on the name of the template it is based on, enter the appropriate template name. |
| Permission Namespace | Optional. To search for a permission based on its namespace, select the appropriate permission namespace. |
| Permission Name | Optional. To search for a permission by name, enter its name. |
| Role Namespace | To search for a permission based on the namespace of the role to which it is assigned, enter the appropriate role namespace. |
| Role Name | Optional. To search for a permission based on the role to which it is assigned, enter the appropriate role name. |
| Principal Name | Optional. To search for a permission based on the principals that currently have this permission through their association with a role, enter an appropriate principal name. |
| Group Namespace | Optional. To search for a permission based on the namespace of groups that have this permission through the group's association with a role, enter an appropriate group namespace. |
| Group Name | Optional. To search for a permission based on the name of a group that has this permission through its association with a role, enter an appropriate group name. |
| Permission Detail Values | Optional. To find a permission based on a specific permission detail value associated with it, enter the value. |
The Permission results display contains the fields described in the table below.
| Title | Description |
|---|---|
| Actions | Actions allow selection of edit or copy for each permission displayed. |
| Template Namespace | The code identifying the application and module the template pertains to. Because templates tend to be general categories, they are often associated with system-level namespaces. |
| Template Name | The template the permission is based on. A template usually defines, in a broad sense, what the permission controls. Similar types of permissions share the same template. |
| Permission Namespace | The code designating the application and module this permission is associated with. |
| Permission Name | The descriptive name for this permission. In most cases this will match the Template Name. |
| Permission Detail Values | Display-only. Detailed information that, in combination with the permission name, defines the permission's function. For example, if the permission name is 'Initiate Document,' the Permission Detail Values field indicates the specific type of document the initiate permission pertains to. Permission detail values can include many different types of data. Some common types are defined below. documentTypeName: The name of the document type associated with this permission. routeNodeName: The point in a document's workflow routing at which this permission becomes relevant. routeStatusCode: The routing status that a document must be in for this permission to apply. propertyName: Often, a field or document element that the permission pertains to. |
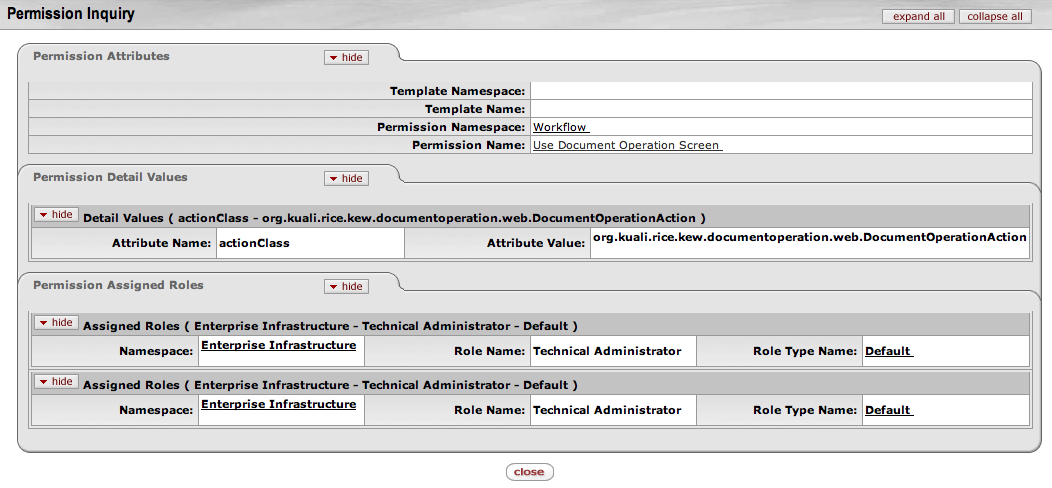
| Granted to Roles | Lists the namespace and name of roles that have this permission. Click on the linked name to view the Role inquiry. |
To view an Inquiry screen for a permission, select the Permission Name of the appropriate row in the search results. The Inquiry screen contains the same information as the Search Results in a slightly different format.
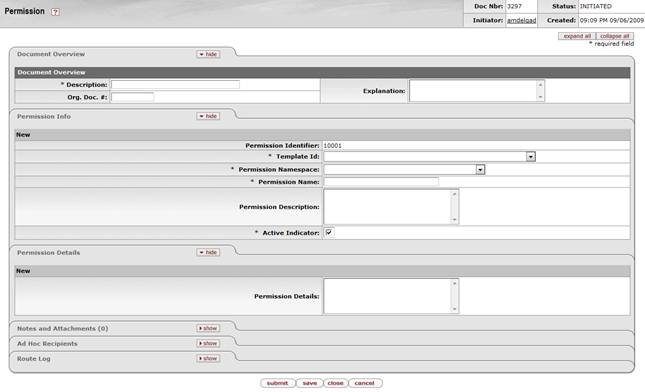
The Permission document includes Document Overview, Permission Info, and Permission Details tabs.
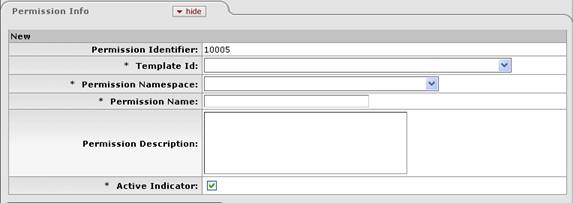
This tab identifies the permissions with a unique system-assigned ID number, a template, namespace, name and description.
| Title | Description |
|---|---|
| Permission Identifier | Display-only. The unique, system-assigned ID number that identifies this permission. |
| Template ID | Required. Select the Template this permission is associated with. Templates identify broad permission types. |
| Permission Namespace | Required. An indicator that associates the permission with a particular application and module. |
| Permission Name | Required. A text name identifying this permission. |
| Permission Description | Optional. Enter a text description of what this permission does. |
| Active Indicator | Required (defaults to 'Yes'). Change the default selection if you wish this permission to be inactive. Inactive permissions will be disregarded by KIM when doing permission checks. |
This tab identifies the permission values that KIM needs to make this permission function. These values vary greatly depending on the type of permission being created. It is highly recommended that users view similar permissions (those with the same Template ID) and discuss Permission Details with technical resources to ensure values are entered correctly.
| Title | Description |
|---|---|
| Permission Details | Optional (though most permissions would require some details to be functional). Enter the permission details specific to this permission. Details should be entered as the name of the property followed by an '=' followed by the value of the property. When entering multiple details they should be separated by a hard return in the text box, such as: componentName=IdentityManagementPersonDocument propertyName=taxId |
Table of Contents
Administration > Identity > Identity > Person
The Person document allows you to identify each user to KIM (and, by extension, to Rice applications). Each Person document includes data about a user's relationship with your institution as well as the roles and groups to which this person belongs.
In KIM a person is a unique combination of an 'entity ID' and a 'principal ID.' The entity ID represents a person with a unique number, and the document associates the entity ID with the user's principal ID number and principal name (often referred to as a user name or user ID). When searching for or working with users in KIM, you usually reference either the principal ID or the principal name. A single entity ID can have multiple principals associated with it
Note that initiation of the Person document is restricted to members of the KR-SYS Technical Administrator or similar application specific role.
Note: Person and HRIS System
Many institutions choose to override parts of the Person document (especially affiliations and contact information) with data from an HR system. Therefore, editing entity data (such as entity ID, principal name, principal ID, and password), contact and affiliation data is not available for any role in the default role configuration. If you wish to allow users to edit this data via the interface you will need to assign the 'Modify Entity' permission to the appropriate role.
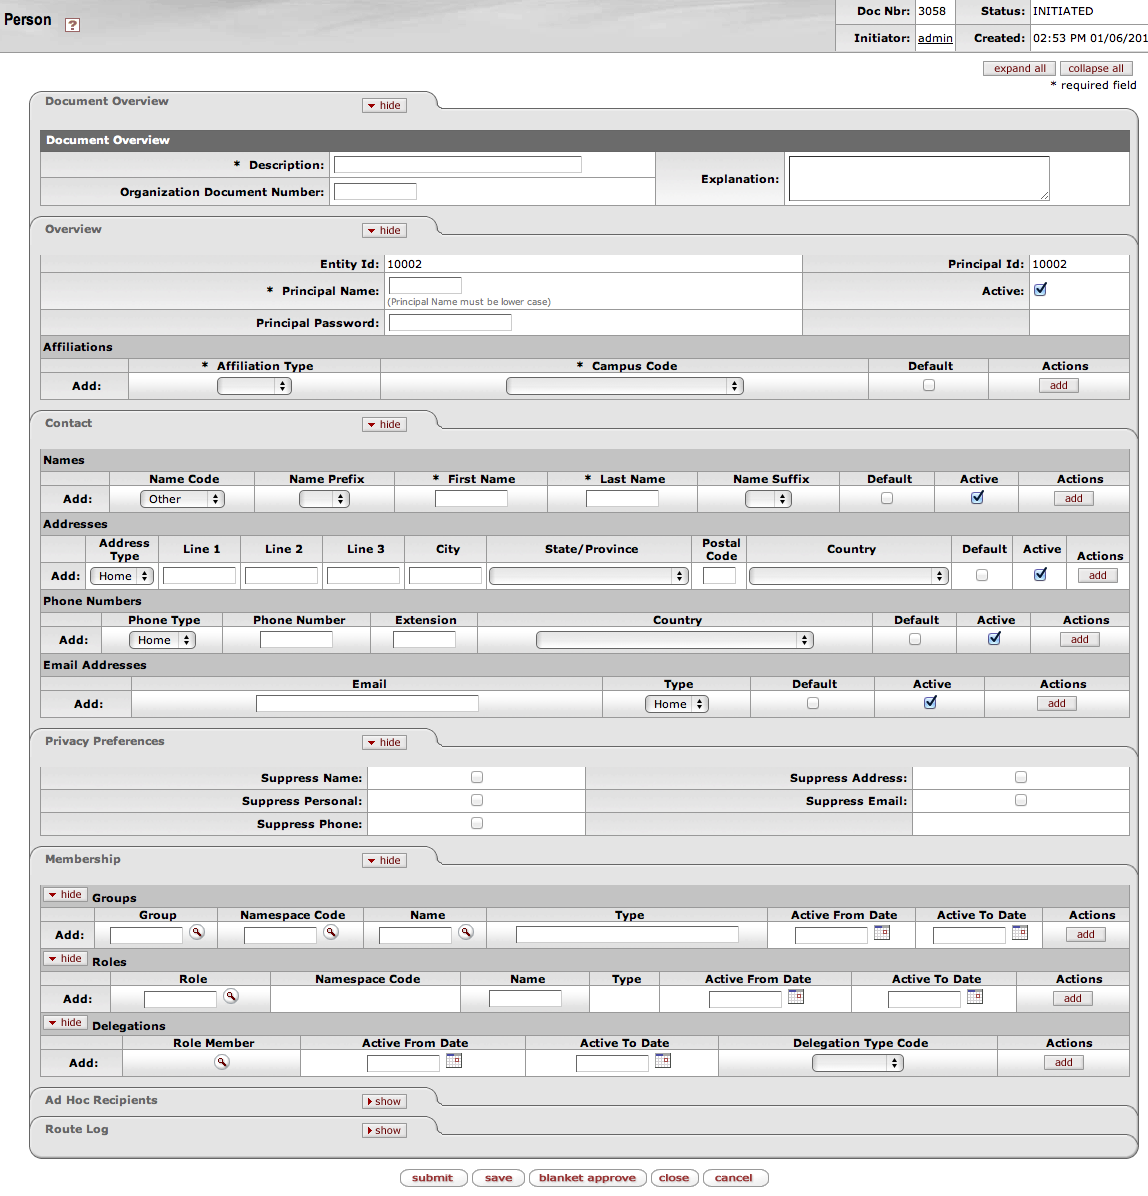
The Person document includes Overview, Contact, Privacy Preferences, and Membership tabs.
The first section in the Overview tab is the Overview section.
| Title | Description |
| Entity Id | Display-only. The unique ID number identifying this person in your database. An individual may have multiple principal IDs but only one entity ID. The system completes this entry automatically when you save or submit the document. |
| Principal ID | Display-only. The unique ID number identifying this principal. Whereas Entity ID represents a unique person, principal represents a set of login information for that person. When selecting a person, you ordinarily reference his or her principal ID. The system completes this entry automatically when you save or submit the document. |
| Principal Name | Required. Enter the user name by which this principal is to be identified. |
| Principal Password | Optional. Enter the password for this principal ID. |
| Active | Check the box to indicate that this principal ID is active. Uncheck the box to indicate that this principal ID is inactive. |
Use the Affiliations section of the Overview tab to add affiliations for this principal ID. Depending on the affiliation type added, you may need to complete additional fields.
| Title | Description |
| Affiliation Type | Optional. Select the type of affiliation from the list. Options include:
Affiliation types of Faculty and Staff require additional information (see below). |
| Campus Code | Required. Select the campus code associated with this affiliation. |
| Default | Check the box to indicate that this affiliation is this principal's default association with your institution. Each principal must have at least one default affiliation. |
| Actions | Click the Add button to add the affiliation. |
If you have selected an Affiliation of 'Faculty' or 'Staff,' the system displays additional fields to collect employment information.
| Title | Description |
| Employee ID | Optional. Enter the Employment ID number associated with this faculty or staff affiliation. Ordinarily this entry is the ID number identifying this principal in your HR system. |
| Primary | Check the box to indicate that this faculty or staff affiliation represents the principal's primary job with your institution. Each principal with a faculty or staff affiliation must have exactly one affiliation marked as 'primary. |
| Employee Status | Required. Select a value to identify the current status of this faculty or staff affiliation. Options include:
|
| Employee Type | Required. Select a value to indicate the type of employment for this affiliation. Options include:
|
| Base Salary Amount | Required. Enter the base salary yearly amount earned for this faculty or staff affiliation. |
| Primary Department Code | Optional. Enter the code for the department associated with this faculty or staff affiliation. |
| Add | Click the Add button to add this row of employment information. |
The Contact tab records the names, addresses, phone numbers and email addresses associated with this Person record. Any Person record can store multiple records for contact information of each type (name, address, phone number, and email address), with one value of each type identified as the default value for the Person record.
| Title | Description |
|---|---|
| Name Code | Optional. Select the type of name to be added in this row. Options include:
|
| Name Prefix | Optional. Select the appropriate title for the name being added in this row. Options include:
|
| First Name | Optional. Enter the first name for this record. |
| Last Name | Optional. Enter the last name for this record. |
| Name Suffix | Optional. Select a suffix for this name record. Options include:
|
| Default | Check this box to indicate that this Name record is to be used as the default for this person. Each Person record must have exactly one Name record identified as the default. |
| Active | Check the box to indicate that this Name record is active. Uncheck the box to indicate that this record should be considered inactive. |
| Actions | Click the Add button to add this Name record. |
| Title | Description |
|---|---|
| Address Type | Optional. Select the type of address being added on this row. Options include:
|
| Line 1-3 | Optional. Use lines 1, 2 and 3 to enter the street address for this row. |
| City | Optional. Enter the city associated with this address. |
| State / Province | Optional. Select the state associated with this address from the list. |
| Postal Code | Optional. Enter the postal code associated with this address. |
| Country | Optional. Select the country associated with this address. |
| Default | Check this box to indicate this address record should be used as the default. A Person record can have no more than one default Address record. |
| Active | Check this box to indicate that this Address record is active. Uncheck the box to indicate that this record is inactive. |
| Actions | Click the Add button to add this Address record. |
| Title | Description |
|---|---|
| Phone Type | Optional. Select the type of phone number being added on this row. Options include:
|
| Phone Number | Optional. Enter the area code and phone number. |
| Extension | Optional. Enter the appropriate extension. |
| Country | Optional. Select the country associated with this Phone Number record. |
| Default | Check this box to indicate that this Phone Number record should be used as the default. A Person record can have no more than one default Phone Number record. |
| Active | Check this box to indicate that this Phone Number record is active. Uncheck the box to indicate that this record is inactive. |
| Actions | Click the Add button to add this Phone Number record. |
|
Title |
Description |
|---|---|
| Optional. Enter the email address for this record. | |
| Type | Optional. Select the type of email address being added on this row. Options include:
|
| Default | Check this box to indicate that this Email Address record should be used as the default. A Person record can have no more than one default Email Address record. |
| Active | Check this box to indicate that this Email Address record is active. Uncheck the box to indicate that this record is inactive. |
| Actions | Click the Add button to add this Email Address record. |
The Privacy Preferences tab allows you to suppress the display of fields on the Contact Tab.
Caution
Note that no role in the base data configuration can modify this privacy preferences information. If you wish this capability to be available via the user interface, you must assign the 'Override Entity Privacy Preferences' permission to a role.
| Title | Description |
|---|---|
| Suppress Name | Optional. Check this box to specify that the system is not to display this person's names. |
| Suppress Personal | Optional. Do not display this person's personal data. |
| Suppress Phone | Optional. Check this box to specify that the system is not to display this person's phone numbers. |
| Suppress Address | Optional. Check this box to specify that the system is not to display this person's addresses. |
| Suppress Email | Optional. Check this box to specify that the system is not to display this person's email addresses. |
The Membership Tab allows you to associate a person with groups and roles and, by extension, with KIM permissions and responsibilities. Assigning a person to a role is the most direct way to give a user KIM permissions and responsibilities.
The tab is divided into three sections, one for managing assignments to Groups, another for Roles, and a third for Delegations.
| Title | Description |
|---|---|
| Group | Optional. Enter the name of the KIM group you want to assign this person to. You can also use the Group lookup to search for and select a valid value. |
| Namespace Code | Display-only. After you select a group to add this person to, the namespace code associated with the selected group is displayed. |
| Name | Display-only. After you select a group to add this person to, the name of that group is displayed. |
| Type | Display-only. After you select a group to add this person to, the type associated with the selected group is displayed. |
| Active From Date | Optional. If this user's assignment to this group is to be effective as of a certain date, enter that date here. |
| Active To Date | Optional. If this user's assignment to this group is to terminate as of a certain date, enter that date here. There is no way to delete a person's assignment to a group. To remove a person from a group, use this field to specify a date in the past. |
| Actions | Click the Add button to add this group assignment. |
| Title | Description |
|---|---|
| Role | Optional. Use the Name lookup to search for and select the role you want to assign this person to. |
| Namespace Code | Display-only. After you select a role to assign to this Person record, the system displays the namespace code associated with that role. |
| Name | Display-only. After you select a role to assign to this Person record, the system displays the name associated with that role. |
| Type | Display-only. After you select a role to assign to this Person record, the system displays the role type associated with the selected role here. |
| Active From Date | Optional. If this user's assignment to this role is to be effective as of a certain date, enter that date here. |
| Active To Date | Optional. If this user's assignment to this role is to terminate as of a certain date, enter that date here. Note that there is no way to delete a person's assignment to a role. To remove a person from a role, use this field to specify a date in the past. |
| Actions | Click the Add button to add this role data. |
When assigning some roles, you may need to supply additional qualifying values that further define this person's assignment. For more information about role qualifiers, see Role.
Delegations allow you to set a user as a primary or secondary delegate for a current member of a role. The delegate has the same permissions as the role member and is able to act on action requests generated for the role member by KIM.
| Title | Description |
|---|---|
| Role Member | Optional. Use the Role Member lookup to search for and select the role and role member you wish to add a delegation for. |
| Active From Date | Optional. If this delegation is to be effective as of a certain date, enter that date here. |
| Active To Date | Optional. If this delegation is to terminate as of a certain date, enter that date here. Note that there is no way to delete a person's delegation. To remove a person from a role, use this field to specify a date in the past. |
| Delegation Type Code | Optional. This defines how the delegate will be able to access workflow action requests generated to the delegating role member. Options are 'Secondary' (the user must use the secondary delegate action list filter to view action requests) and 'Primary' (action requests will route directly to the delegate's action list). |
| Actions | Click the Add button to add this delegation data. |
A person must have at least one affiliation.
Each faculty or staff affiliation must have at least one Employment Information record associated with it.
If a person has any faculty or staff affiliations then one Employment Information record must be marked as 'primary'.
Each person must have a default Name record in the Contacts section.
Each affiliation must be associated with a campus.
Each type of contact information can have only one record marked as the default.
Table of Contents
Administration > Identity > Reference > Phone Type
The Phone Type Lookup displays codes that identify various categories of phone numbers on the Person document.
Note
Phone types cannot be edited via the interface. Technical assistance is required to add new or edit existing phone types.
| Title | Description |
|---|---|
| Phone Type Code | Display-only. The code that identifies the type of phone number. |
| Phone Type Name | Display-only. The descriptive name for this type of phone number. |
| Display Sort Code | Display-only. An alphabetic value that determines the order in which phone types are displayed in the dropdown list. |
| Active Indicator | Display-only. Indicates whether this phone type is active (in which case the system displays it in the Phone Type dropdown list on the Person document). |
Table of Contents
Administration > Identity > Locations > Postal Code
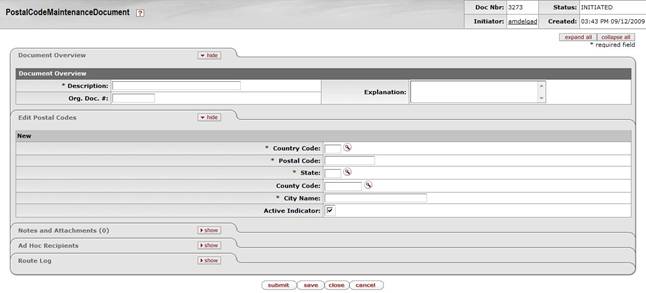
The Postal Code Maintenance document defines the zip code by city and state. When the user chooses the Postal Code option from the Administration menu tab, the system displays the Postal Code Lookup screen. After the user selects a postal code or clicks the create new button, the system presents the Postal Code Maintenance document.
Note
The user may also enter a city and state to find the associated zip code.
The Postal Code Maintenance document includes the Edit Postal Codes tab.
In edit mode, the Edit Postal Codes tab presents a display-only set of fields on the left and editable fields on the right in which the user may enter changes.
| Title | Description |
|---|---|
| Country Code | The country code for the country associated with the zip (postal) code. |
| Postal Code | Identifies a Postal Service code. |
| State | Required. The state associated with the zip (postal) code. |
| County Code | The unique identifying code for the county associated with the zip (postal) code. |
| City Name | Required. The name of the city associated with the zip (postal) code. |
| Active Indicator | Indicates whether the postal code is active or inactive. Remove the check mark to deactivate this postal code. |
Table of Contents
Administration > Identity > Identity > Responsibility
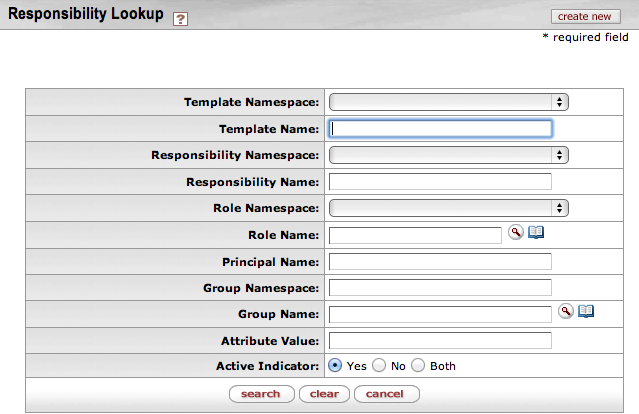
The Responsibility document allows you to create new responsibilities or edit existing ones. The Responsibility Lookup allows you to search for and view existing responsibilities. You can view summarized information about the responsibility detail values as well as the roles with which the responsibility is currently associated.
Only members of a qualified, application specific role can create or modify a Responsibility document and it does not route for approval. Information about the Responsibility document follows detailed information about the Responsibility Lookup below.
Warning
Caution should be exercised when modifying existing responsibilities or adding new ones. Relatively minor changes can result in disruptions to the workflow of documents if made in error. Changes should be made only after sufficient testing with your local configuration.
| Title | Description |
|---|---|
| Template Namespace | Optional. To search for a responsibility based on its template namespace (that is, the name of the application and module to which its responsibility template belongs), select the appropriate namespace. |
| Template Name | Optional. To search for a responsibility based on the name of the template it is based on, enter the appropriate template name. |
| Responsibility Namespace | Optional. To search for a responsibility based on its namespace, select the appropriate responsibility namespace. |
| Responsibility Name | Optional. To search for a responsibility by name, enter its name. |
| Role Namespace | To search for a responsibility based on the namespace of the role to which it is assigned, enter the appropriate role namespace. |
| Role Name | Optional. To search for a responsibility based on the role to which it is assigned, enter the appropriate role name. |
| Principal Name | Optional. To search for a responsibility based on the principals that currently have this responsibility through their association with a role, enter an appropriate principal name. |
| Group Namespace | Optional. To search for a responsibility based on the namespace of groups that have this responsibility through the group's association with a role, enter an appropriate group namespace. |
| Group Name | Optional. To search for a responsibility based on the name of a group that has this responsibility through its association with a role, enter an appropriate group name. |
| Attribute Value | Optional. To find a responsibility based on a specific responsibility detail value associated with it, enter the value. |
| Active Indicatior | Defaults to Yes. Opiton to search for Responsibilities that are active, not ative, or across both. |
The Responsibility results display contains the fields described in the table below.
| Title | Description |
|---|---|
| Actions | Actions allow selection of edit or copy for each responsibility displayed. |
| Template Namespace | The code identifying the application and module the template pertains to. Because responsibilities pertain to workflow, most responsibility templates are associated with the KR-WKFLW (Kuali Rice-Workflow) namespace. |
| Template Name | The template the responsibility is based on. A template usually defines, in a broad sense, what the responsibility is. Since responsibilities normally are normally associated with action requests for user review, most responsibilities have a template name of 'Review. |
| Responsibility Namespace | The code designating the application and module this responsibility is associated with. This code usually corresponds to the namespace of the document type for which the responsibility generates action requests. |
| Responsibility Name | The name of this responsibility. In most cases the responsibility name will be the same as the associated template name ('Review'). Like permission names, responsibility names are not unique. |
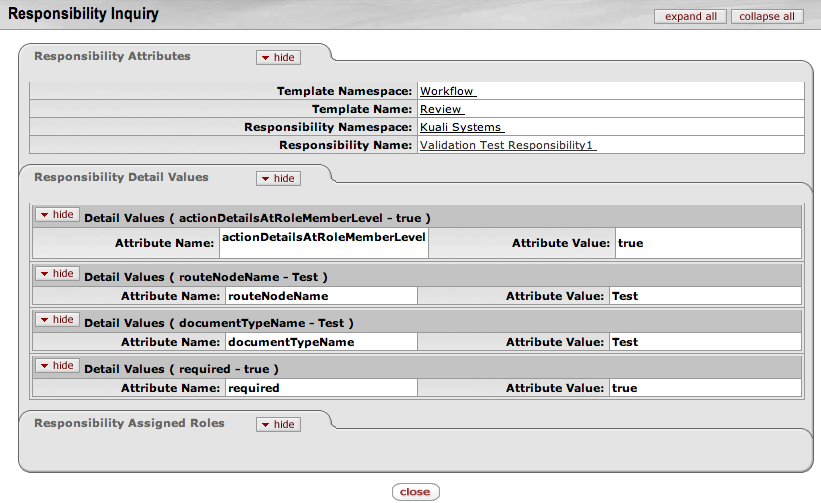
| Responsibility Detail Values | Display-only. Detailed information that defines what document this responsibility generates action requests for, when the requests are generated and how they are handled by workflow. Unlike permissions, which sometimes have different detail values, responsibility detail values generally contain the elements defined below. routeNodeName: The point in a document's workflow routing at which this responsibility generates requests. documentTypeName: The name of the document type for which this responsibility generates action requests. This value may also be a parent document type, which indicates that this responsibility applies to all child documents that contain the appropriate route node. actionDetailsAtRoleMemberLevel: A True or False indicator that defines where the system collects details of this workflow action request. If the value is 'True,' the system collects action details when members are assigned to the role. If the value is 'False,' the system collects action details when this responsibility is assigned to a role. required: A True or False value that indicates whether the system is required to generate an action request for this document type. If the value is 'True' and the document generates no requests associated with this responsibility, then the document will go into exception status. If the value is 'False' and the responsibility generates no action requests, then the document continues to route as normal. |
| Granted to Roles | Lists the namespace and name of roles that have this responsibility. Click on the linked name to view the Role Inquiry. |
To view an Inquiry screen for a responsibility, select the Responsibility Name of the appropriate row in the search results. The Inquiry contains the same information displayed in the search results in a slightly different format.
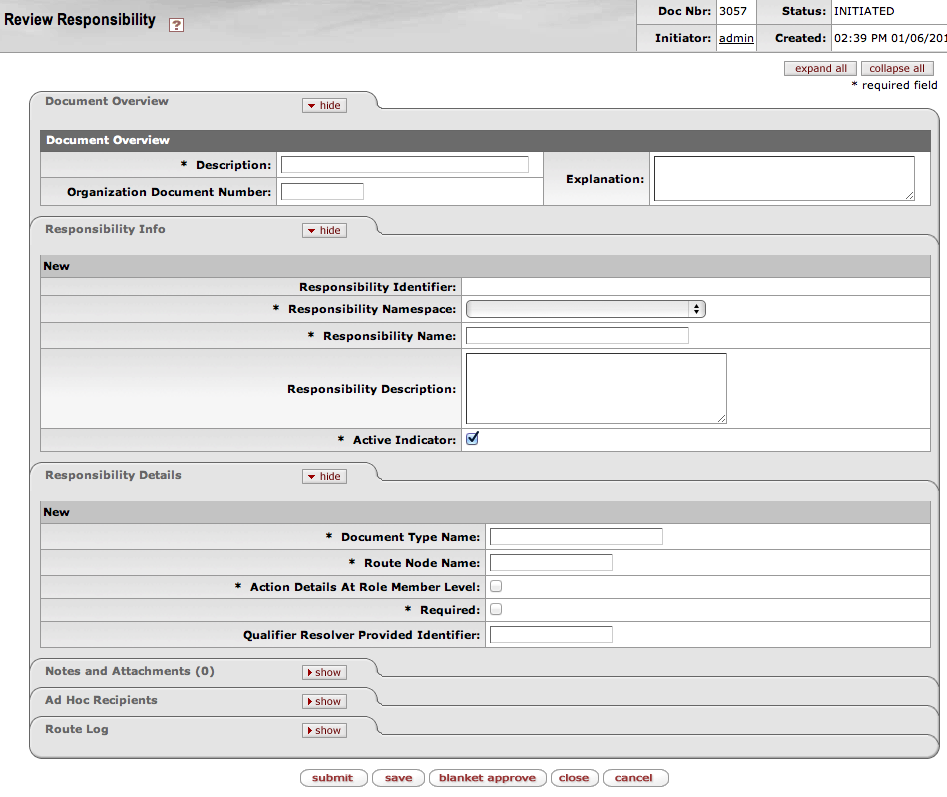
The Responsibility document includes Document Overview, Responsibility Info, and Responsibility Details tabs.
This tab identifies the responsibility with a unique system-assigned ID number, a namespace, name and description.
| Title | Description |
|---|---|
| Responsibility Identifier | Display-only. The unique, system-assigned ID number that identifies this responsibility. |
| Responsibility Namespace | Required. An indicator that associates the responsibility with a particular application and module. |
| Responsibility Name | Required (defaults to 'Review'). A text name identifying this responsibility. Note that this is the only valid value for this document. You cannot use the Responsibility document to establish or modify Responsibilities with the name 'Resolve Exception' -these require a technical resource to modify. |
| Responsibility Description | Optional. Enter a text description of what this responsibility does. |
| Active Indicator | Required (defaults to 'Yes'). Change the default selection if you wish this responsibility to be inactive. Inactive responsibilities will be disregarded by Workflow. |
This tab identifies the document type and route node associated with this responsibility. It also defines other responsibility information such as whether or not the action details reside at the role member level.
| Title | Description |
|---|---|
| Document Type Name | Required. Enter the name of the document type this responsibility is associated with or use the Document Type Lookup to search for and select a value. |
| Route Node Name | Required. The name of the route node at which this responsibility should be invoked. |
| Action Details at Role Member Level | Required (defaults to False). Check this box if you want role members associated with this responsibility to be able to define the type of workflow action they will need to take in order to fulfill the action request it generates. |
| Required | Required (defaults to False). Check this box if you wish documents of this type to go into Exception status if this responsibility does not generate at least one action request. |
| Qualifier Resolver Provided Identifier | Optional. In most cases this field should be blank. It can be used as an additional identifier KIM will use to choose the correct responsibility information for a given doc type. The document type must pass the provided identifier to KIM. |
Table of Contents
Administration > Identity > Identity > Role
The Role document allows you to create a new KIM role and edit an existing role. Each role aggregates a specific set of permissions and responsibilities and allows you to assign members to the role. Rice and Rice Applications contain many existing roles that your institution may want to use as is, but you may also change existing roles and add new ones by using the Role document.
The purpose of each role is defined by its associated permissions and responsibilities. Roles are classified by types that generally indicate the type of permissions and responsibilities with which they can be associated.
Note
The process of creating a new type requires technical assistance. Consequently, KIM does not provide an interface for creating role types.
When you click the Create New button, the system displays the KIM Type Lookup. You must search for and select an existing Type in order for the system to generate a new Role document.
Note
Note that while the KIM Type Lookup is used when creating new groups and roles, not all KIM types are valid for both. When using this Lookup, you may receive different results depending on the KIM types that are valid for the entity you are working with.
The Role document includes Document Overview, Overview, Permissions, Responsibilities, and Assignees tabs.
This tab identifies the role with a unique system-assigned ID number, a namespace and a name. Each role also has a type which tends to match the types of permissions and responsibilities associated with it.
| Title |
Description |
|---|---|
| Role | Display-only. The unique, system-assigned ID number that identifies this role. |
| Type Name | Display-only. Because the role type normally reflects the type of qualifiers this role will need to collect when members are added, this name usually identifies the general types of permissions and responsibilities associated with it. When creating a new role, you must select its type before the system will generate the document. |
| Namespace | Required. An indicator that associates the role with a particular application and module. |
| Role Name | Required. The common descriptive name by which this role is known. |
| Active | Check this box to indicate that this role is active and is, therefore, to be included by KIM when evaluating permissions and responsibilities. Uncheck the box to indicate that this role is inactive |
| Description | Optional. A longer text box for describing the needs or uses of the role. |
This tab identifies the permissions associated with this role. Permissions authorize specific actions in the system with which they are associated. A role can have any number of permissions (including no permissions) associated with it.
| Title | Description |
|---|---|
| Add Permission ID | To add a permission to this role, enter the appropriate permission ID or search for and select a value using the Permission lookup |
| Add | Click the Add button to add the selected permission to this Role document. |
After you add a permission to the document, the system displays additional information about the permission.
Note
Permissions cannot be edited via the Role document. Use the Permission document to perform this function.
| Title | Description |
|---|---|
| Permission Namespace | Display-only. The Namespace identifies the application and module associated with this permission. |
| Permission Identifier | Display-only. The unique system-assigned ID number for this permission. |
| Permission Name | Display-only. The descriptive name of this permission. This often identifies, in general terms, what the permission authorizes. |
| Permission Detail Values | Display-only. The document types, tabs and/or fields this permission authorizes. Not all permissions have detail values. |
| Active Indicator | Display-only. Indicator showing whether this permission is active within the system or not. |
| Actions | Click the Delete button to remove this permission from the role. You may delete a permission only if it has not yet been saved to the database (i.e., you added it to this role but have not yet submitted the document). |
This tab identifies the responsibilities associated with this role. Responsibilities define the workflow actions that will be requested of the role. A role can have any number of responsibilities (including none) associated with it.
| Title | Description |
|---|---|
| Add Responsibility ID | To add a responsibility to this role enter the responsibility ID or search for and select a value using the Responsibility lookup |
| Add | Click the Add button to add the selected responsibility to this Role document. |
After you add a responsibility to the document, the system displays additional information about this responsibility.
Note
Responsibilities cannot generally be edited via the Role document, but some responsibilities have associated attributes that you must define at the role level.
| Title | Description |
|---|---|
| Responsibility Namespace | Display-only. The Namespace identifies the application and module associated with this responsibility. |
| Responsibility Identifier | Display-only. The unique system-assigned ID number identifying this responsibility |
| Responsibility Name | Display-only. The descriptive name of this responsibility. For most Responsibilities the name is 'Review. |
| Responsibility Detail Values | Display-only. This identifies more specific information about the responsibility. Responsibility Detail Values are formatted in a standard way with the following attributes delimited by commas: Route Node: The workflow route level at which this responsibility is invoked. Document Type: The document type for which this responsibility generates workflow requests. Action Details at Role Member Level: A True or False indicator that defines where the details of this workflow action request are defined. If the value is 'True' then action details will be collected when Members are assigned to the role. If the value is 'False' then the action details must be collected when this responsibility is assigned to a role (see Assigning Action Detail Values elsewhere in this section.) Required: Indicates if the routing represented by this responsibility should be required. If this is set to True and the responsibility fails to generate an action request (perhaps because no one is assigned to the associated Role) then the document will go into Exception status. If this routing is optional this value will be False and the document will simply skip this responsibility if no requests are generated. |
| Active Indicator | Display-only. Indicator showing whether this responsibility is active within the system or not. |
| Actions | Click the Delete button to remove this responsibility from this role. You can delete a responsibility only if it has not yet been saved to the database (i.e., you have added it to this role but have not yet submitted the document). |
When adding a responsibility with an Action Detail Values at Role Member Level value of 'False,' you must complete additional fields in a Responsibility Action sub-section. The system displays this section immediately beneath the responsibility you've just added.
The fields in this sub-section define the type of action requests generated for and the general workflow behavior associated with this responsibility. Entries in these fields cause the system to generate the same type of action requests for all members of this role and handle actions by all members in the same way.
| Title | Description |
|---|---|
| Name | Display-only. The namespace and name of the responsibility associated with these action details. |
| Action Type Code | Required. The type of action request that the system is to generate for this responsibility. Options include Approve, FYI and Acknowledge. |
| Priority Number | Optional. If multiple requests are generated at the route node specified on this responsibility, this value determines in the order in which the system will generate these requests. The system processes requests with lower priority numbers before processing requests with higher numbers. Requests with no number are treated as a priority of 1. |
| Action Policy Code | Required. This value determines what happens if multiple members of this role receive the same action request and one of them takes the action. This currently only applies in situations where a single action request is generated to multiple role members (i.e. the action details exist at the role level) or a role is assigned to another role and these nested role members receive an action request. For example, if a role with a responsibility with action details defined at the role level, has three members assigned, all of these members receive the action request defined here; this code determines what the system does when one of them takes action on the document. A value of FIRST indicates that the first role member to take action on the document will automatically clear all the requests for this responsibility that may be in other role member's action lists. A value of ALL indicates that each role member must take individual action to clear his or her requests. |
| Force Action | Check the box to indicate that each user must take this action for this request even if the user has already previously taken action on this document. Leaving the box unchecked allows a request to be immediately fulfilled if the role member has previously taken action on this specific document. |
This tab contains all members who belong to this role. You may also use the tab to add new members and edit the values associated with existing members.
| Title | Description |
|---|---|
| Type Code | Required. Role members can be principals (as defined on the Person document), groups or other roles. Select the type of member you want to add to this Role. |
| Member Identifier | Required. Enter the ID of the member you want to add or use the lookup to search for and select a valid value. The lookup directs you to the Principal, Group or Role lookup based on your Member Type Code selection. |
| Namespace Cd | Display-only. Identifies the namespace code associated with this role member. Note that only groups and roles will display a namespace code. |
| Name | Display-only. Identifies the name of the member being assigned to this role. |
| Full Name | Display-only. Identifies the default, full name of the member being assigned to this role. |
| Active From Date | Optional. Allows you to qualify this member's association with this role by date. Entering a from date will define the earliest date on which this member is a valid member of this role. |
| Active To Date | Optional. Allows you to deactivate a member's association with a role on a specific date. The date you enter defines the date the user is no longer a member of this role. You cannot delete or inactivate role members. To remove a member from a role, specify an active to date. |
| Actions | Click the Add button to add this member to the role. |
Note
Additional fields may be required, such as Chart Code or Organization Code, depending on the role type selected.
Caution
Note that when assigning roles to other roles (nesting roles), qualifying values are not required. Some roles in applications may contain special logic to derive the required qualifiers from the nested role itself without qualifiers being specified. You may always specify qualifying values for a nested role and should do so unless you know the role being assigned contains logic to derive the qualifiers from the nested role. Roles without the proper qualifiers can cause problems throughout your applications. Please consult with an application technical resource if you are unsure of whether or not to provide qualifying values when assigning a role to another role.
This tab identifies identifies delegates associated with the role. Delegates are users that a member of this role has authorized to have the same permissions and take the same actions as the member is authorized to take.
The Assignees Tab dealing with Delegates is slightly different as detailed in the following table. Note that if the members of a role require qualifying values, the delegation requires these values as well. In most cases, delegates must have the same qualifiers as the role member they are associated with.
| Title | Description |
|---|---|
| Role Member | Required. Use the lookup to search for and return the member of this role you wish to create a delegate for. |
| Member Type Code | Required. Delegates may be principals (as defined on the Person document), groups or other roles. Select the type of delegate you want to add to this role. |
| Member Identifier | Required. Enter the ID that identifies the delegate you want to add or use the lookup to search for and select a valid value. Note that the lookup will direct you to the Principal, Group or Role lookup based on your Member Type Code selection. |
| Member Namespace Code | Display-only. Identifies the namespace associated with the selected delegate. Note that only delegations to groups or roles will display a member namespace code. |
| Member Name | Display-only. Shows the name of the selected delegate. |
| Active From Date | Optional. If you want you can qualify this delegate's association with this role by date. Entering a from date will define the earliest date on which this delegate is a valid delegate for this role. |
| Active To Date | Optional. Allows you to deactivate a delegate's association with a role on a specific date. The date you enter defines the date on which the user is no longer a delegate for this role. You cannot delete or deactivate delegates. To remove a delegate from a role, enter an active to date. |
| Delegation Type Code | Required. Select 'Secondary' or 'Primary. Note that this selection only applies to responsibilities associated with the role and indicates if the delegate will receive documents directly in their action list (Primary) or may choose to view documents in their action list using the secondary delegate dropdown (Secondary). |
| Actions | Click the Add button to add this delegate to the role. |
Note
Additional fields may be required, such as Chart Code, depending on the role type selected.
Table of Contents
Administration > Identity > Locations > State
The State Maintenance document defines the U.S. Postal Service codes used to identify states. When the user chooses the State option from the Administration menu tab, the system displays the State Code Lookup screen. After the user selects a state code or clicks the create new button, the system presents the State Maintenance document.
The State Maintenance document includes the Edit States tab.
In edit mode, the Edit States tab presents a display-only set of fields on the left and editable fields on the right in which the user may enter changes.
| Title | Description |
|---|---|
| Country Code | A unique identifying code assigned to the country of which this state is a part. |
| State Abbreviation | The state abbreviation. |
| State Name | Required. The full name of the state associated with the state abbreviation. |
| Active Indicator | Indicates whether the state code is active or inactive. Remove the check mark to deactivate the state code. |

