The Campus Lookup screen provides detailed information about the campuses defined in your system.
To get to the Campus Lookup function, click Campus on the Rice Administration Menu.
This takes you to the Campus Lookup screen where you have the option to create a new Campus by clicking the create new button in the upper right corner under the Login box or to perform a search of campuses already defined in Rice. If you choose to create a new Campus, KIM displays the CampusMaintenanceDocument, which is discussed in the Campus Maintenance section below.
Another way to get to the Campus Lookup screen is to click the Field Lookup button next to the Campus Code field on any screen where it appears. If you do this, you see the Campus Lookup screen without the create new button.
Enter information in one or more of the fields on the Campus Lookup screen and then click the search button to see a list of Campuses that fit your search.
Note
Leave all of the search fields blank to get a list of all Campuses.
If you did NOT begin your Campus Lookup from the Administration menu, your list of search results looks like this:
If you did begin your search from the Administration menu, you see edit and copy as links for each Campus instead of return value. These options are explained in the Campus Maintenance section below.
Click one of the underlined column titles on the search results list to sort the list by that column. Click it again to sort the list in the opposite order.
You can also export the search results list in CSV, spreadsheet, or XML format. Click the appropriate link at the bottom of the search results list to do this.
If you did NOT begin your Campus Lookup from the Administration menu, the Return Value column has a return value link for each campus. Click this return value link for the Campus Code for which you need information and Rice goes back to the screen you were on before and automatically enters the information about that campus on the screen for you.
You can find information about the fields on this screen under Edit Campus Tab in the Campus Maintenance section of this User Guide.
Display this screen by clicking Campus Code in the search results list after you do a Campus Lookup:
You can find information about the fields on this screen in the Edit Campus Tab section under Campus Maintenance, below.
Use a Campus document for each of the different fiscal and physical operating entities of an institution. A campus may be identified as a fiscal entity, a physical entity, or both.
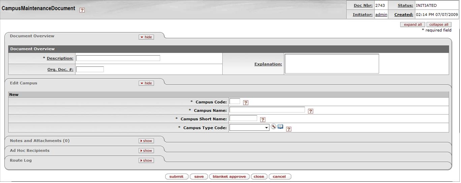
Click Campus on the Rice Administration menu for KIM to display the Campus Lookup screen, then click the create new button. KIM displays the CampusMaintenanceDocument.
The fields on this document are described in the Document Layout section below. Enter information in all required fields and other fields appropriate to this campus, then click the save button to create your new Campus.
If you want to edit information about an existing Campus:
Begin at the Administration menu and do a Campus Lookup to find the campus you need to edit.
On the list of search results, click edit for that Campus.
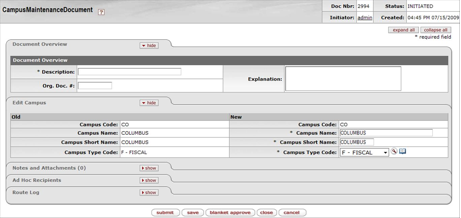
KIM displays the CampusMaintenanceDocument for that campus:
Change the information in the fields that you need to edit, then click the save button at the bottom of the document.
The Campus Maintenance Document has five sections:
Document Overview
Edit Campus
Notes and Attachments
Ad Hoc Recipients
Route Log
You can find documentation on all of the tabs in this document except Edit Campus in the Common Features and Functions section of the User Guide.
In edit mode, the Edit Campus Tab presents a display-only set of fields on the left and editable fields on the right in which you may enter changes. When this tab is displayed in the Create New process, only the editable fields are displayed.
Table 4.29. Campus Maintenance Document: Edit Campus Attributes
| Field Name | Description |
|---|---|
| Campus Code | The unique identifying code assigned to a campus. |
| Campus Name | Required. The familiar name for a specific university campus. |
| Campus Short Name | Required. An abbreviated name for a specific campus; used in reports in which space is limited. |
| Campus Type Code | Required. Indicates the type of campus. Valid values are:
|
The Campus Type Lookup function displays detailed information about specific Campus Type Codes.
To display this screen:
Go to the Campus Lookup screen.
Select a valid Campus Type Code from the dropdown list.
Click the Field Lookup button next to the Campus Type Code field.
There are two ways to search for information using this screen:
Enter information in one or more fields on the Campus Type Lookup screen and then click the Search button. This displays a list of campus types that match the information you entered, similar to the list in the screen print just below.
Leave the fields on the Campus Type Lookup screen blank and click the Search button. This displays a list of all available campus types, similar to this:
You can export the search results list in CSV, spreadsheet, or XML format. Click the appropriate link at the bottom of the search results list to do this.
The Return Value column has a return value link for each Campus Type Code. Click this return value link for the Campus Type Code you need, and Kuali goes back to the screen you were on before and automatically enters the information about that Campus Type Code on the screen for you.
Field information on this screen can be found in the Edit Campus Tab section above.
Use the Campus Type Inquiry screen to see the Campus Type Code and Name and the Active Indicator for a particular campus.
To display this screen:
Go to the Campus Lookup screen.
Select a valid Campus Type Code from the dropdown list.
Click the Inquiry button next to the Campus Type Code field.
Field information on this screen can be found in the Edit Campus Tab section above.
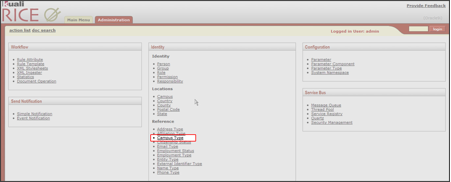
To create or perform maintenance on a Campus Type, click Campus Type on the Administration Menu.
From the Campus Type Lookup screen, you may either create a new Campus Type or search for an existing one.
Note
If you don’t have a create new button in the top right corner of the Campus Type Lookup screen, you did not open the screen from the Administration menu.
When you search for and find an existing Campus Type (see instructions above), you have the option to edit or copy it. After you click the create new, edit, or copy button, KIM displays the Campus Type Maintenance document. This document lets you add and update Campus Types.
The CampusTypeMaintenance document contains four standard tabs and the Edit Campus Type tab. The standard tabs are documented in the Common Features and Functions section of this User Guide. The Edit Campus Type tab is described below.
The Edit Campus Type tab displays the fields that are unique to each Campus Type.
Table 4.30. Campus Maintenance Document: Edit Campus Type Attributes
| Field | Description |
|---|---|
| Campus Type Code | Required. The code used by Rice to identify this type of Campus. Valid values are:
|
| Campus Type Name | Required. The descriptive name for this Campus Type |
| Active Indicator | Required. Indicates whether the Campus Code is active or inactive. Remove the checkmark to deactivate a Campus Type. Removing the checkmark will also remove this Campus Type from the dropdown list on Campus documents. |
The Postal Code Lookup screen provides detailed information about the postal codes (zip codes) defined in KIM.
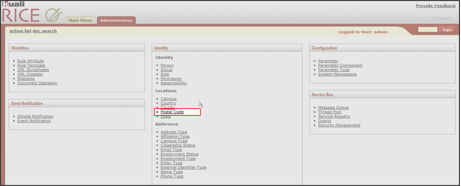
You access the Postal Code Lookup screen by clicking Postal Code in the Identity section of the Administration menu.
A search produces a list similar to the example below.
Note
You may also enter a city and state to search for the associated zip code(s).
Descriptions of the fields in this list can be found in the Postal Code Maintenance section below.
Clicking edit takes you to the Postal Code Maintenance screen.
Clicking copy also takes you to the Postal Code Maintenance screen and populates some of the fields in the Edit Postal Codes tab with information from the item you copied.
Clicking a Country Code from the list takes you to the Country Code Inquiry screen.
Clicking a Postal Code from the list takes you to the Postal Code Inquiry screen.
Clicking a State Code from the list takes you to the State Code Inquiry screen.
Information about these fields can be found in the Postal Code Maintenance section below.
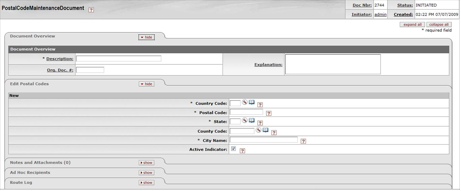
The Postal Code Maintenance Document defines the postal (zip) code by city and state. When you click the Postal Code option on the Administration screen, KIM displays the Postal Code Lookup screen. At this point you can perform a lookup and select a postal code to edit or click the create new button, KIM displays the PostalCodeMaintenanceDocument screen.
To create a new Postal Code, enter information in the required fields in the Document Overview and Edit Postal Codes tabs, then click the submit button at the bottom of the screen.
All of the tabs on this screen are standard, except the Edit Postal Codes tab. You can find information on standard tabs in the Common Features and Functions section of this User Guide.
In edit mode, the Edit Postal Codes tab presents a display-only set of fields on the left and editable fields on the right, in which you may enter changes. The tab looks like this:
In create mode, the Edit Postal Codes tab presents only a set of fields in which you may enter information.
Table 4.31. Postal Code Maintenance Document: Create Postal Codes Attributes
| Field | Description |
|---|---|
| Country Code | The country code for the country associated with the zip (postal) code |
| Postal Code | A Postal Service zip code |
| State | Required. The state associated with the postal (zip) code |
| County Code | The KIM identifying code for the county associated with the postal (zip) code |
| City Name | Required. The name of the city associated with the postal (zip) code |
| Active Indicator | Indicates whether the postal code is active or inactive. Remove the checkmark to deactivate this postal code. |
The County Lookup screen provides information on counties defined in KIM.
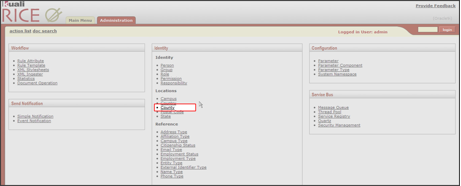
Access the County Code Lookup screen by clicking County in the Identity section of the Administration Menu.
Click the create new button to go to the County Maintenance function, where you can create a new County in Rice.
Conducting a search from this screen returns a list similar to this:
Clicking the edit or copy link in the Action column allows you to edit the county information you selected or to create a new county in Rice, beginning with a copy of the information from this county. This link takes you to the County Maintenance Document.
Clicking a Country Code takes you to the Country Inquiry function for that code.
Clicking a County Code takes you to the County Inquiry function for that code.
Clicking a State code takes you to the State Inquiry function for that code.
This screen provides a snapshot of the important information about a County:
You can find information about the fields on this screen in the County Maintenance section below.
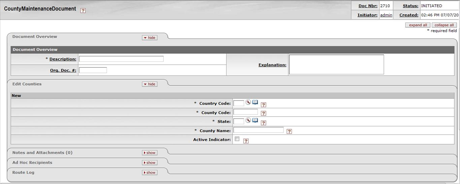
Use the County Maintenance document to assign specific identifying codes to county names. When you click the County option on the Administration screen, KIM displays the County Lookup screen. After you select to edit a county or click the create new button, KIM displays the CountyMaintenanceDocument screen:
To create a new County, enter valid information in the required fields in the Document Overview and Edit Counties tabs, then click the Submit button at the bottom of the screen.
All of the tabs on this screen are standard, except the Edit Counties tab. Information on standard tabs can be found in the Common Features and Functions section of this User Guide.
In edit mode, the Edit Counties tab presents a display-only set of fields on the left and editable fields on the right, in which you may enter changes. The tab looks like this:
In create mode, the Edit Counties tab presents only a set of fields in which you may enter information.
Table 4.32. County Maintenance Document: Create County Attributes
| Field | Description |
|---|---|
| Country Code | Required. The country code for the country in which this county is located. |
| County Code | Required. A unique identifying code assigned to this county. |
| State | Required. The state abbreviation assigned by the U.S. Postal Service to the state in which this county is located. |
| County Name | Required. The actual name of this county. |
| Active Indicator | Optional. Indicates whether the county code is active or inactive. Remove the check mark to deactivate this county code. |
The State Code Lookup function provides a convenient way to find key information pertaining to states that are defined in Rice.
You can display the State Code Lookup screen by clicking State on the Rice Administration menu.
Enter information in one or more of the fields on the State Code Lookup screen and then click the search button to see a list of States that fit your criteria.
Note
Leave all of the search fields blank to display a list of all States.
Click edit or copy in the Actions column to go to the StateMaintenanceDocument screen, where you can edit the existing State or use a copy of it as a base for establishing a new State in KIM.
Click an underlined Country Code to go to the Country Inquiry screen for that Country Code.
You can also export the search results list in CSV, spreadsheet, or XML format. Click the appropriate link at the bottom of the search results list to do this.
The State Inquiry screen provides a snapshot of the most important information defined in Rice for a State.
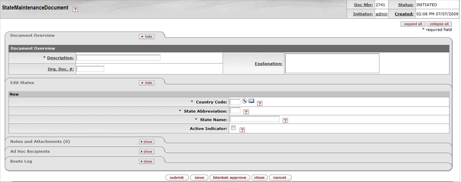
The State document defines the U.S. Postal Service codes used to identify states. When you choose the State option on the Administration menu, KIM displays the State Code Lookup screen. After you click edit for a State or click the create new button, KIM displays the StateMaintenanceDocument.
This screen contains five tabs:
Document Overview
Edit States
Notes and Attachments
Ad Hoc Recipients
Route Log
The Edit States tab is unique to this screen and is described below. The other four tabs are described in the Common Features and Functions section of this User Guide.
The Edit States tab can be displayed with two different sets of fields. Which you see depends on whether you are creating a new State or editing an existing State.
The version of the tab above is displayed when you are creating a new State.
Pictured above in edit mode, the Edit States tab presents a display-only set of fields on the left and editable fields on the right, in which you may enter changes.
Table 4.33. States Maintenance Document: Edit States Attributes
| Field | Description |
|---|---|
| Country Code | A unique identifying code assigned to a country Required for a new State Display-only when editing a State |
| State Abbreviation | The state abbreviation assigned by the U.S. Postal Service Required for a new State Display-only when editing a State |
| State Name | The full name of the state Required for a new State When editing, this field can be modified but not deleted. |
| Active Indicator | Optional. Indicates whether the State code is active or inactive. Remove the checkmark to deactivate the State code. |
This screen provides information about Country Codes and is accessed directly off the Administration menu.
Performing a search on a Country Code produces results similar to this:
Selecting edit or copy in the Actions column takes you to the Country Maintenance Document screen, where you can edit the existing Country Code or use a copy of it as a base for establishing a new Country Code.
Selecting an underlined Country Code takes you to the Country Inquiry screen for that Country Code.
You can also export the search results list in CSV, spreadsheet, or XML format. Click the appropriate link at the bottom of the search results list to do this.
The Country Inquiry screen displays details about a Country in Rice. You get to this screen by clicking a Country Code in the list of search results after you do a Country Lookup.
The Country document is used to assign specific identifying codes to country names.
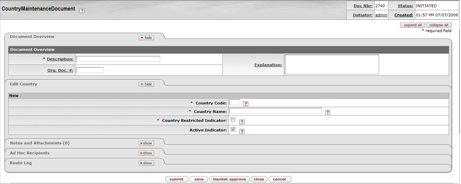
When you choose the Country option on the Administration menu, KIM displays the Country Lookup screen. After you select a country or click the create new button, KIM presents the CountryMaintenanceDocument screen.
All of the tabs in the CountryMaintenanceDocument are standard with the exception of the Edit Country tab. Documentation on standard tabs can be found in the Common Features and Functions section of the User Guide.
Table 4.34. Country Maintenance Document: Edit Country Attributes
| Field | Description |
|---|---|
| Country Code | A unique identifying code assigned to a country. |
| Country Name | Required. The actual name of a specific country. |
| Country Restricted Indicator | Required. Check the box to indicate if the country is restricted from use in procurement. Clear the check box if it is not restricted. |
| Active Indicator | Indicates whether this country code is active or inactive in Rice. Remove the checkmark to deactivate this country code. |


