The Action List page includes your:
Action List
Outbox
Action List Filter
Preferences
In the Kuali Rice portal, the Action List button is available in the upper left hand corner of the screen on most pages.
Your institution may have KEW links inside other applications, such as Kuali Financial Systems (KFS). KFS may display an Action List button at the top left of the KFS page like this:
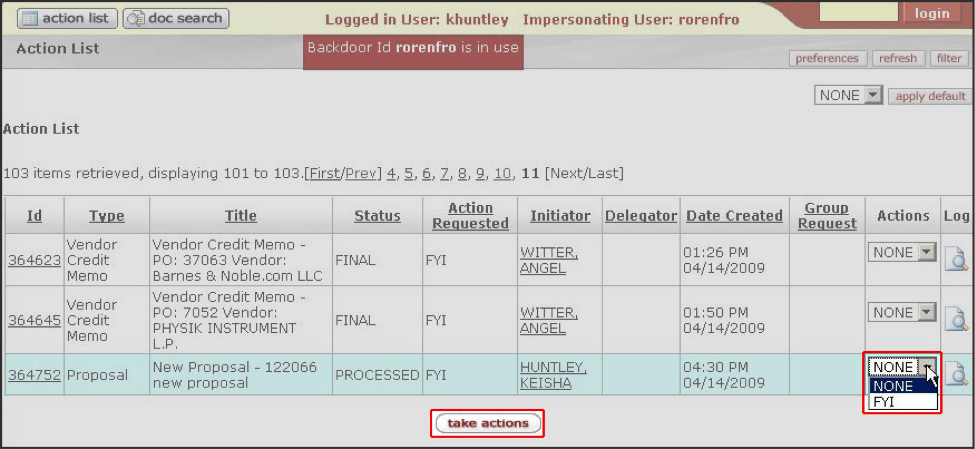
Clicking an Action List link or button displays your Action List page. This is a sample KEW Action List; your institution’s may look somewhat different:
On your Action List page is the list of documents on which you need to take an action, such as Approve, Disapprove, or Acknowledge, and those which you have already completed. These are your action requests. Action requests that someone has delegated to you are also listed on your Action List page. Note: You can only see the Action List for the person who is logged into KEW or another Kuali application.
You can click the title at the top of a column to sort all of your action requests by the information in that column. For example, if you click the column title, Type, KEW sorts your action requests by their Type.
On your Action List, you can see this information about the documents on which you need to take action:
Id: A unique, system-generated ID for each document
When you click a Document Id, KEW displays the actions you can take on this document, such as Blanket Approve, Complete, Approve, Disapprove, and Cancel. The actions you can take are determined by the document’s Type.
Based on your institution’s setup, you may see a Show button in the Document Id column. Click the Show button to see a summary of the document.
Type: The document’s type determines the actions you can take on it.
Title: The title that the initiator gives to the document. Your institution may have standards for document titles that give you specific information about that document.
Status: The current location of the document in its routing path. The Status may be:
Approved: These documents have been approved by all required reviewers and are waiting for additional post-processing.
Cancelled: These documents have been stopped. The document’s initiator can Cancel it before routing begins, or a reviewer of the document can cancel it after routing begins. When a document is cancelled, routing stops; it is not sent to another Action List.
Disapproved: These documents have been disapproved by at least one reviewer. Routing has stopped for these documents.
Enroute: Routing is in progress on these documents and an action request is waiting for someone to take action.
Exception: A routing exception has occurred on this document. Someone with the appropriate KIM Permission (or someone from the Exception Group for this Document Type, although this feature is deprecated) must take action on this document, and it has been sent to the Action List of this workgroup.
Initiated: A user or a process has created this document, but it has not yet been routed to anyone’s Action List.
Processed: These documents have been approved by all required users, and their post-processing is completed. They may be waiting for Acknowledgements. No further action is needed on these documents.
Saved: These documents have been saved for later work. An author (initiator) can save a document before routing begins, or a reviewer can save a document before he or she takes action on it. When someone saves a document, the document goes on that person’s Action List.
Final: All required approvals and all acknowledgements have been received on these documents. No changes are allowed to a document that is in Final status.
Action Requested: The action that you have been asked to take on a document, such as to Approve it.
Initiator: The person who created this document in KEW. Click the initiator’s name to see information about the initiator, including (depending on the initiator's privacy preferences):
Principal Id and Name
Entity Id
Affiliations
Names
Phone Numbers
Email Addresses
Group and Role memberships
Delegator: If someone else has given authority in KEW for you to take action on their action requests, their name appears in this column. KEW displays both primary and secondary delegates this way on your Action List. There are two types of delegate in KEW, you may be a Primary Delegate or a Secondary Delegate:
Primary Delegate: The delegator turns over his or her full authority to a primary delegate. The Action Requests for the delegator only appear in the Action List of the primary delegate.
Secondary Delegate: The secondary delegate acts as a temporary backup and has the same authority as the delegator when the delegator is not available to take action. Documents appear in the Action Lists of both the delegator and the delegate. When either acts on the document, it disappears from both Action Lists. People often have a secondary delegate who takes care of their action requests when they are out of the office.
Date Created: The date and time the document for this action request was created.
Group Request: When you receive an action request because you are part of a group, KEW displays the name of the group in this column. Only one member of a group is required to complete an action request. Click the group name on your Action List to see more details, including:
Group Id
Group Name
Group Active Indicator
Group Members and their user names
Actions: For documents that you receive only for your information (they don’t require that you take any further action), there is a dropdown menu in the Actions column. You can use this menu to agree that you’ve received the document for information purposes: Select FYI, then click the Take Actions button at the bottom of the page.
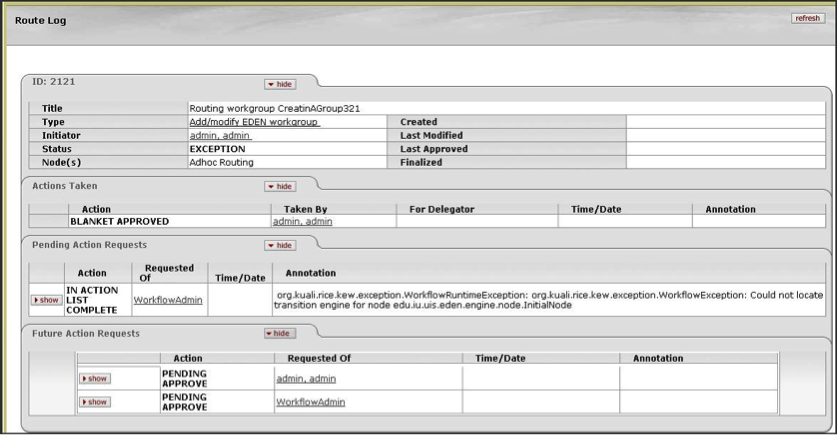
Log: (also known as the Route Log) Click the paper/magnifying glass icon in the Log column to display the Route Log page. This page has details about the routing path and Actions Taken on this document. Learn more about this information in the Route Log Guide. A sample Route Log page:
If enabled for a particular document, messages can also be logged through the route log tab (or page). This allows users to add a deferral message or other message that will be reflected in the routing without taking an action on the document.
This function is enabled by KIM permissions. These permissions have template 'Add Message to Route Log' which takes a document type name as a detail. The bootstrap dataset contains one permission with this template and document type detail 'KualiDocument', however this permission is not granted to any role. This means the functionality will be disabled until the permission is assigned or another permission record with this template and for another document type is created and assigned. When matching permissions for a particular document type the document type hierarchy is considered. Permission records for children document types will override any permission record for its parents.
For example, if we wanted to enable the feature on all KualiDocuments except document type 'Foo', we would first grant the permission with document type detail 'KualiDocument' to a role. Then we would create an additional permission with template 'Add Message to Route Log' and document type detail 'Foo'. For the second permission we do not assign any roles.
By granting these permission(s) to one of the derived workflow roles we can enable this feature to users who have active routing requests. Examples of such roles are KR-WKFLW Approve Request Recipient and KR-WKFLW Acknowledge Request Recipient.
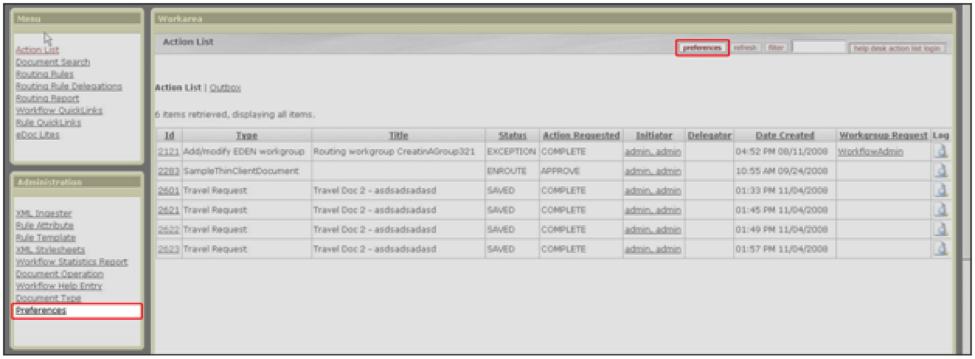
You can customize the appearance and features of your Action List using the Action List Preferences page on KEW. To display this page, click the Preferences button at the top of the Action List page or click the User Preferences link in the Workflow pane of the Main Menu tab. Action List page:
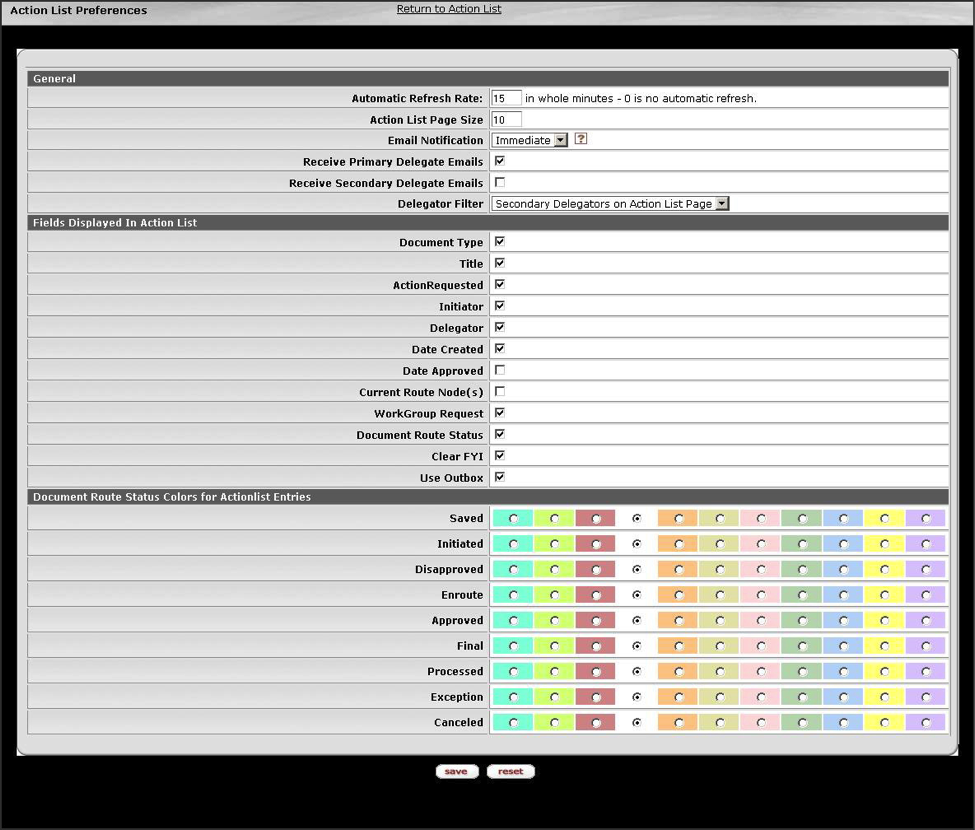
This displays the Action List Preferences page, where you can make choices about how KEW displays and refreshes (updates) your Action List and about how and when you receive email reminders about your new action requests:
The Action List Preferences page has three sections:
In the General section of the Action List Preferences page, you can set the Automatic Refresh Rate for your Action List. Your action requests come in from the server and your Actions Taken are sent to the server each time KEW refreshes (updates) your Action List page. You only see changes to your Action List when KEW refreshes it.
Depending on the network and computers at your workplace, your computer may or may not slow down when KEW refreshes your Action List. If a refresh slows down your computer, you may decide to set the Automatic Refresh Rate for a longer period, such as 10 or 15 minutes.
The Action List Page Size tells KEW how many action requests to display at once on your Action List page.
KEW can automatically send a reminder email to you when get new documents on your Action List. KEW permits you to choose to get email reminders on one of these schedules:
None (KEW won’t send you any email reminders for your Action List.)
Daily (If you have any new action requests, KEW sends you an email reminder once a day.)
Weekly (If you have any new action requests, KEW sends you an email reminder once a week.)
Immediately (KEW sends you an email reminder as soon as you receive a new action request on a document. This is the default – the setting when you start to use KEW.)
The next two fields on the Action List Preferences page allow you to choose whether or not you receive email reminders when action requests come to you because you are the delegate of another person in KEW. Placing a checkmark in the box tells KEW to send you email reminders in each situation.
The Delegator Filter field lets you decide where to show action requests for which you are a secondary delegate. You can choose to have KEW display these action requests on your Action List page or not, using this dropdown menu. If you do not display action requests on which you are the Secondary Delegate on your Action List page, you can only see them on a Filter Page (see Filter, below).
You determine which fields are displayed on your Action List page using this section of the Action List Preferences page. Place a checkmark in the box next to fields that you want to display on your Action List page. (Click the box to checkmark it and click it again to un-checkmark it, and vice versa.)
In this section of the Action List Preferences page, you can choose a color for each different Status of action requests. This can help you quickly find action requests on which you need to take action.
For example, if you set these colors for these routing status levels:
Green for Saved status
Red for Approved status
Blue for Exception status
Your Action List Preferences page looks like this:
Click the Save button at the bottom of the page to make these changes in your Action List.
Action Lists your color changes by Status:
Remember, all of these preferences and settings are on your Action List Preferences page.
As described above, you can use the Action List Preferences page to tell KEW to automatically update (refresh) the information on your Action List on a regular schedule, such as every 15 minutes. You can also click the Refresh button near the top of your Action List page to update the page at any time.
If you have a large Action List, the Filter function can help you by displaying only action requests of certain types. To use the Filter function, click the Filter button in the top right corner of your Action List page:
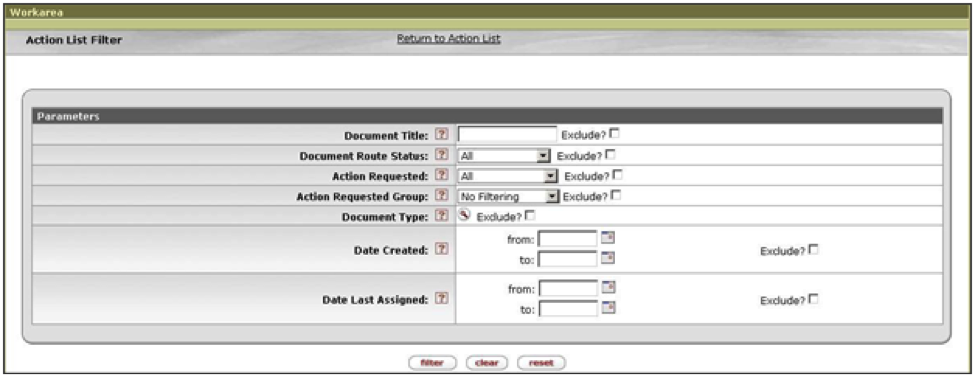
This displays the Action List Filter page:
Each of the fields on the Action List Filter page is called a criteria. You can choose to display only the action requests that are the same as one or more criteria, or you can choose to display all action requests except those that are the same as one or more criteria. You can also use some criteria to display action requests and some to not display action requests.
If you want the filter to display action requests that meet one or more criteria, then just enter those criteria in the appropriate fields (field descriptions are below). Leave the Exclude? checkboxes blank for these criteria.
If you want the filter to display only the action requests that don’t match one or more criteria, then checkmark the Exclude? checkbox for each of these criteria. This tells KEW not to display action requests that match these criteria.
When you’ve selected the criteria you want to use in your filter, click the Filter button at the bottom of the Action List Filter page. KEW displays your Action List filtered in the way you requested.
To display all action requests on your Action List page again, click the Clear button at the bottom of the Action List Filter page or the Clear Filter button at the top of your Action List page.
To undo your most recent filter criteria, click the Reset button at the bottom of the Action List Filter page. This returns you to the list of Action Requests that met your previous set of filter criteria.
Note
Note: The filter is case sensitive – use upper and lower case (capital letters and small letters) exactly the same as the item you’re filtering. For example, if an actual document title is Travel Doc 2, then you must type this in the Document Title field with a capital letter at the beginning of each word, exactly like the real document title. If you type it as travel doc 2, then the filter won’t recognize this document because the capitalization is different.
Document Title: The title given to the document when it was created.
Document Route Status: The current routing Status of the document. You may filter for documents with these routing statuses:
All: Selecting All causes KEW to display all documents that have been submitted for routing. If you select All and Exclude (for the Document Route Status criteria), then KEW displays only documents that are in Initiated status.
Note
Documents that are in Initiated Status have not yet been submitted for routing.
Approved
Disapproved
Enroute
Exception
Processed
Saved
Action Requested: The action you need to take on a document. You may filter your action requests by these Action Requests:
All: matches all Action Requested types
Acknowledge
Approve
Complete
FYI
Action Requested Group: You may filter your action requests by the group to which the action requests were sent. For example, if you are a member of two groups, you might use this filter to display only the action requests you’ve received as part of one of those groups.
Document Type: Use this to filter based on Document Type.
The document’s type tells KEW who needs to take what action on that document. This determines where KEW routes the document.
You can use the Type filter to display only documents of one type, or to display all of your documents except one type. Click the checkbox next to Exclude? if you do NOT want to display the selected Type.
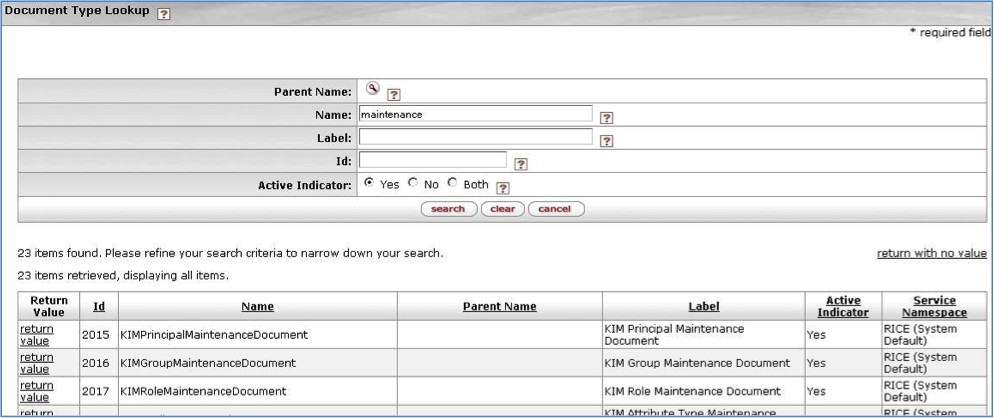
To choose a Type for your filter, click the magnifying glass icon on the Type row. This takes you to the Document Type Lookup page.
Enter information in one or more of these fields to find the Document Type you need for your filter, then click the Search button. This displays a list of document Types that match your search. Find the one you need, and click return value for that Type. This returns you to the previous page and automatically enters it in the Type field. For example, in the screenshot below you searched for a Type with maintenance in the Name. If you want to use the first one in the list, KIM Principal Maintenance Document, click return value in the row for KIM Principal Maintenance Document.
Note
If you do not find the Type that you need, you can either do another search or click the link for return with no value to return to the Action List Filter page without a Type.
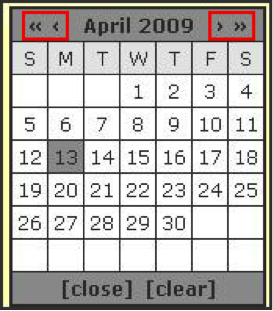
Date Created: Use this filter criteria to select only action requests for documents that were (or were not) created between dates that you choose. You must enter each date in this format: MM/DD/YYYY, e.g., 12/25/2000 for December 25, 2000. Instead of typing the date in the field, you can click the small Calendar icon next to the date field and then click the date you need from the calendar. When you click a date on the calendar, the small calendar disappears and that date is automatically entered in the date field. Use the small arrowheads on either side of the month’s name to display other months. A single arrowhead moves the calendar one month forward or back. A double arrowhead moves the calendar to the same month a year ahead or back.
For example, if you could click the single arrowhead to the left of “April” on this calendar, the month displayed would change to March 2009. If you could click the double arrowhead to the right of “April”, the month would change to April 2010.
Date Last Assigned: Use this filter criteria to select only action requests for documents that were (or were not) assigned to someone between dates that you choose. You must enter each date in this format: MM/DD/YYYY. For more detail on entering or selecting dates, see Date Created above.
When you have used a filter on your Action List, you can see a Clear Filter button at the top of your page:
Click this button to display all of your action requests again.
Note
If your Action List is not filtered, you cannot see the Clear Filter button.
Remember, you can click the Filter button at the top of your Action List page to return to the Filter page and change or Reset your filters.

