Rice provides a quick and convenient way to obtain information on Delegation Rules through the Delegate Rule Lookup. This Lookup also lets you create new Delegation Rules using the create new function and edit existing Delegation Rules.
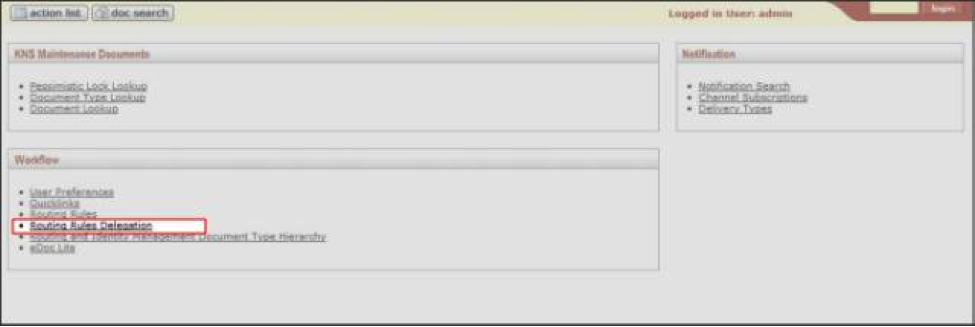
To access the Delegate Rule Lookup screen, click Routing Rules Delegation on the Rice Main Menu.
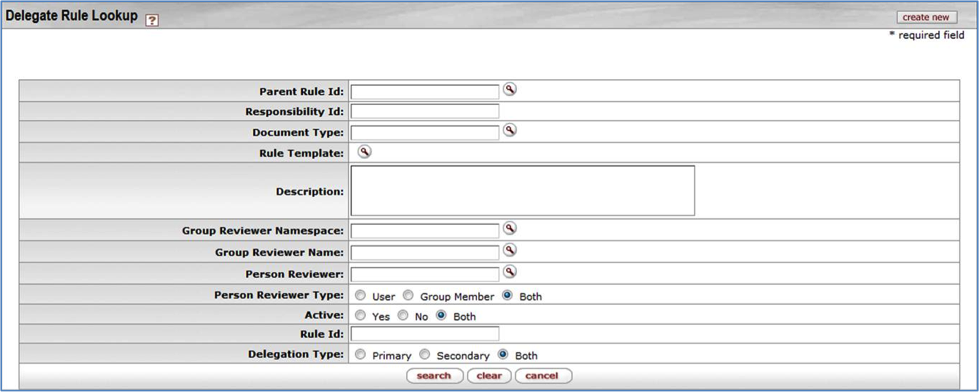
Use the Delegate Rule Lookup screen to find information about a Delegation Rule. You can also create a new Rule by clicking the create new button in the upper right corner of the screen. The create new function is described in the Routing Rule Creation section later in this document.
When you do a search from the Delegate Rule Lookup screen, you can:
View the Delegation Rule information returned by the search
Edit a Delegation Rule
Copy an existing Delegation Rule and create a new one based on that copy
Information about the Lookup function is in the next section of this document. The other two functions are described in the Routing Rule Delegation Maintenance section later in this document.
To find a Delegation Rule quickly, enter information in one or more of the fields on the Lookup screen, then click the search button. If you are not familiar with the search fields, you can leave all of the fields blank and click the search button. The Delegate Rule Lookup page then displays all of the Delegation Rule templates.
The fields on this screen are described in the Routing Rule Delegation Maintenance section of this document.
Note
Parent Rule Id is a unique identification number for a Rule Template; therefore, searching by the Parent Rule Id can be the fastest way to find a particular Rule.
After you click the search button, Delegate Rule Lookup displays a list of Rules that looks similar to this:

Click edit on any row to go to the Routing Rule Delegation document for that Rule. You can use this document to do maintenance on that Rule. This is discussed later in this document, in the Routing Rule Delegation Maintenance section.
Click copy on any row to go to the Routing Rule Delegation document with the information from that Rule copied into the document. This lets you add a new Delegation Rule based on that information. This is discussed later in this document in the Routing Rule Delegation Maintenance section.
Click a Delegation Rule Id to go to the Delegation Rule Inquiry screen for that Rule. This screen displays specific information about how this Rule is set up in Rice. This screen is discussed later in this document in the Delegation Rule Inquiry section.
Click a Parent Rule Id or a Name to go to the Rule Inquiry screen, where you can see details about that Parent Rule ID. More information about this screen can be found in the Rule Inquiry section of this User Guide.
Click a Rule Template to go to the Rule Template Inquiry screen. More information about this screen can be found in the Rule Template Inquiry section of this User Guide.
The standard export options apply to this list of search results. An explanation of the export options can be found in the Common Features and Functions section of this User Guide.
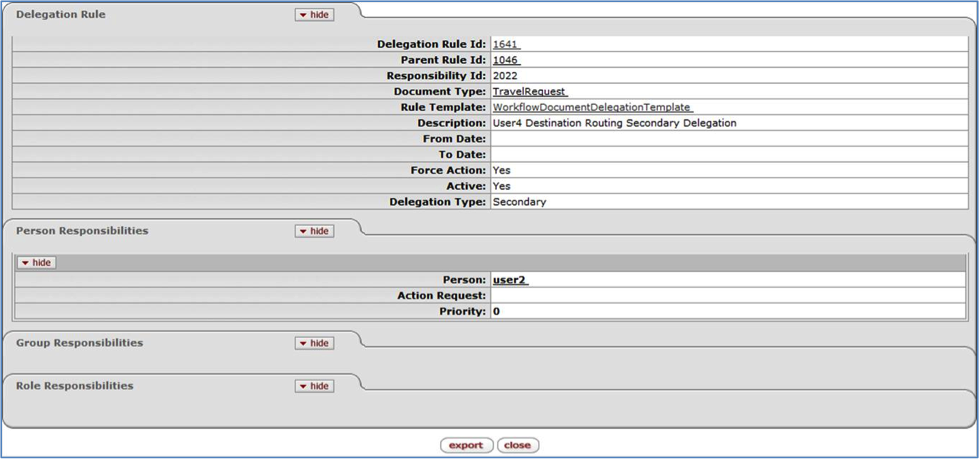
This screen provides specific information on how a Rule works. From this screen, you can either click the close button to return to the previous screen or you can export an XML version of this information.
The fields on this screen are described in the Rule Maintenance section of this document.

To create a new Delegate Routing Rule, start by selecting a Parent Rule to associate with your new Delegate Rule:
Do a field lookup on the Select parent rule field.
This displays the Rule Lookup screen where you search in the Rules your institution has defined in Rice to find the appropriate Parent Rule for your new Delegate Routing Rule.
When you have found the appropriate Parent Rule, click its return value link to return to the Delegate Routing Rule Creation screen with this Parent Rule.

Information from the Parent Rule you selected is now in the Select Parent Responsibility to Delegate From section of the Delegate Routing Rule Creation screen.
Click the Select button for this parent Rule.
Click the continue button.
Rice displays the Routing Rule Delegation screen. Use this screen to enter information for your new Rule. This is described in the Routing Rule Delegation Maintenance section (next).
You can use the Routing Rule Delegation document screen for both editing existing Delegation Rules and for adding new Delegation Rules to Rice.

Note
When Rice first displays the Routing Rule Delegation screen, all of the tabs except the Notes and Attachments, Ad Hoc Recipients, and Route Log tabs, are expanded. They are all collapsed in the screen print above so you can see all of them.
The Routing Rule Delegation screen you see when creating a new Rule has eight tabs:
Document Overview
Delegation Details
Delegate Rule
Persons
Groups
Notes and Attachments
Ad Hoc Recipients
Route Log
The Delegation Details, Delegate Rule, Persons, and Groups tabs are discussed in the sections that follow. The remaining four tabs are commonly used throughout Rice and are described in the Common Features and Functions section of the User Guide.
The Delegation Details tab is where you associate a Parent Rule with a Delegate Rule. It is also where you assign the Reviewer role.
The Delegation Details screen is displayed differently, depending on whether you are creating a new Rule or editing/copying a Rule. The version you see when creating a new Rule looks similar to this:

The information displayed is a copy of the information for the Parent Rule. Descriptions of these fields are below. Change this information as needed, then click the submit button to create this new Rule.
The version you see when editing or copying a Rule looks similar to this:

When you first see this version, the information in both columns is the same. You can modify the information in the fields in the right column, but not the left column. After changing the information appropriately in the right column, click the submit button to save your changes to this Rule.
The fields are the same in both versions of the screen:
Table 3.8.
| Field | Description |
|---|---|
| Parent Rule Id | Rule Id of the Parent Rule for this Rule |
| Description | General description of this Rule |
| Reviewer | The person responsible for reviewing a document in the routing process for this Rule |
| Type | The Type of the Reviewer |
| Action Request | The type of Action this Reviewer can take. This may be:
|
The Delegate Rule tab is displayed differently, depending on whether you are creating a new Rule or editing/copying a Rule. The version you see when creating a new Rule looks similar to this:

Enter the appropriate information for your new Delegate Rule in these fields. There are descriptions of each of these fields below.
The version you see when editing or copying a Rule looks similar to this:

When you first see this version, the information in both columns is the same. You can modify the information in the fields in the right column, but not the left column. After changing the information in the right column appropriately.
The fields are the same in both versions of the screen:
Table 3.9.
| Field | Description |
|---|---|
| Document Type | The Document Type defines the routing definition and other properties for a set of documents. Each document is an instance of a Document Type and conducts the same type of business transaction as other instances of that Document Type. |
| Rule Template | A Rule Template serves as a pattern or design for routing Rules. |
| Delegation Type | Required. Options for Delegation Type are:
|
| Name | The unique Name of the routing delegation Rule you are
creating or editing
NoteYou are not required to enter a Name, but if you don’t, Rice assigns a unique Name to the Rule. |
| Description | The general description of the Rule |
| From Date | The start date of the routing Rule |
| To Date | The expiration date of the routing Rule |
| Force Action | This is a Yes or No flag. A checkmark means Yes, blank means No. |
| Active | A True/False flag to indicate whether this Routing Delegate Rule is active in Rice. If it is active, you can use it in Rice. |
Rice displays the Persons tab differently, depending on whether you are creating a new Rule or editing/copying a Rule. This tab lets you add people to the Rule and set the type of Action each person needs to take under this Rule. The version of the Persons screen that you see when creating a new Delegate Rule looks similar to this:

Enter the appropriate information for the Persons section of your new Delegate Rule in these fields. There are descriptions of each of these fields below.
The version you see when editing or copying a Rule looks similar to this:

Use the top portion of this tab to add a new Person to this Rule and set the Action that Person needs to take and its Priority. Use the lower portion of this tab to change existing values for this Rule.
Note
When you create a new person, you must click the add button when you have entered information in the three required fields.
Table 3.10.
| Field | Description |
|---|---|
| Person | Required. An individual user who receives the document for the Action Requested. |
| Action Request | Required. The type of Action this person needs to take.
This Action may be one of these:
|
| Priority | Required. The priority associated with the Person in this Rule. One is the highest Priority. |
The Groups tab differently, depending on whether you are creating a new Rule or editing/copying a Rule. The version you see when creating a new Rule looks similar to this:

Enter the appropriate information for the Groups section of your new Delegate Rule in these fields. These fields are described below.
The version you see when editing or copying a Rule looks similar to this:

Use the top portion of this tab to add a new Group. Use the lower portion to change existing information for a Group.
Note
When you create a new group, you must click the add button after you enter information in the required fields.
Table 3.11.
| Field | Description |
|---|---|
| Namespace | The Namespace to which this Group will belong. A Namespace is a way to set both Permissions and Entity Attributes. Each Namespace instance is one level of Permissions and Entity Attributes and is one record in Rice. |
| Name | The unique name of this Group |
| Action Request | Required. The type of Action this Group is expected to take.
The Action may be one of these:
|
| Priority | Required. The priority associated with the Group in this Rule. One is the highest Priority. |
The Rice system provides a quick and convenient way to obtain information on Rules through the Rule Lookup feature. This feature also provides an entry point to creating a new Rule through the create new function.
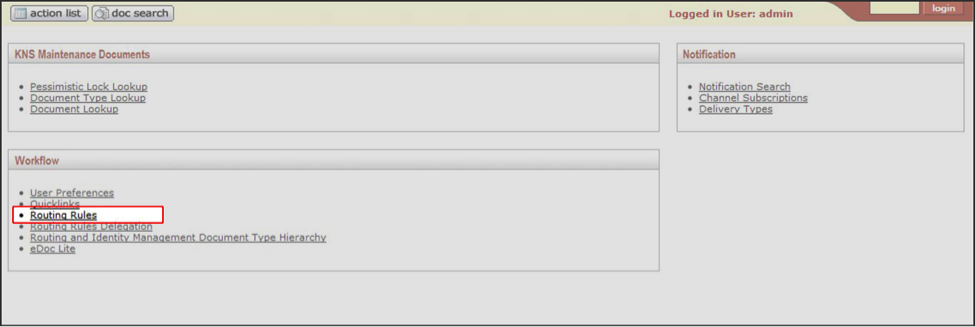
To access the Rule Lookup screen click on Routing Rules on the Rice Main Menu.
The Rule Lookup screen is used to view, edit or copy information about routing rules defined in Rice. It is also the starting point for creating a new rule using the Routing Rule Creation screen.
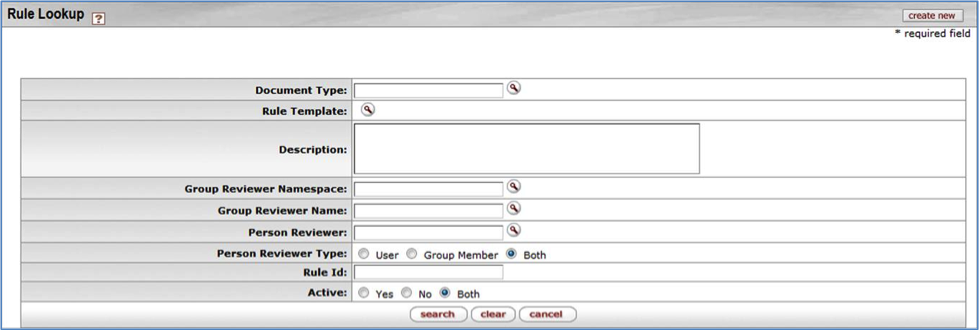
Click on the create new button to go to the Routing Rule Creation screen. The process for creating a new Routing Rule is discussed in the Routing Rule Creation section of this document.
To limit your search results you can select one or more of the available search criteria.
The fields on this screen are described in the Rule Maintenance section of this document.
Note
Rule Id is a unique identification number for a particular rule template; therefore, search by rule Id can produce the most accurate search result.
If you are not familiar with the search criteria provided above you can simply click on the search button and the Rule Lookup page will automatically provide a list of rule templates.
Rule Lookups return a list that looks similar to the following:

Clicking edit on any line item takes you to the Rule Maintenance Document Type Document where you can perform maintenance on that rule. This is discussed later in this document in the Rule Maintenance section.
Clicking copy on any line item takes you to the Rule Maintenance Document Type Document where you can add a new rule based upon the rule you are copying. This is discussed later in this document in the Rule Maintenance section.
Clicking a Rule Id will take you to the Rule Inquiry screen for that specific rule. This is discussed later in this document in the Rule Inquiry section.
Clicking a Document Type will take you to the Document Type Inquiry screen for that specific rule. This is discussed in the Document Type Inquiry section of the User Guide.
The standard export options apply to this list. Explanation of the export options can be found in the Common Features and Functions section of the User Guide.

This screen provides specific information on how the Rule is set up in Rice. The fields on this screen are described in the Rule Maintenance section of this document.

When creating a new Routing Rule you start by entering the Document Type and the Rule Template you want associated with your new Rule, then click the continue button. This takes you to the Rule Maintenance Document Type Document described in the Rule Maintenance section that follows.
Table 3.12.
| Field | Description |
|---|---|
| Document Type | You can select a new document type by clicking on the field lookup button located at the right side of the Doc Type field. |
| Rule Template |
The name of the Rule Template with which this rule is associated. A Rule Template serves as a pattern or design for the routing rules and is a mechanism for providing configuration information to rules. You can select a new template by clicking on the field lookup button located at right side of the Rule Template field. |
The routing report is a tool to check workflow routing. You select a rule template and enter any routing data required by the rule template. You can then view the workflow routing that would be assigned to such a document.

In the default implementation of Rice you can find the link to the Routing Report on the "Main" tab of the portal inside the "Workflow" pane. If for some reason the link is not visible on the "Main" tab you can still directly navigate to the Routing Report. To access the tool directly, replace the last part of the Rice Portal URL (portal.jsp) with kew/RoutingReport.do (for example, http://my.kuali.host/kuali/portal.jsp would become http://my.kuali.host/kuali/kew/RoutingReport.do). The following page is displayed:

The first thing to do is select the rule template to use for the test from the drop-down list. When you select a template the page will update to show the routing data that you need to enter to run the test:

The data entry fields for the routing data use the standard controls described in the Standard Buttons on Lookup Screens document. Here is the example with the routing data:
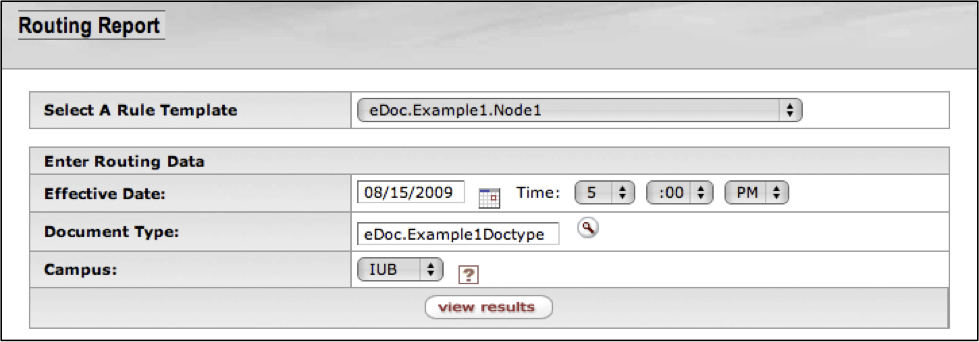
The specific information you need to enter is specific to the rule template you selected. Once you have entered the information, click the button to display the report:
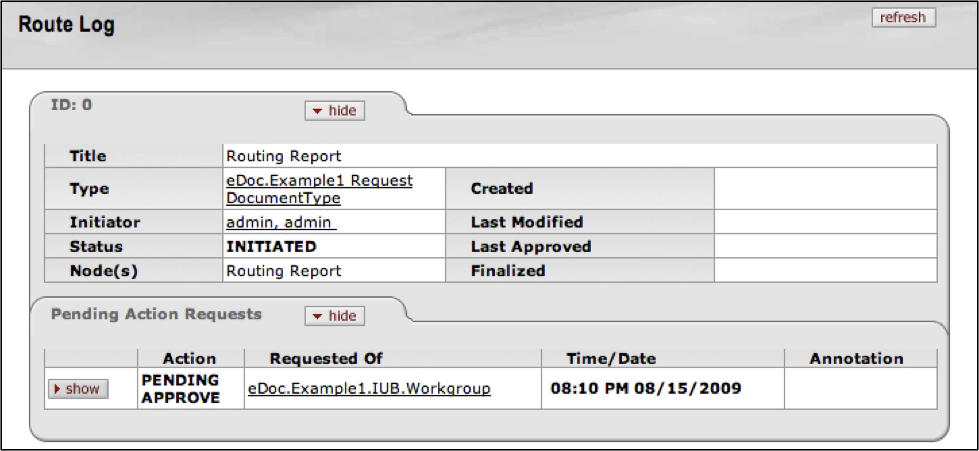
The upper section of the report (labeled “ID: 0”) contains the basic document information fields as if this was an actual document; several fields are blank since there is no actual document.
The lower section of the report (labeled “Pending Action Requests”) contains the routing that the document would be given. Clicking the button on any action displays more detail of the action:

The Rule Maintenance Document Type Document screen is used for both editing existing Rules and for adding new Rules to Rice.
Note
When Rice presents the Rule Maintenance Document Type Document screen all of the tabs except the Notes and Attachments, Ad Hoc Recipients and Route Log are expanded.
The Rule Maintenance Document Type Document screen you see when creating a new rule is composed of seven tabs:
Document Overview
Rule
Persons
Groups
Notes and Attachments
Ad Hoc Recipients
Route Log
The screen you see when you are editing an existing Rule includes an additional tab called Roles.
The Rule, Persons, Groups and Roles tabs are unique and are discussed in the sections that follow. The remaining four tabs are commonly used throughout Rice and are described in the Common Features and Functions section of the User Guide.
The Rule tab is presented differently depending on whether you are creating a new Rule, or editing/copying a Rule. The version you see when creating a new Rule looks similar to this:

The version you see when editing or copying looks similar to this:

Table 3.13.
| Field | Description |
|---|---|
| Document Type | The Document Type defines the routing definition and other properties for a set of documents. Each document is an instance of a Document Type and conducts the same type of business transaction as other instances of that Document Type. |
| Rule Template | The name of the Rule Template with which this rule is associated. A Rule Template serves as a pattern or design for the routing rules and is a mechanism for providing configuration information to rules. |
| Name |
The unique Name of the routing Name you are creating or editing. NoteIt is not required that you enter a Name, but if you don’t the system will assign a unique value. |
| Description | The general description for the rule selected. |
| From Date | The start date of the routing rule. |
| To Date | The expiration date of the routing rule. |
| Force Action | Force Action is used to control workflow routing by making the rule actions mandatory. This is a yes or no flag. A check means yes, blank means no. |
| Active | A true/false flag to indicate if Routing Rule is active in Rice can be applied or not. |
The Persons tab is presented differently depending on whether you are creating a new Rule, or editing/copying a Rule. The version you see when creating a new Rule looks similar to this:

The version you see when editing or copying looks similar to this:

Table 3.14.
| Field | Description |
|---|---|
| Person | An individual user who receives the document for the Action Requested. |
| Action Request | The type of action this person can take.
|
| Priority | The priority associated with the person in this rule. Lower values mean higher priorities, with 1 being the highest priority. |
The Groups tab is presented differently depending on whether you are creating a new Rule, or editing/copying a Rule. The version you see when creating a new Rule looks similar to this:

The version you see when editing or copying looks similar to this:

The top portion of this tab is used to add a new Group while the lower portion is used to change existing values.
Table 3.15.
| Field | Description |
|---|---|
| Namespace | The Namespace to which this Group will belong. A Namespace is a way to scope both Permissions and Entity Attributes. Each Namespace instance is one level of scoping and is one record in the system. |
| Name | The unique name of the Group. |
| Action Request | The type of action this Group is expected to take.
|
| Priority | The priority associated with the Group in this rule. One being the highest. |
The Rules Template Lookup function is available from any screen with the field lookup button next to the Rule Template field. Simply click on the button and you will go a screen that looks like this.

The Rule Template Lookup page will automatically provide a complete list of the rule templates. You can reduce the number of items returned by your search by entering values in the fields, or if you are not sure or familiar with the key word(s) for the search criteria, simply click on the search button.

Clicking on the Id field will take you to the Rule Template Inquiry screen for that particular Rule Template.
Table 3.16.
| Field | Description |
|---|---|
| Return Value | This is a link which will copy the Rule Template information back to the screen which you originated from. |
| Id | A unique Id number for a specific rule template. |
| Name | The name of the rule template. |
| Description | A general description of the rule template. |
| Delegation Rule Template | The delegate rule template selected. |

