Table of Contents
This guide provides information about using Deliver functions. The Deliver Module covers the interactions between the library and its patrons. The Deliver processes include check in, check out, renew, request, hold, manage patron accounts, notices, fines and fees, interlibrary loan and course reserves.
Note
To learn more about the Deliver Module, see the Deliver Overview in the wiki’sOLE Documentation Portal.
This guide is organized to follow the layout of the Deliver tab.
The first section provides an explanation of Deliver Batch Processes. Though not included on the Deliver tab, it is important to understand some of these processes that occur behind the scenes.
Circulation provides access to loaning, returning, requesting, and item bills
Circulation Admin includes the maintenance documents (documents that control database tables) associated with circulation.
Patron provides access to patron records and patron bills.
Patron Admin includes the maintenance documents associated with patron records.
These sections are divided into subsections covering individual functions. For each function, the applicable subsection presents a breadcrumb trail showing how to access the function and information on the layout and fields on the related screen(s). As appropriate, some subsections include business rules and routing information for e-docs and/or special instructions for performing activities.
Note
In order to work efficiently in the system’s Deliver screens, you need to understand the basics of the user interface. For information and instructions on logging on and off, navigating, understanding the components of screens, and performing basic operations in the screens, see the OLE Basic Functionality and Key Concepts.
This guide as well as guides to other OLE modules are available for download from the OLE Documentation Portal.
Tip
Bookmark any page within OLE. This will allow you to easily navigate back to an interface or e-doc in one click, just log in.
 >
>
 >
>

The following table summarizes the functions of the system’s Deliver batch processes. These processes generate notices of various kinds, generate bills for lost items, delete temporary circulation histories and update reshelved materials’ item status.
Each job may be scheduled by a library to run at any time. From the Admin menu, click Batch Job to enter the lookup. ClickSearch. Click Edit to change the schedule for any job. (As of now, the jobs are set to run at 2 AM Eastern time. A more user-friendly scheduling method will be developed.)
Output files from these jobs are stored at a location chosen by the library. The location is identified as the system parameter PDF_Location which can be found at Admin > Configuration > Parameter.
Deliver Batch Jobs
|
Job Name |
Description |
|
generateNoticesJob |
Identifies overdue items and creates notices for delivery to patrons using their preferred delivery method. A first overdue notice is generated n days/hours after the due date/time; subsequent overdue notices (how many determined locally) are then generated n days/hours after the last notice. Also generates replacement fee bills for items that have received n overdue notices. |
|
deleteTemporaryHistoryRecordJob |
If a library decides to store temporary circulation histories, this job purges those records systematically. (OLE runs this job at 2am every morning but this is locally configurable.) |
|
generateRequestExpirationNoticeJob |
A library may opt to send patrons notices when requested items have been removed from an on-hold status because the patrons never picked up the items. This job creates these notices for delivery to patrons using their preferred delivery method but only for patrons whose records have the courtesy notice flag turned on. |
|
deletingExpiredRequestsJob |
Identifies requested items that have been on hold but are now beyond the expiration date; the subsequent list then allows an operator to check-in these items to determine their next destination. |
|
generateOnHoldNoticeJob |
Creates on-hold notices for delivery to patrons using their preferred delivery method to inform them when a requested item has become available and at what pick-up location. If pdfs are generated for mail delivery, the PDF_LOCATION stores the directory location. |
|
updateStatusIntoAvailableAfterReSchelvingJob |
Circulation Desks may set an interval to allow for the time lag between check-in and reshelving. When this interval is defined, items checked-in are given the item status “Recently returned”. This job, following the interval, changes the item status to “Available”. |
|
generateHoldCourtesyNoticeJob |
A library may opt to send patrons reminder notices when borrowed items are close to their due dates/times. This job creates these notices for delivery to patrons using their preferred delivery method but only for patrons whose records have the courtesy notice flag turned on. |
Table of Contents
![]() >
>  >
>
On the Deliver menu, Circulation provides access to a number of circulation functions that allow users to view and maintain a variety of standard Circulation E-Docs.
![]() >
> ![]() >
>![]() >
>![]()
A loan consists of identifying a patron and then creating temporary links to the item(s) being loaned to the patron. The Loan interface allows for staff to circulate materials to patrons.
OLE 1.0 breaks down circulation permissions into several roles. Unit Manager will have all loan privileges including override permissions. Operator will have only “create loan” permissions.
To loan and return items, please sign into OLE as:
| Role | Login |
|---|---|
| Unit Manager | dev2 |
| Operator | edna, eric |
| Super Circulation Supervisor | admin, admin1 |
Warning
You will receive errors if not logged in with one of the above sample users. Login before selecting Loan.
Each staff operator can be authorized to work at one or more circulation desks; one must be set as the default. If they have more than one circulation desk, they will be able to change from one circulation desk to another to indicate where they are. When an operator changes a circulation desk during a session, the change will persist for the rest of the session. The next time the operator logs in OLE will return them to their default location.
Note
For more information about Circulation Desk maintenance and mapping, see Circulation Desk and Circulation Desk Mapping.

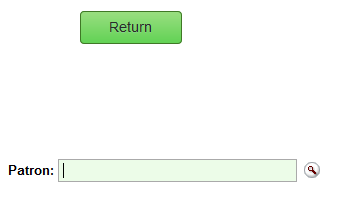
Once you have opened the Loan interface, enter the Patron Barcode and press Enter or search for it from the lookup
 . If you search for a patron record from the lookup, the resulting
display will show a Return Value link to the left of each patron. Click on that link to
populate the patron field on the Loan screen. Press Enter.
. If you search for a patron record from the lookup, the resulting
display will show a Return Value link to the left of each patron. Click on that link to
populate the patron field on the Loan screen. Press Enter.Tip
Clicking on the green Return button will take you to the return menu, allowing you to check-in materials.
Once the patron barcode is entered, details about the patron will appear above the Patron field. If there is a block on the patron or some other problem, then an error message will appear. You may need to access the patron record to address the error or, in some cases an override is permitted for you to continue.
Note
For more information about Patron Documents, see Patron.
If text exists in a user note field in the patron record, this message displays immediately whenever the patron’s barcode is scanned into the system. (The purpose is to be able to deliver a message to the patron in person.) The operator has the option to acknowledge and delete the message or simply acknowledge--in the latter case, the message remains and continues to display each time the patron barcode is entered until the text is removed.
Enter the Item Barcode or search for it from the lookup
 .
. Press Enter
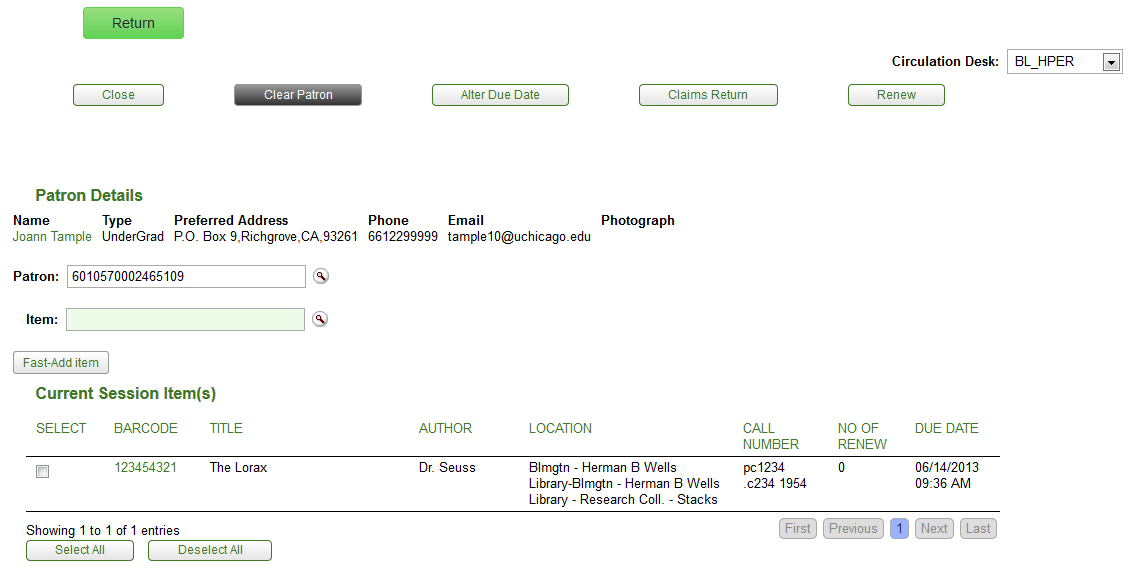
OLE will calculate the due date and time and update the item status to "Loaned". This information displays in the Current Session Item(s) section of the screen. A sound will notify staff of successful check-outs or alert them of issues to address (provided the sound parameter AUDIO_OPTION is turned on and your computer has speakers).
When loaning an item to a patron, an alert may appear to inform you of any problems based on local configurations settings. OLE provides a pop up screen to assist staff to correct these errors and/or override them so that the loan can proceed.
If the patron has presented more than one item to borrow, enter the next item barcode and press Enter. Each new item checked-out will appear at the top of the Current Session Item(s) list.
Clear the patron information to prepare for the next patron.
Tip
Each Circulation Location also defines a timeout interval which has the same effect as manually ending a session. This can be locally configured.
If an item does not have a barcode or cannot be found by a search, click Fast-Add item to create a brief record. This will open a record editor on top of the Loan window:
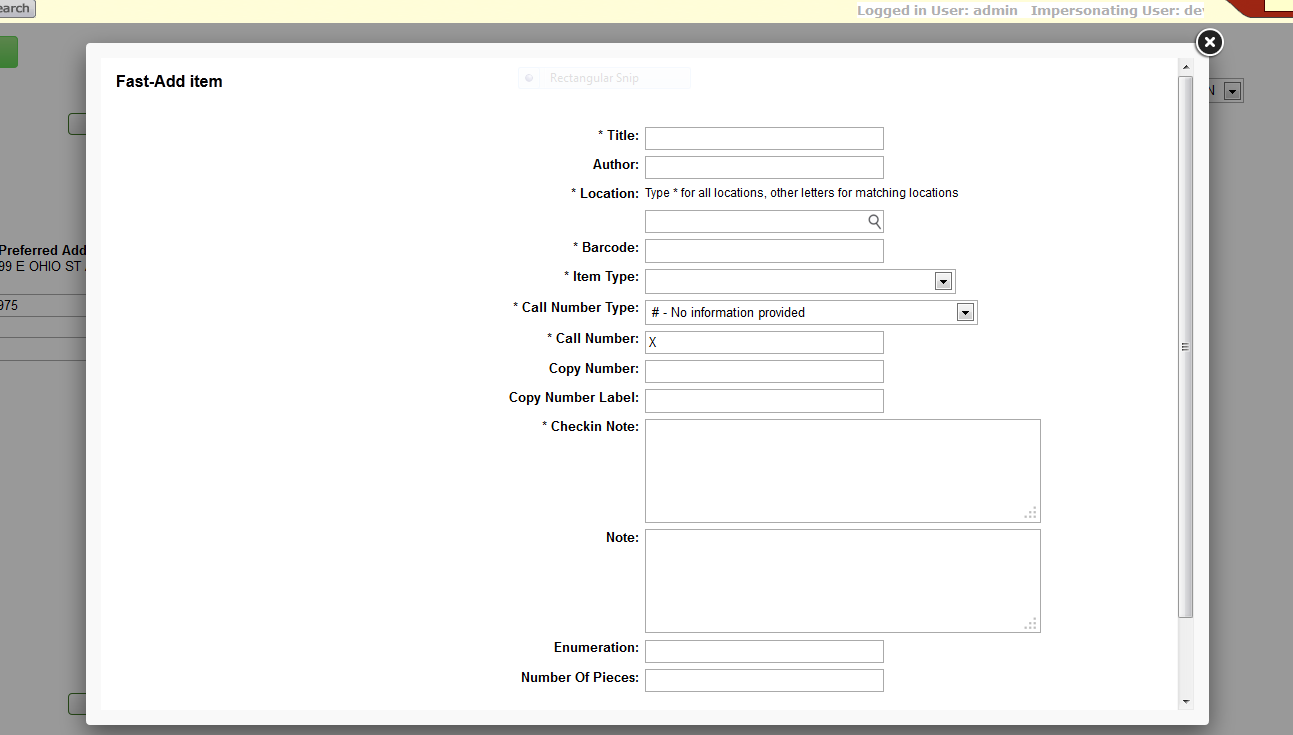
You must enter all fields that have asterisks (*) before their labels.
Click Add.
OLE will provide you with an error message if you forget to enter a value for required field. If the system accepts the data, the window closes and supplies the item barcode in the Item field of the Loan screen.
Press Enter
The Loan now proceeds.
From the top of the loan screen, you can renew items or modify due dates/times.

To renew, select line items from the Current Session Item list or the Items Currently Checked Out list. You can also click the Select All button for either or both lists.
Click
 .
.OLE will update due dates/times.
Tip
Alternatively, enter the item barcode in the item field as though loaning the item and press Enter. The item will be renewed for the patron.
To modify or alter a due date/time, select line items from the Current Session Item list or the Items Currently Checked Out list. You can also click the Select All button for either or both lists.
Click
 .
.The Alter Due Date window will appear.

Enter in a new Due Date or use the calendar icon
 . Note that you can also adjust the due time if your loan periods are
hourly.
. Note that you can also adjust the due time if your loan periods are
hourly.Click
 .
.
Patrons sometimes notify library staff that they have returned items for which they may have received overdue notices or replacement fee bills. In such circumstances a library staff operator with proper permission needs to manually turn on a “claims returned” flag in the item and have the system automatically record the date of the event.
To perform the claims return, select the line item associated with the title.
Click
 .
.Type any notes to record specific circumstances in the pop up window:

Click
 .
.The claims return note and date will appear with the item.
Circulation policies are based on three factors: item location, item type and borrower type. Each specific combination determines the loan period, applicable maximum limits, and other policies pertaining to renewals, requests, etc. These can be defined locally.
Staff must log in and select a circulation desk before loaning, or checking-in items.
![]() >
>  >
>![]() >
>
A return consists of removing the temporary link between the item and the patron that exists in the loan transaction record. A return session begins with the identification of the item being returned and ends when all the items to be checked in have been processed. Returns utilize item barcode numbers as the primary identifier to begin processing a check-in transaction.
OLE 1.0 breaks down circulation permissions into several roles. Unit Manager and operator have permissions to return items within OLE.
To loan and return items, please sign into OLE as:
| Role | Login |
|---|---|
| Unit Manager | dev2 |
| Operator | edna, eric |
Warning
You will receive errors if not logged in with one of the above sample users. Login before selecting Return.
Each staff operator can be authorized to work at one or more circulation desks; one must be set as the default. If they have more than one circulation desk, they will be able to change from one circulation desk to another to indicate where they are. When an operator changes a circulation desk during a session, the change will persist for the rest of the session. The next time the operator logs in OLE will return them to their default location.
Note
For more information about Circulation Desk maintenance and mapping, see Circulation Desk and Circulation Desk Mapping.

The system automatically assumes today’s date/time as the default date/time of any check-in. An operator can change the date/time as needed (e.g., items returned overnight while the library is closed may be checked-in as if returned yesterday).
Tip
Clicking on the green Loan button will take you to the Loan menu, allowing you to check-out materials.
To check-in items, staff will find the Return e-document under Deliver on the Rice 2 menu.
Enter the item barcode or search for it from the lookup
 .
. Press Enter.
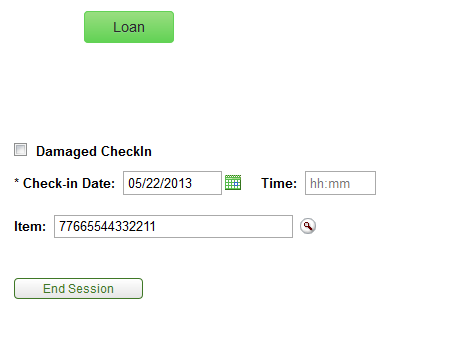
Items returned appear in the Item(s) Returned tab with the most current at the top of the list.
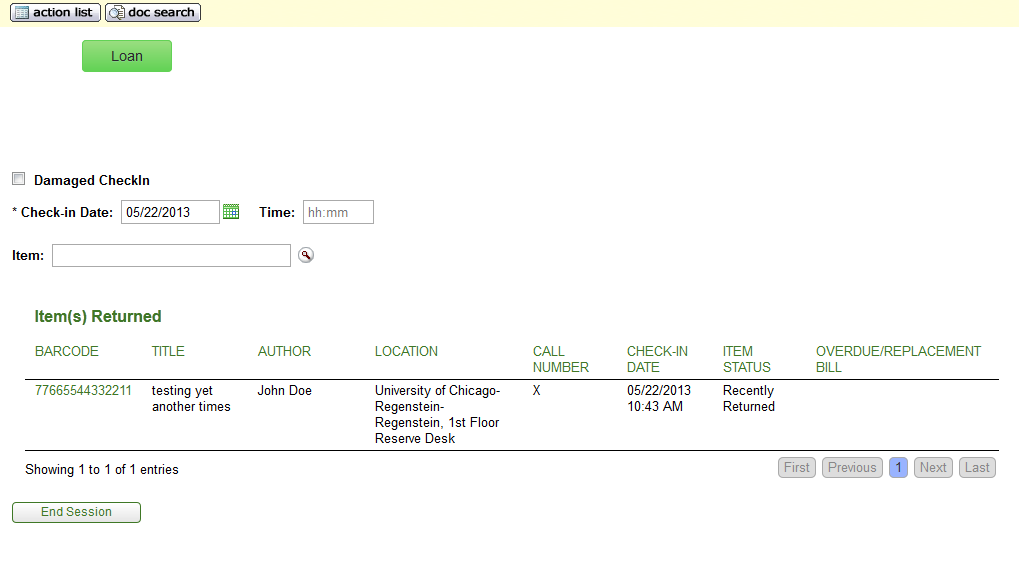
A sound will notify staff of successful check-outs or alert them of issues to address (provided the sound parameter AUDIO_OPTION is turned on the computer has speakers). A visual alert may appear to notify staff of any item related problems based on local configurations settings. These may include recalls, fines, and outstanding holds, item condition notices, and number of pieces an item contains, missing record information, and others. OLE provides a pop up screen to assist staff to correct these errors.
If necessary, OLE will calculate any fines or penalties based upon the locally configured fine rates and create an overdue fine bill and send it automatically to the patron.
Note
For more information about the Patron Bill, see below.
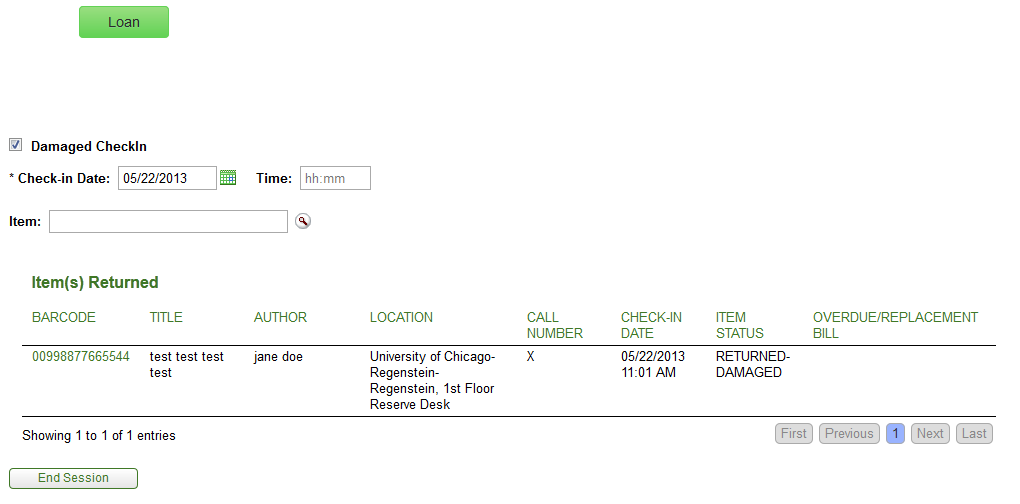
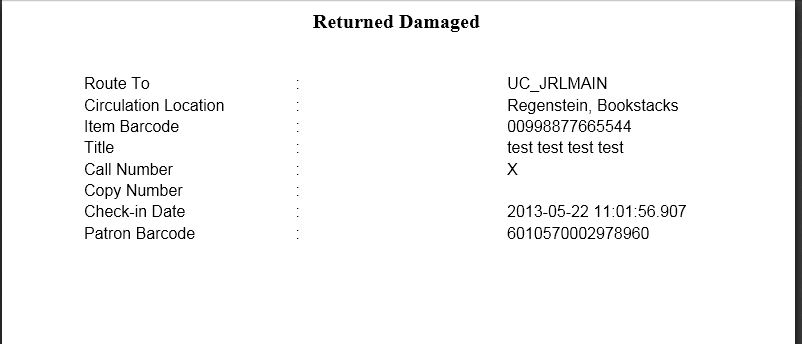
If the Damaged Check-in box is checked, the item’s status becomes Returned-Damaged and a routing slip is printed so that the item can be handled later.
Example of the routing slip:
During a check-in transaction, the system compares the due date/time in the loan transaction record to today’s date/time (as set on the Return screen). If today’s date time is AFTER the due date/time, the system verifies if an overdue fine is to be imposed and if so, the rate at which the fine is calculated. The overdue fine bill is then created automatically as part of the return process.
For check-in, if an operator's circulation desk is not the same as the item's “home” location, OLE sets the item status to "in transit" and prints a routing slip so the item can be sent to its “home” location. When the item is checked in again at the “home” circulation desk, the item status returns to “Available” (or “Recently Returned”—an option to allow for the time gap between check-in and reshelving. A batch program changes “Recently Returned” to “Available” once that time gap has expired).
Check-in of a borrowed item increments the item’s circulation counter by “1”. If an item with no loan transaction is checked-in, the system increments the in-house uses counter by”1”.
At check-in, the system also displays notices of special conditions to the operator. E.g., check-in of an item with a pending request shows a message indicating that the item needs to be placed on hold for the requestor and an on-hold slip is printed. Other conditions result in other messages/directions for the operator.
![]() >
>  >
>![]() >
> ![]()
The Request Document allows staff operators to place patron requests for library items.
Request types include:
Recall (for hold or delivery) Hold (for hold or delivery) Page (for hold or delivery) Copy
In-transit
A recall request applies when an item is checked out to one patron and another patron wants to borrow that item. A “for hold” request means that the patron (i.e., the requestor) will come to a pick-up location to retrieve the item when available. A “for delivery” request means that the item will be automatically checked out and delivered to the patron’s preferred street address when it becomes available. . Each patron’s delivery privileges (either “yes” or “no”) are stored in the patron record and the system will automatically select the request method based on this value. However, if a patron’s delivery privileges=yes, the system still provides for selection of a pick-up location. If one is selected, the request is recall/hold, not recall/delivery. Delivery privileges can be automatically enabled for any patron of a designated borrower type , e.g., you might set up OLE so that any patron belonging to borrower type “faculty” gets delivery privileges. However, delivery privileges can be assigned on an individual basis as well, e.g., you may enable delivery for any student with a physical disability.
Most copy requests are now typically filled by scanning the required item and a file is then emailed to the patron, meaning that copy requests are “delivered” via email. If a paper copy is made, the staff operator will manually address an envelope using the preferred street address from the patron record.
Patrons can place their own requests via a library’s user interface which will need to be customized to interact with the OLE request logic appropriately.
To request items, staff will find Request e-document under Deliver on the Rice 2 menu.
Click Create New in the upper right side of the interface.

The Select Request window will appear.
Select the User Type from the dropdown menu.
Enter the Item Barcode or search for it from the lookup
 .
.Select the Request Type from the dropdown.
Enter the Patron Id or search for it from the lookup
 . This can also be the Proxy Patron Id.
Asterisks indicate a required field.

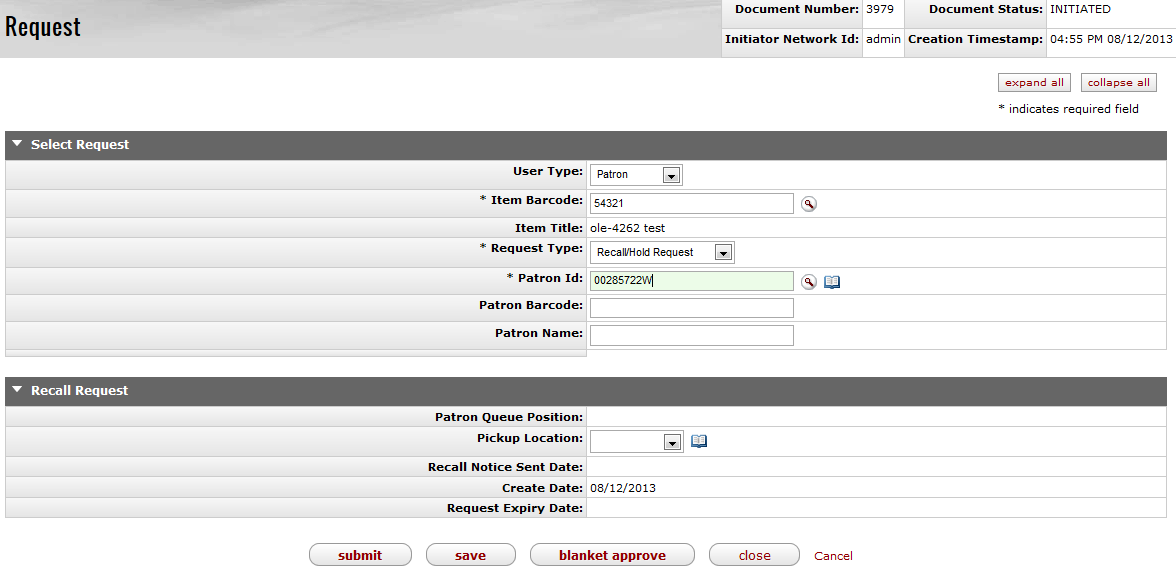
Different Request Types call for different information. Once selected, the interface will change depending on what you select. Below is an example of a Recall/Hold Request:
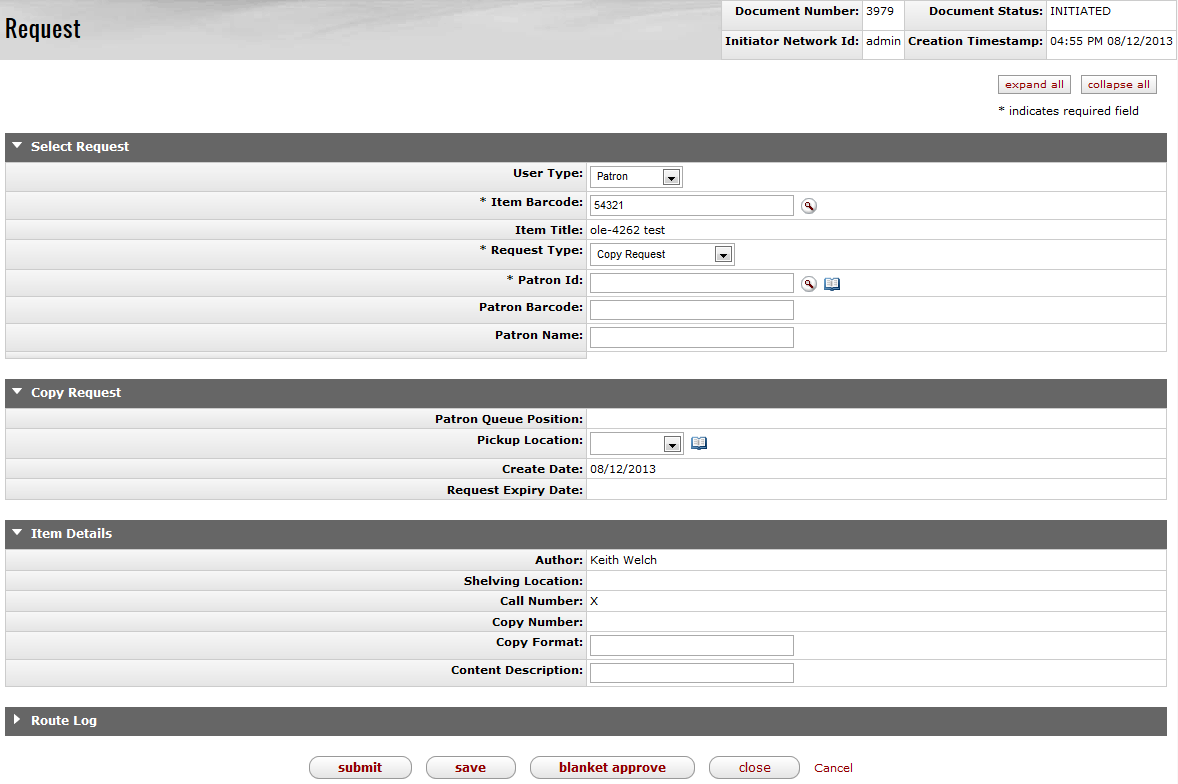
Copy Requests include an Item Details tab to include author and/or call number information:
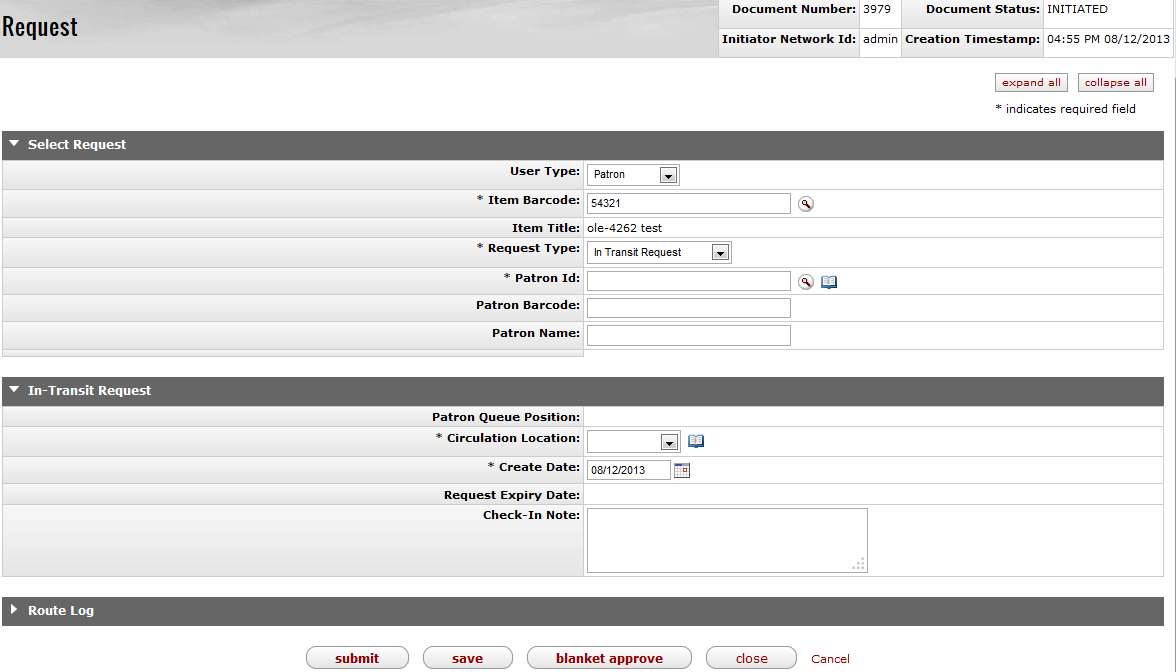
In-Transit Requests contain an In-Transit Request tab. This is to allow for the situation when an item needs to be sent to another Circulation Location (only library staff my place In-Transit Requests):
Click
 .
.
An authorized library staff operator can change a pickup location or an expiration date for a request.
Enter any search criteria in the Request screen and click
 .
.Note
To learn more about searching, see Searching OLE on the OLE E-doc fundamentals wiki page.
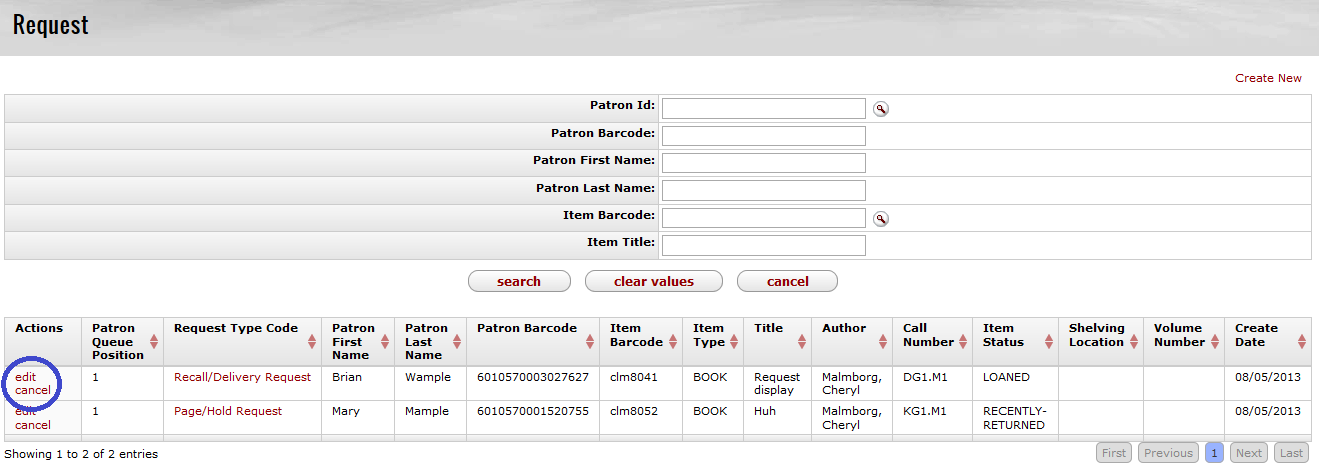
Click edit to modify the request or cancel to remove the request from OLE.
Tip
One additional way to cancel a request is through the “My Account” portal.
To learn more about My Account, see below.
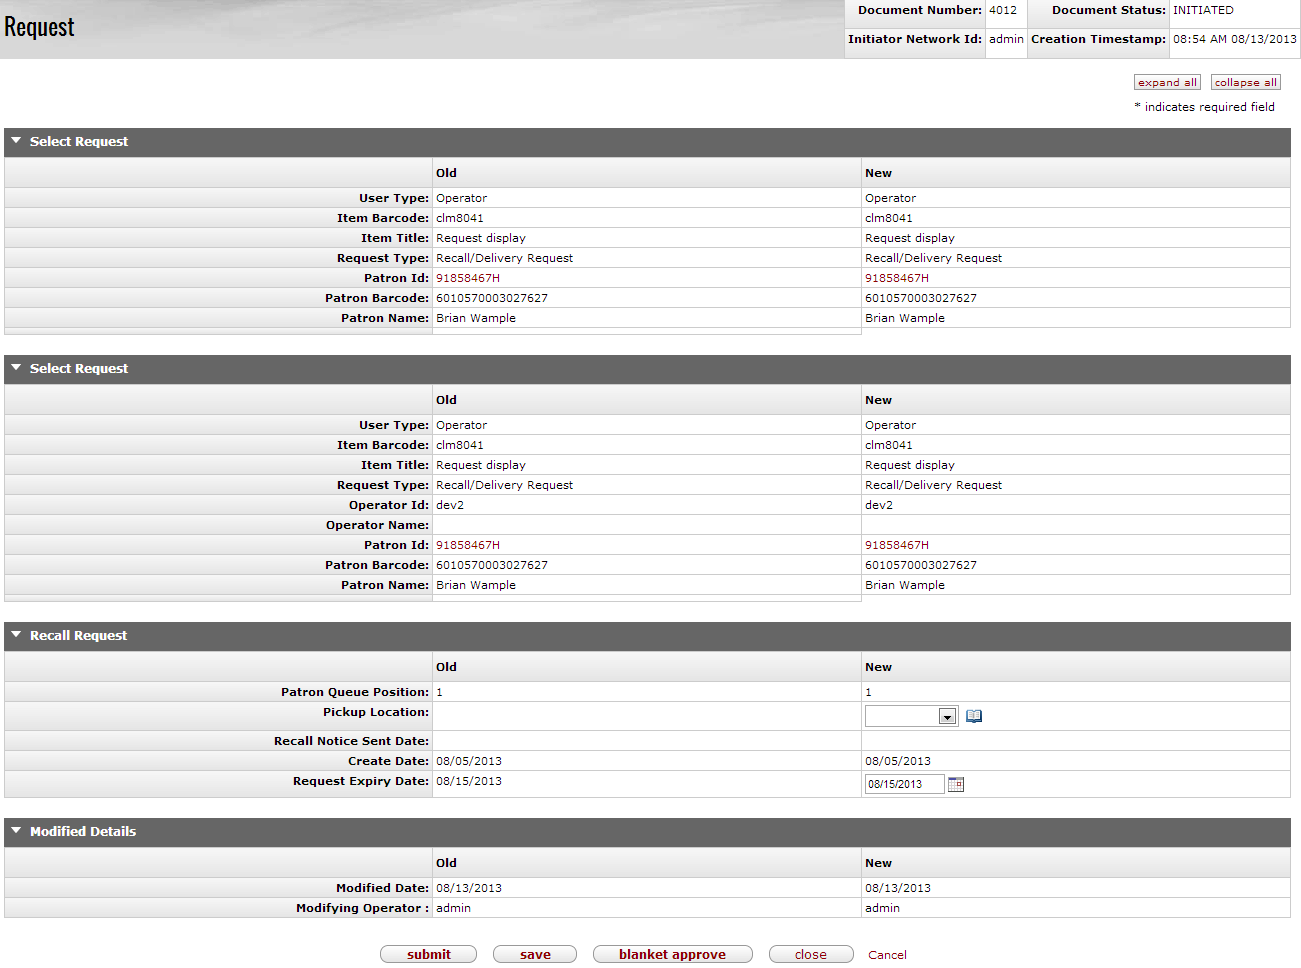
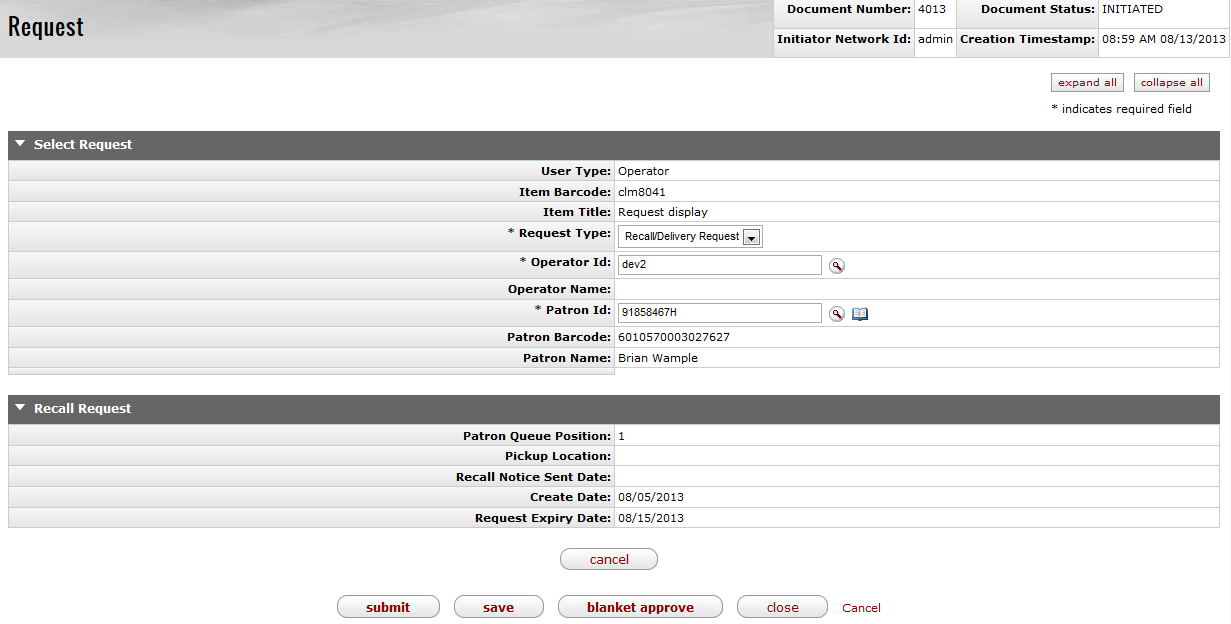
If you click edit, you will be able to change only the Pickup Location and the Request Expiry Date.
Alternatively, if you click cancel from the search screen, a confirmation screen will appear.
Click
 .
.
The request is cancelled and you return to the Rice Main Menu.
When a request for a patron is completed (i.e., the item is checked out to the patron), the request information is removed from active requests and archived.
Requests can only be placed at the item level. Title-level requests will be a future OLE enhancement.
Not all requests are allowed for any item at any time. E.g., you cannot place a page request for an item currently loaned. In that situation, the operator would place a recall or hold request depending on the requestor’s preference.
![]() >
>  >
>![]() >
> ![]()
When more than one patron has requested the same item, an authorized library staff operator can display the request record that enumerates the patrons. The queue can be reordered appropriately.
To reorder multiple requests for the same item, locate the Request Re-Order interface under Circulation on the Deliver menu.
Enter the Item or search for it from the lookup
 .
.To reorder the request queue, change the numeration within the the Queue Position
Click Save.

When multiple requests are made for the same item, recall requests are always given precedence over other request types. Hold requests have second priority followed by paging and copy requests. If there are multiple requests of the same type from multiple patrons, the system places them in the order in which they were made .
![]() >
>  >
>![]()
Each site is able to have bills queued and available for review before transmission or opt to have bills sent immediately. (In the case of printed bills, “immediately” means printed out; actual delivery of course requires manual handling.)
You may also view bills by patron via the patron record.
Note
For more information about Patron Documents, see below
Table of Contents
![]() >
>  >
>
On the Deliver menu, Circulation Admin provides access to a number of circulation functions that allow users to view and maintain a variety of standard Circulation E-Docs.
![]() >
>  >
>![]() >
>![]()
Circulation desks are the basic work locations where operators circulate items to patrons, check-in items, hold items to give to patrons, and help patrons by creating requests. Circulation Desks can also function as pick-up locations where patrons can claim their requested items.
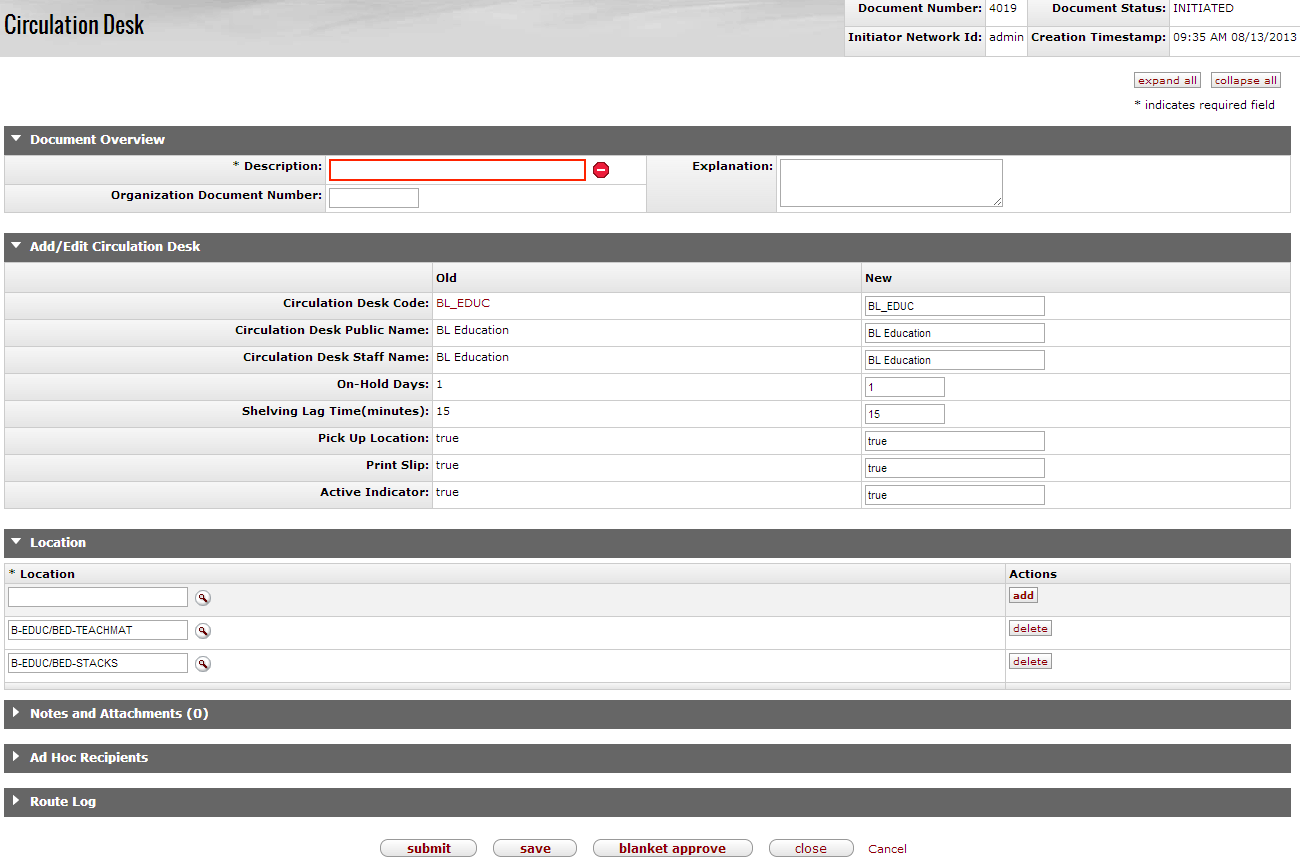
The Circulation Desk document includes the Add/Edit Circulation Desk tab. The system automatically enters data into both the Old and New sections in this tab. Selected data fields are available for editing.
Add/Edit Circulation Desk Tab Definitions
|
Title |
Description |
|
Circulation Desk Code |
Required. The circulation desk code associated with this circulation desk. |
|
Circulation Desk Public Name |
Required. The familiar title of the circulation desk’s public view. |
|
Circulation Desk Staff Name |
Required. The familiar title of the circulation desk’s staff view; may be the same as the public name. |
|
On-Hold Days |
The number of days an item will remain on hold at this circulation desk. |
|
Shelving Lag Time (minutes) |
The amount of time, in minutes, between check-in and reshelving. |
|
Pick Up Location |
Indicates whether this circulation desk can be used as a pick up location for holds. |
|
Print Slip |
Indicates whether this circulation desk can print receipts for patrons. |
|
Active Indicator |
Indicates whether this circulation desk is active or inactive. Remove the check mark to deactivate. |
A circulation desk can have multiple shelving locations but each shelving location can have only a single circulation desk. On the Location tab, you may add and/or delete shelving locations to circulation desks.
Enter a location or search for it from the lookup
 .
.Click
 .
.To remove an existing location, click
 .
.
![]() >
>  >
>![]() >
> ![]()
Circulation Desk Mapping allows users with the role OLE-PTRN Deliver Admin to map circulation desks to OLE operators.
Each operator will have a default circulation desk but they can have one or more circulation desks where they can work. If they have more than one circulation desk, they will be able to change from one circulation desk to another to indicate where they are when circulating library materials.
To map circulation desks, staff will find the Circulation Desk Mapping interface under Circulation Admin on the Deliver menu.
Enter the Operator or search for the person from the lookup
 .
.Press Enter.
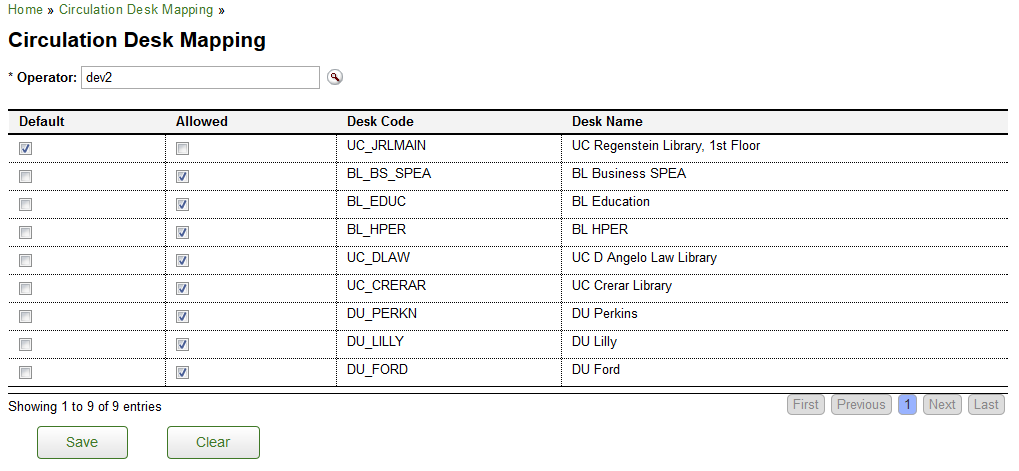
You may change the default circulation desk by checking one of the boxes in the default column. Every time an operator logs into OLE to circulate materials, they will be at this location.
You may select or deselect allowed circulation desks by checking or unchecking the boxes in the allowed column. These will appear in the Circulation Desk dropdown on the Loan/Return interface.
A list of circulation desks will appear below the search.
Click
 .
.
![]() >
>  >
>![]() >
> ![]()
The Fixed Due Date document...
![]() >
>  >
>![]() >
> ![]()
The Request Type document defines the type of request available on the Request edocument and allows the system to apply logic unique to each type. For example, a request, which could include recalls, holds or pages, could be hold or delivery. Hold means that the patron will come to a pick-up location to retrieve the item when it becomes available. Deliver means that the item will be delivered to the patron when it becomes available. Request types could also include Copy or In Transit Requests.
Requests are managed via check-in or check-out transactions and those operations have business logic to follow when an item has a pending request(s) of any kind. Because of that, creating a new request type without adding business logic to the code will be pointless. The Request Type is used by an operator when creating a request for a patron. The Request Type determines the business logic to be followed.
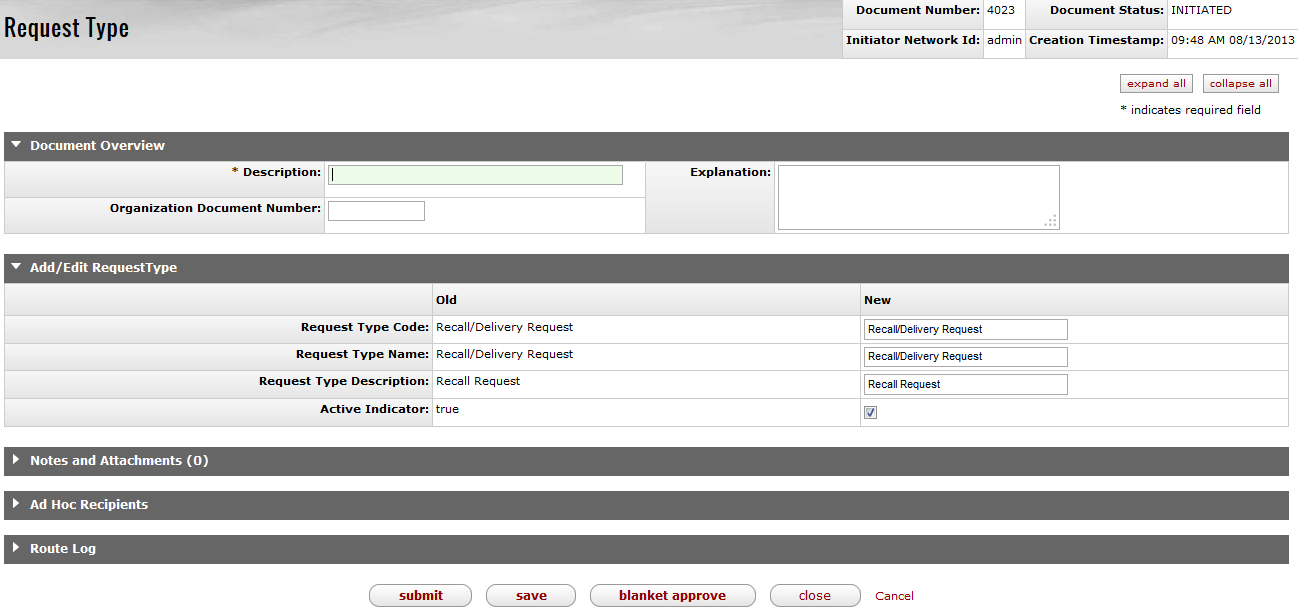
The Request Type document includes the Add/Edit Request Type tab. The system automatically enters data into both the Old and New sections in this tab. Selected data fields are available for editing.
Add/Edit Request Type Tab Definitions
|
Title |
Description |
|
Request Type Code |
Required. The request type code associated with this request type |
|
Request Type Name |
Required. The familiar title of the request type. |
|
Request Type Description |
The familiar description of the request type. |
|
Active Indicator |
Indicates whether this Request Type is active or inactive. Remove the check mark to deactivate |
![]() >
>  >
> ![]() >
> ![]()
The Barcode Status lookup is used to review available statuses for a barcode. Barcode statuses are used in the Patron document to indicate active, lost or stolen. You cannot create or edit barcode statuses.
![]() >
>  >
> >
>  >
> 
The Calendar Group document...
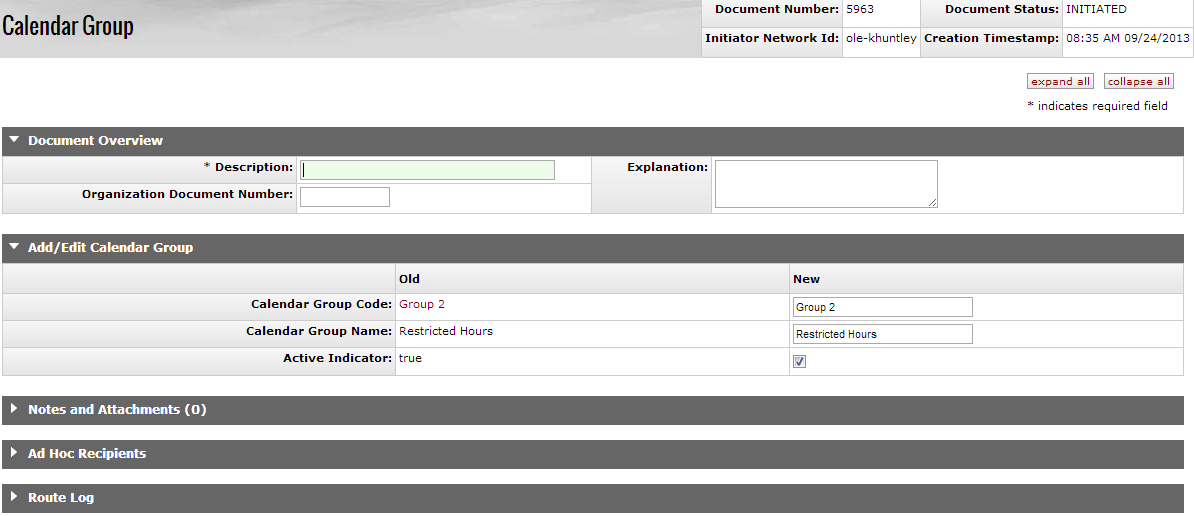
The Calendar Group document includes the Add/Edit Calendar Group tab. The system automatically enters data into both the Old and New sections in this tab. Selected data fields are available for editing.
Add/Edit Calendar Group Tab Definitions
|
Title |
Description |
|
Galendar Group Code |
Required. |
|
Calendar Group Name |
Required. |
|
Active Indicator |
Indicates whether this Calendar Group is active or inactive. Remove the check mark to deactivate |
![]() >
>  >
> >
>  >
> 
The Calendar document...

The Calendar document includes three unique tabs - General, Exception Day, and Exception Period. Above these three tabs, enter the Begin Date, a Group Name, and a Description.
Definitions
|
Title |
Description |
|
Begin Date |
Required. Autopopulates today's date. Enter another date or use
the calendar icon |
|
End Date |
The end date for this calendar. |
|
Group Name |
Required. Select the group name from the dropdown menu. |
|
Description |
Required. The familiar description, or name, of the calendar. Used for ease of identification. |
Click  .
.

General Tab Definitions
|
Title |
Description |
|
Each day of week | |
|
Open Time/ Closed Time | |
|
Actions |
Click Add to add the general calendar times. |
Click  to add an exception day.

Exception Day Tab Definitions
|
Title |
Description |
|
Date |
The date of the calendar exception. Enter the date or use the
calendar icon |
|
Exception Type | |
| Open Time/Closed Time | |
|
Actions |
Click Add to add the general calendar times. |
Click  to add an exception day.

Exception Period Tab Definitions
|
Title |
Description |
|
Begin Date |
The beginning date of the calendar exception period. Enter the
date or use the calendar icon |
|
End Date |
The end date of the calendar exception period. Enter the date or
use the calendar icon |
| Description | |
|
Actions |
Click Add to add the general calendar times. |
Table of Contents
 >
>  >
> 
On the Deliver menu, Patron provides access to users to view and maintain standard Patron E-Docs.
 >
>  >
> ![]() >
> 
The Patron document is used to create and maintain the contact information of patrons within OLE
Permissions to create and maintain Patron records are given to several roles. Patron Manager has all privileges to modify Patrons and the maintenance documents. Full Circulation Attendant has permission to edit patron records
To modify patrons, please sign into OLE as:
| Role | Login |
|---|---|
| Patron Manager | admin |
| Full Circulation Attendant | dev1, dev2 |
From the Patron search screen, staff may view bills and accept payments from the Patron Bill link or create a bill from the Create Bill link.
Note
For more information about creating patron bills, see Patron Bill Payment
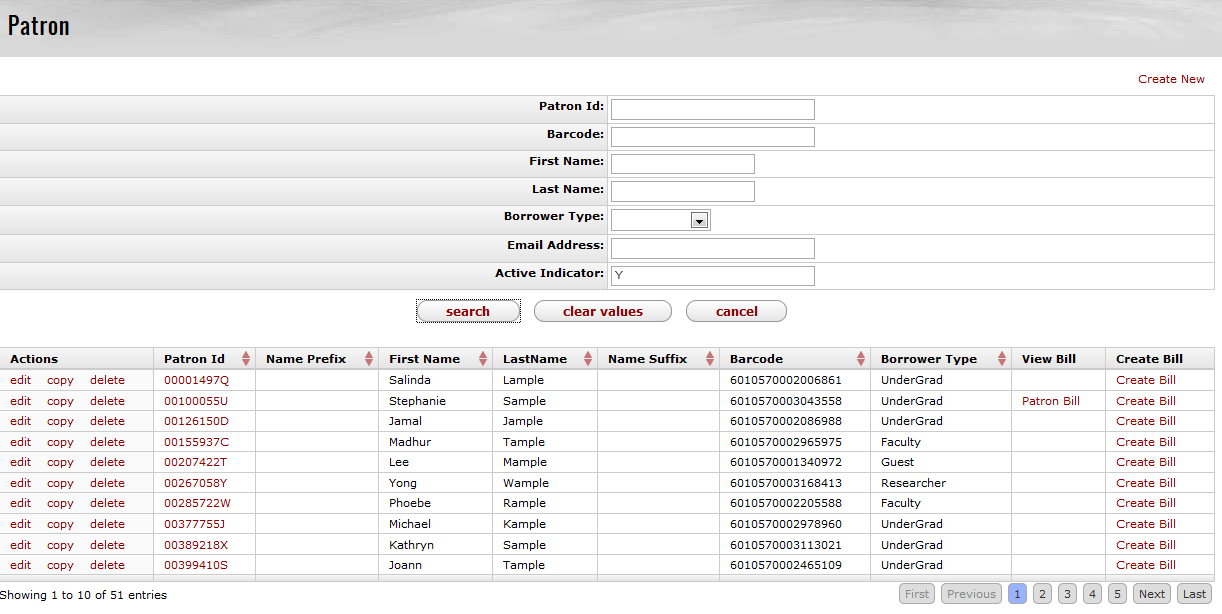
Click Patron Bill to view and accept payments for a patron.
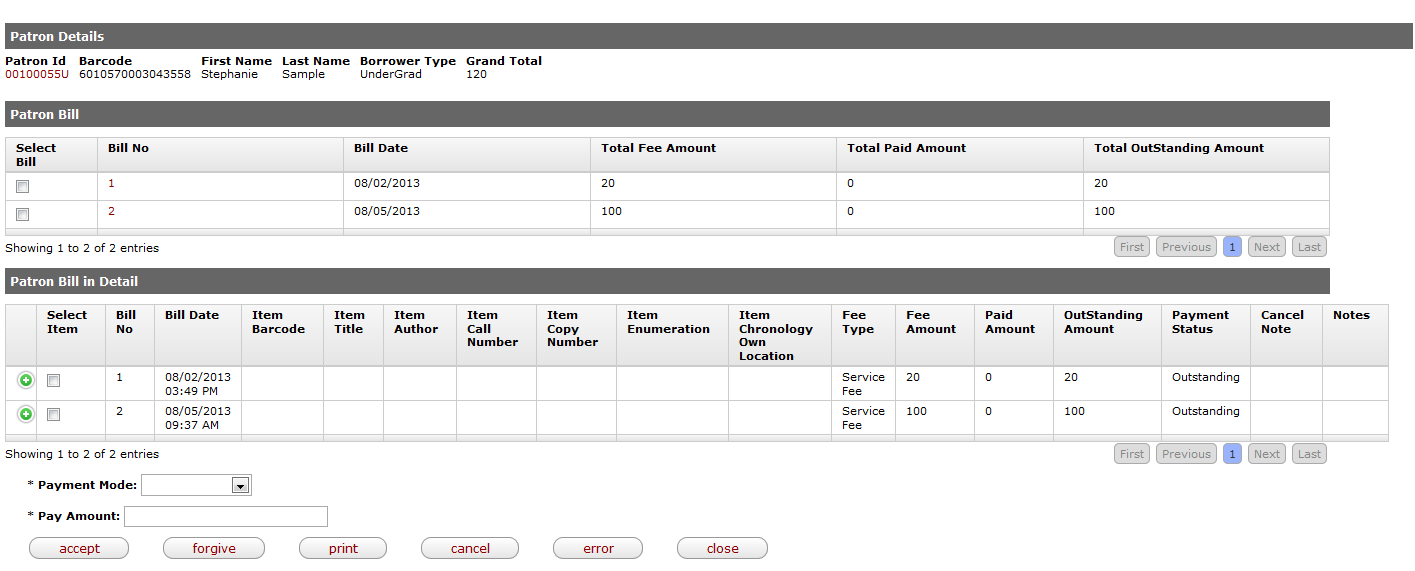
Check the line item the patron would like to pay, either on the total amount (above) or for a single fee on a bill (below).
Select the Payment Mode from the dropdown list if you plan to accept a payment.
Enter the Pay Amount.
Click
 to receive a payment.
Click
 to forgive an amount.
Click
 when the charge was made in error.

The Patron document includes the Overview, Contacts, Affiliations, Library Policies, Loaned Records, Requested Records, Temporary Circulation History Records, Proxy Patron, Proxy For and Local Identification tabs in addition to the standard tabs that display at the bottom of OLE documents.
Note
For more information about the standard tabs, seeStandard Tabs on the OLE E-doc fundamentals wiki page.
The Overview Tab of the Patron Document is different from the standard Document Overview tab found on OLE e-documents and contains basic information about the patron record.

Patron Overview Tab Definitions
|
Title |
Description |
|
Patron ID |
System-assigned unique ID |
|
Barcode |
Required. A unique sequence of numeric or alphanumeric characters printed on a label (also including an optical, machine-readable version of the number) attached to a patron ID card; used to identify the patron in the system for check-out or request transactions; can also serve as a patron login to "my account" functions from the library’s public user interface. |
|
Borrower Type |
Required. Indicates a group of library patrons sharing the same service privileges; one of the primary determinants of loan periods, maximum limits, fine rates, etc. |
|
Source |
Identifies origin of the patron data |
|
Statistical Category |
An identifier as locally defined to fulfill reporting requirements |
|
Activation Date |
Date on which patron’s privileges became active. |
|
Expiration Date |
Date on which a patron’s privileges expire. The expiration date in a patron record can be null. |
|
Active |
Indicates whether this patron is active or inactive. Remove the check mark to deactivate. |
|
Upload Image |
Visual ID of the patron. Browse to find the image on your local machine. Click |
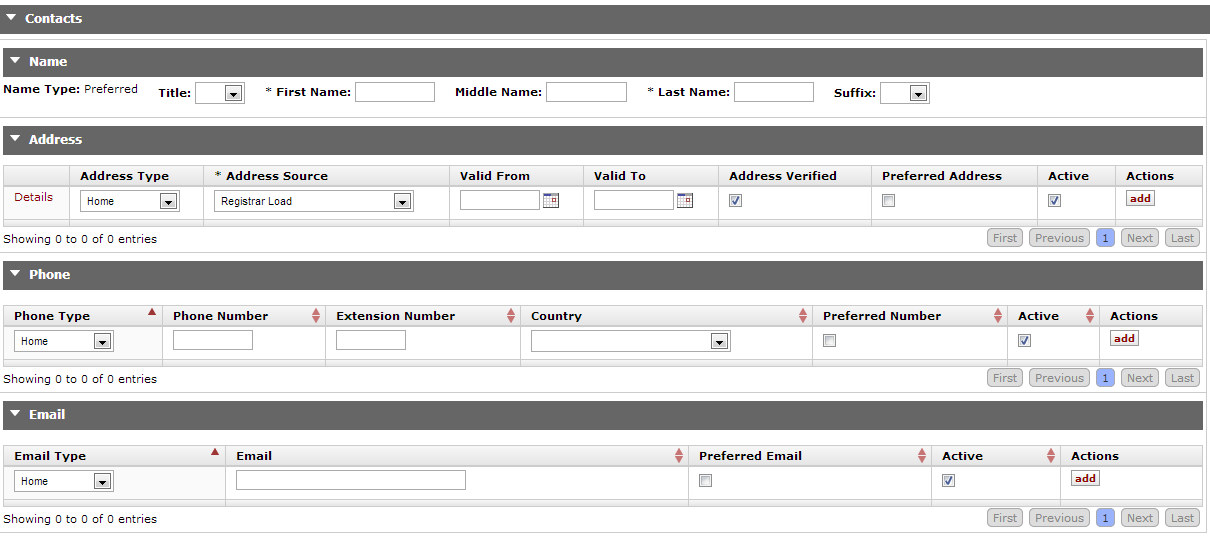
The Contacts tab contains the patron name and contact information. When you modify contact information to an existing patron record, the old tabs will display above the new. When adding lines to the Address, Phone or Email sub-tabs, enter information and then select the add button.
Note
Click Details to view and edit the address.

Patron Contacts Tab Definitions
|
Title |
Description |
|
Name Sub-Tab | |
|
Name Type |
Defaults to Preferred. |
|
Title |
Form of address preceding a name, used in notices and messages addressed to patron |
|
First Name |
Required. Enter the patron’s first name |
|
Middle Name |
Optional. Enter the patron’s middle name |
|
Last Name |
Required. Enter the patron’s last name |
|
Suffix |
A descriptor following a name and providing additional information about a person; used in notices and messages addressed to patron |
|
Address Sub-Tab | |
|
Address Type |
A descriptor identifying characteristics of an address; an address type must be assigned to any address |
|
Address Source |
A value that identifies the origin of a patron's address. |
|
Valid From |
The date at which an address becomes the preferred address for sending notices and patron bills |
|
Valid To |
The date at which an address is no longer the preferred address for sending notices and patron bills |
|
Address Verified |
Indicates whether or not the address is verified; when checking out an item to a patron with an unverified address, the operator receives a prompt to verify the address |
|
Preferred Address |
Indicates which address is used when sending notices and patron bills. Only one address can be the preferred address. |
|
Active |
Indicates whether this address is active or inactive. Remove the check mark to deactivate. |
|
Line 1-3 |
A building name, street number, room number, "attn. of: [nnn]", etc. Three fields are available. |
|
City |
Enter the name of the city for this address |
|
State |
Select the state from the State list. |
|
Postal Code |
Enter the postal code for this address |
|
Country |
Select the country from the Country list |
|
Phone Sub-Tab | |
|
Phone Type |
A descriptor identifying the type of phone number. Each Phone number must have a type but you cannot use a type more than once. |
|
Phone Number |
Enter the phone number here (only numeric characters) |
|
Extension Number |
Optional. Enter the phone number’s Extension |
|
Country |
Select the country from the Country list |
|
Preferred Number |
Indicates which phone number is preferred for contact. Only one phone number can be the preferred number. |
|
Active |
Indicates whether this phone number is active or inactive. Remove the check mark to deactivate. |
|
Email Sub-Tab | |
|
Email Type |
A descriptor identifying the general use/purpose of the email |
|
|
Enter the email address here |
|
Preferred Email |
Indicates which email address is preferred for contact. Only one email address can be preferred. |
|
Active |
Indicates whether this email is active or inactive. Remove the check mark to deactivate. |
The Affiliation tab contains information on how a patron is affiliated and to which campus. When adding lines to the Affiliation tab, enter information and then select the add button.
![]()
Patron Affiliation Tab Definitions
|
Title |
Description |
|
Affiliation Type |
Select the type of affiliation from the Affiliation Type list |
|
Campus Code |
Select the campus from the Campus List |
The Library Policies tab contains information about a patron’s privileges.
![]()
Patron Library Policies Tab Definitions
|
Title |
Description |
|
General Block |
Flag to indicate if the patron is blocked for a reason not otherwise defined in the system; if flag is on, patron cannot checkout or request items. |
|
General Block Note |
A field allowing staff to explain why a general block has been placed on the patron record. Click the |
|
Delivery Privilege |
Enables automatic physical delivery of requested items versus being required to pick up requested items from a pick-up location (i.e., a circulation desk). |
|
Paging Privilege |
Allows a patron to place a paging request. |
|
Courtesy Notice |
Allows the system to send courtesy notices (expired holds and pending due dates) only to those who request them. NoteCourtesy notices can be sent systematically any number of times from the interval setting parameter COURTESY_NOTICE_INTER |
The Loaned Records, Requested Records, and the Temporary Circulation Historytabs allow you to review items linked to the patron. Each tab includes basic information about a title loaned to the patron as well as the due date. Click View all records to see the patron's loanded or requested items, or the patron's temporary Circulation History Record
Note
The Temporary Circulation History Records feature allows users to look up items they have checked out in the past. If privacy concerns trump the desire to offer this feature, a library can opt NOT to create a temporary circulation history.

The Proxy Patron tab allows you to identify another patron as a proxy for this patron as well as set activation and expiration dates for the proxy. When adding a proxy to the Proxy Patron tab, enter the patron and then select the add button.
The Proxy For tab will display the details of the proxied patron. This tab is not editable.

Patron Proxy Patron Tab Definitions
|
Title |
Description |
|
Proxy ID |
System Assigned Unique ID. Enter the Patron who will act as the
proxy or use the Patron Lookup |
|
First Name |
Display only. Once the patron ID has been entered, this field will auto-populate. |
|
Last Name |
Display only. Once the patron ID has been entered, this field will auto-populate. |
|
Barcode |
Display only. Once the patron ID has been entered, this field will auto-populate. |
|
Activation Date |
Date on which the proxy patron becomes active. |
|
Expiration Date |
Date on which the proxy patron becomes inactive. |
The Local Identification tab allows you to further distinguish a patron’s connection to the library. When adding a local id to the Local Identification tab, enter the identification and then select the add button.

Patron Local Identification Tab Definitions
|
Title |
Description |
|
Local ID |
Any identifier as locally defined to further identify the patron, e.g., any other alphanumeric ID used in the institution |
A patron’s lost/invalid barcode number is tracked to prevent fraudulent use of lost or stolen ID cards. Users may update a patron’s barcode on the Overview tab. When this has been done, any expired barcodes will appear on the Expired/Updated Barcode tab with an Effective date.

To update a barcode:
Choose Update barcode at the bottom of the Patron record.
Enter a new barcode in the Overview tab.
Select Submit.
At a minimum, a patron MUST have the following data elements: last name, first name, borrower type, delivery privileges, paging privileges, affiliation, department, barcode, address, delivery preference, address verified , address (can be either a mail address, email or text; if a mail address), address source (required for each address of any type), courtesy notice preference
Any attempt to create a patron record without a required field will refresh the display with a message indicating the missing data element.
Expiration dates in a patron's record can be set to null.
If courtesy notices are not used by a library, these will be set to "No". If switched to Yes, these will only be produced when a special batch process is run.
 >
>  >
>  >
> 
Patron bills for overdue fines and replacement fees are generated automatically by the system through check-in and renewal transactions using information from loan transaction records, calculated based on information from the Circulation Policy Set governing the loan, and sent to patrons using their preferred delivery method. Patron bill information is stored in the system; the formatted bill as delivered to the patron is not. Operators can also manually create patron bills.
Note
Fine rates and replacement fees will be configured locally. By setting fine rates and replacement fees to null or zero, libraries can opt to NOT automatically create these patron bills.
Note
To view the current Circulation Policy (in xml format), see OLE Data Import Templates.
You may alternatively access Patron Bills via the Patron search screen.
Patron bills for replacement and other fees can also be created manually by duly authorized operators using locally-defined fee types, e.g., rentals, copying, etc. and then be delivered to patrons. To do so, click Create Bill on the Patron search screen.
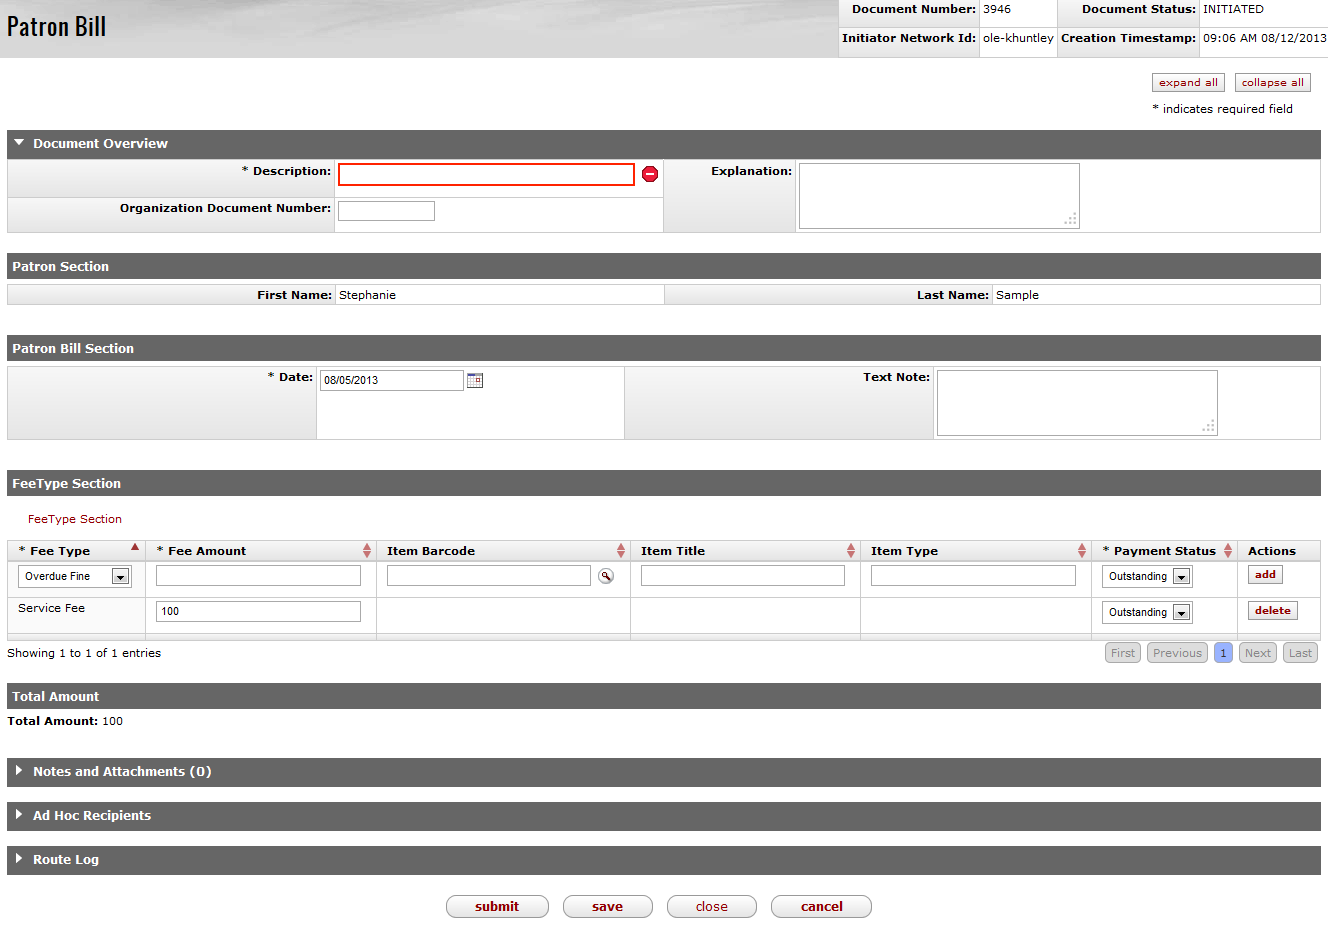
The Patron Bill Payment document includes the Patron Section, Patron Bill Section, Fee Type Section and Total Amount tabs in addition to the standard tabs that display at the bottom of OLE documents.
Note
For more information about the standard tabs, seeStandard Tabs on the OLE E-doc fundamentals wiki page.
The Patron tab is used to identify the patron who has accumulated an overdue fine. It is automatically populated with the name(s) of the individual.

The Patron Bill Section

Patron Bill Section Tabs Definitions
|
Title |
Description |
|
Date |
Required. Date/time a payment was recorded |
|
Text Note |
Free text field to enter information regarding the payment transaction |
The Fee Type Section tab contains the fee information pertaining to the bill. When adding lines to Fee Type Section, enter information and then select the add button.

Fee Type Section Tabs Definitions
|
Title |
Description |
|
Fee Type |
Required. Choose the fee type from the dropdown list. Examples include Overdue, Replacement and Service but these may be locally configured. |
|
Fee Amount |
Required. Enter the monetary amount for any individual fee. |
|
Item Barcode |
Enter the item barcode for the loaned item liable for an overdue
fine or replacement fee or search for it from the Item
lookup |
|
Item Title |
Title of the item associated with the fine or fee |
|
Item Type |
Used in conjunction with location and borrower type, determines the circulation policy applied |
|
Payment Status |
Choose the status of the payment from the dropdown list. |
If you create multiple fees on a patron’s bill, the system calculates the total amount.
![]()
An operator can create a bill manually online by charging any fee.
If an item in a check-in transaction is found to be overdue, the system creates an overdue fine patron bill at check-in, using the applicable values in the appropriate Circulation Policy Set. This bill is then delivered automatically to the patron provided the total amount meets the locally-determined threshold amount. Replacement fee bills are generated by a batch program for those items that are overdue and have received a maximum number of overdue notices.
 >
>  >
> ![]() >
> 
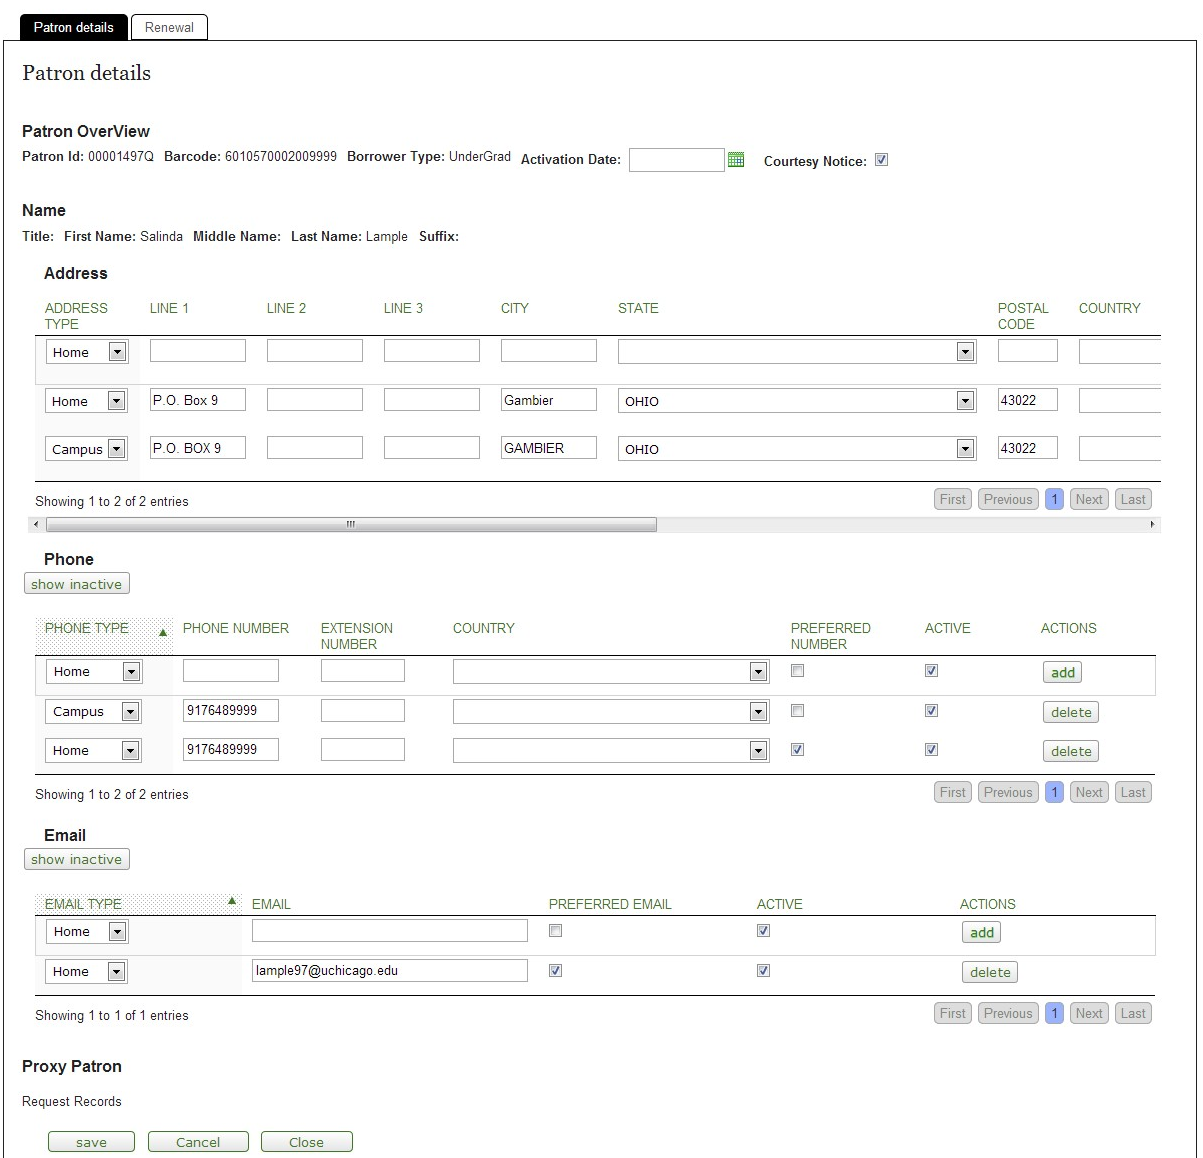
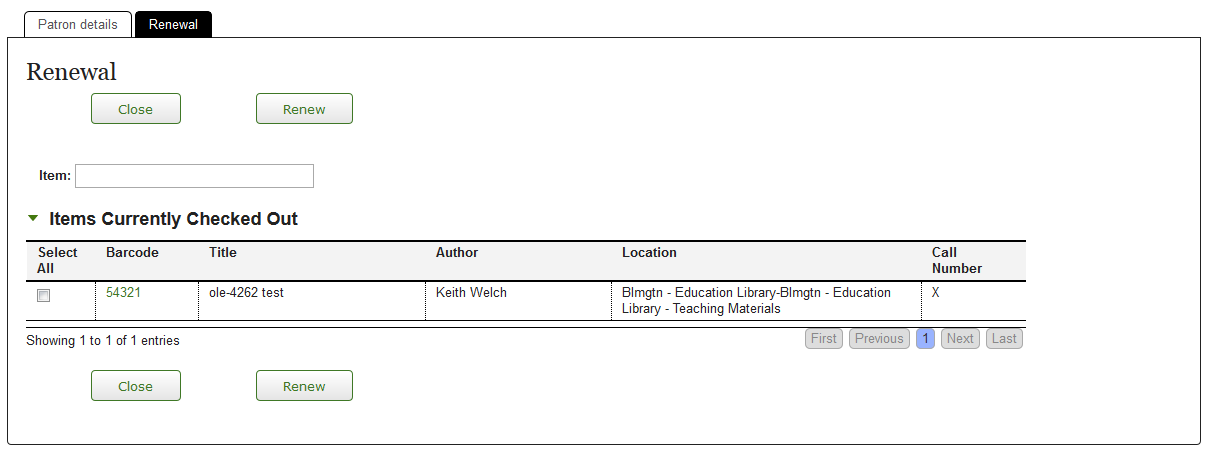
My Account contains two separate tabs, Patron Details and Renewal. To access either, you must first input a Patron Id in the Patron field and press Enter.
Patron details contain the same elements as the Patron Record. Some are not editable from My Account.
Note
For more information about individual patron elements, see Patron.
Table of Contents
![]() >
>  >
>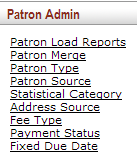
On the Deliver menu, Patron Admin provides access to a number of patron maintenance documents.
![]() >
> >
>![]() >
> ![]()
The Patron Load Report stores uploaded files and allows users to review the xml files uploaded to OLE. It will also give basic information as to record creation, deletion and modification.
Note
To learn about importing patrons to OLE, see the Batch Framework chapter of the OLE Guide to System Administration
From the lookup screen, click ![]() to perform a blank search:
to perform a blank search:

The patron load report search results will present users with the Patron Load ID, File Name, No of Total Records, No. of Created Records, No of Updated Records, No. of Failed Records.
View the patron records from Patron on the Describe tab.
![]() >
>  >
>![]() >
> ![]()
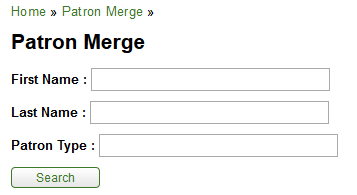
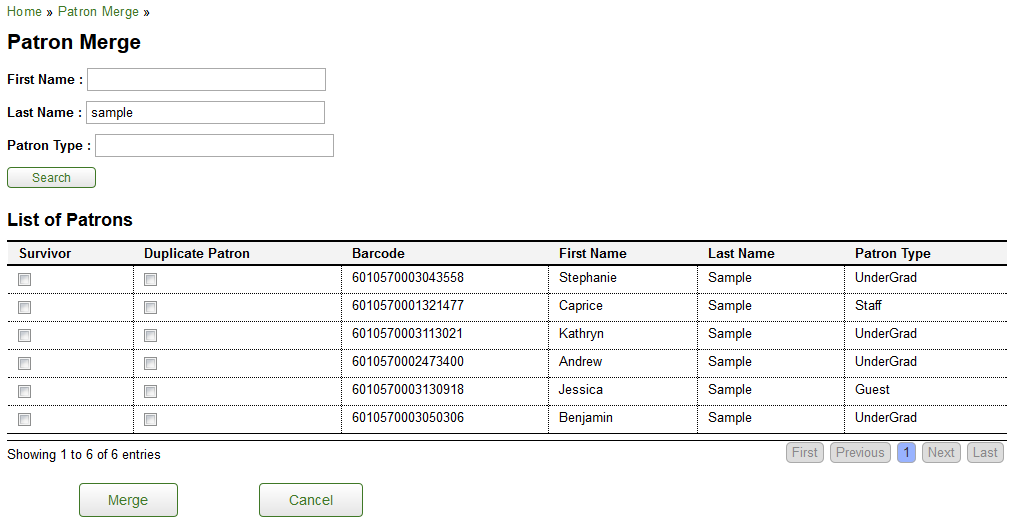
Patron Merge is used to merge two or more patron records online. Patron Merge allows a duly-authorized operator to display all records to be merged. Any records of any kind linked to a duplicate record(s) will be relinked to the survivor record.
 >
>  >
> ![]() >
> 
Borrower types allow for distinct groups to be granted permissions such as the ability to borrow items, the default circulation loan period, ability to renew and/or request, eligibility for physical delivery, etc. Borrower type is one of the three primary characteristics controlling circulation policy sets (the other two being item type and shelving location). Each patron record in OLE must have a borrower type.
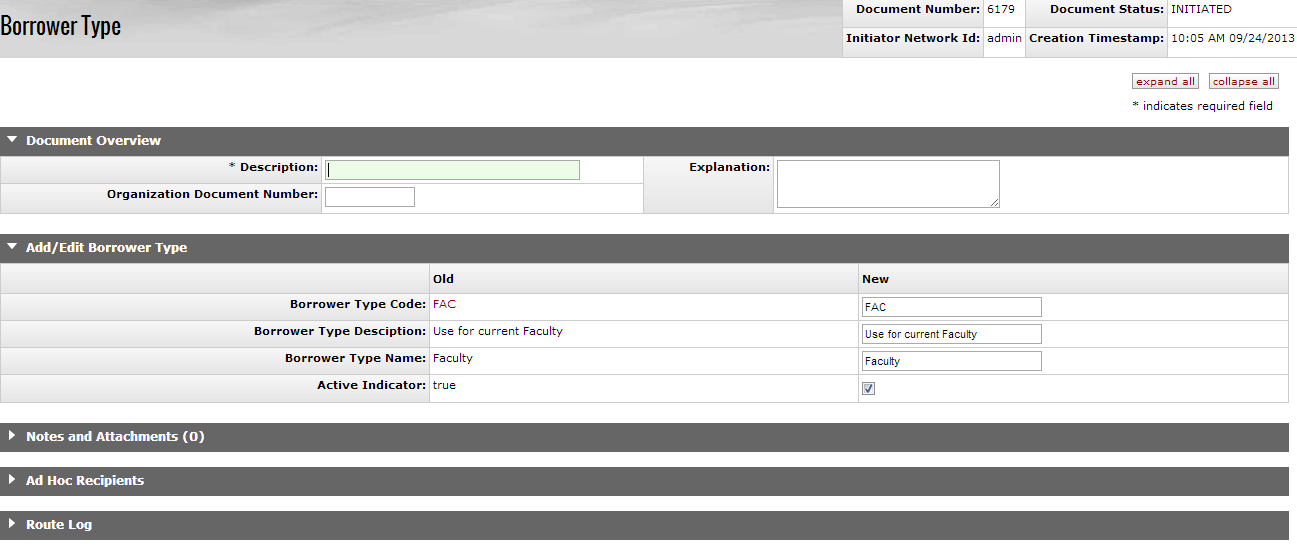
The Borrower Type document includes the Add/Edit Borrower Type tab. The system automatically enters data into both the Old and New sections in this tab. Selected data fields are available for editing.
Add/Edit Borrower Type Tab Definitions
|
Title |
Description |
|
Borrower Type Code |
Required. The borrower type code associated with this borrower type |
|
Borrower Type Description |
Required. A description of the borrower type. |
|
Borrower Type Name |
Required. The familiar title of the borrower type. |
|
Active |
Indicates whether this borrower type is active or inactive. Remove the check mark to deactivate. |
 >
>  >
> ![]() >
> 
The Source document is used to define where the information on the Patron document has been obtained.
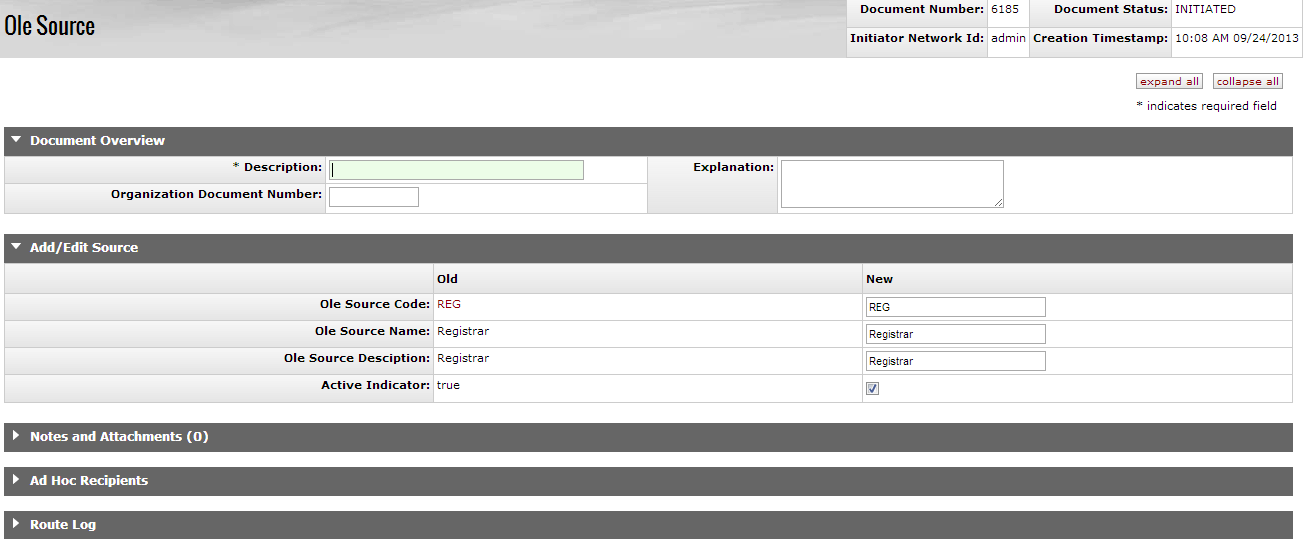
The OLE Source document includes the Add/Edit Source tab. The system automatically enters data into both the Old and New sections in this tab. Selected data fields are available for editing.
Add/Edit Source Tab Definitions
|
Title |
Description |
|
OLE Source Code |
Required. A unique code to identify an OLE source. |
|
OLE Source Name |
Required. The familiar title of the source. |
|
OLE Source Description |
Required. A description of the source. |
|
Active Indicator |
Indicates whether this carrier code is active or inactive. Remove the check mark to deactivate the code. |
 >
>  >
> ![]() >
> ![]()
The Statistical Category document is used to identify statistical categories associated with an OLE patron.
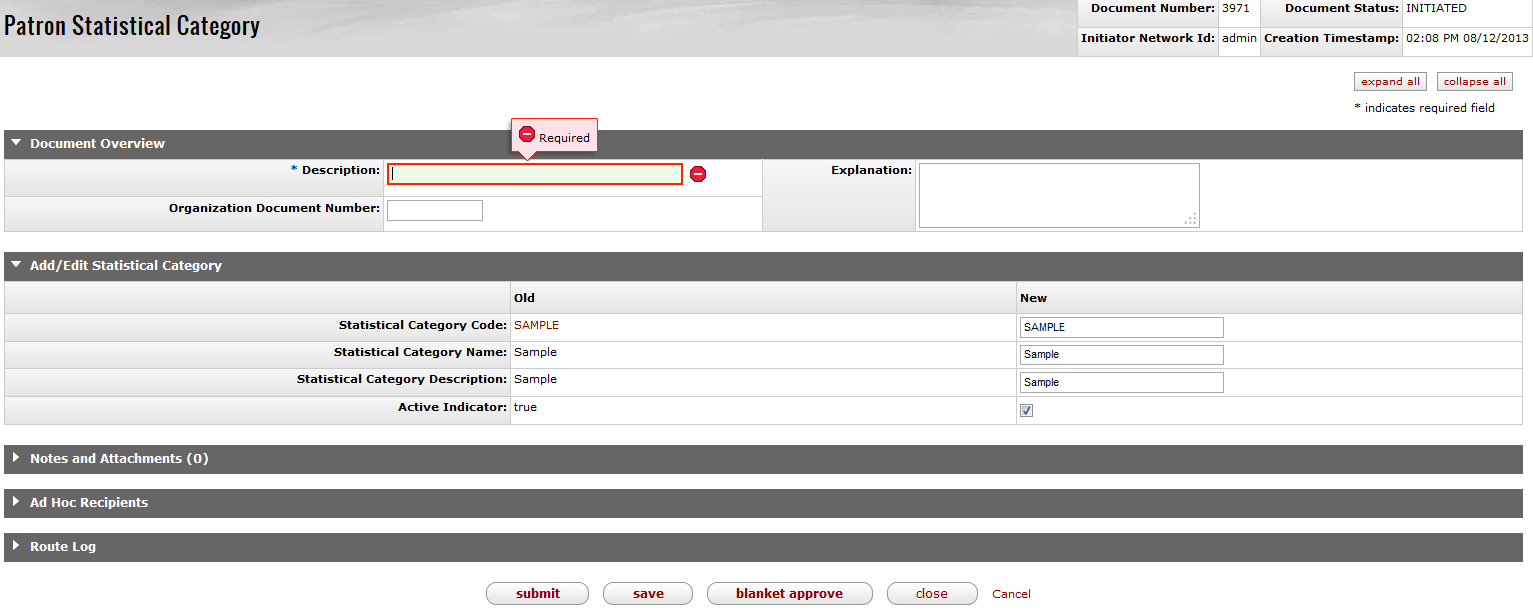
The Statistical Category document includes the Add/Edit Statistical Category tab. The system automatically enters data into both the Old and New sections in this tab. Selected data fields are available for editing.
Add/Edit Statistical Category Tab Definitions
|
Title |
Description |
|
Statistical Category Code |
Required. A unique code to identify a statistical category. |
|
Statistical Category Name |
Required. The familiar title of the statistical category. |
|
Statistical Category Description |
Required. A description of the source statistical category. |
|
Active Indicator |
Indicates whether the statistical category is active or inactive. Remove the check mark to deactivate the code. |
 >
>  >
> ![]() >
> 
The Address Source document is used to define where the address came from on a Patron document. For example, loaded from the registrar, input by an operator or patron, etc. Some or even all of your Address Sources could be identical to your Sources. The Address Source has been defined specifically for situations where you wish to preserve information from a particular Address source when overlaying existing patron data during an import. For example, data from a Source “Registrar” would typically have its address data identified as Address Source “Registar” but you may wish to preserve any existing address whose Address Source is “Patron Supplied”. You would set your import options appropriately.
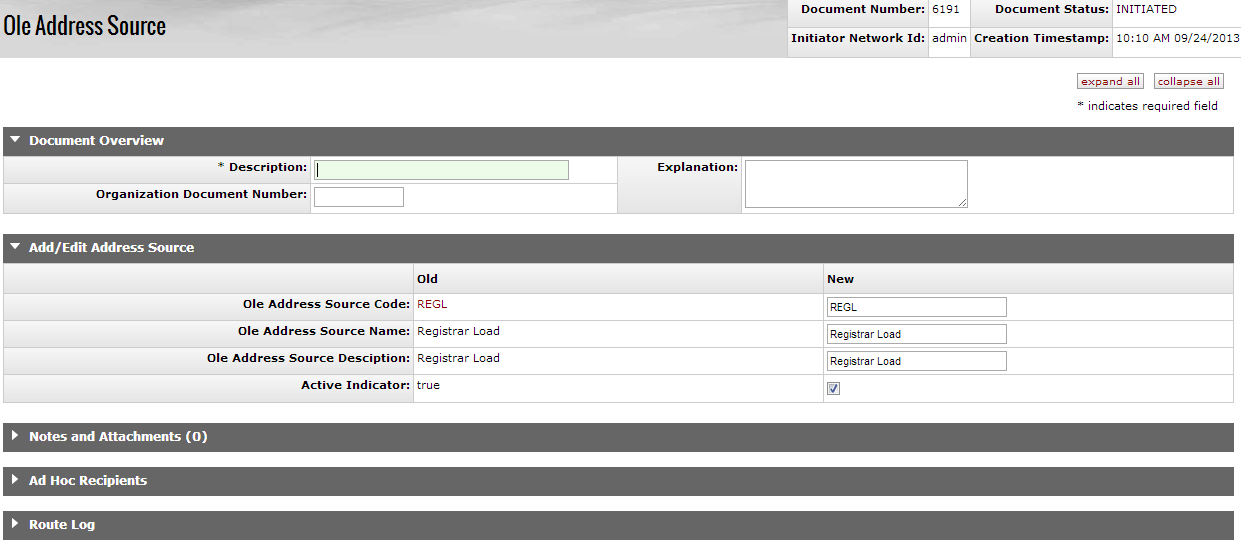
The Address Source document includes the Add/Edit Address Source tab. The system automatically enters data into both the Old and New sections in this tab. Selected data fields are available for editing.
Add/Edit Address Source Tab Definitions
|
Title |
Description |
|
OLE Address Source Code |
Required. A unique code to identify an address source. |
|
OLE Address Source Name |
Required. The familiar title of the address source. |
|
OLE Address Source Description |
Required. A description of the source address source. |
|
Active Indicator |
Indicates whether the address source is active or inactive. Remove the check mark to deactivate the code. |
 >
>  >
> ![]() >
> ![]()
The Fee Type document is used to define the type of fee created on the Patron Bill Payment document.
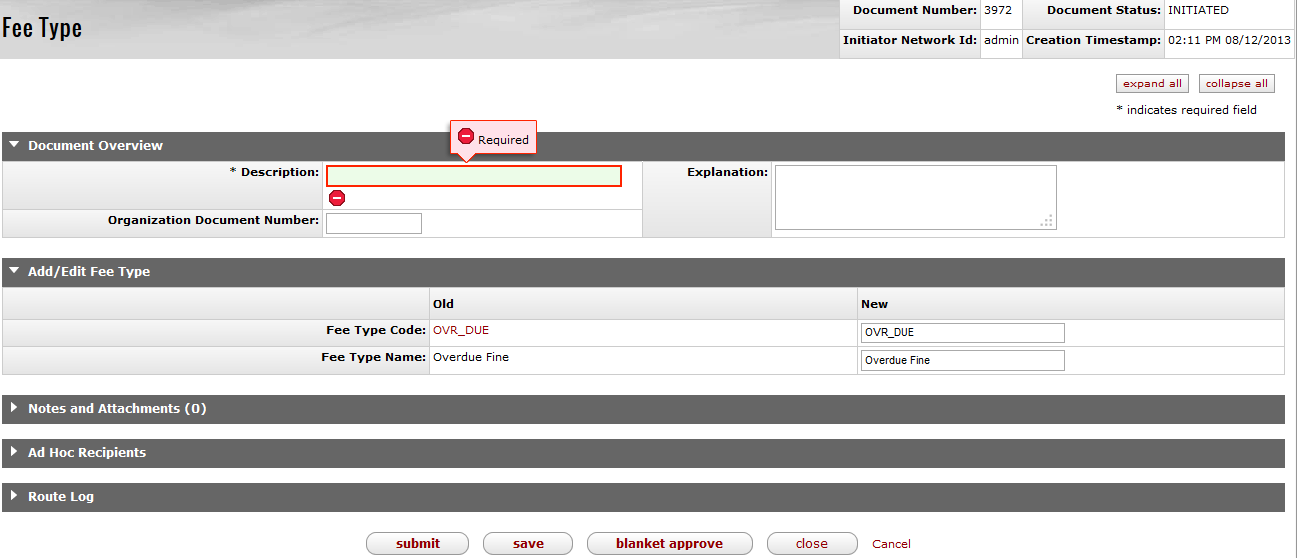
The Fee Type document includes the Add/Edit Fee Type tab. The system automatically enters data into both the Old and New sections in this tab. Selected data fields are available for editing.
Add/Edit Fee Type Tab Definitions
|
Title |
Description |
|
Fee Type Code |
Required. A unique code to identify a fee type. |
|
Fee Type Name |
Required. The familiar title of the fee type. |
 >
>  >
> ![]() >
> ![]()
The Payment Status document is used to define the status of payment on the Patron Bill Payment.
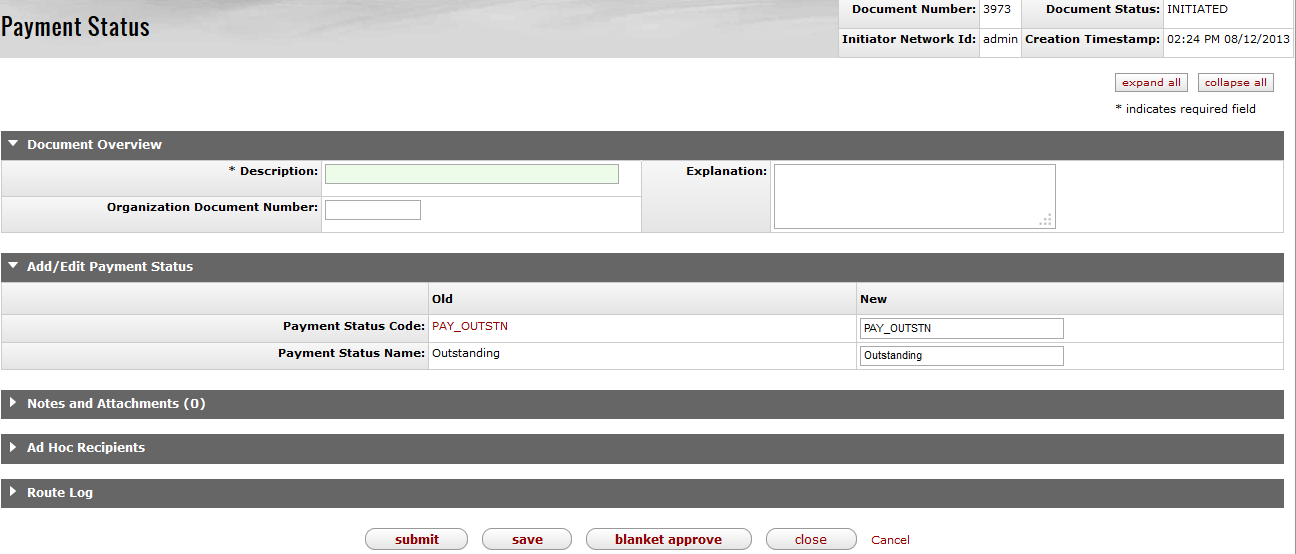
The Payment Status document includes the Add/Edit Payment Status tab. The system automatically enters data into both the Old and New sections in this tab. Selected data fields are available for editing.
Add/Edit Payment Status Tab Definitions
|
Title |
Description |
|
Payment Status Code |
Required. A unique code to identify a payment status. |
|
Payment Status Name |
Required. The familiar title of the payment status. |
 >
>  >
> ![]() >
> ![]()
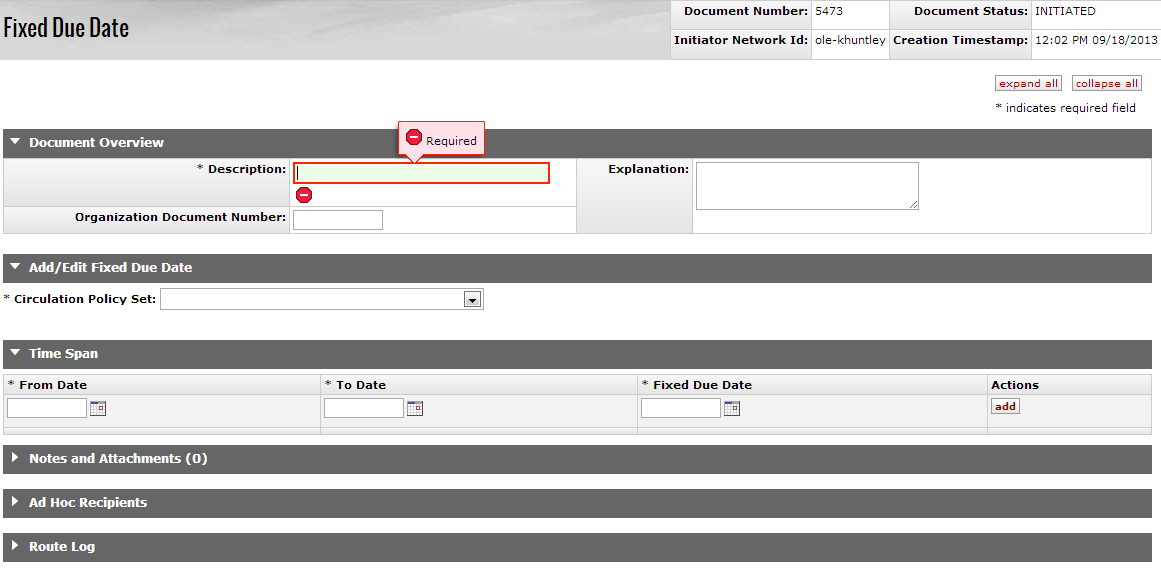
This screen includes unique Add/Edit Fixed Due Date and Time Span tabs in addition to the standard tabs that display at the bottom of OLE documents.
Note
For more information about the standard tabs, see Standard Tabs on the OLE E-Docs fundamentals wiki page.
Table of Contents
|
Term |
Definition |
|
Patron |
An individual who has some level of library privileges. A person with access to a library (virtual or physical) and identified as belonging to a specific group, e.g., faculty, undergraduate, unaffiliated, etc. Each group may have different levels of service privileges, e.g., faculty have indefinite loan periods when borrowing items, undergraduates can borrow for 90 days, etc. Synonyms: borrower, patron, library user |
|
Borrower Type |
A group of library users (e.g., “undergraduate”, “graduate”, “faculty”, “alumni”, “affiliate”, etc.) who share a primary characteristic(s) and have the same service privileges (e.g., loan period, fine rate, access (or not) to interlibrary loan, etc.). Borrower type is one component in determining whether or not a user can borrow a library item and if so, under what policies. |
|
Check digit |
A check digit is a form of redundancy check used for error detection, the decimal equivalent of a binary checksum. It consists of a single digit computed from the other digits in the message. With a check digit, one can detect simple errors in the input of a series of digits, such as a single mistyped digit or some permutations of two successive digits. In libraries, e.g., check digit routines can be used to validate ISBNs, ISSN, and item and patron barcode numbers. |
|
Circulation |
The functions, policies and processes by which a library loans materials to its users, tracks such transactions and charges fines and fees for policy violations, e.g., overdue fines for late returns, lost item replacement fees, etc. Departments in charge of circulation may also issue patron ID cards, rent lockers, collect copying fees, manage the interlibrary loan function, etc. |
|
Circulation Desk |
The place that is considered an item's "home" when it is presented for circulation transactions, i.e., it can be checked out without override AND, when checked-in, does not need to be routed as it is already "home". |
|
Shelving Location |
The place where a library’s item is housed, either permanently or temporarily. Identified in a holdings and/or item-level record, shelving location is used as one attribute in determining whether items housed there are eligible for borrowing and if so, the applicable policy. See also Location. |
|
Item status |
A descriptor describing an item's state for circulation purposes, e.g., "not checked out", "on hold", "checked out", "on shelf", etc. If an item is still in the order process, item status typically is the same as the order status, e.g., "on order", "received", "in processing", etc. |
|
Item Type |
An identifier assigned to each item in a library that, in circulation, is one component to determine whether or not such an item can be borrowed and, if so, the conditions of the loan. Item types are generally defined by each library and can be either a specific format (e.g., “DVD”, “CD”, “Map”, “Dissertation”, etc.) or an indicator of borrowing eligibility (e.g., “Circulating”, “Non-Circulating”). |
|
Loan |
The process by which the system: (1) validates whether or not a library user can borrow a library item based on defined attributes (e.g., the circulation desk location, the shelving location of the item, item type, borrower type, etc.); and (2) if a loan is permitted, links the item with the patron and applies certain conditions (e.g., length of loan period) based on policies defined in configuration files. Synonyms: Check-out, charge, charge out |
|
Loan Period |
The period of time for which a user has been allowed to borrow a library item. The loan period is usually dependent on the item type, the item’s location and the borrower type. A loan period can be expressed in days, hours, as a fixed date, or as “indefinite”. |
|
Location |
An element in a library’s system configuration that describes a conceptual entity (e.g., “The University of X Library") or a building (“John Doe Memorial Library”) or an area (“Doe Library, Bookstacks”; “Doe Library, Circulation Desk”). All library items are assigned to a shelving area location and this becomes an attribute in identifying an item’s eligibility for borrowing and if eligible, the applicable loan policy. Locations may also refer to library staff work areas at which certain functions (e.g., acquisitions, cataloging or circulation) are performed on or with items housed at shelving locations; work areas (e.g., a circulation location) are identified at operator login. |
|
Request |
The ability of a library user/patron to ask for services relating to the retrieval, loan or copying of an item in the library’s collections. Such requests are now typically submitted online through a public interface that must interact with the library’s “back office” system. See also Hold Request and Recall Request. |
|
Return |
The process by which the system: removes the temporary linkage between an item loaned by the library to a patron; calculates any overdue fines or penalties to be charged to the patron; and resets the item status to indicate its next state (e.g., “not checked out”, “in transit”, “on hold”, etc.). Synonyms: Check-in, discharge |
|
Overdue Fine |
The amount charged to a patron when a loaned library item is returned late. Overdue fines are calculated at check-in, based on an amount per day/hour, and may vary depending upon the borrower type, the item’s location and the item type. |
|
Overdue Recall Fine |
The amount charged to a patron when a loaned library item that has been recalled is returned late. Recall overdue fines are calculated at check-in, based on an amount per day/hour, and may vary depending upon the borrower type, the item’s location and the item type. |
|
Replacement Fee |
The amount charged to a patron for an unreturned item. Lost item replacement fees may be a specific amount (as defined in the item-level record) or a standard amount based on borrower type, the item’s location and the item type. |
For additional OLE terms and definitions, see the OLE glossary wiki page.
Below are some of the roles that will be authorized to use Loan/Return, Request, Patron, My Account, and related maintenance documents. Please see individual e-docs for specific requirements in each workflow.
Note
Sample users are provided for ease of testing and can be replaced with local library users.
|
Role Name |
Sample User |
Functions/ Permissions |
|
Patron Manager |
admin |
System user who has all permissions for patrons and for borrower types |
|
Full Circulation Attendant |
dev1 |
System user who can edit patrons and maintenance documents pertaining to patrons with the exception of borrower types |
| Limited Circulation Attendant | testuser1, testuser2 | System user who can view but not edit patron records and has no access to patron type. |
|
Circ Desk Attendant I |
testuser1 |
System user who can view patrons and edit their address, can loan and return items, update/backdate due dates and create fast adds. |
| Circ Desk Attendant II | eric, edna | System user who can loan and return items, update/backdate due dates, create fast adds, create and edit requests, post and forgive payments. |
| Circulation Supervisor | dev1, dev2 | System user who can loan and return items, update/backdate due dates, create fast adds, create and edit requests, post and forgive payments, create and update bills, update request queue, manage patron addresses and proxy accounts. |
| Super Circulation Supervisor | admin; admin1 | System user who can loan and return items, update/backdate due dates, create fast adds, create and edit requests, post and forgive payments, create and update bills, update request queue, manage patron addresses and proxy accounts, and manage circulation desks. |
|
Shelving Location Administrator |
dev1, dev2 |
System user who can create and edit permissions for shelving locations. Can view the location, location level and create, edit a maintenance document only where the location level is a shelving level |
|
Location Administrator |
admin, admin1 |
System user who can add and edit institutions, campuses, libraries and collections. Can view, create, edit location maintenance documents and can view, edit the name of the location level maintenance document. |
|
Deliver Admin |
admin, admin1 |
System user who can initiate and map circulation desks |
|
Operator |
edna, eric, dev2 |
System user who can loan materials |
|
Unit Manager |
dev2 |
System user who can loan and override loan |
|
<any user-Action List> |
<any Kuali user> |
OLE Basic Functionality and Key Concepts.: E-Docs, action buttons- basic overview of elements
OLE Release Documentation on the wiki


